Spinner Tutorial With Examples In Android Studio
In Android, Spinner provides a quick way to select one value from a set of values. Android spinners are nothing but the drop down-list seen in other programming languages. In a default state, a spinner shows its currently selected value. It provides a easy way to select a value from a list of values.

Important Note: Spinner is associated with Adapter view so to fill the data in spinner we need to use one of the Adapter class.
Here is the XML basic code for Spinner:
<Spinner
android:id="@+id/simpleSpinner "
android:layout_width="fill_parent"
android:layout_height="wrap_content" />
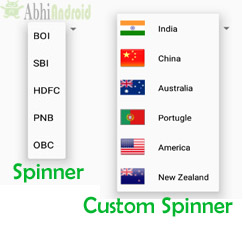
Important Note: To fill the data in a spinner we need to implement an adapter class. A spinner is mainly used to display only text field so we can implement Array Adapter for that. We can also use Base Adapter and other custom adapters to display a spinner with more customize list. Suppose if we need to display a textview and a imageview in spinner item list then array adapter is not enough for that. Here we have to implement custom adapter in our class. Below image of Spinner and Custom Spinner will make it more clear.
An adapter is a bridge between UI component and data source that helps us to fill data in UI component. It holds the data and send the data to adapter view then view can takes the data from the adapter view and shows the data on different views like as list view, grid view, spinner. Whenever you have a list of single items which is backed by an array, you can use Array Adapter.
Here is code of ArrayAdapter in Android:
ArrayAdapter(Context context, int resource, int textViewResourceId, T[] objects)
For more details read ArrayAdapter Tutorial as here we will use it in the below example to explain how Spinner is created in Android.
Table Of Contents
Example of Spinner In Android Studio:
Example 1: Below is the example in which we display a list of bank names in a spinner and whenever you select an item the value will be displayed using toast on Mobile screen. Below is the final output and code:
Select File -> New -> New Project ->. Fill the forms and click "Finish" button.
Step 2: Open res -> layout -> activity_main.xml (or) main.xml and add following code. Here we will create a Spinner inside Relative Layout.
<RelativeLayout xmlns:android="http://schemas.android.com/apk/res/android"
xmlns:tools="http://schemas.android.com/tools"
android:layout_width="match_parent"
android:layout_height="match_parent"
android:paddingBottom="@dimen/activity_vertical_margin"
android:paddingLeft="@dimen/activity_horizontal_margin"
android:paddingRight="@dimen/activity_horizontal_margin"
android:paddingTop="@dimen/activity_vertical_margin"
tools:context=".MainActivity">

<Spinner
android:id="@+id/simpleSpinner"
android:layout_width="wrap_content"
android:layout_height="wrap_content"
android:layout_centerHorizontal="true"
android:layout_marginTop="100dp" />

</RelativeLayout>
Step 3: Now open app-> java -> package -> MainActivity.java and add the following code. Here we will use ArrayAdapter to fill the data in Spinner. Also we are using Toast to display when the item in Spinner is selected.
package example.abhiandriod.spinnerexample;

import android.support.v7.app.AppCompatActivity;
import android.os.Bundle;
import android.view.View;
import android.widget.AdapterView;
import android.widget.ArrayAdapter;
import android.widget.Spinner;
import android.widget.Toast;

public class MainActivity extends AppCompatActivity implements AdapterView.OnItemSelectedListener{

String[] bankNames={"BOI","SBI","HDFC","PNB","OBC"};
@Override
protected void onCreate(Bundle savedInstanceState) {
super.onCreate(savedInstanceState);
setContentView(R.layout.activity_main);
//Getting the instance of Spinner and applying OnItemSelectedListener on it
Spinner spin = (Spinner) findViewById(R.id.simpleSpinner);
spin.setOnItemSelectedListener(this);

//Creating the ArrayAdapter instance having the bank name list
ArrayAdapter aa = new ArrayAdapter(this,android.R.layout.simple_spinner_item,bankNames);
aa.setDropDownViewResource(android.R.layout.simple_spinner_dropdown_item);
//Setting the ArrayAdapter data on the Spinner
spin.setAdapter(aa);
}


//Performing action onItemSelected and onNothing selected
@Override
public void onItemSelected(AdapterView<?> arg0, View arg1, int position,long id) {
Toast.makeText(getApplicationContext(), bankNames[position], Toast.LENGTH_LONG).show();
}

@Override
public void onNothingSelected(AdapterView<?> arg0) {
// TODO Auto-generated method stub

}
}
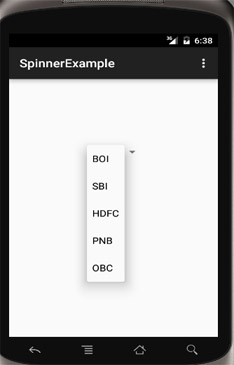
Output:
Now the run the program in Emulator and you will see options to choose among bank names present inside drop down list. You will also see Toast message displaying on the screen when you will select the particular bank.

Custom Spinner:
Custom Spinner is used to display a spinner item with image, text etc (i.e. creating more custom list item). It is achieved in Android using custom adapter like base adapter. For more details read Custom Spinner Tutorial.
DOWNLOAD THIS FREE eBook!

12 thoughts on “Spinner Tutorial With Examples In Android Studio”
Leave a Reply to mintu hoque Cancel reply

DOWNLOAD THIS FREE eBook!


Premium Project Source Code:
- Food Ordering Android App Project Source Code
- Ecommerce Store Android App Project Source Code
- Convert Website Into Android App Project Source Code
- Quiz Game Android App Project Source Code
- Radio Streaming Android App Source Code
- City Guide Android App Project Source Code
- QR Barcode Android App Project Source Code
 Hi, I'm Abhishek, founder and owner of this site. I believe in team work and there is a experienced developer team working on AbhiAndroid with a mission to simplify learning of Android App Development.
CONNECT WITH ME:
Hi, I'm Abhishek, founder and owner of this site. I believe in team work and there is a experienced developer team working on AbhiAndroid with a mission to simplify learning of Android App Development.
CONNECT WITH ME:


error: package R does not exist
good day you will have some tutorial on how to fill a spinner from a soap webservice
alert(‘hi’);
hi,i created a android barcode scanner for attendance purpose but how to make a spinner for subject so that it can identify which class the students attend?
Can you please send me the code of barcode reader?
how i add radio buttons inside spinner….please reply on this as soon as possible.
good ???????????????
You should make a tutorials (not sure if you have tho).
1. How to populate a spinner from mysql db using retrofit 2
How two libraries are most used and I for one struggled a lot on learning how to do either. I spent countless hours searching online how to do that and all tutorials I found were too mixed and none of them specifically targeted retrofit 2. Let alone how to do it fetching a json encoded array.
Most tutorials use very extensive code without retrofit, just plain http client which doesn’t adapt very well to someone whose project uses retrofit. (like in my case).
I want to add … CalendarView inside a spinner, please help.
If we want to apply yhe spinner on text view then how can we do that
how to adjust blinking cursor height in the edit text ?
simply set height in your XML file EDITTEXT “android:text” value for set blinking cursor height.