ViewSwitcher Tutorial With Example In Android Studio
In Android, ViewSwitcher is a sub class of ViewAnimator that is used for switching between views. It is an element of transition widget which helps us to add transitions on the views. It is mainly useful to animate a view on screen. ViewSwitcher switches smoothly between two views (i.e. TextView, ImageView or any layout) and thus provides a way of transitioning from one view to another through appropriate animations. You can create views for a ViewSwitcher widget either using a factory or by adding them on your own.
Important Note: ViewSwitcher can only have two child views of which only one is shown at a time. If you have more than two child views in ViewSwitcher, java.lang.IllegalStateException of “Can’t add more than 2 views to a ViewSwitcher” error will come.
Table Of Contents
Basic ViewSwitcher XML code:
<ViewSwitcher

android:id="@+id/viewswitcher"
android:layout_width="match_parent"
android:layout_height="wrap_content" >

<!--   Add Two View’s Here -- >

</ViewSwitcher>
Steps for Implementation of ViewSwitcher:
- Get the reference of ViewSwitcher in class using findViewById() method, or you can also create an object dynamically.
- Set a factory using switcherid.setFactory() method
- Set an in-animation using switcher.setInAnimation()
- Set an out-animation using switcher.setOutAnimation()
Important Methods Of ViewSwitcher:
Let’s we discuss some important methods of ViewSwitcher that may be called in order to manage the ImageSwitcher.
1. getNextView(): This method return the next view to be displayed in ViewSwitcher. This method returns the view id of next view to be displayed.
Below we get the id of next view to be displayed in ViewSwitcher.
ViewSwitcher simpleViewSwitcher = (ViewSwitcher) findViewById(R.id.simpleViewSwitcher); // get the reference of ViewSwitcher
View nextView=simpleViewSwitcher.getNextView(); // get next view to be displayed
2. reset(): This method is used to reset the ViewSwitcher to hide all of the existing views and to make it think that the first time animation has not yet played. Sometime we need to reset the ViewSwitcher on click event so that it behaves like first time animation has not yet played.
Below we reset the ViewSwitcher to hide all of the existing views.
ViewSwitcher simpleViewSwitcher = (ViewSwitcher) findViewById(R.id.simpleViewSwitcher); // get the reference of ViewSwitcher

simpleViewSwitcher.reset(); // reset the ViewSwitcher to hide all of the existing views
3. showNext(): This method is used to show the next view of ViewSwitcher. As we discussed earlier ViewSwitcher can only have two child views of which only one is shown at a time, so this method is used to show the next views.
Below we perform click event on button and call showNext() method to show the next view in ViewSwitcher.
ViewSwitcher simpleViewSwitcher = (ViewSwitcher) findViewById(R.id.simpleViewSwitcher); // get the reference of ViewSwitcher

Button btnNext=(Button) findViewById(R.id.buttonNext); // get the reference of Button
// set Click event on next button
btnNext.setOnClickListener(new View.OnClickListener() {

public void onClick(View v) {
// TODO Auto-generated method stub
// show the next view of ViewSwitcher
simpleViewSwitcher.showNext();
}
});
4. showPrevious(): This method is used to show the Previous view of ViewSwitcher. As we discussed earlier ViewSwitcher can only have two child views of which only one is shown at a time, so this method is used to show the Previous view.
Below we perform click event on button and call showPrevious() method to show the previous view in ViewSwitcher.
ViewSwitcher simpleViewSwitcher = (ViewSwitcher) findViewById(R.id.simpleViewSwitcher); // get the reference of ViewSwitcher

Button btnPrevious=(Button) findViewById(R.id.buttonPrevious); // get the reference of Button
// set Click event on next button
btnPrevious.setOnClickListener(new View.OnClickListener() {

public void onClick(View v) {
// TODO Auto-generated method stub
// show the previouus view of ViewSwitcher
simpleViewSwitcher.showPrevious();
}
});
5. loadAnimation(Context context, int id): This method is used whenever we need to define an object of Animation class through AnimationUtilities class by calling a static method loadAnimation.
Below we create an object of Animation class and load an animation by using AnimationUtils class.
Animation in = AnimationUtils.loadAnimation(this,android.R.anim.slide_in_left); // load an animation by using AnimationUtils class
6. setInAnimation(in): This method is used to set the animation of the appearance of the object on the screen.
Below we create an object of Animation class and load an animation by using AnimationUtils class and then set the Animation on ViewSwitcher.
ViewSwitcher simpleViewSwitcher=(ViewSwitcher)findViewById(R.id. simpleViewSwitcher); // initiate a ViewSwitcher
Animation in = AnimationUtils.loadAnimation(this,android.R.anim.slide_in_left); // load an animation
simpleViewSwitcher.setInAnimation(in); // set in Animation for ViewSwitcher
7. setOutAnimation(out): This method does the opposite of setInAnimation().
whenever we show the next view, it first removes the old view using an animation set with the setOutAnimation() method, and then places the new one using the animation set by the setInAnimation() method.
Below we create an object of Animation class and load an animation by using AnimationUtils class and then set the out Animation on ViewSwitcher
ViewSwitcher simpleViewSwitcher=(ViewSwitcher)findViewById(R.id. simpleViewSwitcher); // get reference of ViewSwitcher
Animation out = AnimationUtils.loadAnimation(this,android.R.anim.slide_out_right); // load an animation
simpleViewSwitcher.setOutAnimation(out); // set out Animation for ViewSwitcher
8. setFactory(ViewFactory factory): This method is used to create a new view for ViewSwitcher. By using this method we create a new view and replace the old view with that.
Below we show how to create a new view using setFactory method.
ViewSwitcher simpleViewSwitcher=(ViewSwitcher)findViewById(R.id. simpleViewSwitcher); // get reference of ViewSwitcher

// Set the ViewFactory of the ViewSwitcher that will create a new view ( ImageView ) object when asked
simpleViewSwitcher.setFactory(new ViewSwitcher.ViewFactory() {

public View makeView() {
// TODO Auto-generated method stub

// Create a new ImageView and set it's properties
ImageView imageView = new ImageView(getApplicationContext());
imageView.setScaleType(ImageView.ScaleType.FIT_CENTER);
imageView.setLayoutParams(new ImageSwitcher.LayoutParams(LinearLayout.LayoutParams.FILL_PARENT, LinearLayout.LayoutParams.FILL_PARENT));
return imageView;
}
});
Attributes of ViewSwitcher:
Now let’s we discuss some common attributes of a ViewSwitcher that helps us to configure it in our layout (xml).
1. id: id attribute is used to uniquely identify a ViewSwitcher.
<ViewSwitcher

android:id="@+id/viewswitcher"
android:layout_width="match_parent"
android:layout_height="wrap_content" > <!--  id of ViewSwitcher that is used to uniquely identify it -->

<!--   Add View’s Here -- >

</ViewSwitcher>
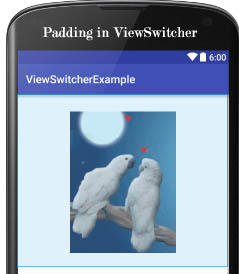
2. padding: This attribute is used to set the padding from left, right, top or bottom side of a ViewSwitcher.
- paddingRight: This attribute is used to set the padding from the right side of a ViewSwitcher.
- paddingLeft: This attribute is used to set the padding from the left side of a ViewSwitcher.
- paddingTop: This attribute is used to set the padding from the top side of a ViewSwitcher.
- paddingBottom: This attribute is used to set the padding from the bottom side of a ViewSwitcher.
- Padding: This attribute is used to set the padding from the all the side’s of a ViewSwitcher.
Below we set the 10dp padding from all the sides of a ViewSwitcher
<ViewSwitcher
android:id="@+id/simpleViewSwitcher"
android:layout_width="match_parent"
android:layout_height="wrap_content"
android:padding="10dp"> <!-- set 10 dp padding from all the sides of ViewSwitcher -->

<!--   Add View’s Here -- >

</ViewSwitcher>
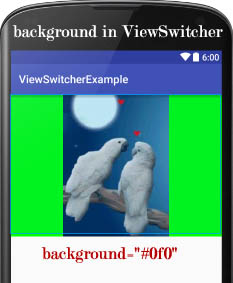
3. background: This attribute is used to set the background of a ViewSwitcher. We can set a color or a drawable in the background of a background: This attribute is used to set the background of a ViewSwitcher.
Below we set the green color for the background of a background: This attribute is used to set the background of a ViewSwitcher.
<ViewSwitcher
android:id="@+id/simpleViewSwitcher"
android:layout_width="match_parent"
android:layout_height="wrap_content"
android:background="#0f0"> <!-- set green color in the background of ViewSwitcher -->

<!--   Add View’s Here -- >

</ViewSwitcher>
Setting Background In ViewSwitcher Java class:
ViewSwitcher simpleViewSwitcher=(ViewSwitcher)findViewById(R.id. simpleViewSwitcher); // get reference of ViewSwitcher
simpleViewSwitcher.setBackgroundColor(Color.GREEN);// set green color in the background of ImageSwitcher.
ViewSwitcher Example In Android Studio:
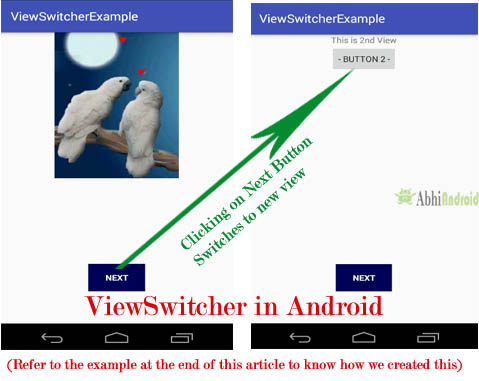
Below is the example of ViewSwitcher in which we display a ViewSwitcher with two views, one is ImageView and other is a layout in which we have a Button and a TextView. In this example we also use one Button for switching the view of ViewSwitcher. Firstly we load and set slide in left and slide in right animation and finally whenever a user click on next button, ViewSwitcher switch between the views and the current view will go out and next view will come in with specified animation.
Below you can download complete Android Studio project code, see final output and step by step explanation of the example:
Step 1: Create a new project and name it ViewSwitcherExample
Step 2: Open res -> layout ->activity_main.xml (or) main.xml and add following code:
In this step we open an xml file and add the code for displaying a Button and a ViewSwitcher by using its different attributes.
<LinearLayout xmlns:android="http://schemas.android.com/apk/res/android"
android:layout_width="match_parent"
android:layout_height="match_parent"
android:orientation="vertical">

<!-- ViewSwitcher with two views one is ImageView and other is LinearLayout in which we have a Button and a TextView -->
<ViewSwitcher
android:id="@+id/simpleViewSwitcher"
android:layout_width="match_parent"
android:layout_height="wrap_content">

<ImageView
android:layout_width="wrap_content"
android:layout_height="wrap_content"
android:layout_gravity="center"
android:src="@drawable/image" />

<LinearLayout
android:layout_width="match_parent"
android:layout_height="wrap_content"
android:gravity="center"
android:orientation="vertical">

<TextView
android:layout_width="wrap_content"
android:layout_height="wrap_content"
android:text="LinearLayout 2" />

<Button
android:layout_width="wrap_content"
android:layout_height="wrap_content"
android:text="- Button 2 -" />


</LinearLayout>
</ViewSwitcher>


<Button
android:id="@+id/buttonNext"
android:layout_width="wrap_content"
android:layout_height="wrap_content"
android:layout_gravity="center"
android:layout_marginTop="150dp"
android:background="#005"
android:text="NEXT"
android:textColor="#fff"
android:textStyle="bold" />

</LinearLayout>
Step 3: Open src -> package -> MainActivity.java
In this step we open MainActivity and add the code to initiate the ViewSwitcher and Button. In this firstly, we load and set slide in left and slide in right animation and finally whenever a user click on next button, ViewSwitcher switch between the views and the current view will go out and next view will come in with specified animation.
package com.example.ip_d.viewswitcherexample;

import android.os.Bundle;
import android.support.v7.app.AppCompatActivity;
import android.view.View;
import android.view.animation.Animation;
import android.view.animation.AnimationUtils;
import android.widget.Button;
import android.widget.ViewSwitcher;

public class MainActivity extends AppCompatActivity {

private ViewSwitcher simpleViewSwitcher;
Button btnNext;

@Override
protected void onCreate(Bundle savedInstanceState) {
super.onCreate(savedInstanceState);

setContentView(R.layout.activity_main);

// get The references of Button and ViewSwitcher
btnNext = (Button) findViewById(R.id.buttonNext);
simpleViewSwitcher = (ViewSwitcher) findViewById(R.id.simpleViewSwitcher); // get the reference of ViewSwitcher
// Declare in and out animations and load them using AnimationUtils class
Animation in = AnimationUtils.loadAnimation(this, android.R.anim.slide_in_left);
Animation out = AnimationUtils.loadAnimation(this, android.R.anim.slide_out_right);

// set the animation type to ViewSwitcher
simpleViewSwitcher.setInAnimation(in);
simpleViewSwitcher.setOutAnimation(out);


// ClickListener for NEXT button
// When clicked on Button ViewSwitcher will switch between views
// The current view will go out and next view will come in with specified animation
btnNext.setOnClickListener(new View.OnClickListener() {

public void onClick(View v) {
// TODO Auto-generated method stub
// show the next view of ViewSwitcher
simpleViewSwitcher.showNext();
}
});
}
}
Output:
Now run the App and you will see bird image in ImageView. Now click on the Next button and you will see view will switch to the 2nd view.
DOWNLOAD THIS FREE eBook!

2 thoughts on “ViewSwitcher Tutorial With Example In Android Studio”
Leave a Reply to Vlado Cancel reply

DOWNLOAD THIS FREE eBook!


Premium Project Source Code:
- Food Ordering Android App Project Source Code
- Ecommerce Store Android App Project Source Code
- Convert Website Into Android App Project Source Code
- Quiz Game Android App Project Source Code
- Radio Streaming Android App Source Code
- City Guide Android App Project Source Code
- QR Barcode Android App Project Source Code
 Hi, I'm Abhishek, founder and owner of this site. I believe in team work and there is a experienced developer team working on AbhiAndroid with a mission to simplify learning of Android App Development.
CONNECT WITH ME:
Hi, I'm Abhishek, founder and owner of this site. I believe in team work and there is a experienced developer team working on AbhiAndroid with a mission to simplify learning of Android App Development.
CONNECT WITH ME:


It is good to show also animation in xml files: slide_in_left.xml, slide_out_right.xml :
Animation in = AnimationUtils.loadAnimation(this, android.R.anim.slide_in_left);
Animation out = AnimationUtils.loadAnimation(this, android.R.anim.slide_out_right);
but good article.
sorry, my bad, those animations are part of SDK. i didn’t notice at first