DatePicker Tutorial With Example In Android Studio
In Android, DatePicker is a widget used to select a date. It allows to select date by day, month and year in your custom UI (user interface). If we need to show this view as a dialog then we have to use a DatePickerDialog class. For selecting time Android also provides timepicker to select time.
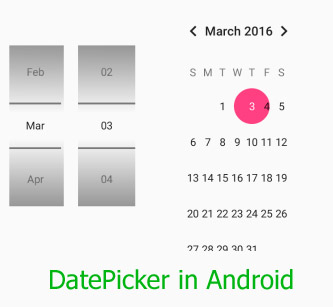
<DatePicker
android:id="@+id/simpleDatePicker"
android:layout_width="wrap_content"
android:layout_height="wrap_content"
android:datePickerMode="spinner"/>
Table Of Contents
Methods of DatePicker
Let’s discuss some common methods of a datepicker which are used to configure a DatePicker in our application.
1. setSpinnersShown(boolean shown):
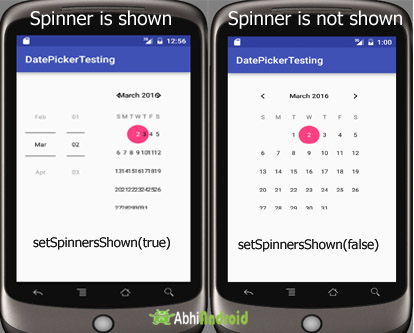
This method is used to set whether the spinner of the date picker in shown or not. In this method you have to set a Boolean value either true or false. True indicates spinner is shown, false value indicates spinner is not shown. Default value for this function is true.
Below we show the use of setSpinnerShown() function by setting false value.
DatePicker simpleDatePicker = (DatePicker)findViewById(R.id.simpleDatePicker); // initiate a date picker

simpleDatePicker.setSpinnersShown(false); // set false value for the spinner shown function
This method is used to get the selected day of the month from a date picker. This method returns an integer value.
Below we get the selected day of the month from a date picker.
/*Add in Oncreate() funtion after setContentView()*/
DatePicker simpleDatePicker = (DatePicker) findViewById(R.id.simpleDatePicker); // initiate a date picker
int day = simpleDatePicker.getDayOfMonth(); // get the selected day of the month
3. getMonth():
This method is used to get the selected month from a date picker. This method returns an integer value.
Below we get the selected month from a date picker.
DatePicker simpleDatePicker = (DatePicker)findViewById(R.id.simpleDatePicker); // initiate a date picker
int month = simpleDatePicker.getMonth(); // get the selected month
4. getYear():
This method is used to get the selected year from a date picker. This method returns an integer value.
Below code is used to get the selected year from a date picker.
DatePicker simpleDatePicker = (DatePicker)findViewById(R.id.simpleDatePicker); // initiate a date picker
int year = simpleDatePicker.getYear(); // get the selected year
5. getFirstDayOfWeek():
This method is used to get the first day of the week. This method returns an integer value.
Below code is used to get the first day of the week.
DatePicker simpleDatePicker = (DatePicker)findViewById(R.id.simpleDatePicker); // initiate a date picker

int firstDay=simpleDatePicker.getFirstDayOfWeek(); // get the first day of the week
Attributes of DatePicker
Now let’s we discuss some important attributes that helps us to configure a DatePicker in your XML file (layout).
1. id: id is an attribute used to uniquely identify a date picker.
<DatePicker
android:id="@+id/simpleDatePicker"
android:layout_width="wrap_content"
android:layout_height="wrap_content"
/>
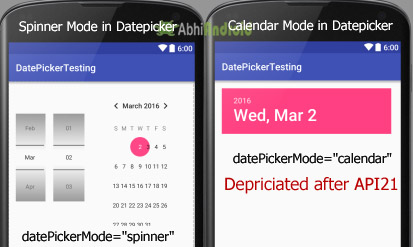
2. datePickerMode: This attribute is used to set the Date Picker in mode either spinner or calendar. Default mode is calendar but this mode is not used after api level 21, so from api level 21 you have to set the mode to spinner.
Below is an example code in which we set the mode to spinner for a date picker.
<DatePicker
android:id="@+id/simpleDatePicker"
android:layout_width="wrap_content"
android:layout_height="wrap_content"
android:datePickerMode="spinner" /> <!-- spinner mode of a date picker -->
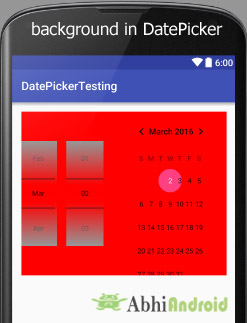
Below we set the red color for the background of a date picker.
<DatePicker
android:id="@+id/simpleDatePicker"
android:layout_width="wrap_content"
android:layout_height="wrap_content"
android:datePickerMode="spinner"
android:background="#f00"/> <!-- red color for the background of the date picker -->
DatePicker simpleDatePicker=(DatePicker)findViewById(R.id.simpleDatePicker); // initiate a date picker
simpleDatePicker.setBackgroundColor(Color.RED); //  red color for the background of a date picker
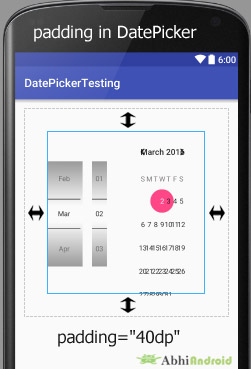
4. padding: padding attribute is used to set the padding from left, right, top or bottom for a date picker.
- paddingRight: set the padding from the right side of the date picker.
- paddingLeft: set the padding from the left side of the date picker.
- paddingTop: set the padding from the top side of the date picker.
- paddingBottom: set the padding from the bottom side of the date picker.
- Padding: set the padding from the all side’s of the date picker.
Below code of padding attribute set the 40dp padding from all the side’s of the date picker.
<DatePicker
android:id="@+id/simpleDatePicker"
android:layout_width="wrap_content"
android:layout_height="wrap_content"
android:datePickerMode="spinner"
android:padding="40dp"/> <!-- 40dp padding from all the sides of a date picker -->
DatePicker Example in Android Studio:
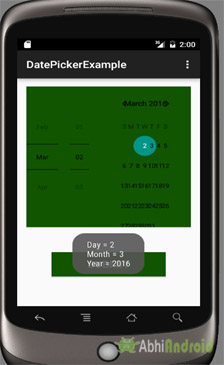
Example 1: In the first example of DatePicker we show simple date picker and a Button in our xml file and perform click event on button. So whenever a user clicks on a button the day of the month, month and year will be displayed by using a Toast. Below is the final output, download code and step by step explanation:
[cp_modal id=”cp_id_2e7ac”] [/cp_modal]
Step 2: Open res -> layout -> activity_main.xml (or) main.xml and add following code:
In this step we open an xml file and add the code for displaying a datepicker with spinner mode and a button for getting the date from the datepicker.
<RelativeLayout xmlns:android="http://schemas.android.com/apk/res/android"
    xmlns:tools="http://schemas.android.com/tools"
    android:layout_width="match_parent"
    android:layout_height="match_parent"
    android:paddingBottom="@dimen/activity_vertical_margin"
    android:paddingLeft="@dimen/activity_horizontal_margin"
    android:paddingRight="@dimen/activity_horizontal_margin"
    android:paddingTop="@dimen/activity_vertical_margin"
    tools:context=".MainActivity">

    <DatePicker
        android:id="@+id/simpleDatePicker"
        android:layout_width="wrap_content"
        android:layout_height="wrap_content"
        android:background="#150"
        android:datePickerMode="spinner" />

    <Button
        android:id="@+id/submitButton"
        android:layout_width="200dp"
        android:layout_height="wrap_content"
        android:layout_below="@+id/simpleDatePicker"
        android:layout_centerHorizontal="true"
        android:layout_marginTop="50dp"
        android:background="#150"
        android:text="SUBMIT"
        android:textColor="#fff"
        android:textSize="20sp"
        android:textStyle="bold" />
</RelativeLayout>
Step 3: Open app -> package -> MainActivity.java
In this step we open MainActivity where we add the code to initiate the datepicker & a button and then perform onClickListener() event on button so whenever a user clicks on the button the day of the month, month and year will be displayed by using a Toast.
package example.abhiandroid.datepickerexample;

import android.support.v7.app.AppCompatActivity;
import android.os.Bundle;
import android.view.Menu;
import android.view.MenuItem;
import android.view.View;
import android.widget.DatePicker;
import android.widget.Button;
import android.widget.Toast;

public class MainActivity extends AppCompatActivity {

    DatePicker simpleDatePicker;
    Button submit;

    @Override
    protected void onCreate(Bundle savedInstanceState) {
        super.onCreate(savedInstanceState);
        setContentView(R.layout.activity_main);
        // initiate the date picker and a button
        simpleDatePicker = (DatePicker) findViewById(R.id.simpleDatePicker);
        submit = (Button) findViewById(R.id.submitButton);
        // perform click event on submit button
        submit.setOnClickListener(new View.OnClickListener() {
            @Override
            public void onClick(View v) {
                // get the values for day of month , month and year from a date picker
                String day = "Day = " + simpleDatePicker.getDayOfMonth();
                String month = "Month = " + (simpleDatePicker.getMonth() + 1);
                String year = "Year = " + simpleDatePicker.getYear();
                // display the values by using a toast
                Toast.makeText(getApplicationContext(), day + "\n" + month + "\n" + year, Toast.LENGTH_LONG).show();
            }
        });

    }


}
Output:
Now run the App in AVD and you will see datepicker will appear on the screen. Choose the date, month & year and click submit. The date you selected will appear on Screen.
Example of DatePickerDialog in Android Studio
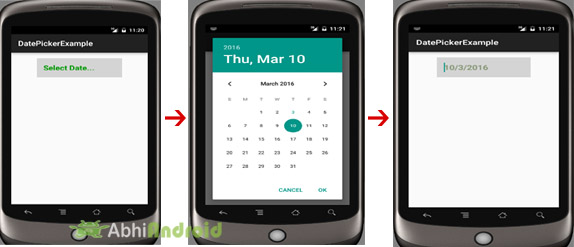
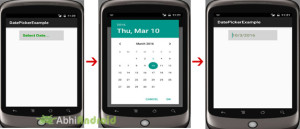
Example 2: In the second example we show the use of date picker dialog in our application, for that we display edittext in our xml file and perform a onClickListener() event on it. So whenever a user click on it date picker dialog is appeared and from there user can adjust the date and after selecting the date it will be displayed in the edit text. Below is the final output, download code and step by step tutorial:
[cp_modal id=”cp_id_347dc”] [/cp_modal]
Step 2: Open res – > layout – > activity_main.xml (or) main.xml and add following code:
In this step we open xml file and add the code for displaying edittext which will be used to display the date of datepicker.
<RelativeLayout xmlns:android="http://schemas.android.com/apk/res/android"
    xmlns:tools="http://schemas.android.com/tools"
    android:layout_width="match_parent"
    android:layout_height="match_parent"
    android:paddingBottom="@dimen/activity_vertical_margin"
    android:paddingLeft="@dimen/activity_horizontal_margin"
    android:paddingRight="@dimen/activity_horizontal_margin"
    android:paddingTop="@dimen/activity_vertical_margin"
    tools:context=".MainActivity">

    <EditText
        android:id="@+id/date"
        android:layout_width="200dp"
        android:layout_height="wrap_content"
        android:layout_centerHorizontal="true"
        android:background="#d4d4d4"
        android:hint="Select Date..."
        android:padding="15dp"
        android:textColor="#897"
        android:textColorHint="#090"
        android:textSize="20sp"
        android:textStyle="bold" />

</RelativeLayout>
Step 3: Open src -> package -> MainActvity.java
In this step we open MainActivity where we add the code to initiate the edittext to display date(day of month, month and year) from a date picker and perform click event on edit text so whenever a user clicks on edit text a date picker dialog is appeared from there user can set the date by choosing day of month , month and year , after setting the date will be displayed in the edit text.
package example.abhiandroid.datepickerexample;

import android.app.DatePickerDialog;
import android.support.v7.app.AppCompatActivity;
import android.os.Bundle;
import android.view.Menu;
import android.view.MenuItem;
import android.view.View;
import android.widget.DatePicker;
import android.widget.EditText;

import java.util.Calendar;

public class MainActivity extends AppCompatActivity {

    EditText date;
    DatePickerDialog datePickerDialog;

    @Override
    protected void onCreate(Bundle savedInstanceState) {
        super.onCreate(savedInstanceState);
        setContentView(R.layout.activity_main);
        // initiate the date picker and a button
        date = (EditText) findViewById(R.id.date);
        // perform click event on edit text
        date.setOnClickListener(new View.OnClickListener() {
            @Override
            public void onClick(View v) {
                // calender class's instance and get current date , month and year from calender
                final Calendar c = Calendar.getInstance();
                int mYear = c.get(Calendar.YEAR); // current year
                int mMonth = c.get(Calendar.MONTH); // current month
                int mDay = c.get(Calendar.DAY_OF_MONTH); // current day
                // date picker dialog
                datePickerDialog = new DatePickerDialog(MainActivity.this,
                        new DatePickerDialog.OnDateSetListener() {

                            @Override
                            public void onDateSet(DatePicker view, int year,
                                                  int monthOfYear, int dayOfMonth) {
                                // set day of month , month and year value in the edit text
                                date.setText(dayOfMonth + "/"
                                        + (monthOfYear + 1) + "/" + year);

                            }
                        }, mYear, mMonth, mDay);
                datePickerDialog.show();
            }
        });

    }


}
Output:
Now run the App in Emulator and fill the date in EditText option.
20 thoughts on “DatePicker Tutorial With Example In Android Studio”
Leave a Reply
Premium Project Source Code:
- Food Ordering Android App Project Source Code
- Ecommerce Store Android App Project Source Code
- Convert Website Into Android App Project Source Code
- Quiz Game Android App Project Source Code
- Radio Streaming Android App Source Code
- City Guide Android App Project Source Code
- QR Barcode Android App Project Source Code
great site …..very simple ,well organized , easy even for the beginner,…well keep it up
if possible do the same kind of work for java also
Awesome tutorials for my every work i use your website for reference .
WHAT CAN I DO FOR THIS ERROR
Description Resource Path Location Type
error: No resource identifier found for attribute ‘timePickerMode’ in package ‘android’ activity_main.xml /Time/res/layout line 10 Android AAPT Problem
very simple and nice and easy to understand
Sir can you tell me how i sotre this date into my sqlite database.Please sir tell me as soon as possible.
Hey can i also get the days like if its Monday, tuesday, wed,fri,sat or sun? How can i do that? Pls help
Hello Mr Abhi, the code is perfectly fine it runs but when i try to put the code on my Fragment java activity everytime i run it , it will close. Could you help me?
i have one problem how to disable the all the dates in date picker and only show today date,yesterday date
Worked, but I have a number picker visible after date is picked. Date is visible too
I did have the datepicker start from an earlier page, not MainActivity.
how to stop user selecting any date of future?
how month be +1 to selected date
first click does not work.. why? maybe any OnTouchEvent?
Please download code and it is free
Hi, I had the same problem, so I made a button instead of an EditText. It worked.
android:focusable=”false” add this code on your XML file
Thank you! I help me to undertand the DatePicker
Really nice and clean, thanks a lot!
very simple and nice and easy to understand
the copied code did not work. I got 37 error messages. not sure where I went wrong. I think I didn’t insert in the correct location.
Please download the code available in the article itself and import it directly in Android Studio. It will work. And then compare it with your error