Include Merge Tag Tutorial With Example In Android Studio
In Android, for reusing the complete layouts we can use the <include/> and <merge/> tags to embed another layout inside the current layout. Android offers a variety of widgets to provide small and reusable interactive elements. In some cases we might also need to reuse larger components that require a special layout.
Reusing layouts is powerful as it allows us to create reusable complex layouts. It also means that any elements of our application that are common across multiple layouts can be extracted, managed separately and then included in each layout. For example, in many cases we need custom title bar with description text and icon, then we can create a custom title bar layout and use this tag (i.e. <include/> and <merge/>) to re-use the same layout in multiple activities.
Table Of Contents
Include Tag:
The <include/> tag helps us to include the xml content’s in our xml file. This is a nice way to share layout parts between different layout’s. Suppose we need to show the custom title in many layouts, for that we simply create a custom layout for title bar and then reuse the layout by using <include/> tag.
Basic include Tag XML code in Android:
<include android:id="@+id/custom_title_layout"
android:layout_width="match_parent"
android:layout_height="match_parent"
layout="@layout/custom_title"/>
Merge Tag:
The <merge /> tag helps us to eliminate redundant view groups in our view hierarchy when including one layout within another. For example, if our main layout is LinearLayout with vertical orientation in which two consecutive views can be re-used in multiple layouts, then the re-usable layout in which you place the two views requires its own root view. However, using another LinearLayout as the root of the re-usable layout would result in a vertical LinearLayout inside a vertical LinearLayout. The nested LinearLayout serves no real purpose other than to slow down our UI performance. To avoid including such a redundant view group, we can instead use the <merge> element as the root view for the re-usable layout.
Basic merge Tag XML code:
<merge xmlns:android="http://schemas.android.com/apk/res/android">


<Button
android:layout_width="fill_parent"
android:layout_height="wrap_content"
android:text="First"/>

<Button
android:layout_width="fill_parent"
android:layout_height="wrap_content"
android:text="Second"/>

</merge>
Now, when we include this layout in another layout (using the <include/> tag), the system ignores the <merge> element and places the two Buttons directly in the layout, in place of the <include/> tag.
Difference between ViewStub and include tag:
The include tag will just include the xml content’s in our xml file. It’s a nice way to share layout parts between different layout’s. The ViewStub tag is a little bit different because it is not directly included, and will be loaded only when you actually need it, i.e when you set ViewStub’s visibility to “true”. This is a nice optimization because you could have a complex layout with tons of small views, complex views or headers anywhere, and still have your Activity load up really fast. Once you use one of those views, it’ll be loaded.
Attributes of include:
Now let’s we discuss some common attributes of a include tag that helps us to configure it in our layout (xml).
1. id: This attribute is used to uniquely identify a include tag.
Below we set the “custom_title_bar” id of the include tag that is used to uniquely identify it.
<include android:id="@+id/custom_title_bar"
android:layout_width="match_parent"
android:layout_height="match_parent"/> <!-- id of the include tag that is used to uniquely identify it-->
2. layout: This attribute is used to supply an identifier for the layout resource to include a custom layout in our main layout.
Below we include a custom layout i.e custom _title in our main layout using include tag.
<include android:id="@+id/custom_title_bar"
android:layout_width="match_parent"
android:layout_height="match_parent"
layout="@layout/custom_title"/> <!-- include custom_title layout in other layout -->
include and merge Tag Example In Android Studio:
Below is the example of include and merge tag in which firstly we create a custom layout with a ImageView and a Button by using merge tag and then include that layout in our main layout using include tag. Finally we access the custom layout’s view’s in our Activity and perform click event on Button. Whenever a user click on Button a toast with message “ Custom Layout’s Button Clicked ” displayed.
Below you can download code, see final output and step by step explanation of the example:

Step 1: Create a new project and name it IncludeTagExample
Step 2: Open res -> layout ->activity_main.xml (or) main.xml and add following code:
In this step we open xml file and then create a TextView and also include a custom_layout file using include tag.
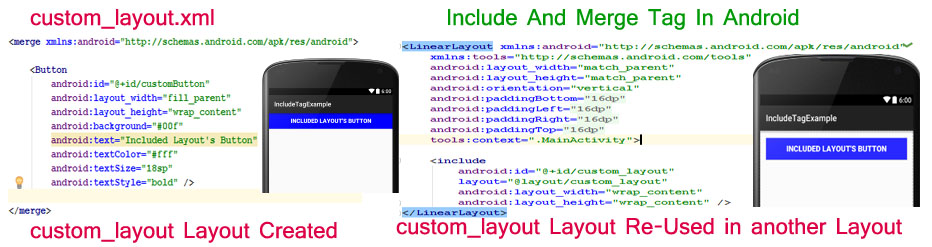
<LinearLayout xmlns:android="http://schemas.android.com/apk/res/android"
xmlns:tools="http://schemas.android.com/tools"
android:layout_width="match_parent"
android:layout_height="match_parent"
android:orientation="vertical"
android:paddingBottom="@dimen/activity_vertical_margin"
android:paddingLeft="@dimen/activity_horizontal_margin"
android:paddingRight="@dimen/activity_horizontal_margin"
android:paddingTop="@dimen/activity_vertical_margin"
tools:context=".MainActivity">

<TextView
android:layout_width="wrap_content"
android:layout_height="wrap_content"
android:layout_gravity="center"
android:text="Example Of Include And Merge Tag"
android:textColor="#00f"
android:layout_marginBottom="100dp"
android:textSize="20sp" />

<include
android:id="@+id/custom_layout"
layout="@layout/custom_layout"
android:layout_width="wrap_content"
android:layout_height="wrap_content" />
</LinearLayout>
Step 3: Create a new xml file i.e custom_layout.xml inside layout and add the below code:
In this file we create a Button and a ImageView using merge tag to display in other activities.
<merge xmlns:android="http://schemas.android.com/apk/res/android">

<Button
android:id="@+id/customButton"
android:layout_width="fill_parent"
android:layout_height="wrap_content"
android:background="#00f"
android:text="Included Layout's Button"
android:textColor="#fff"
android:textSize="18sp"
android:textStyle="bold" />

<ImageView
android:id="@+id/customImageView"
android:layout_width="fill_parent"
android:layout_height="wrap_content"
android:src="@drawable/ic_launcher" />

</merge>
Step 4: Open src -> package -> MainActivity.java
In this step Firstly we get the reference of included layout’s Button and ImageView and finally perform click event on Button. Whenever a user click on Button a toast with message “ Custom Layout’s Button Clicked ” displayed.
package example.abhiandroid.includetagexample;

import android.support.v7.app.AppCompatActivity;
import android.os.Bundle;
import android.view.View;
import android.widget.ImageView;
import android.widget.Button;
import android.widget.Toast;

public class MainActivity extends AppCompatActivity {

Button customButton;
ImageView customImageView;

@Override
protected void onCreate(Bundle savedInstanceState) {
super.onCreate(savedInstanceState);
setContentView(R.layout.activity_main);
customButton = (Button) findViewById(R.id.customButton); // get the reference of custom Layout's Button
customImageView = (ImageView) findViewById(R.id.customImageView); // get the reference of custom Layout's ImageView
customButton.setOnClickListener(new View.OnClickListener() {
@Override
public void onClick(View v) {
// display a toast on Button Click
Toast.makeText(getApplicationContext(), "Custom Layout’s Button Clicked", Toast.LENGTH_LONG).show();
}
});
}
}
One thought on “Include Merge Tag Tutorial With Example In Android Studio”
Leave a Reply to nnnnn Cancel reply
Premium Project Source Code:
- Food Ordering Android App Project Source Code
- Ecommerce Store Android App Project Source Code
- Convert Website Into Android App Project Source Code
- Quiz Game Android App Project Source Code
- Radio Streaming Android App Source Code
- City Guide Android App Project Source Code
- QR Barcode Android App Project Source Code
Notification Example natthi