In Android, RecyclerView is an advanced and flexible version of ListView and GridView. It is a container used for displaying large amount of data sets that can be scrolled very efficiently by maintaining a limited number of views.
RecyclerView was introduced in Material Design in API level 21 (Android 5.0 i.e Lollipop). Material Design brings lot of new features in Android that changed a lot the visual design patterns regarding the designing of modern Android applications.
This new widget is a big step for displaying data because the ListView is one of the most commonly used UI widget. In RecyclerView android provides a lots of new features which are not present in existing ListView or GridView.
Basic RecyclerView XML code:
<?xml version="1.0" encoding="utf-8"?>
<RelativeLayout xmlns:android="http://schemas.android.com/apk/res/android"
    xmlns:tools="http://schemas.android.com/tools"
    android:layout_width="match_parent"
    android:layout_height="match_parent"
    tools:context="abhiandroid.com.recyclerviewexample.MainActivity">
    <android.support.v7.widget.RecyclerView
        android:id="@+id/recyclerView"
        android:layout_width="match_parent"
        android:layout_height="match_parent" />
</RelativeLayout>
Table Of Contents
Gradle Dependency to use in RecyclerView:
The RecyclerView widget is a part of separate library valid for API 7 level or higher. You will need to add the following dependency in your Gradle build file to use recyclerview.
Gradle Scripts > build.gradle
dependencies {
 ...
 compile "com.android.support:recyclerview-v7:23.0.1"
 }
RecyclerView As ListView In Android:
In this article we will discuss how to use a RecyclerView as ListView. For that we need to understand LayoutManager component of RecyclerView.
Layout Manager is basically a very new concept introduced in RecyclerView for defining the type of Layout which RecyclerView should use.
It contains the references for all the views that are filled by the data of the entry. We can create a Custom Layout Manager by extending RecyclerView.
LayoutManager Class of RecyclerView provides three types of in-built Layout Managers.
- LinearLayoutManager: It is used for displaying vertical or horizontal list.
- GridLayoutManager: It is used for displaying the items in the form of Grids.
- StaggeredGridLayoutManager: It is used to show the items in staggered Grid (uneven size image in Grid).
As this article only focus on RecyclerView as ListView so in this article article I am going to discuss only about LinearLayoutManager because it is used to display the data in the form of List.
LinearLayoutManager :
LinearLayoutManager is used for displaying the data items in a horizontal or vertical scrolling List.
If we need a list(vertical or horizontal) then we need to use LinearLayoutManager setting with require orientation. In Simple words we can say that we use the LinearLayoutManager for displaying RecyclerView as a ListView.
Public constructor for LinearLayoutManager: Below we define the public constructor for LinearLayoutManager that should be used for defining orientation(vertical or horizontal) of RecyclerView.
1) LinearLayoutManager(Context context): It is used to create a vertical LinearLayoutManager. In this we need to set only one parameter i.e used to set the context of the current Activity.
Example:
In below code snippet we show how to use this constructor in Android.
With Default Vertical Orientation:
// get the reference of RecyclerView
 RecyclerView recyclerView = (RecyclerView) findViewById(R.id.recyclerView);
 // set a LinearLayoutManager with default orientation
 LinearLayoutManager linearLayoutManager = new LinearLayoutManager(getApplicationContext());
 recyclerView.setLayoutManager(linearLayoutManager); // set LayoutManager to RecyclerView
With Horizontal Orientation:
// get the reference of RecyclerView
 RecyclerView recyclerView = (RecyclerView) findViewById(R.id.recyclerView);
 // set a LinearLayoutManager
 LinearLayoutManager linearLayoutManager = new LinearLayoutManager(getApplicationContext());
 linearLayoutManager.setOrientation(LinearLayoutManager.HORIZONTAL); // set Horizontal Orientation
 recyclerView.setLayoutManager(linearLayoutManager); // set LayoutManager to RecyclerView
2) LinearLayoutManager(Context context, int orientation, boolean reverseLayout):
In this first parameter is used to set the current context, second is used to set the Layout Orientation should be vertical or horizontal. By using this constructor we can easily create a horizontal or vertical List. Third parameter is a boolean value which set to true layouts from end to start, it means items are arranged from end to start.
Example: .
In below code snippet we show how to use this constructor in Android.
// get the reference of RecyclerView
 RecyclerView recyclerView = (RecyclerView) findViewById(R.id.recyclerView);
 // set a LinearLayoutManager with default horizontal orientation and false value for reverseLayout to show the items from start to end
 LinearLayoutManager linearLayoutManager = new LinearLayoutManager(getApplicationContext(),LinearLayoutManager.HORIZONTAL,false);
 recyclerView.setLayoutManager(linearLayoutManager); // set LayoutManager to RecyclerView
Comparison between RecyclerView and ListView:
There are a lots of new features in RecyclerView that are not present in existing ListView. The RecyclerView is more flexible, powerful and a major enhancement over ListView. Here I will try to give you a detailed insight into it.
Below we discuss some important features of RecyclerView that should clear the reason why RecyclerView is better than ListView.
1. Custom Item Layouts: ListView can only layout the items in Vertical Arrangement and that arrangement cannot be customized according to our requirements. Suppose we need to create a horizontal List then that thing is not feasible with default ListView. But with introduction of Recyclerview we can easily create a horizontal or Vertical List. By using Layout Manager component of RecyclerView we can easily define the orientation of Items.
2. Use Of ViewHolder Pattern: ListView Adapters do not require the use of ViewHolder but RecyclerView require the use of ViewHolder that is used to store the reference of View’s.
In ListView it is recommended to use the ViewHolder but it is not compulsion but in RecyclerView it is mandatory to use ViewHolder which is the main difference between RecyclerView and ListView.
ViewHolder is a static inner class in our Adapter which holds references to the relevant view’s. By using these references our code can avoid time consuming findViewById() method to update the widgets with new data.
3. Adapters: In ListView we use many Adapter’s like ArrayAdapter for displaying simple array data, BaseAdapter and SimpleAdapters for custom Lists. In RecyclerView we only use RecyclerView.Adapter to set the data in List. In Below code sinppet we show how our CustomAdapter looks when we extends RecyclerView.Adapter class and use ViewHolder in it.
package abhiandroid.com.recyclerviewexample;
 import android.support.v7.widget.RecyclerView;
 import android.view.LayoutInflater;
 import android.view.View;
 import android.view.ViewGroup;
 import android.widget.TextView;
 public class CustomAdapter extends RecyclerView.Adapter {
 @Override
 public MyViewHolder onCreateViewHolder(ViewGroup parent, int viewType) {
 // infalte the item Layout
 View v = LayoutInflater.from(parent.getContext()).inflate(R.layout.rowlayout, parent, false);
 // set the view's size, margins, paddings and layout parameters
 MyViewHolder vh = new MyViewHolder(v); // pass the view to View Holder
 return vh;
 }
 @Override
 public void onBindViewHolder(MyViewHolder holder, int position) {
 }
 @Override
 public int getItemCount() {
 return 0;
 }
 public class MyViewHolder extends RecyclerView.ViewHolder {
 TextView textView;// init the item view's
 public MyViewHolder(View itemView) {
 super(itemView);

// get the reference of item view's
 textView = (TextView) itemView.findViewById(R.id.textView);
 }
 }
 }
4. Item Animator:
ListView are lacking in support of good animation. RecyclerView brings a new dimensions in it. By using RecyclerView. ItemAnimator class we can easily animate the view.
5. Item Decoration: In ListView dynamically decorating items like adding divider or border was not easy but in RecyclerView by using RecyclerView. ItemDecorator class we have a huge control on it.
Conclusion: At the end we can say that RecyclerView is much more customizable than the existing ListView and gives a lots of control and power to developers.
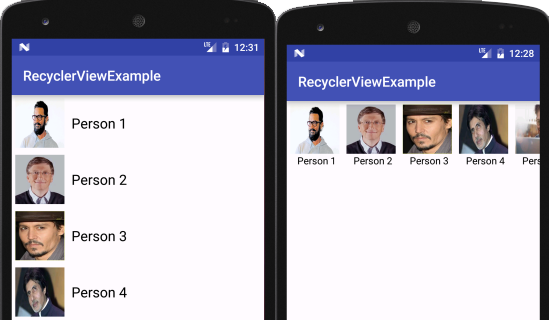
Example Of RecyclerView As Vertical ListView In Android Studio:
Below is the example of RecyclerView As ListView in which we display the vertical list of Person Names with their images by using RecyclerView. In this example we are using LinearLayoutManger with vertical orientation to display the items.
Firstly we declare a RecyclerView in our XML file and then get the reference of it in our Activity. After that we creates two ArrayList for Person Names and Images. After that we set a LayoutManager and finally we set the Adapter to show the items in RecyclerView. Whenever a user clicks on an item the name of the Person is displayed on the screen with the help of Toast.
 Step 1:
Create A New Project And Name It RecyclerViewExample.
Step 2: Open Gradle Scripts > build.gradle and add RecyclerView Library dependency in it.
apply plugin: 'com.android.application'
android {
compileSdkVersion 24
buildToolsVersion "24.0.1"
defaultConfig {
applicationId "abhiandroid.com.recyclerviewexample"
minSdkVersion 16
targetSdkVersion 24
versionCode 1
versionName "1.0"
}
buildTypes {
release {
minifyEnabled false
proguardFiles getDefaultProguardFile('proguard-android.txt'), 'proguard-rules.pro'
}
}
}
dependencies {
compile fileTree(dir: 'libs', include: ['*.jar'])
testCompile 'junit:junit:4.12'
compile 'com.android.support:appcompat-v7:24.1.1'
compile "com.android.support:recyclerview-v7:23.0.1" // dependency file for RecyclerView
}
Step 3:
Open res -> layout -> activity_main.xml (or) main.xml and add following code:
In this step we create a RecyclerView in our XML file.
<?xml version="1.0" encoding="utf-8"?>
<RelativeLayout xmlns:android="http://schemas.android.com/apk/res/android"
    xmlns:tools="http://schemas.android.com/tools"
    android:layout_width="match_parent"
    android:layout_height="match_parent"
    tools:context="abhiandroid.com.recyclerviewexample.MainActivity">
    <android.support.v7.widget.RecyclerView
        android:id="@+id/recyclerView"
        android:layout_width="match_parent"
        android:layout_height="match_parent" />
</RelativeLayout>
Step 4:
Create a new XML file rowlayout.xml for item of RecyclerView and paste the following code in it.
In this step we create a new xml file for item row in which we creates a TextView and ImageView to show the data.
<?xml version="1.0" encoding="utf-8"?>
<LinearLayout xmlns:android="http://schemas.android.com/apk/res/android"
    android:layout_width="match_parent"
    android:layout_height="wrap_content"
    android:orientation="horizontal"
    android:padding="5dp">
    <!--
    items for a single row of RecyclerView
    -->
    <ImageView
        android:id="@+id/image"
        android:layout_width="70dp"
        android:layout_height="70dp"
        android:scaleType="fitXY"
        android:src="@mipmap/ic_launcher" />
    <TextView
        android:id="@+id/name"
        android:layout_width="wrap_content"
        android:layout_height="wrap_content"
        android:layout_gravity="center_vertical"
        android:layout_marginLeft="10dp"
        android:text="ABCD"
        android:textColor="#000"
        android:textSize="20sp" />
</LinearLayout>
Step 5 :
Now open app -> java -> package -> MainActivity.java and add the below code.
In this step firstly we get the reference of RecyclerView. After that we creates two ArrayList’s for Person Names and Images. After that we set a LayoutManager and finally we set the Adapter to show the items in RecyclerView.
package abhiandroid.com.recyclerviewexample;
 import android.os.Bundle;
 import android.support.v7.app.AppCompatActivity;
 import android.support.v7.widget.LinearLayoutManager;
 import android.support.v7.widget.RecyclerView;
 import java.util.ArrayList;
 import java.util.Arrays;
 public class MainActivity extends AppCompatActivity {
 // ArrayList for person names
 ArrayList personNames = new ArrayList<>(Arrays.asList("Person 1", "Person 2", "Person 3", "Person 4", "Person 5", "Person 6", "Person 7","Person 8", "Person 9", "Person 10", "Person 11", "Person 12", "Person 13", "Person 14"));
 ArrayList personImages = new ArrayList<>(Arrays.asList(R.drawable.person1, R.drawable.person2, R.drawable.person3, R.drawable.person4, R.drawable.person5, R.drawable.person6, R.drawable.person7,R.drawable.person1, R.drawable.person2, R.drawable.person3, R.drawable.person4, R.drawable.person5, R.drawable.person6, R.drawable.person7));
 @Override
 protected void onCreate(Bundle savedInstanceState) {
 super.onCreate(savedInstanceState);
 setContentView(R.layout.activity_main);
 // get the reference of RecyclerView
 RecyclerView recyclerView = (RecyclerView) findViewById(R.id.recyclerView);
 // set a LinearLayoutManager with default vertical orientation
 LinearLayoutManager linearLayoutManager = new LinearLayoutManager(getApplicationContext());
 recyclerView.setLayoutManager(linearLayoutManager);
 // call the constructor of CustomAdapter to send the reference and data to Adapter
 CustomAdapter customAdapter = new CustomAdapter(MainActivity.this, personNames,personImages);
 recyclerView.setAdapter(customAdapter); // set the Adapter to RecyclerView
 }
 }
Step 6:
Create a new class CustomAdapter.java inside package and add the following code.
In this step we create a CustomAdapter class and extends RecyclerView.Adapter class with View Holder in it. After that we implement the overrided methods and create a constructor for getting the data from Activity. In this custom Adapter two methods are more important first is onCreateViewHolder in which we inflate the layout item xml and pass it to View Holder and other is onBindViewHolder in which we set the data in the view’s with the help of View Holder. Finally we implement the setOnClickListener event on itemview and on click of item we display the name of the person with the help of Toast.
package abhiandroid.com.recyclerviewexample;
 import android.content.Context;
 import android.support.v7.widget.RecyclerView;
 import android.view.LayoutInflater;
 import android.view.View;
 import android.view.ViewGroup;
 import android.widget.ImageView;
 import android.widget.TextView;
 import android.widget.Toast;
 import java.util.ArrayList;
 public class CustomAdapter extends RecyclerView.Adapter {
 ArrayList personNames;
 ArrayList personImages;
 Context context;
 public CustomAdapter(Context context, ArrayList personNames, ArrayList personImages) {
 this.context = context;
 this.personNames = personNames;
 this.personImages = personImages;
 }
 @Override
 public MyViewHolder onCreateViewHolder(ViewGroup parent, int viewType) {
 // infalte the item Layout
 View v = LayoutInflater.from(parent.getContext()).inflate(R.layout.rowlayout, parent, false);
 // set the view's size, margins, paddings and layout parameters
 MyViewHolder vh = new MyViewHolder(v); // pass the view to View Holder
 return vh;
 }
 @Override
 public void onBindViewHolder(MyViewHolder holder, final int position) {
 // set the data in items
 holder.name.setText(personNames.get(position));
 holder.image.setImageResource(personImages.get(position));
 // implement setOnClickListener event on item view.
 holder.itemView.setOnClickListener(new View.OnClickListener() {
 @Override
 public void onClick(View view) {
 // display a toast with person name on item click
 Toast.makeText(context, personNames.get(position), Toast.LENGTH_SHORT).show();
 }
 });
 }
 @Override
 public int getItemCount() {
 return personNames.size();
 }
 public class MyViewHolder extends RecyclerView.ViewHolder {
 // init the item view's
 TextView name;
 ImageView image;
 public MyViewHolder(View itemView) {
 super(itemView);
 // get the reference of item view's
 name = (TextView) itemView.findViewById(R.id.name);
 image = (ImageView) itemView.findViewById(R.id.image);
 }
 }
 }
Output:
Now run the App and you will person name which can be scrolled in horizontal direction created using RecyclerView.
Example Of RecyclerView As Horizontal ListView In Android Studio
Below is the example of RecyclerView As ListView in which we display the horizontal list of Person Names with their images by using RecyclerView. In this example we are using LinearLayoutManger with horizontal orientation to display the items.
Firstly we declare a RecyclerView in our XML file and then get the reference of it in our Activity. After that we creates two ArrayList’s for Person Names and Images.
After that we set a LayoutManager with horizontal orientation and finally we set the Adapter to show the items in RecyclerView. Whenever a user clicks on an item the name of the Person is displayed on the screen with the help of Toast.
 Step 1:
Create A New Project And Name It RecyclerViewExample.
Step 2: Open Gradle Scripts > build.gradle and add RecyclerView Library dependency in it.
apply plugin: 'com.android.application'
 android {
 compileSdkVersion 24
 buildToolsVersion "24.0.1"
 defaultConfig {
 applicationId "abhiandroid.com.recyclerviewexample"
 minSdkVersion 16
 targetSdkVersion 24
 versionCode 1
 versionName "1.0"
 }
 buildTypes {
 release {
 minifyEnabled false
 proguardFiles getDefaultProguardFile('proguard-android.txt'), 'proguard-rules.pro'
 }
 }
 }
 dependencies {
 compile fileTree(dir: 'libs', include: ['*.jar'])
 testCompile 'junit:junit:4.12'
 compile 'com.android.support:appcompat-v7:24.1.1'
 compile "com.android.support:recyclerview-v7:23.0.1" // dependency file for RecyclerView
 }
Step 3:
Open res -> layout -> activity_main.xml (or) main.xml and add following code:
In this step we create a RecyclerView in our XML file.
<?xml version="1.0" encoding="utf-8"?>
 <RelativeLayout xmlns:android="http://schemas.android.com/apk/res/android"
 xmlns:tools="http://schemas.android.com/tools"
 android:layout_width="match_parent"
 android:layout_height="match_parent"
 tools:context="abhiandroid.com.recyclerviewexample.MainActivity">
 <android.support.v7.widget.RecyclerView
 android:id="@+id/recyclerView"
 android:layout_width="match_parent"
 android:layout_height="match_parent" />
 </RelativeLayout>
Step 4:
Create a new XML file rowlayout.xml for item of RecyclerView and paste the following code in it.
In this step we create a new xml file for item row in which we creates a TextView and ImageView to show the data.
<?xml version="1.0" encoding="utf-8"?>
 <LinearLayout xmlns:android="http://schemas.android.com/apk/res/android"
 android:layout_width="match_parent"
 android:layout_height="wrap_content"
 android:orientation="vertical"
 android:padding="5dp">
 <!--
 items for a single row of RecyclerView
 -->
 <ImageView
 android:id="@+id/image"
 android:layout_width="70dp"
 android:layout_height="70dp"
 android:scaleType="fitXY"
 android:src="@mipmap/ic_launcher" />
 <TextView
 android:id="@+id/name"
 android:layout_width="wrap_content"
 android:layout_height="wrap_content"
 android:layout_gravity="center_vertical"
 android:layout_marginLeft="10dp"
 android:text="ABCD"
 android:textColor="#000" />
 </LinearLayout>
Step 5 :
Now open app -> java -> package -> MainActivity.java and add the below code.
In this step firstly we get the reference of RecyclerView. After that we creates two ArrayList’s for Person Names and Images. After that we set a LayoutManager with horizontal orientation and finally we set the Adapter to show the items in RecyclerView.
package abhiandroid.com.recyclerviewexample;
 import android.os.Bundle;
 import android.support.v7.app.AppCompatActivity;
 import android.support.v7.widget.LinearLayoutManager;
 import android.support.v7.widget.RecyclerView;
 import java.util.ArrayList;
 import java.util.Arrays;
 public class MainActivity extends AppCompatActivity {
 // ArrayList for person names
 ArrayList personNames = new ArrayList<>(Arrays.asList("Person 1", "Person 2", "Person 3", "Person 4", "Person 5", "Person 6", "Person 7","Person 8", "Person 9", "Person 10", "Person 11", "Person 12", "Person 13", "Person 14"));
 ArrayList personImages = new ArrayList<>(Arrays.asList(R.drawable.person1, R.drawable.person2, R.drawable.person3, R.drawable.person4, R.drawable.person5, R.drawable.person6, R.drawable.person7,R.drawable.person1, R.drawable.person2, R.drawable.person3, R.drawable.person4, R.drawable.person5, R.drawable.person6, R.drawable.person7));
 @Override
 protected void onCreate(Bundle savedInstanceState) {
 super.onCreate(savedInstanceState);
 setContentView(R.layout.activity_main);
 // get the reference of RecyclerView
 RecyclerView recyclerView = (RecyclerView) findViewById(R.id.recyclerView);
 // set a LinearLayoutManager with default horizontal orientation and false value for reverseLayout to show the items from start to end
 LinearLayoutManager linearLayoutManager = new LinearLayoutManager(getApplicationContext(),LinearLayoutManager.HORIZONTAL,false);
 recyclerView.setLayoutManager(linearLayoutManager);
 // call the constructor of CustomAdapter to send the reference and data to Adapter
 CustomAdapter customAdapter = new CustomAdapter(MainActivity.this, personNames,personImages);
 recyclerView.setAdapter(customAdapter); // set the Adapter to RecyclerView
 }
 }
Step 6:
Create a new class CustomAdapter.java inside package and add the following code.
In this step we create a CustomAdapter class and extends RecyclerView.Adapter class with View Holder in it. After that we implement the overrided methods and create a constructor for getting the data from Activity, In this custom Adapter two methods are more important first is onCreateViewHolder in which we inflate the layout item xml and pass it to View Holder and other is onBindViewHolder in which we set the data in the view’s with the help of View Holder. Finally we implement the setOnClickListener event on itemview and on click of item we display the name of the person with the help of Toast.
package abhiandroid.com.recyclerviewexample;
 import android.content.Context;
 import android.support.v7.widget.RecyclerView;
 import android.view.LayoutInflater;
 import android.view.View;
 import android.view.ViewGroup;
 import android.widget.ImageView;
 import android.widget.TextView;
 import android.widget.Toast;
 import java.util.ArrayList;
 public class CustomAdapter extends RecyclerView.Adapter {
 ArrayList personNames;
 ArrayList personImages;
 Context context;
 public CustomAdapter(Context context, ArrayList personNames, ArrayList personImages) {
 this.context = context;
 this.personNames = personNames;
 this.personImages = personImages;
 }
 @Override
 public MyViewHolder onCreateViewHolder(ViewGroup parent, int viewType) {
 // infalte the item Layout
 View v = LayoutInflater.from(parent.getContext()).inflate(R.layout.rowlayout, parent, false);
 // set the view's size, margins, paddings and layout parameters
 MyViewHolder vh = new MyViewHolder(v); // pass the view to View Holder
 return vh;
 }
 @Override
 public void onBindViewHolder(MyViewHolder holder, final int position) {
 // set the data in items
 holder.name.setText(personNames.get(position));
 holder.image.setImageResource(personImages.get(position));
 // implement setOnClickListener event on item view.
 holder.itemView.setOnClickListener(new View.OnClickListener() {
 @Override
 public void onClick(View view) {
 // display a toast with person name on item click
 Toast.makeText(context, personNames.get(position), Toast.LENGTH_SHORT).show();
 }
 });
 }
 @Override
 public int getItemCount() {
 return personNames.size();
 }
 public class MyViewHolder extends RecyclerView.ViewHolder {
 // init the item view's
 TextView name;
 ImageView image;
 public MyViewHolder(View itemView) {
 super(itemView);
 // get the reference of item view's
 name = (TextView) itemView.findViewById(R.id.name);
 image = (ImageView) itemView.findViewById(R.id.image);
 }
 }
 }
Output:
Now run the App and you will person name which can be scrolled in horizontal direction created using RecyclerView.
how can we include both horizontal and vertical views in same activity
@Override
public void onBindViewHolder(MyViewHolder holder, final int position) {
// set the data in items
holder.name.setText(personNames.get(position));
holder.image.setImageResource(personImages.get(position));
// implement setOnClickListener event on item view.
holder.itemView.setOnClickListener(new View.OnClickListener() {
@Override
public void onClick(View view) {
// display a toast with person name on item click
Toast.makeText(context, personNames.get(position), Toast.LENGTH_SHORT).show();
}
});
}
Method not working
Can you please download code and import it directly. It will work.
Use this line at your CustomAdapter.java
public class CustomAdapter extends RecyclerView.Adapter {
/*
*/
}
I’m following tutorials for a while. There is not much material for recyclerView out there. Very good explained in details. Just keep going that way, you’re awesome.
How to open other activity on click of item in RecyclerView list.
setonclick listner on the item and use intent
Sir, Material is pretty good, but i’m a fresher for testing purpose how can i download this source code.
The code is available just before the example. Download, extract and import in Android Studio