ViewPager Tutorial With Example In Android Studio [Step by Step]
ViewPager in Android is a class that allows the user to flip left and right through pages of data. This class provides the functionality to flip pages in app.
 It is a widget found in the support library. To use it you‘ll have to put the element inside your XML layout file that’ll contain multiple child views. It is similar to what a ListAdapter does for a ListView.
ViewPager is most often used along with fragment which is convenient way to manage the life cycle of each page. ViewPager class works with PagerAdapter which provides pages.
Basic ViewPager XML Code:
<android.support.v4.view.ViewPager
android:id="@+id/viewpager"
android:layout_width="match_parent"
android:layout_height="match_parent"
app:layout_behavior="@string/appbar_scrolling_view_behavior" />
Steps For Implementing ViewPager:
There are three important steps to implement ViewPager:
1.) A layout(that contains ViewPager) for the MainActivity.
2.) FragmentPagerAdapter/FragmentStatePagerAdapter class which controls the fragments to be shown on page swipes.
3.) Fragments to be shown on swiping the screen.
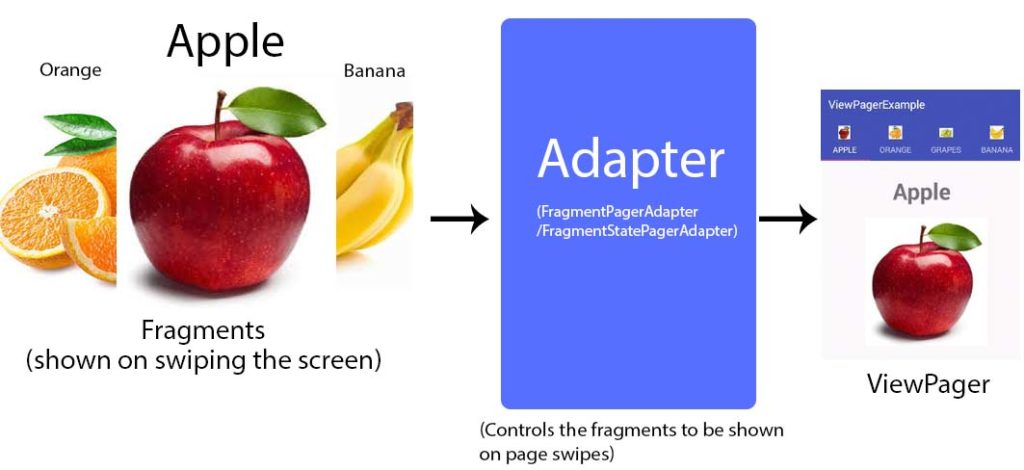
PagerAdapter In ViewPager:
There is a base class called PagerAdapter providing the adapter to populate pages inside of a ViewPager.
When you implement a PagerAdapter, you must override the following methods at minimum:
1. instantiateItem(ViewGroup, int): This method should create the page for the given position passed to it as an argument. We inflate() our layout resource to create the hierarchy of view objects and then set resource for the ImageView in it. Finally, the inflated view is added to the container (which should be the ViewPager) and return it as well.
public Object instantiateItem(ViewGroup container, int position) {
 View itemView = mLayoutInflater.inflate(R.layout.pager_item, container, false);

ImageView imageView = (ImageView) itemView.findViewById(R.id.imageView);
 imageView.setImageResource(mResources[position]);

container.addView(itemView);

return itemView;
 }
2. destroyItem(ViewGroup, int, Object): Removes the page from the container for the given position. We simply removed object using removeView but could’ve also used removeViewAt() by passing it the position.
 public void destroyItem(ViewGroup container, int position, Object object) {
   container.removeView((LinearLayout)object);
  }
3. getCount(): This method should return the number of views available, i.e., number of pages to be displayed/created in the ViewPager.
public int getCount() {
   return mResources.length;
 }
4. isViewFromObject(View, Object): The object returned by instantiateItem() is a key/identifier. This method checks whether the View passed to it (representing the page) is associated with that key or not. It is required by a PagerAdapter to function properly.
  public boolean isViewFromObject(View view, Object object) {
   return view == object;
  }
Implementation Of PagerAdapter:
PagerAdapter is responsible for creating the content of each page. You’ll most likely want to use one of the following two implementation of PagerAdapter:
Using FragmentPagerAdapter To Implement PagerAdapter:
1. Usually to display sliding fragments two methods of FragmentPagerAdapter are used, getCount() and getItem(). The first one returns the number of fragments to be displayed, and the second one is used to display the actual fragment & it should be used when we need to store the whole fragment in memory.
2. It is an implementation of PagerAdapter class that represents each page as Fragment that is persistently kept in the fragment manager as long as the user can return to the page, hence best to use when there’s a fixed small set of screens to be navigated through.
3. It works even better when the content of the fragments are static than something that constantly changes or gets updated.
4. When using FragmentPagerAdapter the host ViewPager must have a valid ID set. It stores the previous data which is fetched from the adapter. It stores the whole fragment in memory and could increase a memory overhead if large amount of fragments are used in the ViewPager.
FragmentPagerAdapter code:
class ViewPagerAdapter extends FragmentPagerAdapter {
    private final List mFragmentList = new ArrayList<>();
    private final List mFragmentTitleList = new ArrayList<>();

    public ViewPagerAdapter(FragmentManager manager)
      super(manager);
      }

      @Override
      public Fragment getItem(int position) {
      return mFragmentList.get(position);
      }

       @Override
       public int getCount() {
       return mFragmentList.size();
        }

        public void addFrag(Fragment fragment, String title) {
          mFragmentList.add(fragment);
          mFragmentTitleList.add(title);
        }

        @Override
        public CharSequence getPageTitle(int position) {
            return mFragmentTitleList.get(position);
        }
    }
Using FragmentStatePagerAdapter For Implementation Of PagerAdapter:
1. Each page is a fragment which gets destroyed as soon as it’s not visible to the user, i.e. keeping the saved state of that fragment. Due to this behavior it consumes much less memory .
2. It takes the new value from the adapter every-time it is executed. It only stores the savedInstanceState of fragments, and destroys all the fragments when they lose focus.
3. It should be used when we have to use dynamic fragments, like fragments with widgets, as their data could be stored in the savedInstanceState. Also it won’t affect the performance even if there are large number of fragments.
Important Note – In simple words, if your ViewPager is having few fixed number of Tabs say 3 or 4 use FragmentPagerAdapter. If it has more Tabs or endless number of Tabs then use FragmentStatePagerAdapter. ViewPager is mainly used for creating Sliding tabs.
PagerTitleStrip:
You can add PagerTitleStrip to ViewPager in layout xml file to display title for each page. PagerTitleStrip helps to identify previous, current and next pages of a viewpager. PagerTitleStrip displays next, current and previous page titles of view pager at top or bottom of the screen. PagerTitleStrip gets page title from view pager adapter.
The getPageTitle() method supplies a title to the page title strip that appears at the top of the screen.
@Override
public CharSequence getPageTitle(int position) {
return mFragmentTitleList.get(position); }
Optional you can also include this code in the activity_main.xml file:
<android.support.v4.view.PageTitleStrip
android:id="@+id/pager_title_strip
android:layout_width="match_parent"
android:layout_height="wrap_content"
android:layout_gravity="top:
android:background="#008080"
android:paddingBottom="4dp"
android:paddingTop="4dp"
android:textColor="#FFFFFF"
/>
ViewPager Example Using Fragments in Android Studio:
Example 1 – ViewPager With Fragment
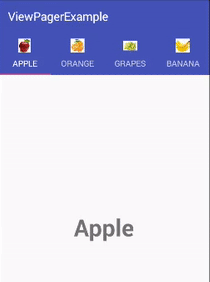
Below is the first example example of ViewPager in which we will learn how to create a simple ViewPager Tabs with four Fixed Tabs using FragmentPagerAdapter.
Below you can download code, see final output and step by step explanation of the basic Pull To refresh example.
 Step 1 : Create a new project and name it ViewPagerExample.
Step 2: Download four images, Apple, Orange, Banana and Grapes from the web. Now save those images in the drawable folder of your project.
Step 3: Open res -> layout ->activity_main.xml (or) main.xml and add following code:
In this step we add the code for using ViewPager with TabLayout having fixed tab.
<android.support.design.widget.CoordinatorLayout xmlns:android="http://schemas.android.com/apk/res/android"
 xmlns:app="http://schemas.android.com/apk/res-auto"
 android:layout_width="match_parent"
 android:layout_height="match_parent">

<android.support.design.widget.AppBarLayout
 android:layout_width="match_parent"
 android:layout_height="wrap_content"
 android:theme="@style/ThemeOverlay.AppCompat.Dark.ActionBar">

<android.support.v7.widget.Toolbar
 android:id="@+id/toolbar"
 android:layout_width="match_parent"
 android:layout_height="?attr/actionBarSize"
 android:background="?attr/colorPrimary"
 app:layout_scrollFlags="scroll|enterAlways"
 app:popupTheme="@style/ThemeOverlay.AppCompat.Light" />

<android.support.design.widget.TabLayout
 android:id="@+id/tabs"
 android:layout_width="match_parent"
 android:layout_height="wrap_content"
 app:tabMode="fixed"
 app:tabGravity="fill"/>
 </android.support.design.widget.AppBarLayout>

<android.support.v4.view.ViewPager
 android:id="@+id/viewpager"
 android:layout_width="match_parent"
 android:layout_height="match_parent"
 app:layout_behavior="@string/appbar_scrolling_view_behavior" />
 </android.support.design.widget.CoordinatorLayout>
Step 4: Open src -> package -> MainActivity.java and add the following code:
In this step we are using the following methods:
tabLayout.setupWithViewPager() – Assigns the ViewPager to TabLayout.
setupViewPager() – Defines the number of tabs by setting appropriate fragment and tab name.
ViewPagerAdapter – Custom adapter class provides fragments required for the ViewPager.
setupTabIcons(): added a method in which I have set all the tab icons.
package com.abhiandroid.viewpagerexample.myapplication;

import android.os.Bundle;
import android.support.design.widget.TabLayout;
import android.support.v4.app.Fragment;
import android.support.v4.app.FragmentManager;
import android.support.v4.app.FragmentPagerAdapter;
import android.support.v4.view.ViewPager;
import android.support.v7.app.AppCompatActivity;
import android.support.v7.widget.Toolbar;
import android.view.Menu;
import android.view.MenuItem;
import android.view.Window;
import android.view.WindowManager;

import java.util.ArrayList;
import java.util.List;


public class MainActivity extends AppCompatActivity {

    private TabLayout tabLayout;
    private ViewPager viewPager;
    private int[] tabIcons = {
            R.drawable.apple,
            R.drawable.orange,
            R.drawable.grapes,
            R.drawable.banana
    };

    @Override
    protected void onCreate(Bundle savedInstanceState) {
        super.onCreate(savedInstanceState);
        setContentView(R.layout.activity_main);
        Toolbar toolbar = (Toolbar) findViewById(R.id.toolbar);
        setSupportActionBar(toolbar);


        viewPager = (ViewPager) findViewById(R.id.viewpager);
        addTabs(viewPager);

        tabLayout = (TabLayout) findViewById(R.id.tabs);
        tabLayout.setupWithViewPager(viewPager);
        setupTabIcons();

    }
    private void setupTabIcons() {
        tabLayout.getTabAt(0).setIcon(tabIcons[0]);
        tabLayout.getTabAt(1).setIcon(tabIcons[1]);
        tabLayout.getTabAt(2).setIcon(tabIcons[2]);
       tabLayout.getTabAt(3).setIcon(tabIcons[3]);
    }
    private void addTabs(ViewPager viewPager) {
        ViewPagerAdapter adapter = new ViewPagerAdapter(getSupportFragmentManager());
        adapter.addFrag(new AppleFragment(), "APPLE");
        adapter.addFrag(new OrangeFragment(), "ORANGE");
        adapter.addFrag(new GrapesFragment(), "GRAPES");
        adapter.addFrag(new BananaFragment(), "Banana");
        viewPager.setAdapter(adapter);
    }

    class ViewPagerAdapter extends FragmentPagerAdapter {
        private final List<Fragment> mFragmentList = new ArrayList<>();
        private final List<String> mFragmentTitleList = new ArrayList<>();

        public ViewPagerAdapter(FragmentManager manager) {
            super(manager);
        }

        @Override
        public Fragment getItem(int position) {
            return mFragmentList.get(position);
        }

        @Override
        public int getCount() {
            return mFragmentList.size();
        }

        public void addFrag(Fragment fragment, String title) {
            mFragmentList.add(fragment);
            mFragmentTitleList.add(title);
        }

        @Override
        public CharSequence getPageTitle(int position) {
            return mFragmentTitleList.get(position);
        }
    }


}
Step 5: Now create 4 xml layouts by right clicking on res/layout -> New -> Layout Resource File and name them as fragment_apple.xml, fragment_orange.xml, fragment_grapes.xml and fragment_banana.xml and add the following code in respective files.
fragment_apple.xml:
<RelativeLayout xmlns:android="http://schemas.android.com/apk/res/android"
 xmlns:tools="http://schemas.android.com/tools"
 android:layout_width="match_parent"
 android:layout_height="match_parent">

<TextView
 android:layout_width="wrap_content"
 android:layout_height="wrap_content"
 android:text="Apple"
 android:textSize="40dp"
 android:textStyle="bold"
 android:layout_centerInParent="true"/>

</RelativeLayout>
fragment_orange.xml
<RelativeLayout xmlns:android="http://schemas.android.com/apk/res/android"
    xmlns:tools="http://schemas.android.com/tools"
    android:layout_width="match_parent"
    android:layout_height="match_parent"
    >

    <TextView
        android:layout_width="wrap_content"
        android:layout_height="wrap_content"
        android:text="Orange"
        android:textSize="40dp"
        android:textStyle="bold"
        android:layout_centerInParent="true"/>

</RelativeLayout>
fragment_grapes.xml
<RelativeLayout xmlns:android="http://schemas.android.com/apk/res/android"
    xmlns:tools="http://schemas.android.com/tools"
    android:layout_width="match_parent"
    android:layout_height="match_parent">

    <TextView
        android:layout_width="wrap_content"
        android:layout_height="wrap_content"
        android:text="Grapes"
        android:textSize="40dp"
        android:textStyle="bold"
        android:layout_centerInParent="true"/>

</RelativeLayout>
fragment_banana.xml
<RelativeLayout xmlns:android="http://schemas.android.com/apk/res/android"
    xmlns:tools="http://schemas.android.com/tools"
    android:layout_width="match_parent"
    android:layout_height="match_parent"
    >

    <TextView
        android:layout_width="wrap_content"
        android:layout_height="wrap_content"
        android:text="Banana"
        android:textSize="40dp"
        android:textStyle="bold"
        android:layout_centerInParent="true"/>

</RelativeLayout>
Step 6: Now we need 4 fragments, so we will create them one by one by right click on package folder and create classes and name them as AppleFragment, OrangeFragment, GrapesFragment and BananaFragment and add the following code respectively.
AppleFragment.java
package com.abhiandroid.viewpagerexample.myapplication;

 import android.os.Bundle;
 import android.support.v4.app.Fragment;
 import android.view.LayoutInflater;
 import android.view.View;
 import android.view.ViewGroup;

public class AppleFragment extends Fragment {

public AppleFragment() {
 // Required empty public constructor
 }

@Override
 public void onCreate(Bundle savedInstanceState) {
 super.onCreate(savedInstanceState);
 }

@Override
 public View onCreateView(LayoutInflater inflater, ViewGroup container,
 Bundle savedInstanceState) {
 // Inflate the layout for this fragment
 return inflater.inflate(R.layout.fragment_apple, container, false);
 }

}
OrangeFragment.java
package com.abhiandroid.viewpagerexample.myapplication;

import android.os.Bundle;
import android.support.v4.app.Fragment;
import android.view.LayoutInflater;
import android.view.View;
import android.view.ViewGroup;

public class OrangeFragment extends Fragment {

    public OrangeFragment() {
        // Required empty public constructor
    }

    @Override
    public void onCreate(Bundle savedInstanceState) {
        super.onCreate(savedInstanceState);
    }

    @Override
    public View onCreateView(LayoutInflater inflater, ViewGroup container,
                             Bundle savedInstanceState) {
        // Inflate the layout for this fragment
        return inflater.inflate(R.layout.fragment_orange, container, false);
    }

}
GrapesFragment.java
package com.abhiandroid.viewpagerexample.myapplication;

import android.os.Bundle;
import android.support.v4.app.Fragment;
import android.view.LayoutInflater;
import android.view.View;
import android.view.ViewGroup;

public class GrapesFragment extends Fragment {

    public GrapesFragment() {
        // Required empty public constructor
    }

    @Override
    public void onCreate(Bundle savedInstanceState) {
        super.onCreate(savedInstanceState);
    }

    @Override
    public View onCreateView(LayoutInflater inflater, ViewGroup container,
                             Bundle savedInstanceState) {
        // Inflate the layout for this fragment
        return inflater.inflate(R.layout.fragment_grapes, container, false);
    }
}
BananaFragment.java
package com.abhiandroid.viewpagerexample.myapplication;

import android.os.Bundle;
import android.support.v4.app.Fragment;
import android.view.LayoutInflater;
import android.view.View;
import android.view.ViewGroup;

public class BananaFragment extends Fragment {

    public BananaFragment() {
        // Required empty public constructor
    }

    @Override
    public void onCreate(Bundle savedInstanceState) {
        super.onCreate(savedInstanceState);
    }

    @Override
    public View onCreateView(LayoutInflater inflater, ViewGroup container,
                             Bundle savedInstanceState) {
        // Inflate the layout for this fragment
        return inflater.inflate(R.layout.fragment_banana, container, false);
    }
}
Output:
Now run the project and slide left to right or vice versa to see how ViewPager works.
ViewPager Example 2 In Android Studio:
Below is the example of ViewPager in Android. We are going to create an AppCompatActivity, add a ViewPager reference and a FragmentPagerAdapter that will help us to navigate between the Fragments. Then, we are going to make instances of Fragments that will be added in our Adapter. The Android ViewPager has default swipe-gestures from one “screen” to another.
Below you can download code, see final output and step by step explanation of the basic Pull To refresh example.
 Step 1: Create a new project and name it AndroidViewPagerExample.
Step 2: Download three images Apple,Orange and Grapes from the web. Now save those images in the drawable folder of your project.
Step 3: Now open res -> layout -> activity_main.xml and add following code:
Add a new xml file inside/res/layoutfolder, with name activity_main.xml. We should have the /res/layout/activity_main.xml file that consists of a LinearLayout with vertical orientation, that includes a ViewPager.
<?xml version="1.0" encoding="utf-8"?>
 <LinearLayout xmlns:android="http://schemas.android.com/apk/res/android"
 xmlns:custom="http://schemas.android.com/apk/res-auto"
 xmlns:tools="http://schemas.android.com/tools"
 android:layout_width="match_parent"
 android:layout_height="match_parent"
 android:layout_gravity="center"
 android:background="@drawable/backround_blue"
 android:orientation="vertical">

<android.support.v4.view.ViewPager
 android:id="@+id/pager"
 android:layout_width="match_parent"
 android:layout_height="match_parent"
 android:layout_gravity="center"
 tools:context=".MainActivity"/>

</LinearLayout>
Step 4: Add a new xml file inside/res/drawable, with name activity backround_blue.xml. It is for setting the background.
<?xml version="1.0" encoding="utf-8"?>
<shape xmlns:android="http://schemas.android.com/apk/res/android">
<gradient
    android:angle="90"
    android:endColor="#3124dc"
    android:startColor="#062539"
    android:type="linear" />
</shape>
Step 5: Now open app -> java -> package -> MainActivity.java and add the following code:
MainActivity.java
This is the Activity in which we are going to create a ViewPager instance and set its FragmentPagerAdapter. It is used to display sliding fragments. Two methods of FragmentPagerAdapter are used, getCount(returns the number of fragments to be displayed) and getItem(used to display the actual fragment).
package com.abhiandroid.viewpagerexample;

 import android.support.v4.app.FragmentManager;
 import android.support.v4.app.FragmentPagerAdapter;
 import android.os.Bundle;
 import android.support.v4.view.ViewPager;
 import android.support.v7.app.AppCompatActivity;

 import com.abhiandroid.viewpagerexample.myapplication1.R;

 public class MainActivity extends AppCompatActivity {

@Override
 protected void onCreate(Bundle savedInstanceState) {
 super.onCreate(savedInstanceState);
 setContentView(R.layout.activity_main);

 ViewPager pager = (ViewPager) findViewById(R.id.pager);
 pager.setAdapter(new MyPagerAdapter(getSupportFragmentManager()));
 }

 private class MyPagerAdapter extends FragmentPagerAdapter {

 public MyPagerAdapter(FragmentManager fm) {
 super(fm);
 }

@Override
 public android.support.v4.app.Fragment getItem(int pos) {
 switch (pos) {
 case 0:
 return FragmentViewPager.newInstance(getString(R.string.title_section1),    R.drawable.apple);
 case 1:
 return FragmentViewPager.newInstance(getString(R.string.title_section2), R.drawable.orange);
 case 2:
 return FragmentViewPager.newInstance(getString(R.string.title_section3), R.drawable.grapes);
 default:
 return FragmentViewPager.newInstance(getString(R.string.title_section1), R.drawable.apple);
 }
 }

@Override
 public int getCount() {
 return 3;
 }
 }
Step 6: Create the layout of the main FragmentViewPager
Add a new xml file inside /res/layout folder, with name fragment_main.xml. We should have the /res/layout/fragment_main.xml file
It is a simple layout xml for the FragmentViewPager.class, that consists of a LinearLayout with vertical orientation, that includes a TextView and an ImageView.
<LinearLayout xmlns:android="http://schemas.android.com/apk/res/android"
 xmlns:tools="http://schemas.android.com/tools"
 android:layout_width="match_parent"
 android:layout_height="match_parent"
 android:background="#00000000"
 android:orientation="vertical">

<TextView
 android:id="@+id/title"
 android:layout_width="wrap_content"
 android:layout_height="wrap_content"
 android:layout_gravity="center"
 android:layout_marginTop="44dp"
 android:textColor="#ffffff"
 android:textSize="60dp" />

<ImageView
 android:id="@+id/image"
 android:layout_width="wrap_content"
 android:layout_height="wrap_content"
 android:layout_gravity="center"
 android:layout_marginTop="44dp" />

</LinearLayout>
Step 7: Create the source code of the main FragmentViewPager support.v4.app.Fragment
FragmentViewPager.java
package com.abhiandroid.viewpagerexample;

/**
 * Created by abhiandroid
 */

import android.os.Bundle;
 import android.view.LayoutInflater;
 import android.view.View;
 import android.view.ViewGroup;
 import android.widget.ImageView;
 import android.widget.TextView;

import com.abhiandroid.viewpagerexample.myapplication1.R;

public class FragmentViewPager extends android.support.v4.app.Fragment {

@Override
 public View onCreateView(LayoutInflater inflater, ViewGroup container, Bundle savedInstanceState) {
 View v = inflater.inflate(R.layout.fragment_main, container, false);

TextView tv = (TextView) v.findViewById(R.id.title);
 tv.setText(getArguments().getString("text"));

ImageView imageView = (ImageView) v.findViewById(R.id.image);
 imageView.setBackgroundResource(getArguments().getInt("img"));

return v;
 }

public static FragmentViewPager newInstance(String text, int image) {

FragmentViewPager f = new FragmentViewPager();
 Bundle b = new Bundle();
 b.putString("text", text);
 b.putInt("img", image);

f.setArguments(b);

return f;
 }
 }
Output:
Now run the project and swipe from left to right or vice versa to see different fruit names and images on screen.
Premium Project Source Code:
- Food Ordering Android App Project Source Code
- Ecommerce Store Android App Project Source Code
- Convert Website Into Android App Project Source Code
- Quiz Game Android App Project Source Code
- Radio Streaming Android App Source Code
- City Guide Android App Project Source Code
- QR Barcode Android App Project Source Code