How To Create Calculator App In Android Studio: Step By Step Guide
Do you use calculator? Of Course you do in your regular life…
So why not create your own basic Calculator Android App in Android Studio and use it for doing those operations.
If you don’t know how to built then you are for treat as we are going to share how the App is created in Android. This is the one of simplest App you can create to understand Android basics.

In this Calculator App tutorial we are going use of multiple Android UI components to design and step by step developing a Basic Calculator application in Android Studio.
Topics Used For Creating Calculator App – Before following the below steps it is recommended you check out EditText, TextView, Button & Linear Layout topics. Also go through JAVA OOPS concept once.
How To Create Calculator App In Android Studio:
Below you can download code, see final output and step by step explanation of Calculator App in Android Studio.
[cp_modal id=”cp_id_e494e”] [/cp_modal]

Step 1: Firstly get the android studio downloaded in your system, then open it.
Step 2: Create a new project and name it Calculator.
Step 3: Open res -> layout -> activity_main.xml (or) main.xml. Here we are going to create the application interface like add layouts, Button , TextView and EditText.
i of Step 3 – Create a Linearlayout vertical, add a textview followed by two textfields Number(decimal) for writing numbers in it. Starting code of activity_main.xml
<?xml version="1.0" encoding="utf-8"?>
<LinearLayout xmlns:android="http://schemas.android.com/apk/res/android"
    xmlns:tools="http://schemas.android.com/tools"
    android:id="@+id/activity_main"
    android:layout_width="match_parent"
    android:layout_height="match_parent"
    android:paddingBottom="@dimen/activity_vertical_margin"
    android:paddingLeft="@dimen/activity_horizontal_margin"
    android:paddingRight="@dimen/activity_horizontal_margin"
    android:paddingTop="@dimen/activity_vertical_margin"
    tools:context="abhiandroid.com.calculater.MainActivity"
    android:orientation="vertical"
    android:gravity="top"
    android:textAlignment="center"
    android:background="@android:color/holo_blue_bright"
    android:weightSum="1">

    <TextView
        android:text="@string/enter_two_numbers"
        android:layout_width="match_parent"
        android:id="@+id/textView"
        android:layout_height="30dp"
        android:gravity="center_horizontal"
        android:textColorLink="?android:attr/editTextColor"
        tools:textStyle="bold|italic"
        android:textStyle="bold|italic"
        android:fontFamily="serif"
        android:visibility="visible"
        android:textSize="24sp"
        android:layout_weight="0.07" />

    <EditText
        android:layout_width="match_parent"
        android:layout_height="wrap_content"
        android:inputType="number"
        android:ems="10"
        android:id="@+id/editOp1"
        android:textSize="18sp"
        android:gravity="center_horizontal"
        android:layout_marginBottom="5dp"
        android:visibility="visible" />

   <EditText
        android:layout_width="match_parent"
        android:layout_height="wrap_content"
        android:inputType="number"
        android:ems="10"
        android:id="@+id/editOp2"
        android:textSize="18sp"
        android:gravity="center_horizontal"
        android:elevation="1dp" />
</LinearLayout>
The UI will currently look like this:

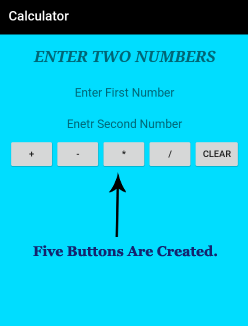
ii of Step 3 – Then before closing the above layout define another layout as Linearlayout horizontal, add five button ( +, -, *, / and Clear) define their properties like id , width, height etc. in it and close the linearlayout.

Following code of activity_main.xml . This code will be inserted in main layout:
   <LinearLayout
        android:orientation="horizontal"
        android:layout_width="match_parent"
        android:layout_height="wrap_content">

        <Button
            android:text="+"
            android:layout_width="78dp"
            android:layout_height="wrap_content"
            android:id="@+id/btnadd"
            android:layout_weight="0.03" />

        <Button
            android:text="-"
            android:layout_width="78dp"
            android:layout_height="wrap_content"
            android:id="@+id/btnsub"
            android:layout_weight="0.03" />

        <Button
            android:text="*"
            android:layout_width="78dp"
            android:layout_height="wrap_content"
            android:id="@+id/btnmul"
            android:layout_weight="0.03"/>

        <Button
            android:text="/"
            android:layout_height="wrap_content"
            android:id="@+id/btndiv"
            android:layout_width="78dp"
            android:layout_weight="0.03" />

        <Button
            android:text="Clear"
            android:layout_width="80dp"
            android:layout_height="wrap_content"
            android:id="@+id/btnclr"
            android:layout_weight="0.03" />
</LinearLayout>
The UI will now look like this:
iii of Step 3 – Further in continuation with previous linearlayout add a textview, textfield(Number) for displaying result which makes the interface complete.
The complete interface code of activity_main.xml:
<?xml version="1.0" encoding="utf-8"?>
<LinearLayout xmlns:android="http://schemas.android.com/apk/res/android"
    xmlns:tools="http://schemas.android.com/tools"
    android:id="@+id/activity_main"
    android:layout_width="match_parent"
    android:layout_height="match_parent"
    android:paddingBottom="@dimen/activity_vertical_margin"
    android:paddingLeft="@dimen/activity_horizontal_margin"
    android:paddingRight="@dimen/activity_horizontal_margin"
    android:paddingTop="@dimen/activity_vertical_margin"
    tools:context="abhiandroid.com.calculater.MainActivity"
    android:orientation="vertical"
    android:gravity="top"
    android:textAlignment="center"
    android:background="@android:color/holo_blue_bright"
    android:weightSum="1">

    <TextView
        android:text="@string/enter_two_numbers"
        android:layout_width="match_parent"
        android:id="@+id/textView"
        android:layout_height="30dp"
        android:gravity="center_horizontal"
        android:textColorLink="?android:attr/editTextColor"
        tools:textStyle="bold|italic"
        android:textStyle="bold|italic"
        android:fontFamily="serif"
        android:visibility="visible"
        android:textSize="24sp"
        android:layout_weight="0.07" />

    <EditText
        android:layout_width="match_parent"
        android:layout_height="wrap_content"
        android:inputType="number"
        android:ems="10"
        android:id="@+id/editOp1"
        android:textSize="18sp"
        android:gravity="center_horizontal"
        android:layout_marginBottom="5dp"
        android:visibility="visible" />

   <EditText
        android:layout_width="match_parent"
        android:layout_height="wrap_content"
        android:inputType="number"
        android:ems="10"
        android:id="@+id/editOp2"
        android:textSize="18sp"
        android:gravity="center_horizontal"
        android:elevation="1dp" />

    <LinearLayout
        android:orientation="horizontal"
        android:layout_width="match_parent"
        android:layout_height="wrap_content">

        <Button
            android:text="+"
            android:layout_width="78dp"
            android:layout_height="wrap_content"
            android:id="@+id/btnadd"
            android:layout_weight="0.03" />

        <Button
            android:text="-"
            android:layout_width="78dp"
            android:layout_height="wrap_content"
            android:id="@+id/btnsub"
            android:layout_weight="0.03" />

        <Button
            android:text="*"
            android:layout_width="78dp"
            android:layout_height="wrap_content"
            android:id="@+id/btnmul"
            android:layout_weight="0.03"/>

        <Button
            android:text="/"
            android:layout_height="wrap_content"
            android:id="@+id/btndiv"
            android:layout_width="78dp"
            android:layout_weight="0.03" />

        <Button
            android:text="Clear"
            android:layout_width="80dp"
            android:layout_height="wrap_content"
            android:id="@+id/btnclr"
            android:layout_weight="0.03" />
    </LinearLayout>

    <TextView
        android:text="@string/result"
        android:layout_width="332dp"
        android:id="@+id/textView1"
        android:layout_marginTop="10dp"
        android:layout_height="50dp"
        android:gravity="center_horizontal"
        android:textColorLink="?android:attr/editTextColor"
        tools:textStyle="bold|italic"
        android:textStyle="bold|italic"
        android:fontFamily="serif"
        android:visibility="visible"
        android:textSize="30sp" />

    <EditText
        android:layout_width="match_parent"
        android:layout_height="wrap_content"
        android:inputType="number"
        android:ems="10"
        android:id="@+id/result"
        android:textSize="18sp"
        android:text="0.00"
        android:gravity="center_horizontal" />
</LinearLayout>
So now we have designed the complete UI of the Calculator App.
Step 4: Open src -> package -> MainActivity.java. The interface part of the application is over, let’s focus on adding functionality to the application. This calculator app basically perform five operations i.e addition, subtraction, multiplication, division and reset. So for that we need to define these operation over button click. For that we use setOnClickListener() function.
parseDouble() is used to convert String value to double. By default the value is String and we need to convert it into Double to perform operation over it.
If person doesn’t enter the value and directly click on the any button then a Toast message will appear on the screen telling user to enter the required numbers.
package abhiandroid.com.calculater;

import android.support.v7.app.AppCompatActivity;
import android.os.Bundle;
import android.view.View;
import android.widget.Button;
import android.widget.EditText;
import android.widget.TextView;
import android.widget.Toast;

public class MainActivity extends AppCompatActivity {
    private EditText opr1;
    private EditText opr2;
    private Button btnadd;
    private  Button btnsub;
    private  Button btnmul;
    private Button btndiv;
    private Button btnclr;
    private TextView txtresult;

    @Override
    protected void onCreate(Bundle savedInstanceState) {
        super.onCreate(savedInstanceState);
        setContentView(R.layout.activity_main);
        opr1 = (EditText) findViewById(R.id.editOp1);
        opr2 = (EditText) findViewById(R.id.editOp2);
        btnadd = (Button) findViewById(R.id.btnadd);
        btnsub = (Button) findViewById(R.id.btnsub);
        btnmul = (Button) findViewById(R.id.btnmul);
        btndiv = (Button) findViewById(R.id.btndiv);
        btnclr = (Button) findViewById(R.id.btnclr);
        txtresult= (TextView) findViewById(R.id.result);
 // Addition
        btnadd.setOnClickListener(new View.OnClickListener() {
            @Override
            public void onClick(View v) {
                if((opr1.getText().length()>0) && (opr2.getText().length()>0))
                {
                    double oper1 = Double.parseDouble(opr1.getText().toString());
                    double oper2 = Double.parseDouble(opr2.getText().toString());
                    double result = oper1 + oper2;
                    txtresult.setText(Double.toString(result));
                }
                else{
                    Toast toast= Toast.makeText(MainActivity.this,"Enter The Required Numbers",Toast.LENGTH_LONG);
                    toast.show();
                }
            }
        });
  //Subtraction
        btnsub.setOnClickListener(new View.OnClickListener() {
            @Override
            public void onClick(View v) {
                if((opr1.getText().length()>0) && (opr2.getText().length()>0))
                {
                    double oper1 = Double.parseDouble(opr1.getText().toString());
                    double oper2 = Double.parseDouble(opr2.getText().toString());
                    double result = oper1 - oper2;
                    txtresult.setText(Double.toString(result));
                }
                else{
                    Toast toast= Toast.makeText(MainActivity.this,"Enter The Required Numbers",Toast.LENGTH_LONG);
                    toast.show();
                }

            }
        });
 // Multiplication
        btnmul.setOnClickListener(new View.OnClickListener() {
            @Override
            public void onClick(View v) {
                if((opr1.getText().length()>0) && (opr2.getText().length()>0))
                {
                    double oper1 = Double.parseDouble(opr1.getText().toString());
                    double oper2 = Double.parseDouble(opr2.getText().toString());
                    double result = oper1 * oper2;
                    txtresult.setText(Double.toString(result));
                }
                else{
                    Toast toast= Toast.makeText(MainActivity.this,"Enter The Required Numbers",Toast.LENGTH_LONG);
                    toast.show();
                }
            }
        });
 // Division
        btndiv.setOnClickListener(new View.OnClickListener() {
            @Override
            public void onClick(View v) {
                if((opr1.getText().length()>0) && (opr2.getText().length()>0))
                {
                    double oper1 = Double.parseDouble(opr1.getText().toString());
                    double oper2 = Double.parseDouble(opr2.getText().toString());
                    double result = oper1 / oper2;
                    txtresult.setText(Double.toString(result));
                }
                else{
                    Toast toast= Toast.makeText(MainActivity.this,"Enter The Required Numbers",Toast.LENGTH_LONG);
                    toast.show();
                }
            }
        });
// Reset Feilds
        btnclr.setOnClickListener(new View.OnClickListener() {
            @Override
            public void onClick(View v) {
                opr1.setText("");
                opr2.setText("");
                txtresult.setText("0.00");
                opr1.requestFocus();
            }
        });

    }
}
OUTPUT:
Now run the App and you will see the basic calculator App. Enter any number and do the operations.
The error is shown in @dimen/activity/…” please advise
dpjindal@gmail.com
create dimens.xml file under value folder
then copy this code:
16dp
16dp
This calculator tutorial really helped me begin to make the transition to android studio. I understood much better layouts, buttons, text views, edit texst, strings, activity_main.xml and ActivityMain.java. Keep up the great work! Thanks.
A very big thank you for this tutorial so explanatory…
Can the below be used in a public function and then called in else {} statements ?
Toast toast= Toast.makeText(MainActivity.this,”Enter The Required Numbers”,Toast.LENGTH_LONG);
toast.show();
How would the function look like ?
What to do to keep the number right?
I want to created a quiz app I don’t know how to go about in doing that. Any help please.
Good Material