TextInputLayout / Floating Labels In EditText With Example In Android Studio
TextInputLayout is a new element introduced in Design Support library to display the floating label in EditText. To display floating label in EditText, TextInputLayout needs to wrapped the EditText. We can also display the error message to EditText by using setError() and setErrorEnabled() methods. It takes the value of hint assigned to EditText and displays it as floating label. Android Design Support Library introduced some important new widgets that helps us to create consistent UI.

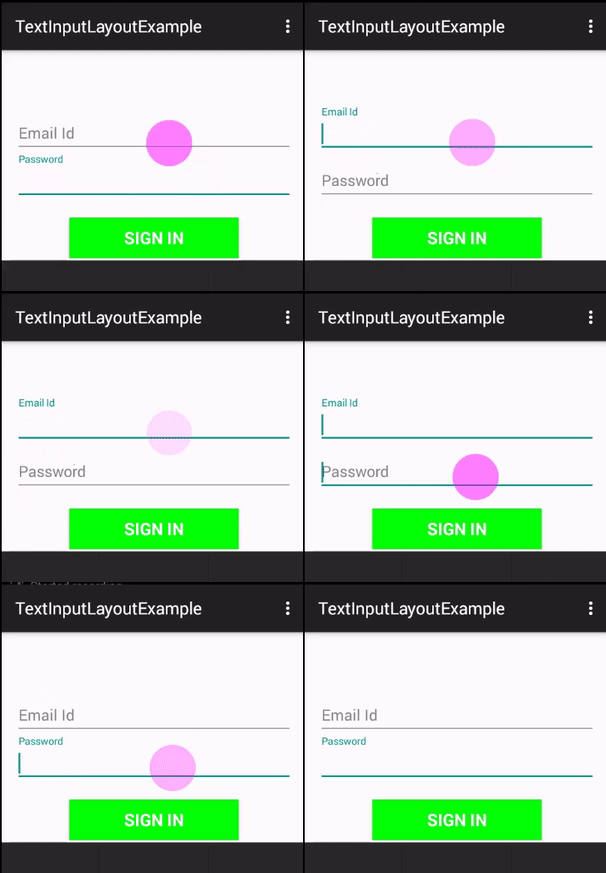
Floating Labels: Floating labels first introduced in Android design support library to display floating label over EditText. Firstly it acts as hint in the EditText when the field is empty. After that when a user start inputting the text it starts animating by moving to floating label position.
Special Note: In Android, one of the most basic UI element or widgets is an EditText. It is generally used to take the any kind of input from the user but what it lacks was a label attached to it. Therefore in most of the implementations hint was used as a label for the EditText. From the time material design was released, a new concept of floating labels was introduced. In this concept initially showed a label as a hint and when a user enters a value in the EditText that hint moves on to the top of the EditText as a floating label.
Table Of Contents
Basic TextInputLayout XML Code:
<android.support.design.widget.TextInputLayout
android:id="@+id/simpleTextInputLayout"
android:layout_width="wrap_content"
android:layout_height="wrap_content">

<EditText
android:id="@+id/simpleEditText"
android:layout_width="wrap_content"
android:layout_height="wrap_content"
android:hint="Enter Your Name" />
</android.support.design.widget.TextInputLayout>
Important Methods Of TextInputLayout:
Let’s we discuss some important methods of TextInputLayout that may be called in order to manage the TextInputLayout.
1. setError(CharSequenceerror): This method is used to set an error message that will be displayed below our EditText. In this method we set CharSequence value for error message.
Below we set the error message that will be displayed below our EditText.
TextInputLayout simpleTextInputLayout = (TextInputLayout) findViewById(R.id.simpleTextInputLayout); // get the reference of TextInputLayout
simpleTextInputLayout.setError("Please Check Field"); // set the error message that will be displayed below our EditText
2. getError(): This method is used for getting the error message that was set to be displayed using setError(CharSequence). It returns null if no error was set or error displaying is not enabled. This method returns CharSequence type value.
Below we firstly set the error and then get the error message that was set to be displayed using setError(CharSequence) method.
TextInputLayout simpleTextInputLayout = (TextInputLayout) findViewById(R.id.simpleTextInputLayout); // get the reference of TextInputLayout
simpleTextInputLayout.setError("Please Check Field"); // set the error message that will be displayed below our EditText
CharSequence errorMessage=simpleTextInputLayout.getError(); // get the error message that was set to be displayed using setError(CharSequence) method.
3. setErrorEnabled(boolean enabled): This method is used to set whether the error functionality is enabled or not in this layout. We set true for enabled and false for disabled error functionality.
Below we set the true value that enabled the error functionality.
TextInputLayout simpleTextInputLayout = (TextInputLayout) findViewById(R.id.simpleTextInputLayout); // get the reference of TextInputLayout
simpleTextInputLayout.setErrorEnabled(true); // set the true value that enabled the error functionality
4. isErrorEnabled(): This method is used to check whether the error functionality is enabled or not in this layout. This method returns Boolean type value which we set using setErrorEnabled (boolean enabled) method.
Below we firstly enabled the error functionality and then check whether the error functionality is enabled or not.
TextInputLayout simpleTextInputLayout = (TextInputLayout) findViewById(R.id.simpleTextInputLayout); // get the reference of TextInputLayout
simpleTextInputLayout.setErrorEnabled(true); // set the true value that enabled the error functionality
Boolean isEnabled = simpleTextInputLayout.isErrorEnabled(); // check whether the error functionality is enabled or not
5. setHint(CharSequence hint): This method is used to set the hint to be displayed in the floating label, if enabled. In this method we set CharSequence value for displaying hint.
Below we set the hint to be displayed in the floating label.
TextInputLayout simpleTextInputLayout = (TextInputLayout) findViewById(R.id.simpleTextInputLayout); // get the reference of TextInputLayout
simpleTextInputLayout.setHint("Enter UserName"); // set the hint to be displayed in the floating label.
6. getHint(): This method is used to get the hint which is displayed in the floating label, if enabled. This method returns CharSequence type value.
Below we set the hint and then get the hint which is displayed in the floating label
TextInputLayout simpleTextInputLayout = (TextInputLayout) findViewById(R.id.simpleTextInputLayout); // get the reference of TextInputLayout
simpleTextInputLayout.setHint("Enter UserName"); // set the hint to be displayed in the floating label.
CharSequence hintValue = simpleTextInputLayout.getHint(); // get the hint which is displayed in the floating label
7. setCounterMaxLength(int maxLength): This method is used to set the max length value to display at the character counter. In this method we pass int type value for setting max length value.
Below we set the max length value to display at the character counter.
TextInputLayout simpleTextInputLayout = (TextInputLayout) findViewById(R.id.simpleTextInputLayout); // get the reference of TextInputLayout
simpleTextInputLayout.setCounterMaxLength(10); // set 10 max length value to display at the character counter
8. getCounterMaxLength(): This method is used for getting the max length shown at the character counter. This method returns int type value which we set through setCounterMaxLength(int maxLength) method.
Below we firstly set the max length value and then get the max length value that shown at the character counter.
TextInputLayout simpleTextInputLayout = (TextInputLayout) findViewById(R.id.simpleTextInputLayout); // get the reference of TextInputLayout
simpleTextInputLayout.setCounterMaxLength(10); // set 10 max length value to display at the character counter
int maxLengthValue= simpleTextInputLayout.getCounterMaxLength(); // get the max length value that shown at the character counter.
9. setCounterEnabled(boolean enabled): This method is used to set whether the character counter functionality is enabled or not in this layout. . We set true for enabled and false for disabled the counter functionality.
Below we set the true value that enabled the counter functionality in this layout.
TextInputLayout simpleTextInputLayout = (TextInputLayout) findViewById(R.id.simpleTextInputLayout); // get the reference of TextInputLayout
simpleTextInputLayout.setCounterEnabled(true); // set the true value that enabled the counter functionality in this layout
10. setTypeface(Typeface typeface): This method is used to set the typeface to use for both the expanded and floating hint.
Below we set Sans – Serif typeface to use for the expanded and floating hint.
TextInputLayout simpleTextInputLayout = (TextInputLayout) findViewById(R.id.simpleTextInputLayout); // get the reference of TextInputLayout
simpleTextInputLayout.setTypeface(Typeface.SANS_SERIF); // set Sans - Serif typeface to use for the expanded and floating hint.
11. getTypeface(): This method is used for getting the typeface used for both the expanded and floating hint. This method returns Typeface type value which we set using setTypeface(Typeface typeface) method.
Below we firstly we set Sans – Serif typeface and then get the typeface used for both the expanded and floating hint.
TextInputLayout simpleTextInputLayout = (TextInputLayout) findViewById(R.id.simpleTextInputLayout); // get the reference of TextInputLayout
simpleTextInputLayout.setTypeface(Typeface.SANS_SERIF); // set Sans - Serif typeface to use for the expanded and floating hint.
Typeface typeface = simpleTextInputLayout.getTypeface(); // get the typeface used for both the expanded and floating hint.
Attributes of TextInputLayouts:
Now let’s we discuss some common attributes of a TextInputLayout that helps us to configure it in our layout (xml).
1. support.design:counterMaxLength: This attribute is used to set the max length to display in the character counter. In this attribute we set int type value for setting max length value. We can also do this programmatically using setCounterMaxLength(int maxLength) method.
Below we set the max length value to display at the character counter.
<android.support.design.widget.TextInputLayout
android:id="@+id/simpleTextInputLayout"
android:layout_width="match_parent"
android:layout_height="wrap_content"
android.support.design:counterMaxLength="10">

<EditText
android:id="@+id/simpleEditText"
android:layout_width="match_parent"
android:layout_height="wrap_content"
android:hint="Enter Your Name" />
</android.support.design.widget.TextInputLayout>

<!--   we set the max length value to display at the character counter -->
2. support.design:counterEnabled: This attribute is used to set whether the character counter functionality is enabled or not in this layout. We set true for enabled and false for disabled the counter functionality. We can also do this programmatically using setCounterEnabled(boolean enabled) method.
Below we set the true value that enabled the counter functionality in this layout.
<android.support.design.widget.TextInputLayout
android:id="@+id/simpleTextInputLayout"
android:layout_width="match_parent"
android:layout_height="wrap_content"
android.support.design:counterEnabled="true"
android.support.design:counterMaxLength="10">

<EditText
android:id="@+id/simpleEditText"
android:layout_width="match_parent"
android:layout_height="wrap_content"
android:hint="Enter Your Name" />
</android.support.design.widget.TextInputLayout>
<!-- set the true value that enabled the counter functionality in this layout-->
3. support.design:errorEnabled: This attribute is used to set whether the error functionality is enabled or not in this layout. We set true for enabled and false for disabled error functionality. We can also do this programmatically using setErrorEnabled(boolean enabled) method.
Below we set the true value that enabled the error functionality.
<android.support.design.widget.TextInputLayout
android:id="@+id/simpleTextInputLayout"
android:layout_width="match_parent"
android:layout_height="wrap_content"
android.support.design:counterEnabled="true"
android.support.design:errorEnabled="true">

<EditText
android:id="@+id/simpleEditText"
android:layout_width="match_parent"
android:layout_height="wrap_content"
android:hint="Enter Your Name" />
</android.support.design.widget.TextInputLayout>
<!-- set the true value that enabled the error functionality in this layout-->
4. android:hint: This attribute is used to set the hint to be displayed in the floating label. We can also set hint programmatically using setHint(CharSequence hint) method.
Below we set the hint to be displayed in the floating label.
<android.support.design.widget.TextInputLayout
android:id="@+id/simpleTextInputLayout"
android:layout_width="match_parent"
android:layout_height="wrap_content"
android:hint="User Name">

<EditText
android:id="@+id/simpleEditText"
android:layout_width="match_parent"
android:layout_height="wrap_content" />
</android.support.design.widget.TextInputLayout>
<!-- set the hint to be displayed in the floating label-->
TextInputLayout/ Floating Labels In EditText Example In Android Studio:
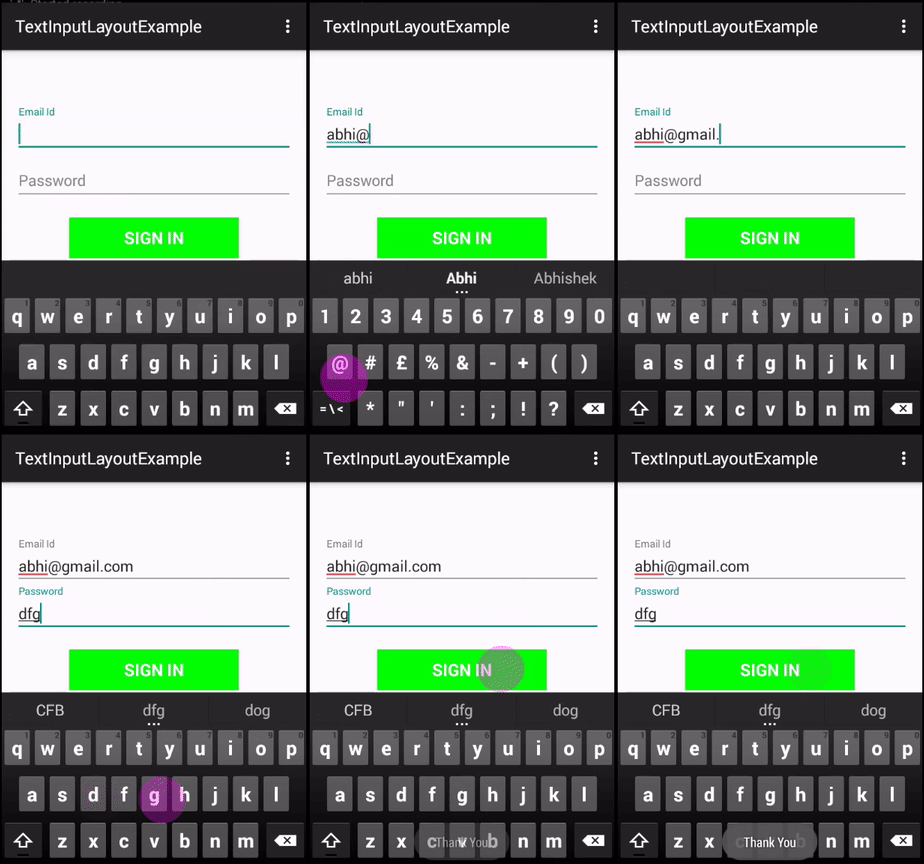
Below is the example to show the usage of TextInputLayout where we create a login form with floating labels, input validations and error messages enabled. In this we also display a Sign In Button and perform click event on it so whenever a user click on Button we check the Fields and if a field is empty we display the error message otherwise we display “Thank You” message by using a Toast.

Step 1: Create a new project and name it TextInputLayoutExample
Step 2: Open Gradle Scripts > build.gradle and add Design support library dependency.
apply plugin: 'com.android.application'

android {
compileSdkVersion 23
buildToolsVersion "23.0.2"

defaultConfig {
applicationId "example.abhiandroid.textinputlayoutexample"
minSdkVersion 15
targetSdkVersion 23
versionCode 1
versionName "1.0"
}
buildTypes {
release {
minifyEnabled false
proguardFiles getDefaultProguardFile('proguard-android.txt'), 'proguard-rules.pro'
}
}
}

dependencies {
compile fileTree(dir: 'libs', include: ['*.jar'])
compile 'com.android.support:appcompat-v7:23.1.1'
compile 'com.android.support:design:23.1.0' // design support library

}
Step 3: Open res -> layout -> activity_main.xml (or) main.xml and add following code:
<LinearLayout xmlns:android="http://schemas.android.com/apk/res/android"
xmlns:android.support.design="http://schemas.android.com/apk/res-auto"
xmlns:tools="http://schemas.android.com/tools"
android:layout_width="match_parent"
android:layout_height="match_parent"
android:orientation="vertical"
android:paddingBottom="@dimen/activity_vertical_margin"
android:paddingLeft="@dimen/activity_horizontal_margin"
android:paddingRight="@dimen/activity_horizontal_margin"
android:paddingTop="@dimen/activity_vertical_margin"
tools:context=".MainActivity">
<!-- first TextInputLayout -->
<android.support.design.widget.TextInputLayout
android:id="@+id/emailTextInputLayout"
android:layout_width="match_parent"
android:layout_height="wrap_content"
android:layout_marginTop="50dp"
android.support.design:counterMaxLength="3">

<EditText
android:id="@+id/emailEditText"
android:layout_width="match_parent"
android:layout_height="wrap_content"
android:hint="Email Id" />
</android.support.design.widget.TextInputLayout>
<!-- first TextInputLayout -->

<android.support.design.widget.TextInputLayout
android:id="@+id/passwordTextInputLayout"
android:layout_width="match_parent"
android:layout_height="wrap_content"
android:hint="Password">

<EditText
android:id="@+id/passwordEditText"
android:layout_width="match_parent"
android:layout_height="wrap_content" />
</android.support.design.widget.TextInputLayout>
<!-- sign In Button -->
<Button
android:id="@+id/signInButton"
android:layout_width="200dp"
android:layout_height="wrap_content"
android:layout_gravity="center"
android:layout_marginTop="20dp"
android:background="#0f0"
android:text="Sign In"
android:textColor="#FFF"
android:textSize="20sp"
android:textStyle="bold" />
</LinearLayout>
Step 4: Open src -> package -> MainActivity.java
In this step we open MainActivity and add the code for initiate the views (TextInputLayout and other views). After that we perform click event on Button so whenever a user click on Button we check the Fields and if a field is empty we display the error message otherwise we display “Thank You” message by using a Toast.
package example.abhiandroid.textinputlayoutexample;

import android.graphics.Typeface;
import android.support.design.widget.TextInputLayout;
import android.support.v7.app.AppCompatActivity;
import android.os.Bundle;
import android.view.View;
import android.widget.EditText;
import android.widget.Button;
import android.widget.Toast;

public class MainActivity extends AppCompatActivity {

TextInputLayout emailTextInputLayout, passwordTextInputLayout;
EditText email, password;
Button signIn;

@Override
protected void onCreate(Bundle savedInstanceState) {
super.onCreate(savedInstanceState);
setContentView(R.layout.activity_main);
// get the reference of View's
emailTextInputLayout = (TextInputLayout) findViewById(R.id.emailTextInputLayout);
passwordTextInputLayout = (TextInputLayout) findViewById(R.id.passwordTextInputLayout);
email = (EditText) findViewById(R.id.emailEditText);
password = (EditText) findViewById(R.id.passwordEditText);
signIn = (Button) findViewById(R.id.signInButton);
// perform click event on sign In Button
signIn.setOnClickListener(new View.OnClickListener() {
@Override
public void onClick(View v) {
if (validate(email, emailTextInputLayout) && validate(password, passwordTextInputLayout)) {
//  display a Thank You message
Toast.makeText(getApplicationContext(), "Thank You", Toast.LENGTH_LONG).show();

}
}
});
}

// validate fields
private boolean validate(EditText editText, TextInputLayout textInputLayout) {
if (editText.getText().toString().trim().length() > 0) {
return true;
}
editText.requestFocus(); // set focus on fields
textInputLayout.setError("Please Fill This.!!!"); // set error message
return false;
}
}
Output:
Now run the app and you will see login form on the screen. Click on email & password and you will see label text is Floating which looks beautiful.

Premium Project Source Code:
- Food Ordering Android App Project Source Code
- Ecommerce Store Android App Project Source Code
- Convert Website Into Android App Project Source Code
- Quiz Game Android App Project Source Code
- Radio Streaming Android App Source Code
- City Guide Android App Project Source Code
- QR Barcode Android App Project Source Code