EditText Tutorial With Example In Android Studio: Input Field
In Android, EditText is a standard entry widget in android apps. It is an overlay over TextView that configures itself to be editable. EditText is a subclass of TextView with text editing operations. We often use EditText in our applications in order to provide an input or text field, especially in forms. The most simple example of EditText is Login or Sign-in form.
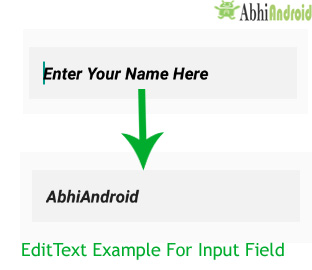
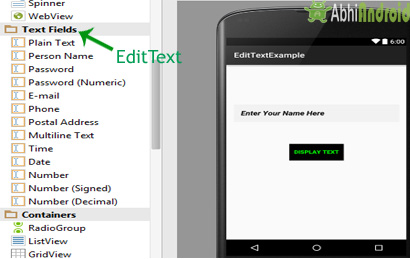
Table Of Contents
EditText Code:
We can create a EditText instance by declaring it inside a layout(XML file) or by instantiating it programmatically (i.e. in Java Class).
EditText code in XML:
<EditText
android:id="@+id/simpleEditText"
android:layout_height="wrap_content"
android:layout_width="match_parent"/>
Retrieving / Getting the Value From EditText In Java Class:
Below is the example code of EditText in which we retrieve the value from a EditText in Java class. We have used this code in the example you will find at the end of this post.
EditText simpleEditText = (EditText) findViewById(R.id.simpleEditText);
String editTextValue = simpleEditText.getText().toString();
Attributes of EditText:
Now let’s we discuss few attributes that helps us to configure a EditText in your xml.
1. id: id is an attribute used to uniquely identify a text EditText. Below is the example code in which we set the id of a edit text.
<EditText
android:id="@+id/simpleEditText"
android:layout_height="wrap_content"
android:layout_width="match_parent"/>
2. gravity: The gravity attribute is an optional attribute which is used to control the alignment of the text like left, right, center, top, bottom, center_vertical, center_horizontal etc.
Below is the example code with explanation included in which we set the right gravity for text of a EditText.
<EditText
    android:id="@+id/simpleEditText"
    android:layout_width="fill_parent"
    android:layout_height="wrap_content"
    android:text="Enter Email"
    android:gravity="right"/><!--gravity of a edit text-->

Below is the example code in which we set the text “Username” in a edit text.
<EditText
    android:id="@+id/simpleEditText"
    android:layout_width="fill_parent"
    android:layout_height="wrap_content"
    android:layout_centerInParent="true"
    android:text="Username"/><!--set text in edit text-->
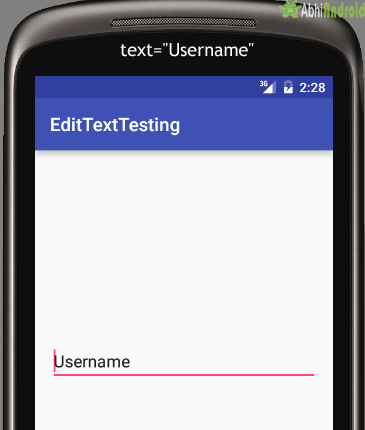
Below is the example code in which we set the text in a text view programmatically means in java class.
EditText editText = (EditText)findViewById(R.id.simpleEditText);
editText.setText("Username");//set the text in edit text
4. hint: hint is an attribute used to set the hint i.e. what you want user to enter in this edit text. Whenever user start to type in edit text the hint will automatically disappear.
Below is the example code with explanation in which we set the hint of a edit text.
<EditText
    android:id="@+id/simpleEditText"
    android:layout_width="fill_parent"
    android:layout_height="wrap_content"
    android:layout_centerInParent="true"
    android:hint="Enter Your Name Here" /><!--display the hint-->
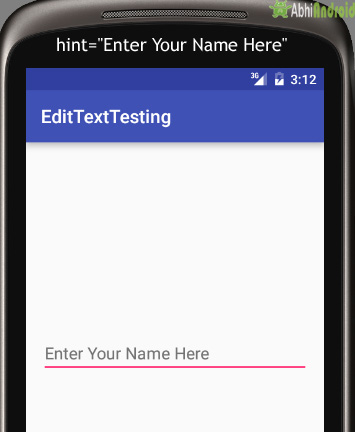
Below is the example code in which we set the text in a text view programmatically means in java class.
EditText editText = (EditText)findViewById(R.id.simpleEditText);
editText.setHint("Enter Your Name Here");//display the hint
5. textColor: textColor attribute is used to set the text color of a text edit text. Color value is in the form of “#argb”, “#rgb”, “#rrggbb”, or “#aarrggbb”.
Below is the example code with explanation included in which we set the red color for the displayed text of a edit text.
<EditText
    android:id="@+id/simpleEditText"
    android:layout_width="fill_parent"
    android:layout_height="wrap_content"
    android:layout_centerInParent="true"
    android:text="Password"
    android:textColor="#f00"/><!--set the red text color-->
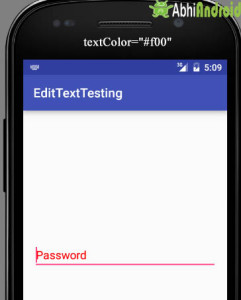
Below is the example code in which we set the text color of a edit text programmatically means in java class.
EditText simpleEditText=(EditText)findViewById(R.id.simpleEditText);
simpleEditText.setTextColor(Color.RED);//set the red text color
6. textColorHint: textColorHint is an attribute used to set the color of displayed hint.
Below is the example code with explanation included in which we set the green color for displayed hint of a edit text.
<EditText
    android:id="@+id/simpleEditText"
    android:layout_width="fill_parent"
    android:layout_height="wrap_content"
    android:layout_centerInParent="true"
    android:hint="Enter Your Name Here"
    android:textColorHint="#0f0"/><!--set the hint color green-->
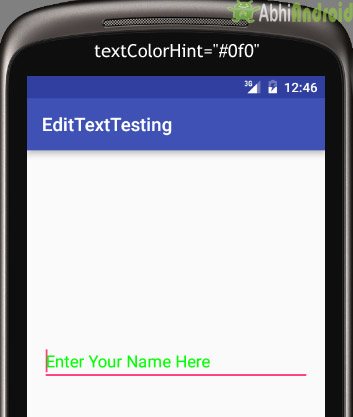
Below is the example code in which we set the hint color of a edit text programmatically means in java class.
EditText simpleEditText=(EditText)findViewById(R.id.simpleEditText);
simpleEditText.setHintTextColor(Color.green(0));//set the green hint color
7. textSize: textSize attribute is used to set the size of text of a edit text. We can set the text size in sp(scale independent pixel) or dp(density pixel).
Below is the example code in which we set the 25sp size for the text of a edit text.
<EditText
    android:id="@+id/simpleEditText"
    android:layout_width="fill_parent"
    android:layout_height="wrap_content"
    android:layout_centerInParent="true"
    android:text="AbhiAndroid"
    android:textSize="25sp" /><!--set 25sp text size-->
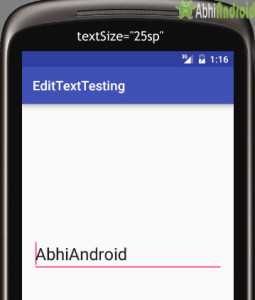
Below is the example code in which we set the text size of a edit text programmatically means in java class.
EditText simpleEditText=(EditText)findViewById(R.id.simpleEditText);
simpleEditText.setTextSize(25);//set size of text
8. textStyle: textStyle attribute is used to set the text style of a edit text. The possible text styles are bold, italic and normal. If we need to use two or more styles for a edit text then “|” operator is used for that.
Below is the example code with explanation included, in which we set the bold and italic text styles for text.
<EditText
    android:id="@+id/simpleEditText"
    android:layout_width="fill_parent"
    android:layout_height="wrap_content"
    android:layout_centerInParent="true"
    android:text="Email"
    android:textSize="25sp"
    android:textStyle="bold|italic"/><!--set bold and italic text style-->
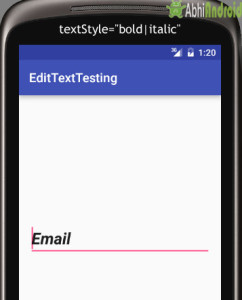
Below is the example code with explanation included in which we set the black color for the background, white color for the displayed hint and set 10dp padding from all the side’s for edit text.
<EditText
    android:id="@+id/simpleEditText"
    android:layout_width="fill_parent"
    android:layout_height="wrap_content"
    android:layout_centerInParent="true"
    android:hint="Enter Your Name Here"
    android:padding="15dp"
    android:textColorHint="#fff"
    android:textStyle="bold|italic"
    android:background="#000"/><!--set background color black-->

Below is the example code in which we set the background color of a edit text programmatically means in java class.
EditText simpleEditText=(EditText)findViewById(R.id.simpleEditText);
simpleEditText.setBackgroundColor(Color.BLACK);//set black background color
10. padding: padding attribute is used to set the padding from left, right, top or bottom. In above example code of background we also set the 10dp padding from all the side’s of edit text.
Example I – EditText in Android Studio
Below is the example of edit text in which we get the value from multiple edittexts and on button click event the Toast will show the data defined in Edittext.
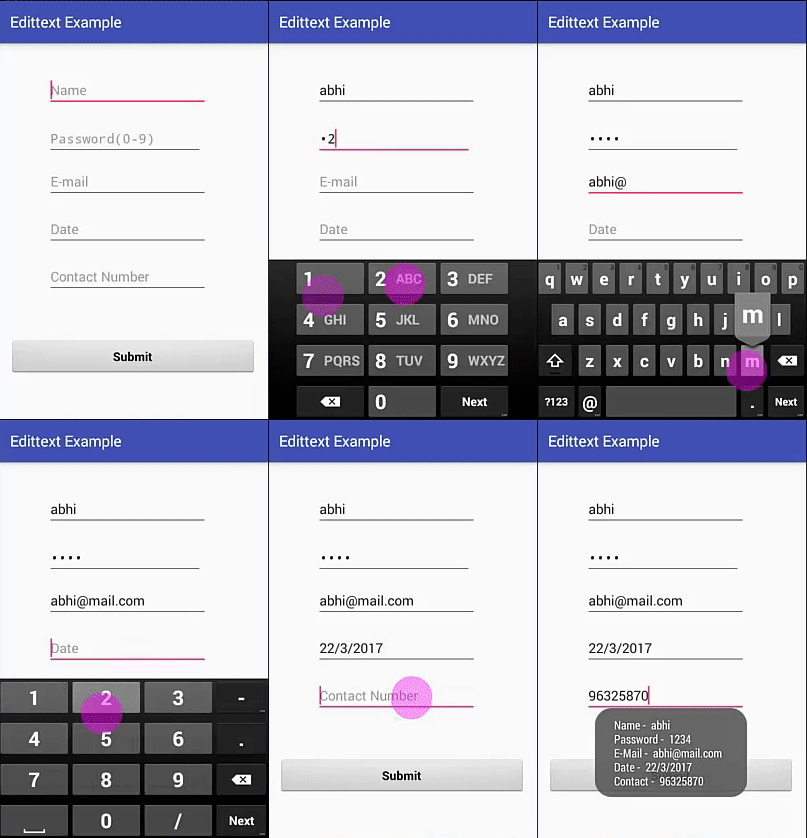
Step 1: Create a new project in Android Studio and name it EditTextExample.
Step 2: Now Open res -> layout -> xml (or) activity_main.xml and add following code. In this code we have added multiple edittext and a button with onclick functionality.
<?xml version="1.0" encoding="utf-8"?>
<RelativeLayout xmlns:android="http://schemas.android.com/apk/res/android"
    xmlns:tools="http://schemas.android.com/tools"
    android:id="@+id/activity_main"
    android:layout_width="match_parent"
    android:layout_height="match_parent"
    android:paddingBottom="@dimen/activity_vertical_margin"
    android:paddingLeft="@dimen/activity_horizontal_margin"
    android:paddingRight="@dimen/activity_horizontal_margin"
    android:paddingTop="@dimen/activity_vertical_margin"
    tools:context="com.example.edittextexample.MainActivity">

    <EditText
        android:id="@+id/editText1"
        android:layout_width="wrap_content"
        android:layout_height="wrap_content"
        android:layout_alignParentLeft="true"
        android:layout_alignParentStart="true"
        android:layout_alignParentTop="true"
        android:layout_marginLeft="50dp"
        android:layout_marginStart="50dp"
        android:layout_marginTop="24dp"
        android:ems="10"
        android:hint="@string/name"
        android:inputType="textPersonName"
        android:selectAllOnFocus="true" />

    <EditText
        android:id="@+id/editText2"
        android:layout_width="wrap_content"
        android:layout_height="wrap_content"
        android:layout_alignLeft="@+id/editText1"
        android:layout_alignStart="@+id/editText1"
        android:layout_below="@+id/editText1"
        android:layout_marginTop="19dp"
        android:ems="10"
        android:hint="@string/password_0_9"
        android:inputType="numberPassword" />

    <EditText
        android:id="@+id/editText3"
        android:layout_width="wrap_content"
        android:layout_height="wrap_content"
        android:layout_alignLeft="@+id/editText2"
        android:layout_alignStart="@+id/editText2"
        android:layout_below="@+id/editText2"
        android:layout_marginTop="12dp"
        android:ems="10"
        android:hint="@string/e_mail"
        android:inputType="textEmailAddress" />

    <EditText
        android:id="@+id/editText4"
        android:layout_width="wrap_content"
        android:layout_height="wrap_content"
        android:layout_alignLeft="@+id/editText3"
        android:layout_alignStart="@+id/editText3"
        android:layout_below="@+id/editText3"
        android:layout_marginTop="18dp"
        android:ems="10"
        android:hint="@string/date"
        android:inputType="date" />

    <EditText
        android:id="@+id/editText5"
        android:layout_width="wrap_content"
        android:layout_height="wrap_content"
        android:layout_alignLeft="@+id/editText4"
        android:layout_alignStart="@+id/editText4"
        android:layout_below="@+id/editText4"
        android:layout_marginTop="18dp"
        android:ems="10"
        android:hint="@string/contact_number"
        android:inputType="phone" />

    <Button
        android:id="@+id/button"
        style="@android:style/Widget.Button"
        android:layout_width="match_parent"
        android:layout_height="wrap_content"
        android:layout_alignParentLeft="true"
        android:layout_alignParentStart="true"
        android:layout_below="@+id/editText5"
        android:layout_marginTop="62dp"
        android:text="@string/submit"
        android:textSize="16sp"
        android:textStyle="normal|bold" />
</RelativeLayout>
Step 3: Now open app -> java -> package -> MainActivity.java and add the below code.
In this we just fetch the text from the edittext, further with the button click event a toast will show the text fetched before.
package com.example.edittextexample;

import android.support.v7.app.AppCompatActivity;
import android.os.Bundle;
import android.view.View;
import android.widget.Button;
import android.widget.EditText;
import android.widget.Toast;

public class MainActivity extends AppCompatActivity {

    Button submit;
    EditText name, password, email, contact, date;

    @Override
    protected void onCreate(Bundle savedInstanceState) {
        super.onCreate(savedInstanceState);
        setContentView(R.layout.activity_main);
        name = (EditText) findViewById(R.id.editText1);
        password = (EditText) findViewById(R.id.editText2);
        email = (EditText) findViewById(R.id.editText3);
        date = (EditText) findViewById(R.id.editText4);
        contact = (EditText) findViewById(R.id.editText5);
        submit = (Button) findViewById(R.id.button);

        submit.setOnClickListener(new View.OnClickListener() {
            @Override
            public void onClick(View v) {
                if (name.getText().toString().isEmpty() || password.getText().toString().isEmpty() || email.getText().toString().isEmpty() || date.getText().toString().isEmpty()
                        || contact.getText().toString().isEmpty()) {
                    Toast.makeText(getApplicationContext(), "Enter the Data", Toast.LENGTH_SHORT).show();
                } else {
                    Toast.makeText(getApplicationContext(), "Name -  " + name.getText().toString() + " \n" + "Password -  " + password.getText().toString()
                            + " \n" + "E-Mail -  " + email.getText().toString() + " \n" + "Date -  " + date.getText().toString()
                            + " \n" + "Contact -  " + contact.getText().toString(), Toast.LENGTH_SHORT).show();
                }
            }
        });
    }
}
Output:
Now start the AVD in Emulator and run the App. You will see screen asking you to fill the data in required fields like name, password(numeric), email, date, contact number. Enter data and click on button. You will see the data entered will be displayed as Toast on screen.
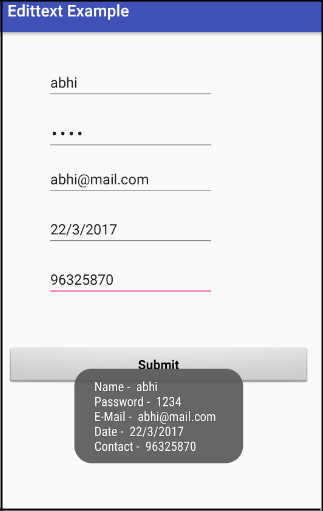
Example II – EditText in Android Studio
Below is the example of edit text in which we get the value from a edit text on button click event and then display it in a Toast. Below is the final output and code.
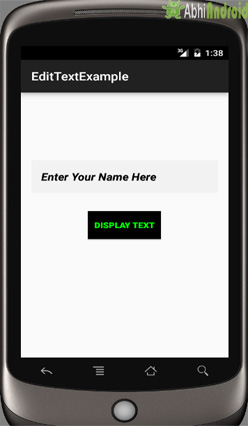
Select File -> New -> New Project and Fill the forms and click "Finish" button.
Step 2: Now Open res -> layout -> xml (or) activity_main.xml and add following code. Here we will design one EditText for filling name and one Button which will be used to display the name entered by the user.
<RelativeLayout xmlns:android="http://schemas.android.com/apk/res/android"
    xmlns:tools="http://schemas.android.com/tools"
    android:layout_width="match_parent"
    android:layout_height="match_parent"
    android:paddingBottom="@dimen/activity_vertical_margin"
    android:paddingLeft="@dimen/activity_horizontal_margin"
    android:paddingRight="@dimen/activity_horizontal_margin"
    android:paddingTop="@dimen/activity_vertical_margin"
    tools:context=".MainActivity">

    <EditText
        android:id="@+id/simpleEditText"
        android:layout_width="fill_parent"
        android:layout_height="wrap_content"
        android:layout_centerHorizontal="true"
        android:background="#F2F2F2"
        android:hint="Enter Your Name Here"
        android:padding="15dp"
        android:textColorHint="#000"
        android:textStyle="bold|italic"
        android:layout_marginTop="100dp" />

    <Button
        android:id="@+id/displayText"
        android:layout_width="wrap_content"
        android:layout_height="wrap_content"
        android:layout_centerInParent="true"
        android:background="#000"
        android:padding="10dp"
        android:text="Display Text"
        android:textColor="#0f0"
        android:textStyle="bold" />


</RelativeLayout>
Step 3: Now open app -> java -> package -> MainActivity.java and add the below code. The explanation is included in the code itself as comment.
package example.abhiandriod.edittextexample;

import android.graphics.Color;
import android.support.v7.app.AppCompatActivity;
import android.os.Bundle;
import android.view.Menu;
import android.view.MenuItem;
import android.view.View;
import android.widget.Button;
import android.widget.EditText;
import android.widget.Toast;

public class MainActivity extends AppCompatActivity {

    @Override
    protected void onCreate(Bundle savedInstanceState) {
        super.onCreate(savedInstanceState);
        setContentView(R.layout.activity_main);
        final EditText simpleEditText = (EditText) findViewById(R.id.simpleEditText);//get the id for edit text
        Button displayText = (Button) findViewById(R.id.displayText);//get the id for button
        displayText.setOnClickListener(new View.OnClickListener() {
            @Override
            public void onClick(View view) {
                if (simpleEditText.getText().toString() != null)//check whether the entered text is not null
                {
                    Toast.makeText(getApplicationContext(), simpleEditText.getText().toString(), Toast.LENGTH_LONG).show();//display the text that you entered in edit text
                }
            }
        });
    }


}
Output:
Now start the AVD in Emulator and run the App. You will see screen asking you to fill your name. Enter your name and click on button. You will see the name entered will be displayed as Toast on screen.
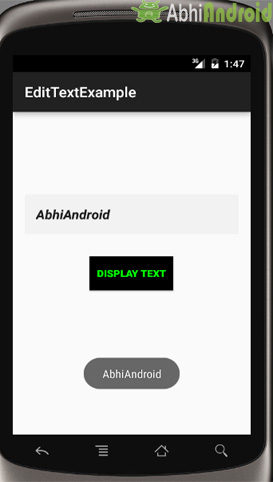
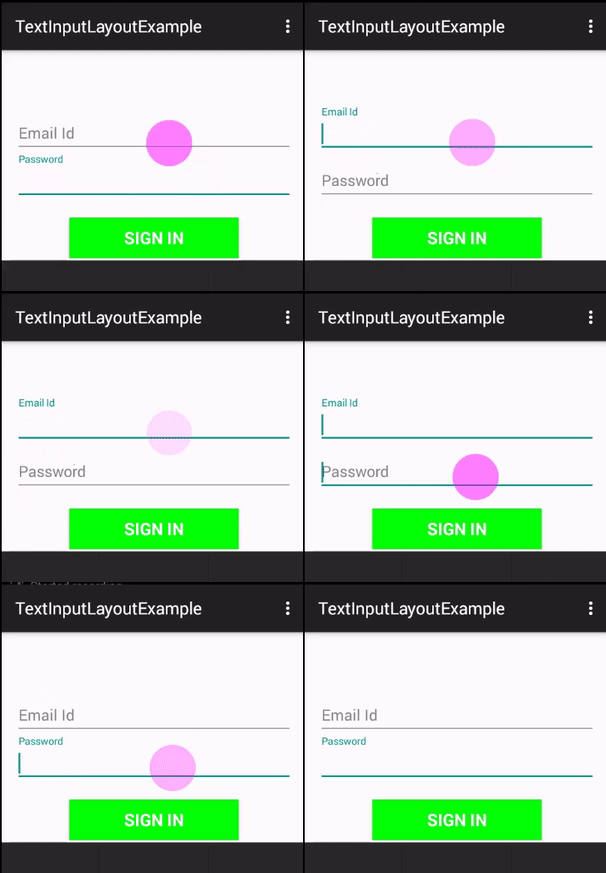
TextInputLayout / Floating Labels In EditText:
TextInputLayout is a new element introduced in Material Design Support library to display the floating label in EditText. Read our advance Floating Labels tutorial to learn how to use it in your App.
5 thoughts on “EditText Tutorial With Example In Android Studio: Input Field”
Leave a Reply
Premium Project Source Code:
- Food Ordering Android App Project Source Code
- Ecommerce Store Android App Project Source Code
- Convert Website Into Android App Project Source Code
- Quiz Game Android App Project Source Code
- Radio Streaming Android App Source Code
- City Guide Android App Project Source Code
- QR Barcode Android App Project Source Code
nice…..very useful
How can I remove the auto tab setting/function of the EditText at enter?
Hello
How do you find “Edit Text” after decompile with apktool ?
cumi6x
Awesome!!!