ListView Tutorial With Example In Android Studio
List of scrollable items can be displayed in Android using ListView. It helps you to displaying the data in the form of a scrollable list. Users can then select any list item by clicking on it. ListView is default scrollable so we do not need to use scroll View or anything else with ListView.
ListView is widely used in android applications. A very common example of ListView is your phone contact book, where you have a list of your contacts displayed in a ListView and if you click on it then user information is displayed.
Adapter: To fill the data in a ListView we simply use adapters. List items are automatically inserted to a list using an Adapter that pulls the content from a source such as an arraylist, array or database.
ListView in Android Studio: Listview is present inside Containers. From there you can drag and drop on virtual mobile screen to create it. Alternatively you can also XML code to create it.

<ListView xmlns:android="http://schemas.android.com/apk/res/android"
    xmlns:tools="http://schemas.android.com/tools"
    android:id="@+id/simpleListView"
    android:layout_width="match_parent"
    android:layout_height="wrap_content"
    tools:context="abhiandroid.com.listexample.MainActivity">
</ListView>
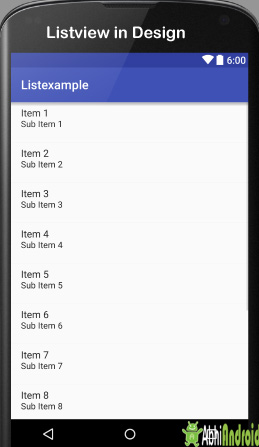
Listview look in Design:

Table Of Contents
Attributes of ListView:
Lets see some different attributes of ListView which will be used while designing a custom list:
1. id: id is used to uniquely identify a ListView.
Below is the id attribute’s example code with explanation included.
<!-- Id of a list view uniquely identify it-->
<ListView
android:id="@+id/simpleListView"
android:layout_width="fill_parent"
android:layout_height="wrap_content"
/>
2. divider: This is a drawable or color to draw between different list items.
Below is the divider example code with explanation included, where we draw red color divider between different views.
<!--Divider code in ListView-->
<ListView
android:id="@+id/simpleListView"
android:layout_width="fill_parent"
android:layout_height="wrap_content"
android:divider="#f00"
android:dividerHeight="1dp"
/>

In above example of divider we also set the divider height 1dp between the list items. The height should be in dp,sp or px.
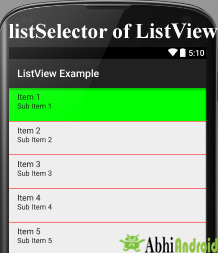
4. listSelector: listSelector property is used to set the selector of the listView. It is generally orange or Sky blue color mostly but you can also define your custom color or an image as a list selector as per your design.

<!-- List Selector Code in ListView -->
<ListView
android:id="@+id/simpleListView"
android:layout_width="fill_parent"
android:layout_height="wrap_content"
android:divider="#f00"
android:dividerHeight="1dp"
android:listSelector="#0f0"/> <!--list selector in green color-->
Adapters Use in ListView:
An adapter is a bridge between UI component and data source that helps us to fill data in UI component. It holds the data and send the data to adapter view then view can takes the data from the adapter view and shows the data on different views like as list view, grid view, spinner etc.
ListView is a subclass of AdapterView and it can be populated by binding to an Adapter, which retrieves the data from an external source and creates a View that represents each data entry.
In android commonly used adapters are:
- Array Adapter
- Base Adapter
Now we explain these two adapter in detail:
1.Array Adapter:
Whenever you have a list of single items which is backed by an array, you can use ArrayAdapter. For instance, list of phone contacts, countries or names.
Important Note: By default, ArrayAdapter expects a Layout with a single TextView, If you want to use more complex views means more customization in list items, please avoid ArrayAdapter and use custom adapters.
Below is Array Adapter code:
ArrayAdapter adapter = new ArrayAdapter<String>(this,R.layout.ListView,R.id.textView,StringArray);
Example of list view using Array Adapter:
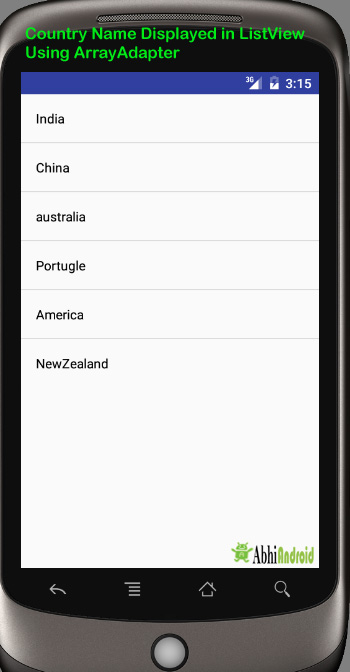
In this example, we display a list of countries by using simple array adapter. Below is the final output we will create:

<?xml version="1.0" encoding="utf-8"?>
<LinearLayout xmlns:android="http://schemas.android.com/apk/res/android"
android:layout_width="match_parent"
android:layout_height="match_parent"
android:orientation="vertical">

<ListView
android:id="@+id/simpleListView"
android:layout_width="fill_parent"
android:layout_height="wrap_content"
android:divider="@color/material_blue_grey_800"
android:dividerHeight="1dp" />
</LinearLayout>
Step 2: Create a new activity name Listview and below is the code of activity_listview.xml
<?xml version="1.0" encoding="utf-8"?>
<LinearLayout xmlns:android="http://schemas.android.com/apk/res/android"
android:layout_width="match_parent"
android:layout_height="match_parent"
android:orientation="vertical">

<TextView
android:id="@+id/textView"
android:layout_width="fill_parent"
android:layout_height="wrap_content"
android:layout_gravity="center"
android:padding="@dimen/activity_horizontal_margin"
android:textColor="@color/black" />
</LinearLayout>
Step 3: Now in this final step we will use ArrayAdapter to display the country names in UI. Below is the code of MainActivity.java
package abhiandroid.com.listexample;

import android.os.Bundle;
import android.app.Activity;
import android.view.Menu;
import android.widget.ArrayAdapter;import android.widget.ListView;

public class MainActivity extends Activity
{
    // Array of strings...
    ListView simpleList;
    String countryList[] = {"India", "China", "australia", "Portugle", "America", "NewZealand"};

    @Override   protected void onCreate(Bundle savedInstanceState) {
        super.onCreate(savedInstanceState);      setContentView(R.layout.activity_main);
        simpleList = (ListView)findViewById(R.id.simpleListView);
        ArrayAdapter<String> arrayAdapter = new ArrayAdapter<String>(this, R.layout.activity_listview, R.id.textView, countryList);
        simpleList.setAdapter(arrayAdapter);
    }
}
Output Screen:
Now run the App in Emulator. You will see the below output screen where list of country names will be printed:

BaseAdapter is a common base class of a general implementation of an Adapter that can be used in ListView. Whenever you need a customized list you create your own adapter and extend base adapter in that. Base Adapter can be extended to create a custom Adapter for displaying a custom list item. ArrayAdapter is also an implementation of BaseAdapter.
Example of list view using Custom adapter(Base adapter):
In this example we display a list of countries with flags. For this, we have to use custom adapter as shown in example:

<?xml version="1.0" encoding="utf-8"?>
<LinearLayout xmlns:android="http://schemas.android.com/apk/res/android"
android:layout_width="match_parent"
android:layout_height="match_parent"
android:orientation="vertical">

<ListView
android:id="@+id/simpleListView"
android:layout_width="fill_parent"
android:layout_height="wrap_content"
android:divider="@color/material_blue_grey_800"
android:dividerHeight="1dp"
android:footerDividersEnabled="false" />
</LinearLayout>
Step 2: Create a new activity name Listview and below is the code of activity_listview.xml
<?xml version="1.0" encoding="utf-8"?>
<LinearLayout xmlns:android="http://schemas.android.com/apk/res/android"
android:layout_width="match_parent"
android:layout_height="match_parent"
android:orientation="horizontal">

<ImageView
android:id="@+id/icon"
android:layout_width="50dp"
android:layout_height="50dp"
android:src="@drawable/ic_launcher" />

<TextView
android:id="@+id/textView"
android:layout_width="fill_parent"
android:layout_height="wrap_content"
android:layout_gravity="center"
android:padding="@dimen/activity_horizontal_margin"
android:textColor="@color/black" />
</LinearLayout>
Step 3: In third step we will use custom adapter to display the country names in UI by coding MainActivity.java. Below is the code of MainActivity.java
Important Note: Make sure flag images are stored in drawable folder present inside res folder with correct naming.
package com.abhiandroid.listbaseexample;

import android.app.Activity;
import android.os.Bundle;
import android.widget.ListView;

public class MainActivity extends Activity {

ListView simpleList;
String countryList[] = {"India", "China", "australia", "Portugle", "America", "NewZealand"};
int flags[] = {R.drawable.india, R.drawable.china, R.drawable.australia, R.drawable.portugle, R.drawable.america, R.drawable.new_zealand};

@Override
protected void onCreate(Bundle savedInstanceState) {
super.onCreate(savedInstanceState);
setContentView(R.layout.activity_main);
simpleList = (ListView) findViewById(R.id.simpleListView);
CustomAdapter customAdapter = new CustomAdapter(getApplicationContext(), countryList, flags);
simpleList.setAdapter(customAdapter);
}
}
Step 4: Now create another class Custom Adapter which will extend BaseAdapter. Below is the code of CustomAdapter.java
package com.abhiandroid.listbaseexample;

import android.content.Context;
import android.media.Image;
import android.view.LayoutInflater;
import android.view.View;
import android.view.ViewGroup;
import android.widget.BaseAdapter;
import android.widget.ImageView;
import android.widget.TextView;

import java.util.zip.Inflater;

public class CustomAdapter extends BaseAdapter {
Context context;
String countryList[];
int flags[];
LayoutInflater inflter;

public CustomAdapter(Context applicationContext, String[] countryList, int[] flags) {
this.context = context;
this.countryList = countryList;
this.flags = flags;
inflter = (LayoutInflater.from(applicationContext));
}

@Override
public int getCount() {
return countryList.length;
}

@Override
public Object getItem(int i) {
return null;
}

@Override
public long getItemId(int i) {
return 0;
}

@Override
public View getView(int i, View view, ViewGroup viewGroup) {
view = inflter.inflate(R.layout.activity_listview, null);
TextView country = (TextView)           view.findViewById(R.id.textView);
ImageView icon = (ImageView) view.findViewById(R.id.icon);
country.setText(countryList[i]);
icon.setImageResource(flags[i]);
return view;
}
Output:
Now run the App in Emulator and it will show you name of countries along with flags. Below is the output screen:

36 thoughts on “ListView Tutorial With Example In Android Studio”
Leave a Reply
Premium Project Source Code:
- Food Ordering Android App Project Source Code
- Ecommerce Store Android App Project Source Code
- Convert Website Into Android App Project Source Code
- Quiz Game Android App Project Source Code
- Radio Streaming Android App Source Code
- City Guide Android App Project Source Code
- QR Barcode Android App Project Source Code
Hi, I want to ask something, what’s @dimen/activity_horizontal_margin means ?
Thank you 😀
Hi! ,
Thank you for such a useful and helpful way of explanation.. ..
Now, I have next requirement ,I want ListView to clickable after selection of any image or text and it must also take all the data which that particular clicked listView contains.
Please Help me.
Thank You
I want to make an activity where i can show the details of the particular item on the list.Kindly give some tutorials.
Morning Abhi,
great tutorial and your book is awesome. Thanks a lot for the outstanding job. am definitely going to recommend and share this to my school mates.
I kindly request for a favor if possible, i want to know how to build the city guide. you can remove most of the features in yours. i do not have money/fund to purchase as i am a student and i know it will be unfair for me to ask you to please provide me with the source code or better instead a proper tutorial guide on how to achieve that. I do not necessarily want the code. i want to understand how everything came about. what is what and why like you do in your other tutorials. hope to hear from you soon. Thanks
can you tell me , if i select any desert place name in first UI and there description or photo will be show on second UI.
please suggest me how can i connect this listview to the database and show the data of mysql database in listview
Hi your tutorials are great- really comprehensive! I’m having a problem though with the 2nd tutorial in the Custom Adapter, the problem line is:
view = inflter.inflate(R.layout.activity_listview, null);
The root: ‘null’ parameter is throwing an error, and stopping my ListView activity loading in the emulator. Is there an alternative for this without resorting to using a ViewHolder?
Thanks
view = inflter.inflate(R.layout.activity_listview, null); is giving me this error: “ImageView.setImageResource(int) on a null reference ” and it says : “Unconditional layout inflation from view adapter: Should use view holder pattern(use recycled view passed into this method as the seconds parameter) for smoother scrolling, how do I solve this?
How to start a new Activity when an item is clicked in listview
Use intent
Hi,
Really great articles, it helps me a lot. thanks bro!
How can i start to new activity when click on the item? Thanks..
hello thanks for the tutorial but i’m getting an error with getApplicationContext().
it says cannot resolve method ‘getApplicationContext()’
Can You send me code for – When I click on list View Item then it go on Scroll view Activity.
Please help that why we need an extra layout file for list view even we are representing in activity main
That layout is for the items in the listview i.e. image & text
How to use multicheck box after multiple item selection how to uncheck……?
Thank, I have finally found a tutorial which is actually working fine
Can anyone tell me why we need to give
inflter = (LayoutInflater.from(applicationContext));
above statement even though we are not having that argument in CustomAdapter class Constructor.?
hi, if i use ur example on Los or Mos devices & didn’t set the text Color explicitly, by default it takes it to be white?? so is it mandatory to set the text color?
thank you sir
thanks
how to get “list view” when we press an button from the navigation drawer?
and after clicking an icon in the list view i should get another screen.
please tell me how to do this
Please read NavigationDrawer tutorial: http://abhiandroid.com/materialdesign/navigation-drawer
Another recommended read: http://abhiandroid.com/materialdesign/toolbar
how to add submenu in the listview in your example?
please give me reply.
Please consider using ExpandableListView for that purpose https://abhiandroid.com/ui/expandablelistview
THANK YOU BHAI
import java.util.zip.Inflater;
This part of the code is grayscaled in my code..
Am I doing something wrong? ;<
Thanks Once Again to explain such a complex topic in such a nice way………..
it is complex to me, to learn about adapters , when i study this tutorial i have fully understand. Thank you admin.
super..it’s working….
how to add this listview in alertdialog box plz send me code
great
can you send me code with included radio button in this code
Hi,
Thanks for suggesting a new topic. We will definitely write a separate tutorial on it but it will take some time as we are busy writing on material design tutorial. We will update you when we have written on it.
Thanks
Abhishek
Hi,
We have added it. So please read using radio button inside ListView https://abhiandroid.com/ui/radiobutton-inside-listview.html
somthing error custmor adapter not set in listview