Table Layout Tutorial With Example In Android
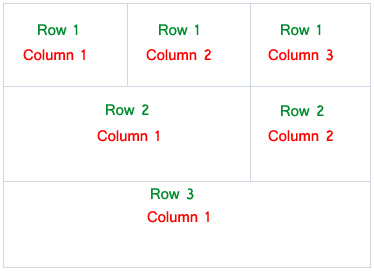
In Android, Table Layout is used to arrange the group of views into rows and columns. Table Layout containers do not display a border line for their columns, rows or cells. A Table will have as many columns as the row with the most cells.

A table can also leave the cells empty but cells can’t span the columns as they can in HTML(Hypertext markup language).
Table Of Contents
Important Points About Table Layout In Android:
- For building a row in a table we will use the
<TableRow>element. Table row objects are the child views of a table layout. - Each row of the table has zero or more cells and each cell can hold only one view object like ImageView, TextView or any other view.
- Total width of a table is defined by its parent container
- Column can be both stretchable and shrinkable. If shrinkable then the width of column can be shrunk to fit the table into its parent object and if stretchable then it can expand in width to fit any extra space available.
Important Note: We cannot specify the width of the children’s of the Table layout. Here, width always match parent width. However, the height attribute can be defined by a child; default value of height attribute is wrap content.
Basic Table Layout code in XML:
<TableLayout xmlns:android="http://schemas.android.com/apk/res/android"
    android:layout_width="match_parent"
    android:layout_height="match_parent"
    android:collapseColumns="0"> <!-- collapse the first column of the table row-->


    <!-- first row of the table layout-->
    <TableRow
        android:id="@+id/row1"
        android:layout_width="fill_parent"
        android:layout_height="wrap_content">

        <!-- Add elements/columns in the first row-->

    </TableRow>
</TableLayout>
Attributes of TableLayout in Android:
Now let’s we discuss some important attributes that help us to configure a table layout in XML file (layout).
1. id: id attribute is used to uniquely identify a Table Layout.
<TableLayout
android:id="@+id/simpleTableLayout"
android:layout_width="match_parent"
android:layout_height="match_parent/>
2. stretchColumns: Stretch column attribute is used in Table Layout to change the default width of a column which is set equal to the width of the widest column but we can also stretch the columns to take up available free space by using this attribute. The value that assigned to this attribute can be a single column number or a comma delimited list of column numbers (1, 2, 3…n).
If the value is 1 then the second column is stretched to take up any available space in the row, because of the column numbers are started from 0.
If the value is 0,1 then both the first and second columns of table are stretched to take up the available space in the row.
If the value is ‘*’ then all the columns are stretched to take up the available space.
Below is the example code of stretch column attribute of table layout with explanation included in which we stretch the first column of layout.
<?xml version="1.0" encoding="utf-8"?>

    <TableLayout xmlns:android="http://schemas.android.com/apk/res/android"
        android:id="@+id/simpleTableLayout"
        android:layout_width="match_parent"
        android:layout_height="match_parent"
        android:stretchColumns="1"> <!-- stretch the second column of the layout-->

        <!-- first row of the table layout-->
        <TableRow

            android:id="@+id/firstRow"
            android:layout_width="fill_parent"
            android:layout_height="wrap_content">

            <!-- first element of the row-->
            <TextView

                android:id="@+id/simpleTextView"
                android:layout_width="wrap_content"
                android:layout_height="wrap_content"
                android:background="#b0b0b0"
                android:padding="18dip"
                android:text="Text 1"
                android:textColor="#000"
                android:textSize="12dp" />

            <TextView

                android:id="@+id/simpleTextView"
                android:layout_width="wrap_content"
                android:layout_height="wrap_content"
                android:background="#FF0000"
                android:padding="18dip"
                android:text="Text 2"
                android:textColor="#000"
                android:textSize="14dp" />

        </TableRow>
    </TableLayout>

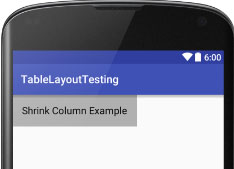
3. shrinkColumns: Shrink column attribute is used to shrink or reduce the width of the column‘s. We can specify either a single column or a comma delimited list of column numbers for this attribute. The content in the specified columns word-wraps to reduce their width.
If the value is 0 then the first column’s width shrinks or reduces by word wrapping its content.
If the value is 0,1 then both first and second columns are shrinks or reduced by word wrapping its content.
If the value is ‘*’ then the content of all columns is word wrapped to shrink their widths.
Below is the example code of shrink column attribute of table layout with explanation included in which we shrink the first column of layout.
<?xml version="1.0" encoding="utf-8"?>
<TableLayout xmlns:android="http://schemas.android.com/apk/res/android"
    android:layout_width="match_parent"
    android:layout_height="match_parent"
    android:shrinkColumns="0"> <!-- shrink the first column of the layout-->


    <!-- first row of the table layout-->
    <TableRow
        android:id="@+id/firstRow"
        android:layout_width="fill_parent"
        android:layout_height="wrap_content">

        <!-- first element of the first row-->
        <TextView
            android:layout_width="wrap_content"
            android:layout_height="wrap_content"
            android:background="#b0b0b0"
            android:padding="18dip"
            android:text="Shrink Column Example"
            android:textColor="#000"
            android:textSize="18dp" />

    </TableRow>
</TableLayout>

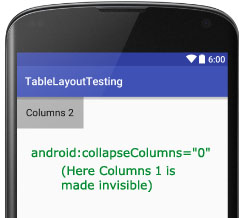
4. collapseColumns: collapse columns attribute is used to collapse or invisible the column’s of a table layout. These columns are the part of the table information but are invisible.
If the values is 0 then the first column appears collapsed, i.e it is the part of table but it is invisible.
Below is the example code of collapse columns with explanation included in which we collapse the first column of table means first column is an part of table but it is invisible so you can see only the second column in screenshot.
<?xml version="1.0" encoding="utf-8"?>
<TableLayout xmlns:android="http://schemas.android.com/apk/res/android"
    android:layout_width="match_parent"
    android:layout_height="match_parent"
    android:collapseColumns="0"> <!-- collapse the first column of the table row-->


    <!-- first row of the table layout-->
    <TableRow
        android:id="@+id/simpleTableLayout"
        android:layout_width="fill_parent"
        android:layout_height="wrap_content">

        <!-- first element of the row that is the part of table but it is invisible-->
        <TextView
            android:layout_width="wrap_content"
            android:layout_height="wrap_content"
            android:background="#b0b0b0"
            android:padding="18dip"
            android:text="Columns 1"
            android:textColor="#000"
            android:textSize="18dp" />

        <!-- second element of the row that is shown in the screenshot-->
        <TextView
            android:layout_width="wrap_content"
            android:layout_height="wrap_content"
            android:background="#b0b0b0"
            android:padding="18dip"
            android:text="Columns 2"
            android:textColor="#000"
            android:textSize="18dp" />
    </TableRow>
</TableLayout>

TableLayout Example In Android Studio:
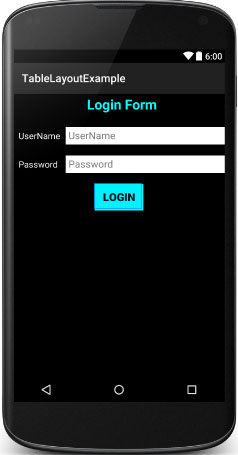
Below is an example of Table layout in Android where we display a login form with two fields user name and password and one login button and whenever a user click on that button a message will be displayed by using a Toast.
Below you can download project code, see final output and step by step explanation of the example:

Step 1: Create a new project and name it TableLayoutExample
Step 2: Open res -> layout ->activity_main.xml (or) main.xml and add following code:
In this step we open an xml file ( activity_main.xml ) and add the code for displaying username and password fields by using textview and edittext with one login button.
<TableLayout xmlns:android="http://schemas.android.com/apk/res/android"
    android:layout_width="match_parent"
    android:layout_height="match_parent"
    android:background="#000"
    android:orientation="vertical"
    android:stretchColumns="1">

    <TableRow android:padding="5dip">

        <TextView
            android:layout_height="wrap_content"
            android:layout_marginBottom="20dp"
            android:layout_span="2"
            android:gravity="center_horizontal"
            android:text="@string/loginForm"
            android:textColor="#0ff"
            android:textSize="25sp"
            android:textStyle="bold" />
    </TableRow>

    <TableRow>

        <TextView
            android:layout_height="wrap_content"
            android:layout_column="0"
            android:layout_marginLeft="10dp"
            android:text="@string/userName"
            android:textColor="#fff"
            android:textSize="16sp" />

        <EditText
            android:id="@+id/userName"
            android:layout_height="wrap_content"
            android:layout_column="1"
            android:layout_marginLeft="10dp"
            android:background="#fff"
            android:hint="@string/userName"
            android:padding="5dp"
            android:textColor="#000" />
    </TableRow>

    <TableRow>

        <TextView
            android:layout_height="wrap_content"
            android:layout_column="0"
            android:layout_marginLeft="10dp"
            android:layout_marginTop="20dp"
            android:text="@string/password"
            android:textColor="#fff"
            android:textSize="16sp" />

        <EditText
            android:id="@+id/password"
            android:layout_height="wrap_content"
            android:layout_column="1"
            android:layout_marginLeft="10dp"
            android:layout_marginTop="20dp"
            android:background="#fff"
            android:hint="@string/password"
            android:padding="5dp"
            android:textColor="#000" />
    </TableRow>


    <TableRow android:layout_marginTop="20dp">

        <Button
            android:id="@+id/loginBtn"
            android:layout_height="wrap_content"
            android:layout_gravity="center"
            android:layout_span="2"
            android:background="#0ff"
            android:text="@string/login"
            android:textColor="#000"
            android:textSize="20sp"
            android:textStyle="bold" />
    </TableRow>
</TableLayout>
Step 3: Open src -> package -> MainActivity.java
In this step we open MainActivity and add the code to initiate the edittext and button and then perform click event on button and display the message by using a Toast.
package example.abhiandriod.tablelayoutexample;

import android.support.v7.app.AppCompatActivity;
import android.os.Bundle;
import android.view.Menu;
import android.view.MenuItem;
import android.view.View;
import android.widget.Button;
import android.widget.Toast;

public class MainActivity extends AppCompatActivity {

    @Override
    protected void onCreate(Bundle savedInstanceState) {
        super.onCreate(savedInstanceState);
        setContentView(R.layout.activity_main);
        // initiate a button
        Button loginButton = (Button) findViewById(R.id.loginBtn);
        // perform click event on the button
        loginButton.setOnClickListener(new View.OnClickListener() {
            @Override
            public void onClick(View v) {
                Toast.makeText(getApplicationContext(), "Hello AbhiAndroid..!!!", Toast.LENGTH_LONG).show();  // display a toast message
            }
        });
    }


}
Step 4: Open res -> values -> strings.xml
In this step we open string file which is used to store string data of the app.
<resources>
    <string name="app_name">TableLayoutExample</string>
    <string name="hello_world">Hello world!</string>
    <string name="action_settings">Settings</string>
    <string name="loginForm">Login Form</string>
    <string name="userName">UserName</string>
    <string name="password">Password</string>
    <string name="login">LogIn</string>
</resources>
Output:
Now run the App and you will see the Login form UI which we designed in Table Layout.
5 thoughts on “Table Layout Tutorial With Example In Android”
Leave a Reply
Premium Project Source Code:
- Food Ordering Android App Project Source Code
- Ecommerce Store Android App Project Source Code
- Convert Website Into Android App Project Source Code
- Quiz Game Android App Project Source Code
- Radio Streaming Android App Source Code
- City Guide Android App Project Source Code
- QR Barcode Android App Project Source Code
I real need to know the situation where i will be forced to use table layout
My teacher copies code from this site, still can’t run it or explain it.
My teacher copies code from this site and still couldn’t run it XD
Keep it up sir.
Thank you sir, this guidance is really helpful for my app