GridView Tutorial With Examples In Android
In android GridView is a view group that display items in two dimensional scrolling grid (rows and columns), the grid items are not necessarily predetermined but they are automatically inserted to the layout using a ListAdapter. Users can then select any grid item by clicking on it. GridView is default scrollable so we don’t need to use ScrollView or anything else with GridView.
Adapter Is Used To Fill Data In Gridview: To fill the data in a GridView we simply use adapter and grid items are automatically inserted to a GridView using an Adapter which pulls the content from a source such as an arraylist, array or database. You can read full Adapter tutorial here.
GridView in Android Studio: Gridview is present inside Containers. From there you can drag and drop on virtual mobile screen to create it. Alternatively you can also XML code to create it.
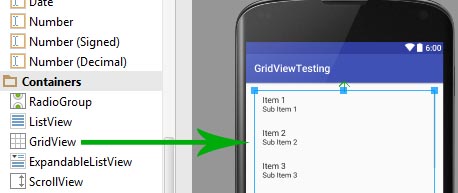
Basic GridView code in XML:
<GridView
android:id="@+id/simpleGridView"
android:layout_width="fill_parent"
android:layout_height="wrap_content"
android:numColumns="3"/>
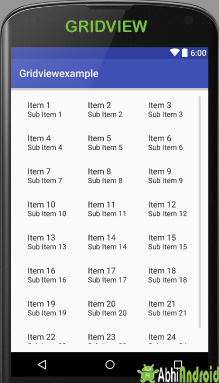
numColumns property specified that there is 3 columns to show, if we set it to auto_fit then it automatically display as many column as possible to fill the available space of the screen. Even if the phone is in portrait mode or landscape mode it automatically fill the whole space.
Table Of Contents
Attributes of GridView:
Lets see different attributes of GridView which will be used while designing a custom grid view:
1.id: id is used to uniquely identify a GridView.
Below is the id attribute’s example code with explanation included in which we don’t specify the number of columns in a row that’s why the GridView behaves like a ListView.
Below is the id attribute example code for Gridview:
<GridView
android:id="@+id/simpleGridView"
android:layout_width="fill_parent"
android:layout_height="wrap_content"
/>
2.numColumns: numColumn define how many columns to show. It may be a integer value, such as “5” or auto_fit.
auto_fit is used to display as many columns as possible to fill the available space on the screen.
Important Note: If we don’t specify numColumn property in GridView it behaves like a ListView with singleChoice.
Below is the numColumns example code where we define 4 columns to show in the screen.
<!-- numColumns example code -->
<GridView
android:id="@+id/simpleGridView"
android:layout_width="fill_parent"
android:layout_height="wrap_content"
android:numColumns="4"/> <!-- numColumns set to 4-->
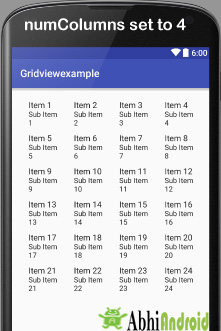
Below is the horizontalSpacing example code with explanation included where horizontal spacing between grid items is 50 dp.
<!--Horizontal space example code in grid view-->>
<GridView
android:id="@+id/simpleGridView"
android:layout_width="fill_parent"
android:layout_height="wrap_content"
android:numColumns="3"
android:horizontalSpacing="50dp"/><!--50dp horizontal space between grid items-->
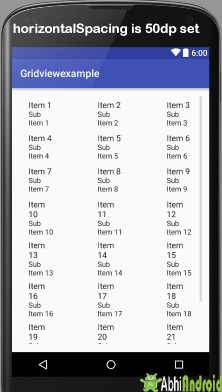
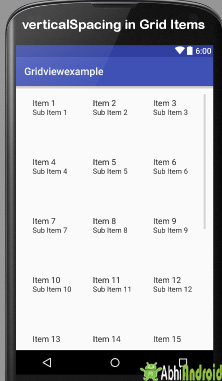
Below is the verticalSpacing example code with explanation included, where vertical spacing between grid items is 50dp.
<!-- Vertical space between grid items code -->
<GridView
android:id="@+id/simpleGridView"
android:layout_width="fill_parent"
android:layout_height="wrap_content"
android:numColumns="3"
android:verticalSpacing="50dp"/><!--50dp vertical space set between grid items-->
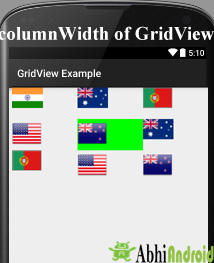
Below is the columnWidth example code. Here column width is 80dp and selected item’s background color is green which shows the actual width of a grid item.
Important Note: In the below code we also used listSelector property which define color for selected item. Also to see the output of columnWidth using listSelector we need to use Adapter which is our next topic. The below code is not sufficient to show you the output.
<!--columnWidth in Grid view code-->
<GridView
android:id="@+id/simpleGridView"
android:layout_width="fill_parent"
android:layout_height="wrap_content"
android:numColumns="3"
android:columnWidth="80dp"
android:listSelector="#0f0"/><!--define green color for selected item-->
GridView Example Using Different Adapters In Android Studio:
An adapter is a bridge between UI component and data source that helps us to fill data in UI component. It holds the data and sends the data to adapter view, then view can takes the data from the adapter view and shows the data on different views like as list view, grid view, spinner etc.
GridView and ListView both are subclasses of AdapterView and it can be populated by binding to an Adapter, which retrieves the data from an external source and creates a View that represents each data entry. In android commonly used adapters which fill data in GridVieware:
1. Array Adapter
2. Base Adapter
3. Custom Array Adapter
Now we explain these adapters in detail:
1. Avoid Array Adapter To Fill Data In GridView:
Whenever you have a list of single items which is backed by an array, you can use ArrayAdapter. For instance, list of phone contacts, countries or names.
By default, ArrayAdapter expects a Layout with a single TextView, If you want to use more complex views means more customization in grid items, please avoid ArrayAdapter and use custom adapters.
ArrayAdapter adapter = new ArrayAdapter<String>(this,R.layout.ListView,R.id.textView,StringArray);
2. GridView Using Base Adapter In Android:
Base Adapter is a common base class of a general implementation of an Adapter that can be used in GridView. Whenever you need a customized grid view you create your own adapter and extend base adapter in that. Base Adapter can be extended to create a custom Adapter for displaying custom grid items. ArrayAdapter is also an implementation of BaseAdapter. You can read BaseAdapter tutorial here.
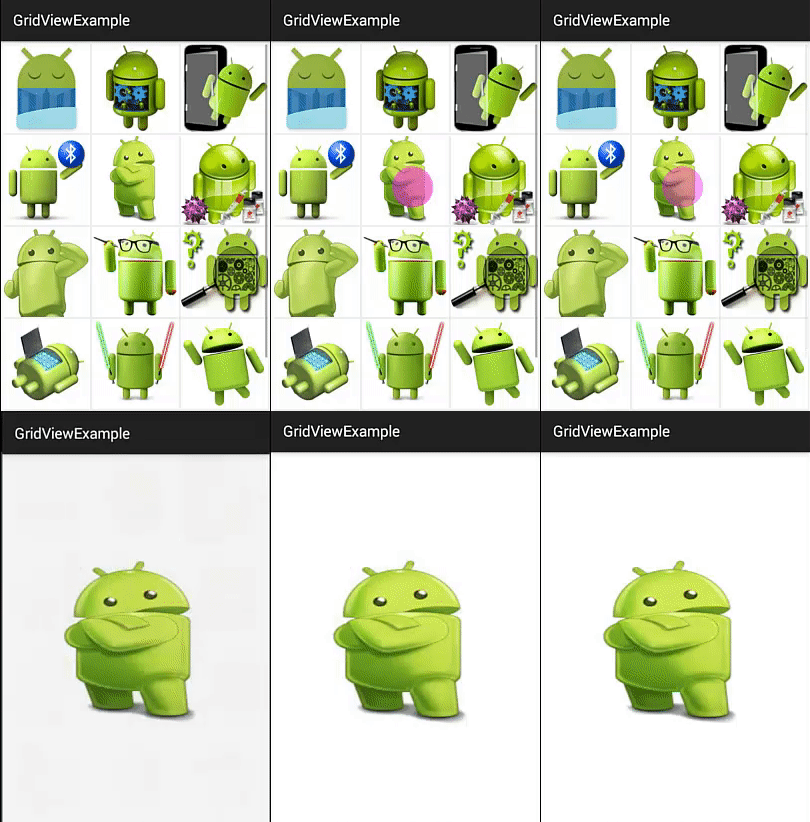
Example of GridView using Base Adapter in Android Studio: Below is the example of GridView in Android, in which we show the Android logo’s in the form of Grids. In this example firstly we create an int type array for logo images and then call the Adapter to set the data in the GridView. In this we create a CustomAdapter by extending BaseAdapter in it. At Last we implement setOnItemClickListener event on GridView and on click of any item we send that item to another Activity and show the logo image in full size.
Below you can download code, see final output and step by step explanation of the example.
Step 1: Create a new Android project in Android Studio and fill all the required details. In our case we have named GridViewExample and package com.example.gourav.GridViewExample
Step 2: Open activity_main.xml and paste the below code. In this we have created a Grid view insideLinear Layout and also set number of columns to 3.
<?xml version="1.0" encoding="utf-8"?>
<LinearLayout xmlns:android="http://schemas.android.com/apk/res/android"
    android:layout_width="match_parent"
    android:layout_height="match_parent"
    android:orientation="vertical">
    <!--
    GridView with 3 value for numColumns attribute
    -->
    <GridView
        android:id="@+id/simpleGridView"
        android:layout_width="fill_parent"
        android:layout_height="wrap_content"
        android:footerDividersEnabled="false"
        android:padding="1dp"
        android:numColumns="3" />
</LinearLayout>
Step 3: : Create a new XML file and paste the below code. We have named activity_gridview.xml.
In this step we create a new XML file and add a ImageView in it. This file is used in CustomAdapter to set the logo images
<?xml version="1.0" encoding="utf-8"?>
<LinearLayout xmlns:android="http://schemas.android.com/apk/res/android"
    android:layout_width="match_parent"
    android:layout_height="wrap_content"
    android:padding="1dp"
    android:orientation="vertical">
    <ImageView
        android:id="@+id/icon"
        android:layout_width="match_parent"
        android:layout_height="120dp"
        android:scaleType="fitXY"
        android:layout_gravity="center_horizontal"
        android:src="@drawable/logo1" />
</LinearLayout>
Step 4:Now open drawable folder and save small size png images of different logo’s and name them like logo1,logo2 and etc.
Step 5: Now open MainActivity.java and paste the below code. If your package name is different, don’t copy it.
In this step firstly we get the reference of GridView and then create a int type array for Android logo’s. After that we call the CustomAdapter and pass the array in it. At Last we implement setOnItemClickListener event on GridView and on click of any item we send that item to another Activity to show the logo image in Full Size. I have added comments in code to help you to understand the code easily so make you read the comments.
package com.example.gourav.GridViewExample;
import android.content.Intent;
import android.os.Bundle;
import android.support.v7.app.AppCompatActivity;
import android.view.View;
import android.widget.AdapterView;
import android.widget.GridView;
public class MainActivity extends AppCompatActivity {
    GridView simpleGrid;
    int logos[] = {R.drawable.logo1, R.drawable.logo2, R.drawable.logo3, R.drawable.logo4,
            R.drawable.logo5, R.drawable.logo6, R.drawable.logo7, R.drawable.logo8, R.drawable.logo9,
            R.drawable.logo10, R.drawable.logo11, R.drawable.logo12, R.drawable.logo13};
    @Override
    protected void onCreate(Bundle savedInstanceState) {
        super.onCreate(savedInstanceState);
        setContentView(R.layout.activity_main);
        simpleGrid = (GridView) findViewById(R.id.simpleGridView); // init GridView
        // Create an object of CustomAdapter and set Adapter to GirdView
        CustomAdapter customAdapter = new CustomAdapter(getApplicationContext(), logos);
        simpleGrid.setAdapter(customAdapter);
        // implement setOnItemClickListener event on GridView
        simpleGrid.setOnItemClickListener(new AdapterView.OnItemClickListener() {
            @Override
            public void onItemClick(AdapterView<?> parent, View view, int position, long id) {
                // set an Intent to Another Activity
                Intent intent = new Intent(MainActivity.this, SecondActivity.class);
                intent.putExtra("image", logos[position]); // put image data in Intent
                startActivity(intent); // start Intent
            }
        });
    }
}
Step 6: Create a new class CustomAdapter and paste the below code.
In this step we create a CustomAdapter class by extending BaseAdapter in it. In this step we set the logo image’s in the grid items. I have added comments in code to help you to understand the code easily so make you read the comments.
package com.example.gourav.GridViewExample;
import android.content.Context;
import android.view.LayoutInflater;
import android.view.View;
import android.view.ViewGroup;
import android.widget.BaseAdapter;
import android.widget.ImageView;
public class CustomAdapter extends BaseAdapter {
    Context context;
    int logos[];
    LayoutInflater inflter;
    public CustomAdapter(Context applicationContext, int[] logos) {
        this.context = applicationContext;
        this.logos = logos;
        inflter = (LayoutInflater.from(applicationContext));
    }
    @Override
    public int getCount() {
        return logos.length;
    }
    @Override
    public Object getItem(int i) {
        return null;
    }
    @Override
    public long getItemId(int i) {
        return 0;
    }
    @Override
    public View getView(int i, View view, ViewGroup viewGroup) {
        view = inflter.inflate(R.layout.activity_gridview, null); // inflate the layout
        ImageView icon = (ImageView) view.findViewById(R.id.icon); // get the reference of ImageView
        icon.setImageResource(logos[i]); // set logo images
        return view;
    }
}
Step 7: Now Create a new XML file named activity_second and paste the below code in it.
In this step we create an XML file for our Second Activity to display the logo image in full size.
<?xml version="1.0" encoding="utf-8"?>
<RelativeLayout xmlns:android="http://schemas.android.com/apk/res/android"
    xmlns:tools="http://schemas.android.com/tools"
    android:layout_width="match_parent"
    android:layout_height="match_parent"
    android:paddingBottom="@dimen/activity_vertical_margin"
    android:paddingLeft="@dimen/activity_horizontal_margin"
    android:paddingRight="@dimen/activity_horizontal_margin"
    android:paddingTop="@dimen/activity_vertical_margin"
    android:background="#fff"
    tools:context="com.example.gourav.GridViewExample.SecondActivity">
    <ImageView
        android:id="@+id/selectedImage"
        android:layout_width="match_parent"
        android:layout_height="wrap_content"
        android:layout_centerInParent="true"
        android:scaleType="fitXY" />
</RelativeLayout>
Step 8: Now Create a new Activity with name SecondActivity.class and add below code in it.
In this step we create a new Activity in which firstly we initiate the ImageView and then get the Image from our Previous Activity by using Intent object and set the same in the ImageView.
package com.example.gourav.GridViewExample;
import android.content.Intent;
import android.os.Bundle;
import android.support.v7.app.AppCompatActivity;
import android.widget.ImageView;
public class SecondActivity extends AppCompatActivity {
    ImageView selectedImage;
    @Override
    protected void onCreate(Bundle savedInstanceState) {
        super.onCreate(savedInstanceState);
        setContentView(R.layout.activity_second);
        selectedImage = (ImageView) findViewById(R.id.selectedImage); // init a ImageView
        Intent intent = getIntent(); // get Intent which we set from Previous Activity
        selectedImage.setImageResource(intent.getIntExtra("image", 0)); // get image from Intent and set it in ImageView
    }
}
Output: Now run the App and you will see different Android images in GridView. Click on the any image and full size of it will open up.
3. GridView Example Using Custom ArrayAdapter In Android Studio:
ArrayAdapter is also an implementation of BaseAdapter so if we want more customization then we create a custom adapter and extend ArrayAdapter in that. Here we are creating GridView using custom array adapter.
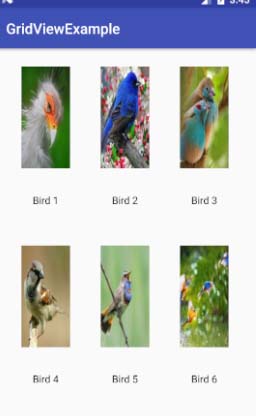
Example of GridView using Custom Adapter : Example of Grid View using custom arrayadapter to show birds in the form of grids. Below is the code and final output:
Below you can download code, see final output and step by step explanation of the topic.
Step 1: Create a new project and name it GridViewExample.
Step 2: Now open app -> res -> layout -> activity_main.xml (or) main.xml and add following code :
<RelativeLayout xmlns:android="http://schemas.android.com/apk/res/android"
    xmlns:tools="http://schemas.android.com/tools"
    android:id="@+id/activity_main"
    android:layout_width="match_parent"
    android:layout_height="match_parent"
    android:paddingBottom="@dimen/activity_vertical_margin"
    android:paddingLeft="@dimen/activity_horizontal_margin"
    android:paddingRight="@dimen/activity_horizontal_margin"
    android:paddingTop="@dimen/activity_vertical_margin"
    tools:context="abhiandroid.com.gridviewexample.MainActivity">

    <GridView
        android:id="@+id/simpleGridView"
        android:layout_width="match_parent"
        android:layout_height="wrap_content"
        android:numColumns="3"/>

</RelativeLayout>
Step 3: Create a new layout Activity in app -> res-> layout-> new activity and name it grid_view_items.xml and add following code:
<RelativeLayout xmlns:android="http://schemas.android.com/apk/res/android"
    xmlns:tools="http://schemas.android.com/tools"
    android:id="@+id/grid_view_items"
    android:layout_width="match_parent"
    android:layout_height="match_parent"
    android:paddingBottom="@dimen/activity_vertical_margin"
    android:paddingLeft="@dimen/activity_horizontal_margin"
    android:paddingRight="@dimen/activity_horizontal_margin"
    android:paddingTop="@dimen/activity_vertical_margin"
    tools:context="abhiandroid.com.gridviewexample.GridViewItems">

    <ImageView
        android:id="@+id/imageView"
        android:layout_width="150dp"
        android:layout_height="150dp"
        android:padding="5dp"
        android:scaleType="fitXY"
        android:src="@drawable/ic_launcher"
        android:layout_alignParentTop="true"
        android:layout_centerHorizontal="true" />

    <TextView
        android:id="@+id/textView"
        android:layout_width="wrap_content"
        android:layout_height="wrap_content"
        android:padding="@dimen/activity_horizontal_margin"
        android:text="Demo"
        android:textColor="#000"
        android:layout_below="@+id/imageView"
        android:layout_centerHorizontal="true"
        android:layout_marginTop="13dp" />
</RelativeLayout>
Step 4: Now open app -> java -> package -> MainActivity.java
import android.support.v7.app.AppCompatActivity;
import android.os.Bundle;
import android.support.v7.app.AppCompatActivity;
import android.os.Bundle;
import android.view.Menu;
import android.view.MenuItem;
import android.widget.GridView;
import java.util.ArrayList;

public class MainActivity extends AppCompatActivity {

    GridView simpleList;
    ArrayList birdList=new ArrayList<>();
    @Override
    protected void onCreate(Bundle savedInstanceState) {
        super.onCreate(savedInstanceState);
        setContentView(R.layout.activity_main);
        simpleList = (GridView) findViewById(R.id.simpleGridView);
        birdList.add(new Item("Bird 1",R.drawable.b1));
        birdList.add(new Item("Bird 2",R.drawable.b2));
        birdList.add(new Item("Bird 3",R.drawable.b3));
        birdList.add(new Item("Bird 4",R.drawable.b4));
        birdList.add(new Item("Bird 5",R.drawable.b5));
        birdList.add(new Item("Bird 6",R.drawable.b6));

        MyAdapter myAdapter=new MyAdapter(this,R.layout.grid_view_items,birdList);
        simpleList.setAdapter(myAdapter);

    }
}
Step5 : Create a new Class src -> package -> MyAdapter.java and add the following code:
import android.content.Context;
import android.view.LayoutInflater;
import android.view.View;
import android.view.ViewGroup;
import android.widget.ArrayAdapter;
import android.widget.ImageView;
import android.widget.TextView;

import java.util.ArrayList;

public class MyAdapter extends ArrayAdapter {

    ArrayList birdList = new ArrayList<>();

    public MyAdapter(Context context, int textViewResourceId, ArrayList objects) {
        super(context, textViewResourceId, objects);
        birdList = objects;
    }

    @Override
    public int getCount() {
        return super.getCount();
    }

    @Override
    public View getView(int position, View convertView, ViewGroup parent) {

        View v = convertView;
        LayoutInflater inflater = (LayoutInflater) getContext().getSystemService(Context.LAYOUT_INFLATER_SERVICE);
        v = inflater.inflate(R.layout.grid_view_items, null);
        TextView textView = (TextView) v.findViewById(R.id.textView);
        ImageView imageView = (ImageView) v.findViewById(R.id.imageView);
        textView.setText(birdList.get(position).getbirdName());
        imageView.setImageResource(birdList.get(position).getbirdImage());
        return v;

    }

}
Step 6: Create a new Class src -> package -> Item.java and add the below code:
public class Item {

    String birdListName;
    int birdListImage;

    public Item(String birdName,int birdImage)
    {
        this.birdListImage=birdImage;
        this.birdListName=birdName;
    }
    public String getbirdName()
    {
        return birdListName;
    }
    public int getbirdImage()
    {
        return birdListImage;
    }
}
Output:
Now run the App and you will see different bird images in GridView.
23 thoughts on “GridView Tutorial With Examples In Android”
Leave a Reply
Premium Project Source Code:
- Food Ordering Android App Project Source Code
- Ecommerce Store Android App Project Source Code
- Convert Website Into Android App Project Source Code
- Quiz Game Android App Project Source Code
- Radio Streaming Android App Source Code
- City Guide Android App Project Source Code
- QR Barcode Android App Project Source Code
Dear Sir,
Is it possible to make the Gridview in the same format as the sql table? What I mean is that in Sql if every row (record) has five columns, it should come in the android Gridview also in the same format, as we do in Gridviews of C#, VB.Net, etc.
Waiting for your kind and earliest possible reply.
Fysal Usman
Congratulations on your website. The explanations are easy to understand.
I recently started studying Java / Android and I was wondering if you could make available some examples of Gridview with a checkbox that allows multiple selections in GridView.
Thanks in advance,
Please use ArrayList birdList=new ArrayList(); to correct error on getbirdname() function and getbirdimage() function
I want to open a GridView(Where some pictures and text are shown) .But i want to open this GridView whenever i clicked on the picture . But i have no idea how i pass the GridView uisng intent.Without GridView single picture and text are passing but whenever i want to open a GridView then the app is crashed.Pls someone help me.
TIA
my CustumAdapter is not coming , plz help me.
i want image and text to be inflate in second activity …. in second example only image is going to next activity … with that i want text also… plz tell me
Use ArrayList birdList = new ArrayList(); and try
sry use this arraylist instead,
ArrayList birdList = new ArrayList();
textView.setText(birdList.get(position).getbirdName());
imageView.setImageResource(birdList.get(position).getbirdImage());
The above mentioned lines are not working in my android project,
calling the getbirdImage() function from the MyAdapter.java class is giving error here and same is the case of the getbirdImage().
what page show in menifest file and how?
hello Abhi sir thanks for helping me any time .I stuck on a problem i want a grid layout with row*column in 2*2 ratio how i will i achive it and I am using recycler view to inflate the data so the view is also scrolling i also want to scroll my data with a fix time of interval.
why it is showing an error in getbirdname() function and getbirdimage() function
Is it possible that in “Base Adapter”, we can add ‘name’ with the picture ???? Plz reply soon.
Sir my program run but it position every time change if I do scrolling up and down.
So what is the error…
textView.setText(birdList.get(position).getbirdName());
imageView.setImageResource(birdList.get(position).getbirdImage());
These lines are not working for me. It can’t find getbirdName() or getbirdImage()? Please help.
Please download code, it will work. If you still face problem, let us know.
yes sir i also facing same problem..
cannot download. too many requests
change
ArrayList birdList = new ArrayList();
to
ArrayList birdList = new ArrayList();
ArrayList<Item> birdList = new ArrayList<Item>();
this is the best way to learn android
this will be show in landscape and portrait mode with same view like in landscape mode vertical and horizontal size is same as in portrait made size.
yes vertical and horizontal size will remain same but the gap between each image in grid will adjust according to the width of the screen. Try using the above gridview example in both landscape and portrait mode.