Absolute Layout With Example In Android Studio
In Android, an Absolute Layout is a layout used to design the custom layouts. In this layout you can specify the exact location of its children by using x and y coordinates.

Important Note 2: Absolute layout is depreciated in Android because of the same reason as discussed in above note.
Table Of Contents
Android Absolute Layout Syntax Code:
<AbsoluteLayout xmlns:android="http://schemas.android.com/apk/res/android"

android:layout_width="fill_parent"
android:layout_height="fill_parent">

<!-- add child view’s here -->

</AbsoluteLayout>
Attributes of Absolute Layout:
1.id: In android id is a attribute used to uniquely identify a Absolute Layout.
Below is id attribute’s example code with explanation included.
<AbsoluteLayout
android:id="@+id/absoluteLayout"
android:layout_width="fill_parent"
android:layout_height="fill_parent"/>
2.layout_x: In Absolute Layout layout_x attribute is used to specify the x- coordinate of the view(TextView or any other view). The possible value for this is in dp or px.
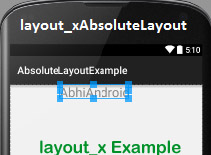
Below is the layout_x attribute’s example code with explanation included in which we set the 200px value for the x-coordinate.
<TextView
android:layout_width="wrap_content"
android:layout_height="wrap_content"
android:text="AbhiAndroid"
android:textSize="25sp"
android:layout_x="200px"/> <!--x-coordinates of a text view in AbsoluteLayout-->
3.layout_y: In AbsoluteLayout layout_y attribute is used to specify the y- coordinate of the view(TextView or any other view). The possible value for this is in dp or px.
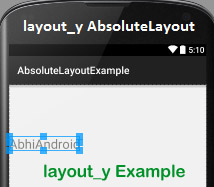
Below is the layout_y attribute’s example code with explanation included in which we set the 200px value for the y- coordinate.
<TextView
android:layout_width="wrap_content"
android:layout_height="wrap_content"
android:text="AbhiAndroid"
android:textSize="25sp"
android:layout_y="200px"/><!--y-coordinate of a text view in Android Studio-->
Example of Absolute Layout in Android:
Below is the example code of Absolute Layout in which we design a login screen with two field user name and password and one button for login. We set the all views using x and y coordinates of the screen and set the values in px(pixels). Below is the final output and code:
[cp_modal id=”cp_id_390fb”] [/cp_modal]

Select File -> New -> New Project. Fill the forms and click “Finish” button.
Step 2: Open res -> layout -> activity_main.xml (or) main.xml and add following code. Here we are designing a login form inside Absolute Layout.
<AbsoluteLayout xmlns:android="http://schemas.android.com/apk/res/android"
    android:layout_width="fill_parent"
    android:layout_height="fill_parent">

    <TextView
        android:layout_x="110px"
        android:layout_y="110px"
        android:text="User Name"
        android:layout_width="wrap_content"
        android:layout_height="wrap_content" />
    <EditText
        android:layout_x="250px"
        android:layout_y="80px"
        android:width="100px"
        android:layout_width="200dp"
        android:layout_height="wrap_content" />
    <TextView
        android:layout_x="110px"
        android:layout_y="200px"
        android:text="Password"
        android:layout_width="wrap_content"
        android:layout_height="wrap_content" />
    <EditText
        android:layout_x="250px"
        android:layout_y="150px"
        android:width="100px"
        android:layout_width="200dp"
        android:layout_height="wrap_content" />
    <Button
        android:layout_width="wrap_content"
        android:layout_height="wrap_content"
        android:text="Log In"
        android:layout_x="300px"
        android:layout_y="300px"/>
</AbsoluteLayout>
Step 3: Now Open java -> package -> MainActivity.java and paste the below code.
package example.abhiandriod.absolytelayoutexample;

import android.support.v7.app.AppCompatActivity;
import android.os.Bundle;
import android.view.Menu;
import android.view.MenuItem;

public class MainActivity extends AppCompatActivity {

    @Override
    protected void onCreate(Bundle savedInstanceState) {
        super.onCreate(savedInstanceState);
        setContentView(R.layout.activity_main);
    }

    @Override
    public boolean onCreateOptionsMenu(Menu menu) {
        // Inflate the menu; this adds items to the action bar if it is present.
        getMenuInflater().inflate(R.menu.menu_main, menu);
        return true;
    }

    @Override
    public boolean onOptionsItemSelected(MenuItem item) {
        // Handle action bar item clicks here. The action bar will
        // automatically handle clicks on the Home/Up button, so long
        // as you specify a parent activity in AndroidManifest.xml.
        int id = item.getItemId();

        //noinspection SimplifiableIfStatement
        if (id == R.id.action_settings) {
            return true;
        }

        return super.onOptionsItemSelected(item);
    }
}
Step 4: Now Open Manifests and click on AndroidManifest.xml and paste the below code
<?xml version="1.0" encoding="utf-8"?>
<manifest xmlns:android="http://schemas.android.com/apk/res/android"
    package="example.abhiandriod.absolytelayoutexample" >

    <application
        android:allowBackup="true"
        android:icon="@mipmap/ic_launcher"
        android:label="@string/app_name"
        android:theme="@style/AppTheme" >
        <activity
            android:name=".MainActivity"
            android:label="@string/app_name" >
            <intent-filter>
                <action android:name="android.intent.action.MAIN" />

                <category android:name="android.intent.category.LAUNCHER" />
            </intent-filter>
        </activity>
    </application>

</manifest>
Step 5: Lastly Open res -> values ->strings.xml and paste the below code.
<resources>
    <string name="app_name">AbsolyteLayoutExample</string>
    <string name="hello_world">Hello world!</string>
    <string name="action_settings">Settings</string>
</resources>
Output:
Now run the App in Emulator or AVD. You will see the login form designed in Absoulte Layout having fix x and y coordinate.

One thought on “Absolute Layout With Example In Android Studio”
Leave a Reply
Premium Project Source Code:
- Food Ordering Android App Project Source Code
- Ecommerce Store Android App Project Source Code
- Convert Website Into Android App Project Source Code
- Quiz Game Android App Project Source Code
- Radio Streaming Android App Source Code
- City Guide Android App Project Source Code
- QR Barcode Android App Project Source Code
So easy way to understand