ImageButton Tutorial With Example In Android Studio
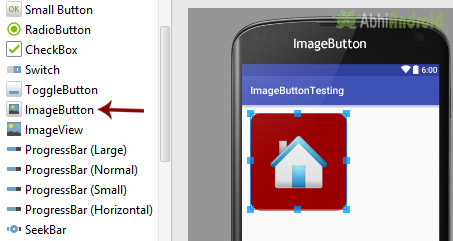
In Android, ImageButton is used to display a normal button with a custom image in a button. In simple words we can say, ImageButton is a button with an image that can be pressed or clicked by the users. By default it looks like a normal button with the standard button background that changes the color during different button states.

Important Note: Standard button background image is displayed in the background of button whenever you create an image button. To remove that image, you can define your own background image in xml by using background attribute or in java class by using setBackground() method.
Below is the code and image which shows how custom imagebutton looks in Android:
Important Note: ImageButton has all the properties of a normal button so you can easily perform any event like click or any other event which you can perform on a normal button.
ImageButton code in XML:
<!--Make Sure To Add Image Name home in Drawable Folder-->
<ImageButton
android:id="@+id/simpleImageButton"
android:layout_width="wrap_content"
android:layout_height="wrap_content"
android:src="@drawable/home" />

Table Of Contents
Attributes of ImageButton:
Now let’s we discuss some important attributes that helps us to configure a image button in your xml file (layout).
1. id: id is an attribute used to uniquely identify a image button. Below is the example code in which we set the id of a image button.
<ImageButton
android:id="@+id/simpleImageButton"
android:layout_width="wrap_content"
android:layout_height="wrap_content"/>
2. src: src is an attribute used to set a source file of image or you can say image in your image button to make your layout look attractive.
Below is the example code in which we set the source of an image button. Make sure you have saved an image in drawable folder name home before using below code.
<ImageButton
    android:id="@+id/simpleImageButton"
    android:layout_width="wrap_content"
    android:layout_height="wrap_content"
    android:src="@drawable/home"/> <!--src(source)file from drawable folder which display an imagebutton-->
Setting Image Source In ImageButton Using Java class:
We can also set the source image at run time programmatically in java class. For that we use setImageResource() function as shown in below example code.
/*Add in Oncreate() funtion after setContentView()*/
ImageButton simpleImageButton = (ImageButton)findViewById(R.id.simpleImageButton);
simpleImageButton.setImageResource(R.drawable.home); //set the image programmatically
3. background: background attribute is used to set the background of an image button. We can set a color or a drawable in the background of a Button.
Below is the example code in which we set the black color for the background and an home image as the source of the image button.
<ImageButton
    android:id="@+id/simpleImageButton"
    android:layout_width="wrap_content"
    android:layout_height="wrap_content"
    android:src="@drawable/home"
    android:background="#000"/><!-- black background color for image button-->

Below is the example code in which we set the black background color of a image button programmatically means in java class.
/*Add in Oncreate() funtion after setContentView()*/
ImageButton simpleImageButton = (ImageButton) findViewById(R.id.simpleImageButton);
simpleImageButton.setBackgroundColor(Color.BLACK); //set black background color for image button
4. padding: padding attribute is used to set the padding from left, right, top or bottom of the ImageButton.
- paddingRight : set the padding from the right side of the image button.
- paddingLeft : set the padding from the left side of the image button.
- paddingTop : set the padding from the top side of the image button.
- paddingBottom : set the padding from the bottom side of the image button.
- padding : set the padding from the all side’s of the image button.
Below is the example code of padding attribute in which we set the 20dp padding from all the side’s of a image button.
<ImageButton
    android:id="@+id/simpleImageButton"
    android:layout_width="wrap_content"
    android:layout_height="wrap_content"
    android:background="#000"
    android:src="@drawable/home"
    android:padding="30dp"/><!-- set 30dp padding from all the sides of the view-->

Example of ImageButton In Android Studio:
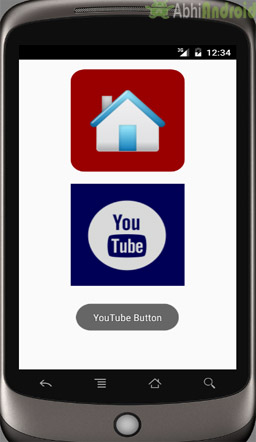
In the below example of ImageButton we display two custom image buttons with source and background. One is simple image button with simple background and other one is a round corner image button and whenever you click on an button, the name of the button will be displayed in a toast. Below is the code and final output:
[cp_modal id=”cp_id_2ba06″] [/cp_modal]

In this step we create a new project in android studio by filling all the necessary details of the app like app name, package name, api versions etc.
Select File -> New -> New Project and Fill the forms and click "Finish" button.
Step 3: Right click on drawable -> New -> Drawable resource file and create new xml file name custom_image-buttton.xml and add following code
In this Step we create drawable xml in which we used solid and corner properties, solid is used to set the background color for the image button and corner is used to set the radius for button corners.
<?xml version="1.0" encoding="utf-8"?>
<shape xmlns:android="http://schemas.android.com/apk/res/android">
    <solid android:color="#900" /><!-- background color for imagebutton-->
    <corners android:radius="20dp" /><!-- round corners for imagebutton-->
</shape>
Step 3: Open app -> layout -> activity_main.xml (or) main.xml and add following code:
In this step, we open an xml file and add the code which display two custom image buttons by using src, background, gravity and other attributes in Relative Layout.
<RelativeLayout xmlns:android="http://schemas.android.com/apk/res/android"
    xmlns:tools="http://schemas.android.com/tools"
    android:layout_width="match_parent"
    android:layout_height="match_parent"
    android:paddingBottom="@dimen/activity_vertical_margin"
    android:paddingLeft="@dimen/activity_horizontal_margin"
    android:paddingRight="@dimen/activity_horizontal_margin"
    android:paddingTop="@dimen/activity_vertical_margin"
    tools:context=".MainActivity">

<!--Make sure to save two images home and youtube in drawable folder-->

    <ImageButton
        android:id="@+id/simpleImageButtonHome"
        android:layout_width="wrap_content"
        android:layout_height="wrap_content"
        android:layout_centerHorizontal="true"
        android:background="@drawable/custom_image_button"
        android:padding="20dp"
        android:src="@drawable/home" />

    <ImageButton
        android:id="@+id/simpleImageButtonYouTube"
        android:layout_width="wrap_content"
        android:layout_height="wrap_content"
        android:layout_below="@+id/simpleImageButtonHome"
        android:layout_centerHorizontal="true"
        android:layout_marginTop="20dp"
        android:background="#005"
        android:padding="20dp"
        android:src="@drawable/youtube" />

</RelativeLayout>
Step 4: Open app -> package -> MainActivity.java
In this step, we add the code to initiate the image button’s and then perform click event on them and display the text for selected item using a toast.
package example.abhiandriod.imagebuttonexample;

import android.app.Activity;
import android.graphics.Color;
import android.support.v7.app.AppCompatActivity;
import android.os.Bundle;
import android.view.Menu;
import android.view.MenuItem;
import android.view.View;
import android.widget.ImageButton;
import android.widget.Toast;


public class MainActivity extends Activity {

    @Override
    protected void onCreate(Bundle savedInstanceState) {
        super.onCreate(savedInstanceState);
        setContentView(R.layout.activity_main);

// initiate view's
        ImageButton simpleImageButtonHome = (ImageButton)findViewById(R.id.simpleImageButtonHome);
        ImageButton simpleImageButtonYouTube = (ImageButton)findViewById(R.id.simpleImageButtonYouTube);

// perform click event on button's
        simpleImageButtonHome.setOnClickListener(new View.OnClickListener() {
            @Override
            public void onClick(View view) {
                Toast.makeText(getApplicationContext(),"Home Button",Toast.LENGTH_LONG).show();// display the toast on home button click
            }
        });
        simpleImageButtonYouTube.setOnClickListener(new View.OnClickListener() {
            @Override
            public void onClick(View view) {
                Toast.makeText(getApplicationContext(),"YouTube Button",Toast.LENGTH_LONG).show();// display the toast on you tube button click
            }
        });
    }


}
Output:
Now start the AVD in Emulator and run the App. You will see two ImageButton out of which top one is round corner. Click on any image and its name will be displayed on screen.

2 thoughts on “ImageButton Tutorial With Example In Android Studio”
Leave a Reply
Premium Project Source Code:
- Food Ordering Android App Project Source Code
- Ecommerce Store Android App Project Source Code
- Convert Website Into Android App Project Source Code
- Quiz Game Android App Project Source Code
- Radio Streaming Android App Source Code
- City Guide Android App Project Source Code
- QR Barcode Android App Project Source Code
Hello,
In android studio how to close whole application on button click
hiiiiii,i create it….