Switch (On/Off) Tutorial With Example In Android Studio
In Android, Switch is a two-state toggle switch widget that can select between two options. It is used to display checked and unchecked state of a button providing slider control to user. Switch is a subclass of CompoundButton. It is basically an off/on button which indicate the current state of Switch. It is commonly used in selecting on/off in Sound, Bluetooth, WiFi etc.
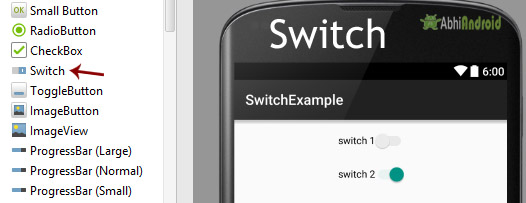
Switch allow the users to change the setting between two states like turn on/off wifi, Bluetooth etc from your phone’s setting menu. It was introduced after Android 4.0 version (API level 14).
Important Note: Android Switch and ToggleButton both are the subclasses of CompoundButton class.
Switch code in XML:
<Switch
android:id="@+id/simpleSwitch"
android:layout_width="wrap_content"
android:layout_height="wrap_content"/>
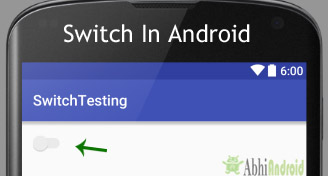
Below is an example code in which we checked the current state of a Switch.
// initiate a Switch
Switch simpleSwitch = (Switch) findViewById(R.id.simpleSwitch);

// check current state of a Switch (true or false).
Boolean switchState = simpleSwitch.isChecked();
Table Of Contents
Attributes of Switch:
Now let’s we discuss important Switch attributes that helps us to configure a Switch in XML file(layout).
1. id: id is an attribute used to uniquely identify a Switch.
<Switch
android:id="@+id/simpleSwitch"
android:layout_width="wrap_content"
android:layout_height="wrap_content"/>
2. checked: checked attribute of Switch is used to set the current state of a Switch. The value can be either true or false where true shows the checked state and false shows unchecked state of a Switch. The default value of checked attribute is false. We can also set the current state programmatically.
Below we set “true” value for checked attribute that sets the current state to checked.
<Switch
android:id="@+id/simpleSwitch"
android:layout_width="wrap_content"
android:layout_height="wrap_content"
android:checked="true"/> <!-- set the current state of the Switch-->

Below we set the current state of Switch in java class.
/*Add in Oncreate() funtion after setContentView()*/
// initiate a Switch
Switch simpleSwitch = (Switch) findViewById(R.id.simpleSwitch);

//set the current state of a Switch
simpleSwitch.setChecked(true);
3. text: text attribute is used to set the text in a Switch. We can set the text in xml as well as in the java class.
Below we set the text “Sound” for the Switch.
<Switch
android:id="@+id/simpleSwitch"
android:layout_width="wrap_content"
android:layout_height="wrap_content"
android:layout_centerHorizontal="true"
android:text="Sound" /> <!--displayed text of switch-->

In the below code we set text of Switch via java class.
/*Add in Oncreate() funtion after setContentView()*/
// initiate Switch
Switch simpleSwitch = (Switch) findViewById(R.id.simpleSwitch);

//displayed text of the Switch
simpleSwitch.setText("switch");
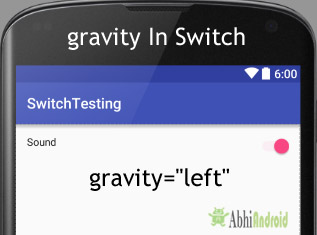
4. gravity: The gravity attribute is an optional attribute which is used to control the alignment of the text in Switch. We can set text left, right, center, top, bottom, center_vertical, center_horizontal etc in Switch.
In the below code we set the left gravity for the text in Switch.
<Switch
    android:id="@+id/simpleSwitch"
    android:layout_width="fill_parent"
    android:layout_height="wrap_content"
    android:text="Sound"
    android:checked="true"
    android:gravity="left"/><!--gravity of the Switch-->
In the below example we set the textOn as “Yes” and textOff as “No” for a Switch.
<Switch
    android:id="@+id/simpleSwitch"
    android:layout_width="wrap_content"
    android:layout_height="wrap_content"
    android:checked="true"
    android:text="Notification"
    android:textOff="No"
    android:textOn="Yes"/><!-- text to be displayed whenever current state is checked-->

Below we set the textOn and textOff of a Switch in java class.
/*Add in Oncreate() funtion after setContentView()*/
Switch simpleSwitch = (Switch) findViewById(R.id.simpleSwitch); // initiate Switch

simpleSwitch.setTextOn("On"); // displayed text of the Switch whenever it is in checked or on state
simpleSwitch.setTextOff("Off"); // displayed text of the Switch whenever it is in unchecked i.e. off state
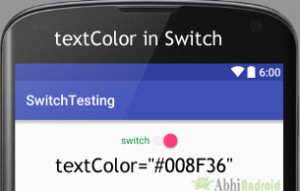
6. textColor: textColor attribute is used to set the text color of a Switch. Color value is in the form of “#argb”, “#rgb”, “#rrggbb”, or “#aarrggbb”.
Below is the example code with explanation included in which we set the red color for the displayed text of a Switch.
<Switch
    android:id="@+id/simpleSwitch"
    android:layout_width="wrap_content"
    android:layout_height="wrap_content"
    android:checked="true"
    android:text="switch"
    android:layout_centerHorizontal="true"
    android:textOn="On"
    android:textOff="Off"
    android:gravity="center"
    android:textColor="#008F36"/><!-- Green color for displayed text-->
Below is the example code in which we set the text color of a Switch programmatically.
/*Add in Oncreate() funtion after setContentView()*/
 Switch simpleSwitch = (Switch) findViewById(R.id.simpleSwitch);// initiate Switch

 simpleSwitch.setTextColor(Color.GREEN); //red color for displayed text of Switch
7. textSize: textSize attribute is used to set the size of the text of a Switch. We can set the text size in sp(scale independent pixel) or dp(density pixel).
Below is the example code in which we set the 25sp size for the text of a Switch.
<Switch
    android:id="@+id/simpleSwitch"
    android:layout_width="wrap_content"
    android:layout_height="wrap_content"
    android:checked="true"
    android:text="switch"
    android:layout_centerHorizontal="true"
    android:textOn="On"
    android:textOff="Off"
    android:textColor="#f00"
    android:gravity="center"
    android:textSize="25sp"/> <!--25sp displayed text size-->

Below is the example code in which we set the text size of a Switch programmatically.
Switch simpleSwitch = (Switch) findViewById(R.id.simpleSwitch); // initiate Switch

simpleSwitch.setTextSize(25); // set 25sp displayed text size of Switch
9. textStyle: textStyle attribute is used to set the text style of the text of a Switch. The possible text styles are bold, italic and normal. If we need to use two or more styles for a text view then use “|” operator.
Below we set the bold and italic text styles for text of a Switch.
<Switch
    android:id="@+id/simpleSwitch"
    android:layout_width="wrap_content"
    android:layout_height="wrap_content"
    android:checked="false"
    android:text="switch"
    android:layout_centerHorizontal="true"
    android:textOn="On"
    android:textOff="Off"
    android:textColor="#f00"
    android:gravity="center"
    android:textSize="25sp"
    android:textStyle="bold|italic"/><!--bold and italic text style for displayed text-->

Below we set the black color for the background and red color for the displayed text of a Switch.
<Switch
    android:id="@+id/simpleSwitch"
    android:layout_width="wrap_content"
    android:layout_height="wrap_content"
    android:checked="true"
    android:text="switch"
    android:layout_centerHorizontal="true"
    android:textOn="On"
    android:textOff="Off"
    android:textColor="#f00"
    android:padding="20dp"
    android:gravity="center"
    android:textSize="25sp"
    android:background="#000"/><!-- black background color-->
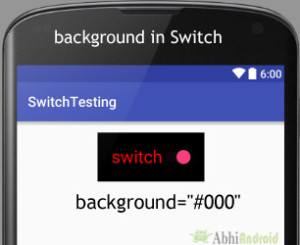
Below we set the background color of a Switch programmatically.
Switch simpleSwitch = (Switch) findViewById(R.id.simpleSwitch);
simpleSwitch.setBackgroundColor(Color.BLACK);
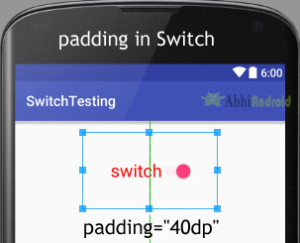
11. padding: padding attribute is used to set the padding from left, right, top or bottom in Switch.
- paddingRight: set the padding from the right side of the Switch.
- paddingLeft: set the padding from the left side of the Switch.
- paddingTop: set the padding from the top side of the Switch.
- paddingBottom: set the padding from the bottom side of the Switch.
- Padding: set the padding from the all side’s of the Switch.
Below we set the 20dp padding from all the side’s of the Switch.
<Switch
    android:id="@+id/simpleSwitch"
    android:layout_width="wrap_content"
    android:layout_height="wrap_content"
    android:checked="true"
    android:text="switch"
    android:layout_centerHorizontal="true"
    android:textOn="On"
    android:textOff="Off"
    android:textColor="#f00"
    android:gravity="center"
    android:textSize="25sp"
    android:padding="40dp"/><!-- 20dp padding from all the side's-->
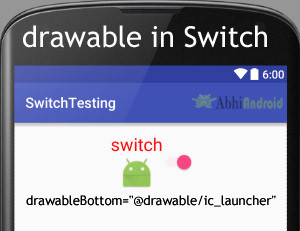
Below we set the icon to the below of the text of a Switch. You can try other three by yourself.
Before you try this make sure you have icon image in drawable folder
<Switch
    android:id="@+id/simpleSwitch"
    android:layout_width="wrap_content"
    android:layout_height="wrap_content"
    android:checked="true"
    android:text="switch"
    android:layout_centerHorizontal="true"
    android:textOn="On"
    android:textOff="Off"
    android:textColor="#f00"
    android:gravity="center"
    android:textSize="25sp"
    android:drawableBottom="@drawable/ic_launcher"/><!--drawable icon to be displayed in the bottom of text-->
Example of Switch In Android Studio:
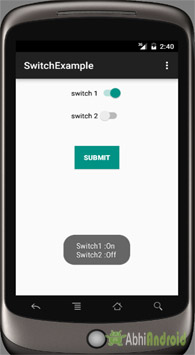
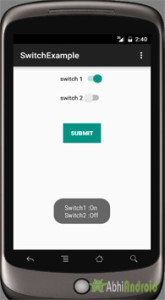
Below is the example of Switch in Android Studio. In this example, we display two Switches and one “submit” button using background & other attributes as discussed earlier in this post. Whenever you click on submit button the current state for both the Switch’s is displayed in a Toast. Below is the final output, code and example explained step by step:
[cp_modal id=”cp_id_5e2fa”] [/cp_modal]
In this step we create a new project in android studio by filling all the necessary details of the app like app name, package name, api versions etc.
Select File -> New -> New Project Fill the forms and click "Finish" button.
Step 2: Open res -> layout -> activity_main.xml (or) main.xml and add following code:
In this step we open an xml file and add the code for displaying two Switch and one normal button.
<LinearLayout xmlns:android="http://schemas.android.com/apk/res/android"
    xmlns:tools="http://schemas.android.com/tools"
    android:layout_width="match_parent"
    android:layout_height="match_parent"
    android:orientation="vertical"
    android:paddingBottom="@dimen/activity_vertical_margin"
    android:paddingLeft="@dimen/activity_horizontal_margin"
    android:paddingRight="@dimen/activity_horizontal_margin"
    android:paddingTop="@dimen/activity_vertical_margin"
    tools:context=".MainActivity">


    <Switch
        android:id="@+id/simpleSwitch1"
        android:layout_width="wrap_content"
        android:layout_height="wrap_content"
        android:layout_gravity="center"
        android:checked="false"
        android:text="switch 1"
        android:textOff="Off"
        android:textOn="On" />

    <Switch
        android:id="@+id/simpleSwitch2"
        android:layout_width="wrap_content"
        android:layout_height="wrap_content"
        android:layout_gravity="center"
        android:layout_marginTop="20dp"
        android:checked="true"
        android:text="switch 2"
        android:textOff="Off"
        android:textOn="On" />

    <Button
        android:id="@+id/submitButton"
        android:layout_width="wrap_content"
        android:layout_height="wrap_content"
        android:layout_gravity="center"
        android:layout_marginTop="50dp"
        android:background="#009284"
        android:padding="10dp"
        android:text="Submit"
        android:textColor="#fff"
        android:textStyle="bold" />
</LinearLayout>
Step 3: Open app -> java -> package -> MainActivity.java
In this step we open MainActivity where we add the code to initiate the two Switch’s and one normal button. And then we perform click event on button and display the text of current state of Switch by using a toast.
package example.abhiandriod.switchexample;

import android.support.v7.app.AppCompatActivity;
import android.os.Bundle;
import android.view.View;
import android.widget.Button;
import android.widget.Switch;
import android.widget.Toast;

public class MainActivity extends AppCompatActivity {

    Switch simpleSwitch1, simpleSwitch2;
    Button submit;

    @Override
    protected void onCreate(Bundle savedInstanceState) {
        super.onCreate(savedInstanceState);
        setContentView(R.layout.activity_main);
        // initiate view's
        simpleSwitch1 = (Switch) findViewById(R.id.simpleSwitch1);
        simpleSwitch2 = (Switch) findViewById(R.id.simpleSwitch2);
        submit = (Button) findViewById(R.id.submitButton);
        submit.setOnClickListener(new View.OnClickListener() {
            @Override
            public void onClick(View view) {
                String statusSwitch1, statusSwitch2;
                if (simpleSwitch1.isChecked())
                    statusSwitch1 = simpleSwitch1.getTextOn().toString();
                else
                    statusSwitch1 = simpleSwitch1.getTextOff().toString();
                if (simpleSwitch2.isChecked())
                    statusSwitch2 = simpleSwitch2.getTextOn().toString();
                else
                    statusSwitch2 = simpleSwitch2.getTextOff().toString();
                Toast.makeText(getApplicationContext(), "Switch1 :" + statusSwitch1 + "\n" + "Switch2 :" + statusSwitch2, Toast.LENGTH_LONG).show(); // display the current state for switch's
            }
        });

    }
}
Output:
Now start the AVD in Emulator and run the App. You will see two switch and one Button. Now change the state of the switch (i.e. either checked or unchecked) and click on the Button. You will see the state displayed on screen as Toast.
9 thoughts on “Switch (On/Off) Tutorial With Example In Android Studio”
Leave a Reply
Premium Project Source Code:
- Food Ordering Android App Project Source Code
- Ecommerce Store Android App Project Source Code
- Convert Website Into Android App Project Source Code
- Quiz Game Android App Project Source Code
- Radio Streaming Android App Source Code
- City Guide Android App Project Source Code
- QR Barcode Android App Project Source Code
Hi! i appreciate those examples you gave ,but uhm…i need your help on how to control my background sound/music with the switch,as in on to play sound and off to stop sound
that is very useful for me
great job
Thanks, it works.
That was very helpful
Very well Explained but I still have a question. How to turn On/Off the sound of the application when the swich is checked?
Hello. Your article was helpful. But the textOn and textOff attribute isnt working. Only the text mentioned in text attribute is working in my case. I have tried by placing the code in both java class and xml. Did you use that attriute for toggle button? Can u help?
You have to set: android:showText=”true”
some code not working.. like statusSwitch what’s the menaning of statusSwitch no write on the functionailty on the code.
statusSwitch is just the name of string we created. You can give any name you wish. Please let us know which part of code not working so we can help you out.
well explanation.