Chronometer Tutorial With Example In Android Studio
In Android, Chronometer is a class that implements a simple timer. Chronometer is a subclass of TextView. This class helps us to add a timer in our app.
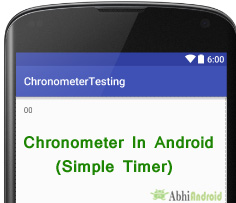
You can give Timer start time in the elapsedRealTime() timebase and it start counting from that. If we don’t give base time then it will use the time at which time we call start() method. By default a chronometer displays the current timer value in the form of MM:SS or H:MM:SS. We can set our own format into an arbitrary string.
Chronometer code in XML:
<Chronometer
android:id="@+id/simpleChronometer"
android:layout_width="wrap_content"
android:layout_height="wrap_content" />
Table Of Contents
Methods Of Chronometer In Android:
Let’s discuss some important methods of chronometer that may be called in order to manage the chronometer.
1. start(): start function of chronometer is used to start the counting up.
Below we start the counting up of a chronometer.
Chronometer simpleChronometer = (Chronometer) findViewById(R.id.simpleChronometer); // initiate a chronometer

simpleChronometer.start(); // start a chronometer
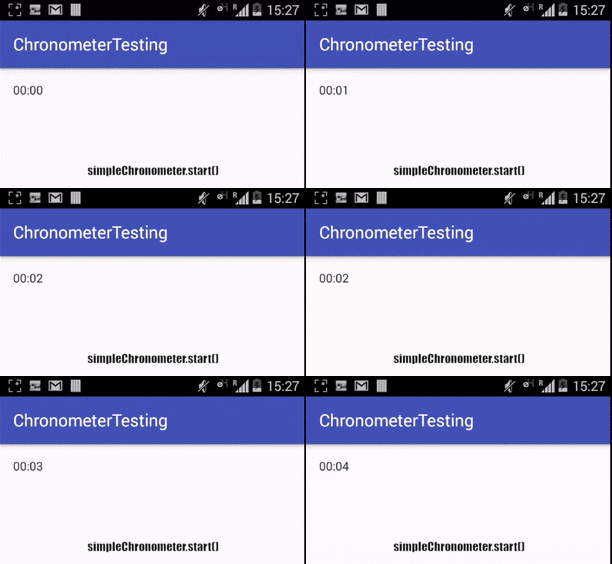
2. stop(): stop function of chronometer is used to stop the counting up.
Below code stop the counting of a chronometer.
Chronometer simpleChronometer = (Chronometer) findViewById(R.id.simpleChronometer); // initiate a chronometer

simpleChronometer.stop(); // stop a chronometer
3. setFormat(String format): set format function of chronometer is used to set the format string used to display. In other words we can say it is used to display text, numbers etc along-with chronometer.
In the below example code we set the string format for displaying a chronometer.
Chronometer simpleChronometer = (Chronometer) findViewById(R.id.simpleChronometer); // initiate a chronometer
simpleChronometer.start(); // start a chronometer
simpleChronometer.setFormat("Time Running - %s"); // set the format for a chronometer
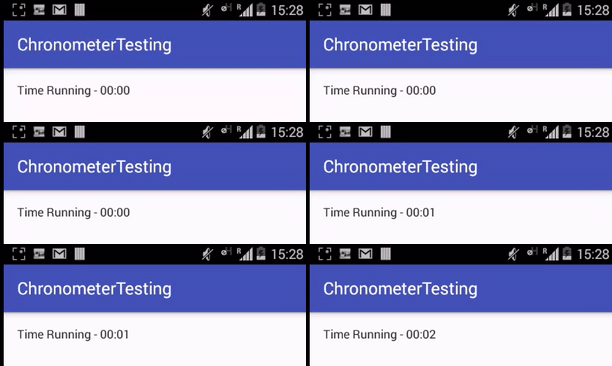
4. getformat(): This function of chronometer is used for getting the current format string. This methods returns a string type value.
Below we get the current format string from a chronometer.
simpleChronometer = (Chronometer) findViewById(R.id.simpleChronometer); // initiate a chronometer

String formatType=simpleChronometer.getFormat(); // get the format from a chronometer
5. setOnChronometerTickListener(Chronometer.OnChronometerTickListener listener): This is a listener event which is automatically called when the chronometer changes.
Below we show the use of setOnChronometerTickListener() for a chronometer.
Chronometer simpleChronometer = (Chronometer) findViewById(R.id.simpleChronometer); // initiate a chronometer
// perform set on chronometer tick listener event of chronometer

simpleChronometer.setOnChronometerTickListener(new Chronometer.OnChronometerTickListener() {

@Override

public void onChronometerTick(Chronometer chronometer) {

// do something when chronometer changes

}

});
6. setBase(long base): set base function of chronometer is used to set the time that count up time is in reference to. You can give it a start time in the elapsedRealtime() timebase, and it counts up from that, or if you don’t give it a base time, it will use the time at which you call start().
SystemClock.elapsedRealtime() is the number of milliseconds since the device was turned on.
Below we set the base time for a chronometer.
Chronometer simpleChronometer = (Chronometer) findViewById(R.id.simpleChronometer); // initiate a chronometer

simpleChronometer.setBase(SystemClock.elapsedRealtime()); // set base time for a chronometer
7. getBase(): get base function is used to get the base time from a chronometer. This method returns a base time as set through the setBase() function. This method return long value.
Below we get the base time from a chronometer.
Chronometer simpleChronometer = (Chronometer) findViewById(R.id.simpleChronometer); // initiate a chronometer

long base=simpleChronometer.getBase(); // get base time from a chronometer
Attributes of Chronometer In Android:
Now let’s we discuss some common attributes of a chronomter that helps us to configure it in our layout (xml).
1. Id: id attribute is used to uniquely identify a chronometer.
<Chronometer
android:id="@+id/simpleChronometer"
android:layout_width="wrap_content"
android:layout_height="wrap_content" />
2. gravity: The gravity attribute is an optional attribute which is used to control the alignment of the text like left, right, center, top, bottom, center_vertical, center_horizontal etc.
Below we set the center_horizontal gravity for text of a chronometer.
<Chronometer
android:id="@+id/simpleChronometer"
android:layout_width="fill_parent"
android:layout_height="wrap_content"
android:gravity="center_horizontal" /><!-- center horizontal gravity for the text of chronometer -->

3. textColor: textColor attribute is used to set the text color of chronometer. Color value is in the form of “#argb”, “#rgb”, “#rrggbb”, or “#aarrggbb”.
Below we set the red color for the displayed text of a chronometer.
<Chronometer
android:id="@+id/simpleChronometer"
android:layout_width="fill_parent"
android:layout_height="wrap_content"
android:gravity="center_horizontal"
android:textColor="#f00"/><!-- red color for the text of chronometer -->

Setting textColor of Chronometer In Java class:
Chronometer simpleChronometer = (Chronometer) findViewById(R.id.simpleChronometer); // initiate a chronometer

simpleChronometer.setTextColor(Color.RED); // set red color for the displayed text of a chronometer
4. textSize: textSize attribute is used to set the size of text of chronometer. We can set the text size in sp (scale independent pixel) or dp ( density pixel ).
Below we set the 25sp size for the text of a chronometer.
<Chronometer
android:id="@+id/simpleChronometer"
android:layout_width="fill_parent"
android:layout_height="wrap_content"
android:gravity="center_horizontal"
android:textColor="#f00"
android:textSize="25sp"/><!-- 25 sp size for displayed text of chronometer -->
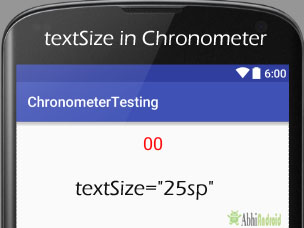
Setting textSize of Chronometer In Java class:
Chronometer simpleChronometer = (Chronometer) findViewById(R.id.simpleChronometer); // initiate a chronometer

simpleChronometer.setTextSize(25); // set text size of a chronometer
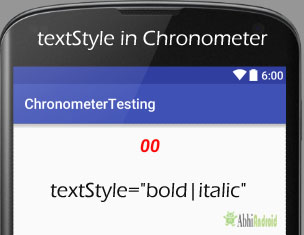
5. textStyle: textStyle attribute is used to set the text style of a chronometer. The possible text styles are bold, italic and normal. If we need to use two or more styles for a chronomter text then “|” operator is used for that.
Below we set the bold and italic text styles for text of a chronometer.
<Chronometer
android:id="@+id/simpleChronometer"
android:layout_width="wrap_content"
android:layout_height="wrap_content"
android:layout_centerHorizontal="true"
android:textColor="#f00"
android:textSize="25sp"
android:textStyle="bold|italic"/><!-- bold and italic style for displayed text of chronometer -->
6. background: background attribute is used to set the background of a chronometer. You can set a color or a drawable in the background of a text view. You can also set the background color programmatically means in java class.
Below we set the green color for the background of a chronometer.
<Chronometer

android:id="@+id/simpleChronometer"
android:layout_width="50dp"
android:layout_height="wrap_content"
android:layout_centerHorizontal="true"
android:textColor="#f00"
android:textSize="25sp"
android:textStyle="bold|italic"
android:background="#0f0"/><!-- green background color of chronometer -->

Setting background of Chronometer In Java class:
Chronometer simpleChronometer = (Chronometer) findViewById(R.id.simpleChronometer); // initiate a chronometer

simpleChronometer.setBackgroundColor(Color.GREEN); // set green color for the background of a chronometer
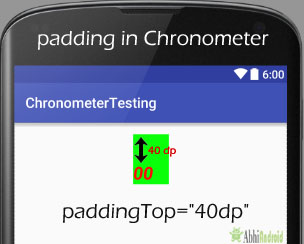
7. padding: padding attribute is used to set the padding from left, right, top or bottom.
- paddingRight : set the padding from the right side of the chronometer.
- paddingLeft : set the padding from the left side of the chronometer.
- paddingTop : set the padding from the top side of the chronometer.
- paddingBottom : set the padding from the bottom side of the
- Padding : set the padding from the all side’s of the chronometer.
Below we set 20dp padding from the top of a chronometer.
<Chronometer

android:id="@+id/simpleChronometer"
android:layout_width="50dp"
android:layout_height="wrap_content"
android:layout_centerHorizontal="true"
android:textColor="#f00"
android:textSize="25sp"
android:textStyle="bold|italic"
android:background="#0f0"
android:paddingTop="20dp"/><!-- 20 dp padding from the top of a chronometer -->
8. drawableBottom: drawableBottom is the drawable to be drawn to the below of the text of chronometer.
9. drawableTop: drawableTop is the drawable to be drawn to the top of the text of a chronometer.
10. drawableRight: drawableRight is the drawable to be drawn to the right side of the text of a chronometer.
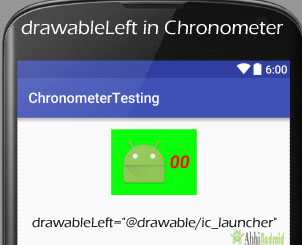
11. drawableLeft: drawableLeft is the drawable to be drawn to the left side of the text of a chronometer.
Below we set the icon to the left side of the text of chronometer. Make sure to save ic_launcher image in drawable folder.
<Chronometer

android:id="@+id/simpleChronometer"
android:layout_width="wrap_content"
android:layout_height="wrap_content"
android:layout_centerHorizontal="true"
android:textColor="#f00"
android:textSize="25sp"
android:textStyle="bold|italic"
android:background="#0f0"
android:gravity="center"
android:padding="10dp"
android:drawableLeft="@drawable/ic_launcher"/><!-- drawable left of a chronometer -->
Chronometer Example in Android Studio:
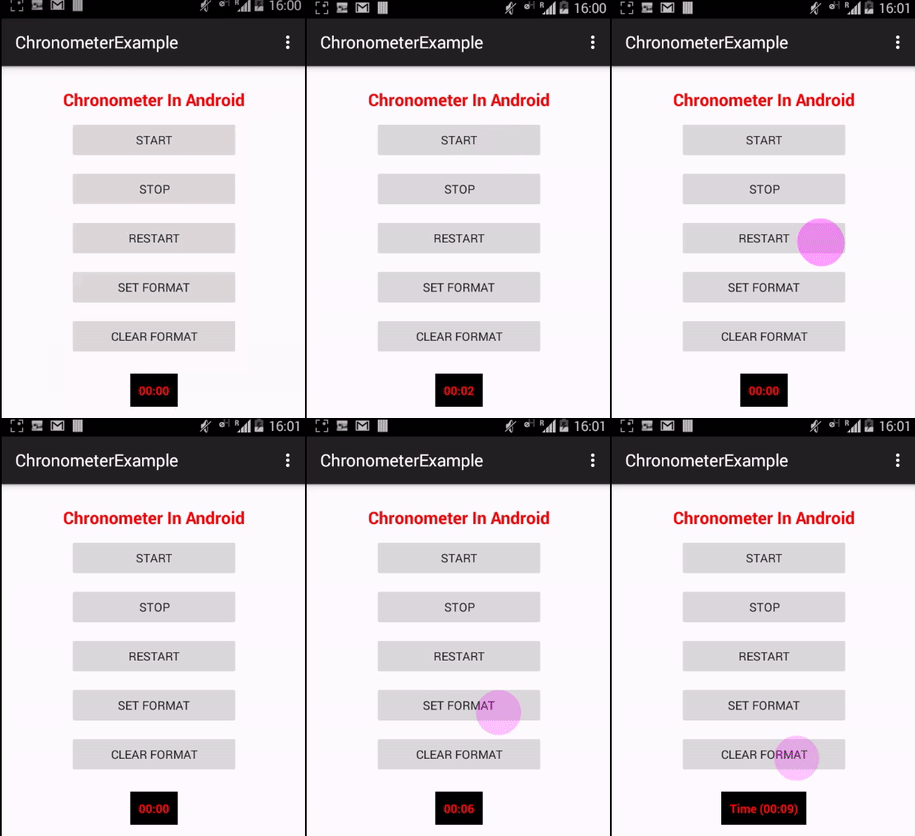
In the example of chronometer we display chronometer with five buttons and perform click events on that buttons. Buttons are used to start, stop, restart, setFormat and clearFormat of chronometer. Below is the final output, download project code and step by step explanation.
Step 1: Create a new project and name it ChronometerExample.
Step 2: Open res -> layout -> activity_main.xml (or) main.xml and add following code:
In this step we open xml file and add the code for displaying a chronometer with five buttons to perform operations on chronometer.
<RelativeLayout xmlns:android="http://schemas.android.com/apk/res/android"
    xmlns:tools="http://schemas.android.com/tools"
    android:layout_width="match_parent"
    android:layout_height="match_parent"
    android:paddingBottom="@dimen/activity_vertical_margin"
    android:paddingLeft="@dimen/activity_horizontal_margin"
    android:paddingRight="@dimen/activity_horizontal_margin"
    android:paddingTop="@dimen/activity_vertical_margin"
    tools:context=".MainActivity">

    <TextView
        android:id="@+id/textView1"
        android:layout_width="wrap_content"
        android:layout_height="wrap_content"
        android:layout_alignParentTop="true"
        android:layout_centerHorizontal="true"
        android:layout_marginTop="10dp"
        android:text="@string/chronometerInAndroid"
        android:textColor="#FF0000"
        android:textSize="20dp"
        android:textStyle="bold" />

    <Button
        android:id="@+id/startButton"
        android:layout_width="200dp"
        android:layout_height="wrap_content"
        android:layout_below="@+id/textView1"
        android:layout_centerHorizontal="true"
        android:layout_marginTop="10dp"
        android:text="@string/start" />

    <Button
        android:id="@+id/stopButton"
        android:layout_width="200dp"
        android:layout_height="wrap_content"
        android:layout_below="@+id/startButton"
        android:layout_centerHorizontal="true"
        android:layout_marginTop="10dp"
        android:text="@string/stop" />

    <Button
        android:id="@+id/restartButton"
        android:layout_width="200dp"
        android:layout_height="wrap_content"
        android:layout_below="@+id/stopButton"
        android:layout_centerHorizontal="true"
        android:layout_marginTop="10dp"
        android:text="@string/restart" />

    <Button
        android:id="@+id/setFormat"
        android:layout_width="200dp"
        android:layout_height="wrap_content"
        android:layout_below="@+id/restartButton"
        android:layout_centerHorizontal="true"
        android:layout_marginTop="10dp"
        android:text="@string/setFormat" />

    <Button
        android:id="@+id/clearFormat"
        android:layout_width="200dp"
        android:layout_height="wrap_content"
        android:layout_below="@+id/setFormat"
        android:layout_centerHorizontal="true"
        android:layout_marginTop="10dp"
        android:text="@string/clearFormat" />
    <!-- chronometer with black background and red text color -->
    <Chronometer
        android:id="@+id/simpleChronometer"
        android:layout_width="wrap_content"
        android:layout_height="wrap_content"
        android:layout_below="@+id/clearFormat"
        android:layout_centerHorizontal="true"
        android:layout_marginTop="20dp"
        android:background="#000"
        android:gravity="center"
        android:padding="10dp"
        android:textColor="#f00"
        android:textStyle="bold" />

</RelativeLayout>
Step 3: Open src -> package -> MainActivity.java
In this step we open MainActivity and add the code to initiate the chronometer, five button and then perform on click listener event on buttons to perform start, stop and other operations on chronometer as discussed earlier in this post.
package example.abhiandroid.chronometerexample;

import android.os.Bundle;
import android.os.SystemClock;
import android.support.v7.app.AppCompatActivity;
import android.view.Menu;
import android.view.MenuItem;
import android.view.View;
import android.widget.Button;
import android.widget.Chronometer;

public class MainActivity extends AppCompatActivity {

    Chronometer simpleChronometer;
    Button start, stop, restart, setFormat, clearFormat;

    @Override
    protected void onCreate(Bundle savedInstanceState) {
        super.onCreate(savedInstanceState);
        setContentView(R.layout.activity_main);
        // initiate views
        simpleChronometer = (Chronometer) findViewById(R.id.simpleChronometer);
        start = (Button) findViewById(R.id.startButton);
        stop = (Button) findViewById(R.id.stopButton);
        restart = (Button) findViewById(R.id.restartButton);
        setFormat = (Button) findViewById(R.id.setFormat);
        clearFormat = (Button) findViewById(R.id.clearFormat);
        // perform click  event on start button to start a chronometer
        start.setOnClickListener(new View.OnClickListener() {

            @Override
            public void onClick(View v) {
                // TODO Auto-generated method stub

                simpleChronometer.start();
            }
        });

        // perform click  event on stop button to stop the chronometer
        stop.setOnClickListener(new View.OnClickListener() {

            @Override
            public void onClick(View v) {
                // TODO Auto-generated method stub

                simpleChronometer.stop();
            }
        });

        // perform click  event on restart button to set the base time on chronometer
        restart.setOnClickListener(new View.OnClickListener() {

            @Override
            public void onClick(View v) {
                // TODO Auto-generated method stub

                simpleChronometer.setBase(SystemClock.elapsedRealtime());
            }
        });

        // perform click  event on set Format button to set the format of chronometer
        setFormat.setOnClickListener(new View.OnClickListener() {

            @Override
            public void onClick(View v) {
                // TODO Auto-generated method stub

                simpleChronometer.setFormat("Time (%s)");
            }
        });

        // perform click  event on clear button to clear the current format of chronmeter as you set through set format
        clearFormat.setOnClickListener(new View.OnClickListener() {

            @Override
            public void onClick(View v) {
                // TODO Auto-generated method stub

                simpleChronometer.setFormat(null);
            }
        });
    }


}
Step 4: Open res -> values -> strings.xml
In this step we shows the list of strings that will be used in our example.
<resources>
    <string name="app_name">ChronometerExample</string>
    <string name="hello_world">Hello world!</string>
    <string name="action_settings">Settings</string>
    <string name="chronometerInAndroid">Chronometer In Android</string>
    <string name="start">Start</string>
    <string name="stop">Stop</string>
    <string name="restart">Restart</string>
    <string name="setFormat">Set Format</string>
    <string name="clearFormat">Clear Format</string>
</resources>
Output:
Now run the App and you will see 5 buttons to start, stop, restart, set format and clear format of Chronometer.
11 thoughts on “Chronometer Tutorial With Example In Android Studio”
Leave a Reply
Premium Project Source Code:
- Food Ordering Android App Project Source Code
- Ecommerce Store Android App Project Source Code
- Convert Website Into Android App Project Source Code
- Quiz Game Android App Project Source Code
- Radio Streaming Android App Source Code
- City Guide Android App Project Source Code
- QR Barcode Android App Project Source Code
is there any code to pause the Chronometer
I need to get the time difference. How do I get time difference between the two times? Which method should be used.
Excellent Tutorials
Many Many Thanks
Hi,
Can you please help with how to get the chronometer elapsed time and read it in the second activity through an intent? I would be grateful..
Nice explanation and simple to understand. Thank You.
Nice explanation and simple. Thank You.
hi nice tutorial, but could please show me how can you record the start time and stop time as two different text views in a different Activity. please.I am really stuck.
Thanks
nice tuto ,, thank you for all your explaining (// “im baad in English”);
i nead to know ho to count a millisecond and how to count laps for example
thank you
Sorry, by bad I typed wrong the first android:layout_width property.
It works really fine.
Hi,
I’m trying your code
I get the next issue:
Information:Gradle tasks [:app:clean, :app:generateDebugSources, :app:generateDebugAndroidTestSources, :app:mockableAndroidJar, :app:prepareDebugUnitTestDependencies, :app:assembleDebug]
E:\MyDevs\Android\AndroidStudioProjects\Crono2\app\src\main\res\layout\main.xml
Error:(4, 27) String types not allowed (at ‘layout_width’ with value ‘match_parents’).
Error:(5, 28) String types not allowed (at ‘layout_height’ with value ‘match_parents’).
E:\MyDevs\Android\AndroidStudioProjects\Crono2\app\build\intermediates\res\merged\debug\layout\main.xml
Error:(4, 27) String types not allowed (at ‘layout_width’ with value ‘match_parents’).
Error:(5, 28) String types not allowed (at ‘layout_height’ with value ‘match_parents’).
Error:Execution failed for task ‘:app:processDebugResources’.
> com.android.ide.common.process.ProcessException: Failed to execute aapt
Information:BUILD FAILED
Information:Total time: 3.536 secs
Information:5 errors
Information:0 warnings
Information:See complete output in console
Can you figure out what wrong on my side?
great explanation