xml encoding=”utf-8″ ?>
In android, An adapter is a bridge between UI component and data source that helps us to fill data in UI component. It holds the data and send the data to adapter view then view can takes the data from the adapter view and shows the data on different views like listview, gridview, spinner etc. ArrayAdapter is more simple and commonly used Adapter in android.
- Whenever you have a list of single type of items which is backed by an array, you can use ArrayAdapter. For instance, list of phone contacts, countries or names.
- By default, ArrayAdapter expects a Layout with a single TextView, If you want to use more complex views means more customization in grid items or list items, please avoid ArrayAdapter and use custom adapters.
Important Note:
ArrayAdapter is an implementation of BaseAdapter so if we need to create a custom list view or a grid view then we have to create our own custom adapter and extend ArrayAdapter in that custom class. By doing this we can override all the function’s of BaseAdapter in our custom adapter.
Here is code of ArrayAdapter in Android:
ArrayAdapter(Context context, int resource, int textViewResourceId, T[] objects)
In the above code snippet is the implementation of a ArrayAdapter. Below is the description of all the parameters used for the implementation of a ArrayAdapter to show a list of elements in a list view or in a spinner.
Parameters used in ArrayAdapter:
Lets discuss parameter in ArrayAdapter class:
- context:
The first parameter is used to pass the context means the reference of current class. Here this is a keyword used to show the current class reference. We can also use getApplicationContext(), getActivity() in the place of this keyword. getApplicationContext() is used in a Activity and getActivity() is used in a Fragment.
Below is the example code in which we set the current class reference in a adapter.
ArrayAdapter arrayAdapter = new ArrayAdapter(this, int resource, int textViewResourceId, T[] objects);
- resource:
The second parameter is resource id used to set the layout(xml file) for list items in which you have a text view.
Below is the example code in which we set the layout.
ArrayAdapter arrayAdapter = new ArrayAdapter(this, R.layout.list_view_items, int textViewResourceId, T[] objects);
- textViewResourceId:
The third parameter is textViewResourceId which is used to set the id of TextView where you want to display the actual text.
Below is the example code in which we set the id(identity) of a text view.
ArrayAdapter arrayAdapter = new ArrayAdapter(this, R.layout.list_view_items, R.id.textView, T[] objects);
- objects:
The fourth parameter is an array of objects, used to set the array of elements in the textView. We can set the object of array or array list here.
Below is the example code in which we set the Animal array in adapter to display the Animal name’s list.
String animalList[] = {"Lion","Tiger","Monkey","Elephant","Dog","Cat","Camel"};
ArrayAdapter arrayAdapter = new ArrayAdapter(this, R.layout.list_view_items, R.id.textView, animalList);
Example of an ArrayAdapter:
Example 1:
Below is the example, in which we displays a list of animal names in a list view using simple array adapter. Below is the final output and code:

Create a new project and name it ArrayAdapterExample.
Open Android Studio -> Select File -> New -> New Project. Fill the forms and click "Finish" button.
Step 2:
Now open app -> res -> layout -> xml (or) activity_main.xml and add following code :
<RelativeLayout xmlns:android="http://schemas.android.com/apk/res/android"
    xmlns:tools="http://schemas.android.com/tools"
    android:layout_width="match_parent"
    android:layout_height="match_parent"
    tools:context=".MainActivity">

    <ListView
        android:id="@+id/simpleListView"
        android:layout_width="match_parent"
        android:layout_height="wrap_content"
        android:divider="#000"
        android:dividerHeight="2dp"/>

</RelativeLayout>
Step 3:
Create a new Activity activity_list_view.xml and add the below code
<?xml version="1.0" encoding="utf-8"?>
<LinearLayout xmlns:android="http://schemas.android.com/apk/res/android"
    android:layout_width="match_parent"
    android:layout_height="match_parent"
    android:orientation="vertical">

    <TextView
        android:id="@+id/textView"
        android:layout_width="fill_parent"
        android:layout_height="wrap_content"
        android:layout_gravity="center"
        android:padding="@dimen/activity_horizontal_margin"
        android:textColor="#000" />
</LinearLayout>
Step 4:
Now Open app -> java -> package -> MainActivity.java and add the below code. Here we will use ArrayAdapter to display the items in Listview.
package example.abhiandriod.arrayadapterexample; //use package of your project

import android.support.v7.app.AppCompatActivity;
import android.os.Bundle;
import android.widget.ArrayAdapter;
import android.widget.ListView;

public class MainActivity extends AppCompatActivity {
    // Array of strings...
    ListView simpleList;
    String animalList[] = {"Lion","Tiger","Monkey","Elephant","Dog","Cat","Camel"};
    @Override
    protected void onCreate(Bundle savedInstanceState) {
        super.onCreate(savedInstanceState);
        setContentView(R.layout.activity_main);
        simpleList = (ListView) findViewById(R.id.simpleListView);

        ArrayAdapter<String> arrayAdapter = new ArrayAdapter<String>(this, R.layout.activity_list_view, R.id.textView, animalList);
        simpleList.setAdapter(arrayAdapter);
    }

    }
}
Output:
Now run the App in Emulator and you will see the below output:

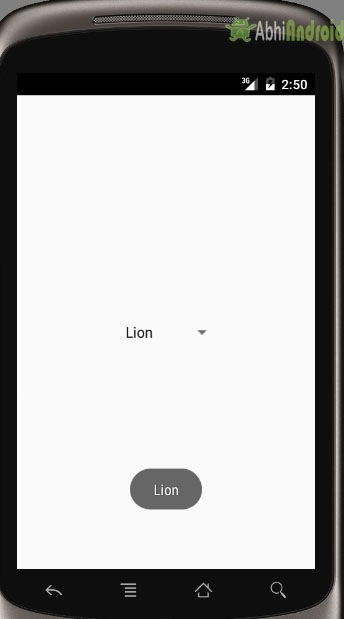
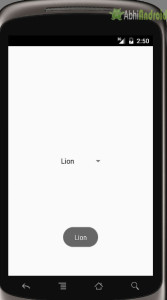
Example 2:
Below is the example, In which we display a list of Animal’s name in spinner using ArrayAadapter. Below is the final output and code:
Create a new project and name it ArrayAdapterExample.
Select File -> New -> New Project. Fill the forms and click "Finish" button.
Step 2:
Now open app -> res -> layout -> activity_main.xml (or) main.xml and add following code:
<RelativeLayout xmlns:android="http://schemas.android.com/apk/res/android"
    xmlns:tools="http://schemas.android.com/tools"
    android:layout_width="match_parent"
    android:layout_height="match_parent"
    tools:context=".MainActivity">

    <Spinner
        android:id="@+id/animalNamesSpinner"
        android:layout_width="wrap_content"
        android:layout_height="wrap_content"
        android:layout_centerInParent="true"/>

</RelativeLayout>
Step 3:
Now create a new Activity simple_spinner_item.xml and add the below code:
<?xml version="1.0" encoding="utf-8"?>
<TextView xmlns:android="http://schemas.android.com/apk/res/android"
    android:id="@android:id/text1"
    style="?android:attr/spinnerItemStyle"
    android:singleLine="true"
    android:layout_width="match_parent"
    android:layout_height="wrap_content"
    android:ellipsize="marquee"
    android:textAlignment="inherit"/>
Step 4:
Now open app -> java -> package -> MainActivity.java and add the following code
package example.abhiandriod.arrayadapterexample;

import android.app.Activity;
import android.os.Bundle;
import android.view.View;
import android.widget.AdapterView;
import android.widget.ArrayAdapter;
import android.widget.Spinner;
import android.widget.Toast;

public class MainActivity extends Activity implements
        AdapterView.OnItemSelectedListener {
    // Array of strings...
    String animalList[] = {"Lion", "Tiger", "Monkey", "Elephant", "Dog", "Cat", "Camel"};

    @Override
    protected void onCreate(Bundle savedInstanceState) {
        super.onCreate(savedInstanceState);
        setContentView(R.layout.activity_main);
        //Getting the instance of Spinner and applying OnItemSelectedListener on it
        Spinner spin = (Spinner) findViewById(R.id.animalNamesSpinner);
        spin.setOnItemSelectedListener(this);

        //Creating the ArrayAdapter instance having the animal name's list
        ArrayAdapter aa = new ArrayAdapter(this, android.R.layout.simple_spinner_item, animalList);
        aa.setDropDownViewResource(android.R.layout.simple_spinner_dropdown_item);
        //Setting the ArrayAdapter data on the Spinner
        spin.setAdapter(aa);
    }


    //Performing action onItemSelected and onNothing selected
    @Override
    public void onItemSelected(AdapterView<?> arg0, View arg1, int position, long id) {
        Toast.makeText(getApplicationContext(), animalList[position], Toast.LENGTH_LONG).show();
    }

    @Override
    public void onNothingSelected(AdapterView<?> arg0) {
        // TODO Auto-generated method stub

    }
}
Output:
Now run the App in Emulator / AVD and you will see the animals name listed in a Spinner
I have just read the ArrayAdapter from your Android tutorial , And have surely made up my mind to follow your android tutorials for rest of the other things
best tutorials for beginner thanks
Nice guidelines… keep posting such informative articles….
Your all tutorials are well explained in simple words. I loved it keep up good work 🙂
Thanks
i think it’s amazing tutorial and its helps me a lot to understand
what is the ellipsize? what does this line code mean: android:ellipsize=”marquee”
It makes Textview to scroll horizontally
Sir what is the meaning of this line in the Spinner Example.
aa.setDropDownViewResource(android.R.layout.simple_spinner_dropdown_item);
This line define view of items when list is open and take it from view in android libary