Before we share BaseAdapter it is first important to revise Adapter. In android, an adapter is a bridge between UI component and data source that helps us to fill data in the UI component. It holds the data and send the data to adapter view then view can takes the data from the adapter view and shows the data on different views like as list view, grid view, spinner etc. For more customization of views we uses the base adapter. Now lets discuss BaseAdapter class.
- BaseAdapter is a common base class of a general implementation of an Adapter that can be used in ListView, GridView, Spinner etc.
- Whenever you need a customized list in a ListView or customized grids in a GridView you create your own adapter and extend base adapter in that.
- Base Adapter can be extended to create a custom Adapter for displaying a custom list item.
Important Note:
ArrayAdapter is also an implementation of BaseAdapter.
Here is the code of Custom Adapter when we extends the BaseAdapter in that:
public class CustomAdapter extends BaseAdapter {

@Override
public int getCount() {
return 0;
}

@Override
public Object getItem(int i) {
return null;
}

@Override
public long getItemId(int i) {
return 0;
}

@Override
public View getView(int i, View view, ViewGroup viewGroup) {

return null;
}
In the above code snippet we see the overrided methods of BaseAdapter which are used to set the data in a list, grid or a spinner. From there we mainly used two functions getCount() and getView().
Let’s discuss all these functions in detail:
1. getCount():
The getCount() function returns the total number of items to be displayed in a list. It counts the value from array list size() method or an array’s length. For example, if we have an list of elements in an arraylist and we have to display the items in a list view then we can count the total number of elements using the size function and then that integer value is returned by the function getCount() as shown below.
@Override
public int getCount() {
int count=arrayList.size(); //counts the total number of elements from the arrayList
return count;//returns the total count to adapter
}
2. getView(int i, View view, ViewGroup viewGroup):
This function is automatically called when the list item view is ready to be displayed or about to be displayed. In this function we set the layout for list items using LayoutInflater class and then add the data to the views like ImageView, TextView etc.
Below is the getView function’s example code with explanation included in which we set the layout using LayoutInflater and then get the view’s id and implement them.
@Override
public View getView(int i, View view, ViewGroup viewGroup) {
view = inflter.inflate(R.layout.activity_gridview, null);//set layout for displaying items
ImageView icon = (ImageView) view.findViewById(R.id.icon);//get id for image view
icon.setImageResource(flags[i]);//set image of the item’s
return view;
}
3. getItem(int i):
This function is used to Get the data item associated with the specified position in the data set to obtain the corresponding data of the specific location in the collection of data items.
Below is the example code in which we returns the array list’s item according to position.
@Override
public Object getItem(int i) {
return arrayList.get(i);
}
4. getItemId(int i):
As for the getItemId (int position), it returns the corresponding to the position item ID. The function returns a long value of item position to the adapter.
Below is the code in which we returns the position.
@Override
public long getItemId(int i) {
return i;
}
BaseAdapter Example In Android Studio:
Example 1:
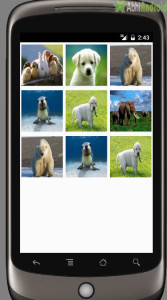
Example of BaseAdapter for displaying Animal images in grids using GridView.
In the below example we display animals images in the form of grids using custom adapter to show the usage of BaseAdapter. Below is the final output and code with explanation:
[cp_modal id=”cp_id_26b43″] [/cp_modal]
Create a new project and name it BaseAdapterExample.
Step 2: Now open res -> layout -> activity_main.xml (or) main.xml and add following code. Here we will create Gridview inside LinearLayout:
<?xml version="1.0" encoding="utf-8"?>
<LinearLayout xmlns:android="http://schemas.android.com/apk/res/android"
android:layout_width="match_parent"
android:layout_height="match_parent"
android:orientation="vertical">

<GridView
android:id="@+id/simpleGridView"
android:layout_width="fill_parent"
android:layout_height="wrap_content"
android:footerDividersEnabled="false"
android:numColumns="3" />
</LinearLayout>
Step 3:
Create a new Activity activity_gridview.xml inside layout and add the below code:
<?xml version="1.0" encoding="utf-8"?>
<LinearLayout xmlns:android="http://schemas.android.com/apk/res/android"
    android:layout_width="match_parent"
    android:layout_height="match_parent"
    android:orientation="vertical">

    <ImageView
        android:id="@+id/icon"
        android:layout_width="100dp"
        android:layout_height="100dp"
        android:scaleType="fitXY"
        android:layout_margin="5dp"
        android:layout_gravity="center_horizontal" />
</LinearLayout>
Step 3:
Now open app -> java -> package -> MainActivity.java and add the below code. Make sure you have images saved in drawable folder with the names we have used or else change the name based on the images present in your drawable folder.
package example.abhiandriod.baseadapterexample;

import android.app.Activity;
import android.os.Bundle;
import android.widget.GridView;

public class MainActivity extends Activity {

GridView simpleGrid;
int animals[] = {R.drawable.animal13, R.drawable.animal14, R.drawable.animal15, R.drawable.animal16, R.drawable.animal17, R.drawable.animal18, R.drawable.animal15, R.drawable.animal16, R.drawable.animal17};

@Override
protected void onCreate(Bundle savedInstanceState) {
super.onCreate(savedInstanceState);
setContentView(R.layout.activity_main);
simpleGrid = (GridView) findViewById(R.id.simpleGridView);
CustomAdapter customAdapter = new CustomAdapter(getApplicationContext(), animals);
simpleGrid.setAdapter(customAdapter);
}
}
Step 4:
Create a new class CustomAdapter.java inside package and add the following code
package example.abhiandriod.baseadapterexample; //Use your package

import android.content.Context;
import android.view.LayoutInflater;
import android.view.View;
import android.view.ViewGroup;
import android.widget.BaseAdapter;
import android.widget.ImageView;

public class CustomAdapter extends BaseAdapter {
Context context;
int animals[];
LayoutInflater inflter;

public CustomAdapter(Context applicationContext, int[] animals) {
this.context = applicationContext;
this.animals = animals;
inflter = (LayoutInflater.from(applicationContext));
}

@Override
public int getCount() {
return animals.length;
}

@Override
public Object getItem(int i) {
return null;
}

@Override
public long getItemId(int i) {
return 0;
}

@Override
public View getView(int i, View view, ViewGroup viewGroup) {
view = inflter.inflate(R.layout.activity_gridview, null);
ImageView icon = (ImageView) view.findViewById(R.id.icon);
icon.setImageResource(animals[i]);
return view;
}
}
Output:
Now run the App in Emulator / AVD and you will see Animals listed in Grids. So this is one use of BaseAdapter in Gridview.
Example 2:
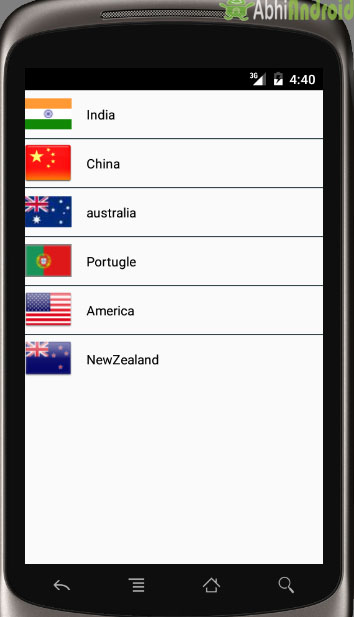
Example of BaseAdapter to display list of countries in a ListView using Custom BaseAdapter
In the below example we display list of countries with their flags using custom adapter to show the usage of BaseAdapter. Below is the final output and code with explanation step by step.
[cp_modal id=”cp_id_0b715″][/cp_modal]
Create a new project in Android Studio and name it BaseAdapterExample
Select File -> New -> New Project. Fill the forms and click "Finish" button.
Step 2
: Now Open app -> res -> layout -> activity_main.xml (or) main.xml and add following code :
<?xml version="1.0" encoding="utf-8"?>
<LinearLayout xmlns:android="http://schemas.android.com/apk/res/android"
    android:layout_width="match_parent"
    android:layout_height="match_parent"
    android:orientation="vertical">

    <ListView
        android:id="@+id/simpleListView"
        android:layout_width="fill_parent"
        android:layout_height="wrap_content"
        android:divider="@color/material_blue_grey_800"
        android:dividerHeight="1dp"
        android:footerDividersEnabled="false" />
</LinearLayout>
Step 3:
Now create another XML layout. In our case, we name it as activity_listview.xml. Add the below code in it. Also make sure you have iclauncher image saved in drawable folder or add it.
<?xml version="1.0" encoding="utf-8"?>
<LinearLayout xmlns:android="http://schemas.android.com/apk/res/android"
    android:layout_width="match_parent"
    android:layout_height="match_parent"
    android:orientation="horizontal">

    <ImageView
        android:id="@+id/icon"
        android:layout_width="50dp"
        android:layout_height="50dp"
        android:src="@drawable/ic_launcher" />

    <TextView
        android:id="@+id/textView"
        android:layout_width="fill_parent"
        android:layout_height="wrap_content"
        android:layout_gravity="center"
        android:padding="@dimen/activity_horizontal_margin"
        android:textColor="#000" />
</LinearLayout>
Step 4:
Now open app -> java-> package -> MainActivity.java and add the below code.
package example.abhiandriod.baseadapterexample;

import android.app.Activity;
import android.os.Bundle;
import android.widget.ListView;

public class MainActivity extends Activity {

    ListView simpleList;
    String countryList[] = {"India", "China", "australia", "Portugle", "America", "NewZealand"};
    int flags[] = {R.drawable.india, R.drawable.china, R.drawable.australia, R.drawable.portugle, R.drawable.america, R.drawable.new_zealand};

    @Override
    protected void onCreate(Bundle savedInstanceState) {
        super.onCreate(savedInstanceState);
        setContentView(R.layout.activity_main);
        simpleList = (ListView) findViewById(R.id.simpleListView);
        CustomAdapter customAdapter = new CustomAdapter(getApplicationContext(), countryList, flags);
        simpleList.setAdapter(customAdapter);
    }
}
Step 4:
Create new class CustomAdapter.java and add following code
package example.abhiandriod.baseadapterexample;

import android.content.Context;
import android.view.LayoutInflater;
import android.view.View;
import android.view.ViewGroup;
import android.widget.BaseAdapter;
import android.widget.ImageView;
import android.widget.TextView;


public class CustomAdapter extends BaseAdapter {
    Context context;
    String countryList[];
    int flags[];
    LayoutInflater inflter;

    public CustomAdapter(Context applicationContext, String[] countryList, int[] flags) {
        this.context = context;
        this.countryList = countryList;
        this.flags = flags;
        inflter = (LayoutInflater.from(applicationContext));
    }

    @Override
    public int getCount() {
        return countryList.length;
    }

    @Override
    public Object getItem(int i) {
        return null;
    }

    @Override
    public long getItemId(int i) {
        return 0;
    }

    @Override
    public View getView(int i, View view, ViewGroup viewGroup) {
        view = inflter.inflate(R.layout.activity_listview, null);
        TextView country = (TextView) view.findViewById(R.id.textView);
        ImageView icon = (ImageView) view.findViewById(R.id.icon);
        country.setText(countryList[i]);
        icon.setImageResource(flags[i]);
        return view;
    }
}
Output:
Now run the App in Emulator / AVD and you will see item country names with flags listed in Listview.

This tutorial was really useful. I used both parts to make a list and a grid for my app. Thank you
so nice and fully satisfied bro. keep it up…
Hi Sir i’m straggling with one android app can u please help me
First, I would say thank you for the tutorial,
I have a question please, how can you use
CustomAdapter customAdapter = new CustomAdapter(getApplicationContext(), countryList, flags);
if CustomAdapter extends BaseAdapter, and BaseAdapter is an abstract class?
Very nice explanation….
THANK YOU SOOOO MUCH YOU SSAVE MY DAY….NICE EXPALANATION KEEP IT UP SIR….
Thanks for nice tutorial. Could make a tutorial on how to display remote images(urls) on listview using baseAdapter?Your current tutorials only displays images from drawable folder.Looking forward for your next tutorial about remote image loader on listview.
nice to explain in a easy way..
Big Thanks for this tutorial, it’s very easy to be understood and implemented
Thanks for your great explanation
It was the best I have ever seen. thanks a lot
It works like a charm
Very interesting and simple explanation .please do more tutorials on asynctask and downloading image from internet
Impressive….
Nice …But it’s not working in android Studio….App getting Crash…..
It is working fine here. Please download code and import in Android Studio. It will work.
Superb Explanation!!!!!!!I was finding this topic very difficult but I got what I want over here….
nice
Nice explanation