ImageSwitcher Tutorial With Example In Android Studio
In Android, ImageSwitcher is a specialized ViewSwitcher that contain ImageView type children. ImageSwitcher is available in Android from v1.6+.
It is an element of transition widget which helps us to add transitions on the images. It is mainly useful to animate an image on screen. ImageSwitcher switches smoothly between two images and thus provides a way of transitioning from one Image to another through appropriate animations.
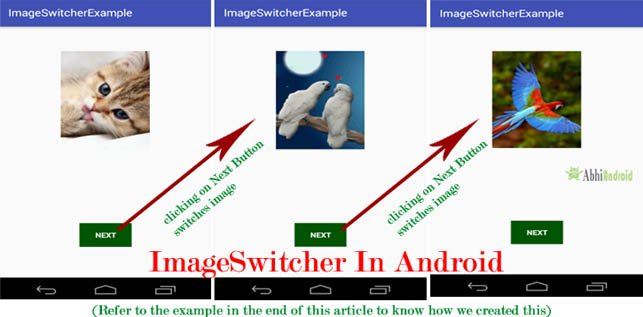
Table Of Contents
Basic ImageSwitcher code in XML:
<ImageSwitcher
    android:id="@+id/simpleImageSwitcher"
    android:layout_width="match_parent"
    android:layout_height="wrap_content"/>
Steps for Implementation of ImageSwitcher:
- Get the reference of ImageSwitcher in class using findViewById() method, or you can also create an object dynamically.
- Set a factory using switcherid.setFactory()
- Set an in-animation using switcherid.setInAnimation()
- Set an out-animation using switcherid.setOutAnimation()
Important Methods Of ImageSwitcher:
Let’s we discuss some important methods of ImageSwitcher that may be called in order to manage the ImageSwitcher.
1. setFactory(ViewFactory factory): This method is used to create a new view for ImageSwitcher. By using this method we create a new ImageView and replace the old view with that.
Below code create a new view using setFactory method.
ImageSwitcher simpleImageSwitcher=(ImageSwitcher)findViewById(R.id. simpleImageSwitcher); // get reference of ImageSwitcher

// Set the ViewFactory of the ImageSwitcher that will create ImageView object when asked
imageSwitcher.setFactory(new ViewSwitcher.ViewFactory() {

public View makeView() {
// TODO Auto-generated method stub

// Create a new ImageView and set it's properties
ImageView imageView = new ImageView(getApplicationContext());
imageView.setScaleType(ImageView.ScaleType.FIT_CENTER);
imageView.setLayoutParams(new ImageSwitcher.LayoutParams(LinearLayout.LayoutParams.FILL_PARENT, LinearLayout.LayoutParams.FILL_PARENT));
return imageView;
}
 });
2. setImageDrawable(Drawable drawable): This method is used to set an image in ImageSwitcher. In this we pass an image for Drawable.
Below we set image in ImageSwitcher by using setImageDrawable method.
ImageSwitcher simpleImageSwitcher=(ImageSwitcher)findViewById(R.id. simpleImageSwitcher); // initiate a ImageSwitcher
simpleImageSwitcher.setImageDrawable(getResources().getDrawable(R.drawable.ic_launcher)); // set drawable image in ImageSwitcher

3. setImageResource(int resid): This method is also used to set an image in image switcher. The image is passed in the form of integer id.
Below we set image in ImageSwitcher by using setImageDrawable method.
ImageSwitcher simpleImageSwitcher=(ImageSwitcher)findViewById(R.id. simpleImageSwitcher); // initiate a ImageSwitcher
simpleImageSwitcher.setImageResource(R.drawable.ic_launcher); // set image resource in ImageSwitcher
4. setImageURI(Uri uri): This method is also used to set an image in image switcher. The image is passed in the form of URI.
Below we set Image in ImageSwitcher from raw folder using Uri:
Before using below code first create a raw name folder in res directory and save an image name image1 in that folder.
ImageSwitcher simpleImageSwitcher=(ImageSwitcher)findViewById(R.id. simpleImageSwitcher); // get reference of ImageSwitcher
simpleImageSwitcher.setImageURI(Uri.parse("android.resource://" + getPackageName() + "/" + R.raw.image1)); // set Image in ImageSwitcher from raw folder using Uri
5. loadAnimation(Context context, int id): This method is used whenever we need to define an object of Animation class through AnimationUtils class by calling a static method loadAnimation.
Below we create an object of Animation class and load an animation by using AnimationUtils class.
// load an animation by using AnimationUtils class
Animation in = AnimationUtils.loadAnimation(this, android.R.anim.slide_in_left);
 Animation out = AnimationUtils.loadAnimation(this, android.R.anim.slide_out_right);
6. setInAnimation(Animation inAnimation): This method is used to set the animation of the appearance of the object on the screen.
Below we create an object of Animation class and load an animation by using AnimationUtils class and then set the Animation on ImageSwitcher.
ImageSwitcher simpleImageSwitcher=(ImageSwitcher)findViewById(R.id. simpleImageSwitcher); // initiate a ImageSwitcher
Animation in = AnimationUtils.loadAnimation(this,android.R.anim.slide_in_left); // load an animation
simpleImageSwitcher.setInAnimation(in); // set in Animation for ImageSwitcher
7. setOutAnimation(Animation outAnimation): This method does the opposite of setInAnimation().
Whenever we use set a new Image in ImageView, it first removes the old view using an animation set with the setOutAnimation() method, and then places the new one using the animation set by the setInAnimation() method.
Below we create an object of Animation class and load an animation by using AnimationUtils class and then set the out Animation on ImageSwitcher
ImageSwitcher simpleImageSwitcher=(ImageSwitcher)findViewById(R.id. simpleImageSwitcher); // get reference of ImageSwitcher
Animation out = AnimationUtils.loadAnimation(this,android.R.anim.slide_out_right); // load an animation
simpleImageSwitcher.setOutAnimation(out); // set out Animation for ImageSwitcher

Attributes of ImageSwitcher:
Now let’s we discuss some common attributes of a ImageSwitcher that helps us to configure it in our layout (xml).
1. Id: id attribute is used to uniquely identify a ImageSwitcher.
Below we set the id of the ImageSwitcher that is used to uniquely identify it.
<ImageSwitcher
android:id="@+id/simpleImageSwitcher"
android:layout_width="wrap_content"
android:layout_height="wrap_content" /> <!--  id of ImageSwitcher that is used to uniquely identify it -->
2. padding: This attribute is used to set the padding from left, right, top or bottom side of a ImageSwitcher.
- paddingRight: This attribute is used to set the padding from the right side of a ImageSwitcher.
- paddingLeft: This attribute is used to set the padding from the left side of a ImageSwitcher.
- paddingTop: This attribute is used to set the padding from the top side of a ImageSwitcher.
- paddingBottom: This attribute is used to set the padding from the bottom side of a ImageSwitcher.
- Padding: This attribute is used to set the padding from the all the side’s of a ImageSwitcher.
Below we set the 10dp padding from all the sides of a ImageSwitcher
<ImageSwitcher
android:id="@+id/imageSwitcher"
android:layout_width="match_parent"
android:layout_height="200dp"
android:layout_gravity="center_horizontal"
android:padding="10dp" /> <!-- set 10 dp padding from all the sides of TextSwitcher -->
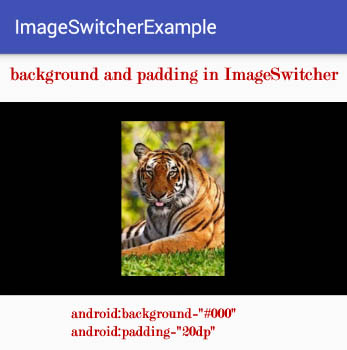
3. background: This attribute is used to set the background of a ImageSwitcher. We can set a color or a drawable in the background of a ImageSwitcher.
Below is the example code with explanation included in which we set the black color for the background of a ImageSwitcher.
<ImageSwitcher
android:id="@+id/imageSwitcher"
android:layout_width="match_parent"
android:layout_height="200dp"
android:layout_gravity="center_horizontal"
android:background="#000" /> <!-- set black color in the background of TextSwitcher -->
Setting background In ImageSwitcher In Java class:
ImageSwitcher imageSwitcher = (ImageSwitcher) findViewById(R.id.imageSwitcher); // get the reference of ImageSwitcher.
imageSwitcher.setBackgroundColor(Color.BLACK); // set black color in the background of ImageSwitcher.
ImageSwitcher Example In Android Studio:
Below is the example of ImageSwitcher in Android Studio where we display a ImageSwitcher by using its different attributes. In this we use one Button for changing the image in ImageSwitcher. Firstly we create an array of id’s Images and create dynamic ImageView using setFactory method and then load and set slide in left and slide in right animation and finally set the Image in the ImageSwitcher on Button click using setImageResource method. Whenever a user click on next button ImageSwitcher switch between the images and the current Image will go out and next Image will come in with specified animation.
Below you can download complete project code, see final output and step by step explanation:
Step 1: Create a new project and name it ImageSwitcherExample
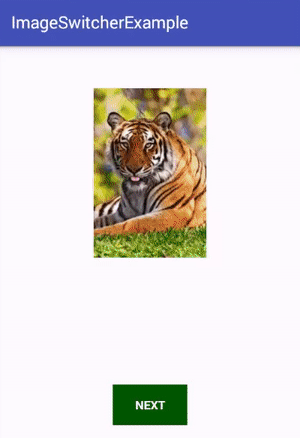
Step 2: Open res -> layout ->activity_main.xml (or) main.xml and add following code :
In this step we open an xml file and add the code for displaying a Button and a ImageSwitcher by using its different attributes.
<LinearLayout xmlns:android="http://schemas.android.com/apk/res/android"
    android:layout_width="match_parent"
    android:layout_height="match_parent"
    android:orientation="vertical">


    <ImageSwitcher
        android:id="@+id/simpleImageSwitcher"
        android:layout_width="match_parent"
        android:layout_height="200dp"
        android:layout_gravity="center_horizontal"
        android:layout_marginTop="50dp" />


    <Button
        android:id="@+id/buttonNext"
        android:layout_width="wrap_content"
        android:layout_height="wrap_content"
        android:layout_marginTop="150dp"
        android:layout_gravity="center"
        android:background="#050"
        android:textColor="#fff"
        android:textStyle="bold"
        android:text="NEXT" />

</LinearLayout>
Step 3: Open src -> package -> MainActivity.java
In this step we open MainActivity and add the code for initiate the ImageSwitcher and Button. In this Firstly we create an array of id’s Images and create dynamic ImageView using setFactory method and then load and set slide in left and slide in right animation and finally set the Image in the ImageSwitcher on button click using setImageResource method. Whenever a user click on next button ImageSwitcher switch between the images and the current Image will go OUT and next Image will come in with specified animation.
package com.example.ip_d.imageswitcherexample;

import android.os.Bundle;
import android.support.v7.app.AppCompatActivity;
import android.view.View;
import android.view.animation.Animation;
import android.view.animation.AnimationUtils;
import android.widget.Button;
import android.widget.ImageSwitcher;
import android.widget.ImageView;
import android.widget.LinearLayout;
import android.widget.ViewSwitcher;

public class MainActivity extends AppCompatActivity {
    private ImageSwitcher simpleImageSwitcher;
    Button btnNext;


    // Array of Image IDs to Show In ImageSwitcher
    int imageIds[] = {R.drawable.image1, R.drawable.images2, R.drawable.image3, R.drawable.images4, R.drawable.images5};
    int count = imageIds.length;
    // to keep current Index of ImageID array
    int currentIndex = -1;

    @Override
    protected void onCreate(Bundle savedInstanceState) {
        super.onCreate(savedInstanceState);

        setContentView(R.layout.activity_main);

        // get The references of Button and ImageSwitcher
        btnNext = (Button) findViewById(R.id.buttonNext);
        simpleImageSwitcher = (ImageSwitcher) findViewById(R.id.simpleImageSwitcher);
        // Set the ViewFactory of the ImageSwitcher that will create ImageView object when asked
        simpleImageSwitcher.setFactory(new ViewSwitcher.ViewFactory() {

            public View makeView() {
                // TODO Auto-generated method stub

                // Create a new ImageView and set it's properties
                ImageView imageView = new ImageView(getApplicationContext());
                // set Scale type of ImageView to Fit Center
                imageView.setScaleType(ImageView.ScaleType.FIT_CENTER);
                // set the Height And Width of ImageView To FIll PARENT
                imageView.setLayoutParams(new ImageSwitcher.LayoutParams(LinearLayout.LayoutParams.FILL_PARENT, LinearLayout.LayoutParams.FILL_PARENT));
                return imageView;
            }
        });

        // Declare in and out animations and load them using AnimationUtils class
        Animation in = AnimationUtils.loadAnimation(this, android.R.anim.slide_in_left);
        Animation out = AnimationUtils.loadAnimation(this, android.R.anim.slide_out_right);

        // set the animation type to ImageSwitcher
        simpleImageSwitcher.setInAnimation(in);
        simpleImageSwitcher.setOutAnimation(out);


        // ClickListener for NEXT button
        // When clicked on Button ImageSwitcher will switch between Images
        // The current Image will go OUT and next Image  will come in with specified animation
        btnNext.setOnClickListener(new View.OnClickListener() {

            public void onClick(View v) {
                // TODO Auto-generated method stub
                currentIndex++;
                //  Check If index reaches maximum then reset it
                if (currentIndex == count)
                    currentIndex = 0;
                simpleImageSwitcher.setImageResource(imageIds[currentIndex]); // set the image in ImageSwitcher
            }
        });

    }

}
Output:
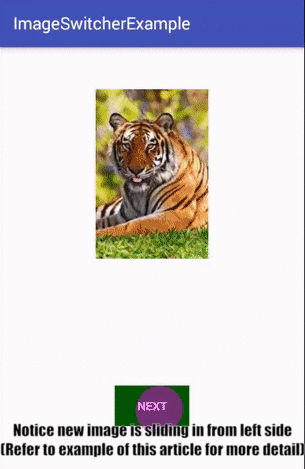
Now run the App and you will see Next button on screen. Click on it and image will slide in. Click on next button and new image will slide in and older image will slide out. This is ImageSwitcher in Android.
One thought on “ImageSwitcher Tutorial With Example In Android Studio”
Leave a Reply to Nag Cancel reply
Premium Project Source Code:
- Food Ordering Android App Project Source Code
- Ecommerce Store Android App Project Source Code
- Convert Website Into Android App Project Source Code
- Quiz Game Android App Project Source Code
- Radio Streaming Android App Source Code
- City Guide Android App Project Source Code
- QR Barcode Android App Project Source Code
How to retrieve images from sqlite database instead of storing the drawable folder?
How to insert(upload) image from the UI to the sqlite?
How to change the data in the textview when we click the button with the image as shown in the above?
Please give me reply……..