Sliding Drawer Tutorial With Example In Android Studio
In Android, Sliding Drawer is used to hide the content out of the screen and allows the user to drag a handle to bring the content on screen. It can be used horizontally or vertically both.
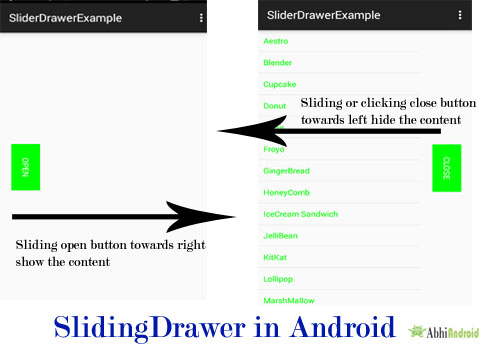
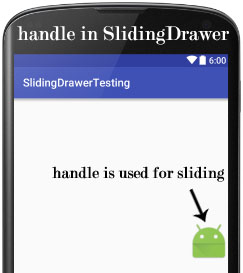
Sliding Drawer is a special widget composed of two children views, one is the handle that the user’s drags, and other is content attached to the handle which dragged along-with it.
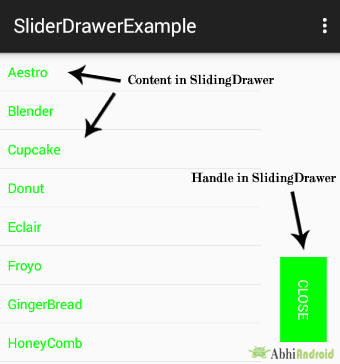
Table Of Contents
Sliding Drawer Important Points:
- Sliding Drawer should be used as an overlay inside layouts means Sliding Drawer should only be used inside of a Relative Layout or a Frame Layout for instance.
- The size of the Sliding Drawer defines how much space the content will occupy once slide out, so Sliding Drawer should usually use match_parent for both its dimensions.
- Inside an XML ( layout ), Sliding Drawer must define the id of the handle and of the content.
Basic Sliding Drawer XML Code:
<LinearLayout xmlns:android="http://schemas.android.com/apk/res/android"
    android:id="@+id/layout"
    android:layout_width="fill_parent"
    android:layout_height="fill_parent">

    <SlidingDrawer
        android:id="@+id/simpleSlidingDrawer"
        android:layout_width="fill_parent"
        android:layout_height="wrap_content"
        android:content="@+id/content"
        android:handle="@+id/handle"
        android:orientation="horizontal"
        android:rotation="180">

        <!-- Button for the handle of SlidingDrawer -->
        <Button
            android:id="@id/handle"
            android:layout_width="wrap_content"
            android:layout_height="wrap_content"
            android:background="#0f0"
            android:rotation="270"
            android:text="Open"
            android:textColor="#fff" />

        <!-- layout for the content of the SLidingDrawer -->
        <LinearLayout
            android:id="@id/content"
            android:layout_width="fill_parent"
            android:layout_height="fill_parent"
            android:orientation="horizontal"
            android:rotation="180">

          <!-- DEFINE ALL YOUR CONTENT,WIDGETS HERE WHICH YOU WANT TO ADD IN SLIDING DRAWER LAYOUT. -->
            <ListView
                android:id="@+id/simpleListView"
                android:layout_width="fill_parent"
                android:layout_height="fill_parent" />
        </LinearLayout>
    </SlidingDrawer>
</LinearLayout>
Important Methods Of Slider Drawer:
Let’s we discuss some important methods of SliderLayout that may be called in order to manage the SliderDrawer.
1. open(): This method is used to opens the drawer immediately. Sometime we open the drawer on View click (Button, TextView etc), so for that functionality we need to use this function.
Below we show how to use the open method of Sliding Drawer. We can also use this method on click of a View(Button or any other view).
SlidingDrawer simpleSlidingDrawer =(SlidingDrawer) findViewById(R.id.simpleSlidingDrawer); // initiate the SlidingDrawer
simpleSlidingDrawer.open(); // open the Sliding Drawer
2. close(): This method is used to close the drawer immediately. Sometime we close the drawer on View click ( Button, TextView etc), so for that we need to use this function.
Below we show how to use the close method of Sliding Drawer. We can also use this method on click of a View(Button or any other view).
SlidingDrawer simpleSlidingDrawer =(SlidingDrawer)findViewById(R.id.simpleSlidingDrawer); // initiate the SlidingDrawer
simpleSlidingDrawer.close(); // close the Sliding Drawer
3. animateOpen(): This method is used to opens the drawer with an animation. This method is same as simple open() method but the only difference is we use this method when we need to open the drawer with an animation.
Below we open the drawer with an animation. We can also use this method on click of a View (Button or any other view).
SlidingDrawer simpleSlidingDrawer =(SlidingDrawer)findViewById(R.id.simpleSlidingDrawer); // initiate the SlidingDrawer
simpleSlidingDrawer.animateOpen(); // open the Sliding Drawer with an animation
4. animateClose(): This method is used to close the drawer with an animation. This method is same as simple close() method but the only difference is we use this method when we need to close the drawer with an animation.
Below we close the drawer with an animation. We can also use this method on click of a View (Button or any other view).
SlidingDrawer simpleSlidingDrawer =(SlidingDrawer)findViewById(R.id.simpleSlidingDrawer); // initiate the SlidingDrawer
simpleSlidingDrawer.animateOpen(); // close the Sliding Drawer with an animation
5. isOpened(): This method indicate whether the drawer is currently fully opened. This method returns Boolean type value either true or false. It returns true if the drawer is currently opened and false if it is close.
Below we check whether the drawer is currently opened or not.
SlidingDrawer simpleSlidingDrawer =(SlidingDrawer)findViewById(R.id.simpleSlidingDrawer); // initiate the SlidingDrawer
Boolean isSliderOpen= simpleSlidingDrawer.isOpened(); // check whether the slider is opened or not
6. lock(): This method is used to lock the SliderDrawer so that touch events are ignores. Sometime in a situation we need to lock the drawer so that touch event are disable and here we use this method.
Below we lock the drawer so that touch event are ignores. We can also use this method on click of a View (Button or any other view).
SlidingDrawer simpleSlidingDrawer = (SlidingDrawer) findViewById(R.id.simpleSlidingDrawer); // initiate the SlidingDrawer
simpleSlidingDrawer.lock(); // lock the sliderDrawer so that touch event are disabled
7. unlock(): This method is used to unlock the SlidingDrawer so that touch events are processed. This method is used when for a situation we lock the drawer and now we need to unlock the drawer so that touch events are processed.
Below we unlock the drawer so that touch event are processed. We can also use this method on click of a View (Button or any other view).
SlidingDrawer simpleSlidingDrawer = (SlidingDrawer) findViewById(R.id.simpleSlidingDrawer); // initiate the SlidingDrawer
simpleSlidingDrawer. unlock(); // unlock the sliderDrawer so that touch event are processed
8. setOnDrawerCloseListener(OnDrawerCloseListeneronDrawerCloseListener): This method is used to sets the listener that receives the notification when the drawer becomes close.
Below we show how to use of setOnDrawerCloseListener event in android.
SlidingDrawer simpleSlidingDrawer = (SlidingDrawer) findViewById(R.id.simpleSlidingDrawer); // initiate the SlidingDrawer
simpleSlidingDrawer.setOnDrawerCloseListener(new SlidingDrawer.OnDrawerCloseListener() {
@Override
public void onDrawerClosed() {
// add code here for the drawer closed event
}
});
9. setOnDrawerOpenListener(OnDrawerOpenListeneronDrawerOpenListener): This method is used to set the listener that receives the notification when the drawer becomes open.
Below we show how to use setOnDrawerOpenListener() event in android.
SlidingDrawer simpleSlidingDrawer = (SlidingDrawer) findViewById(R.id.simpleSlidingDrawer); // initiate the SlidingDrawer
simpleSlidingDrawer.setOnDrawerOpenListener(new SlidingDrawer.OnDrawerOpenListener() {
@Override
public void onDrawerOpened() {
// add code here for the Drawer Opened Event
}
});
10. setOnDrawerScrollListener(OnDrawerScrollListeneronDrawerScrollListener): This method is used to set the listener that receives the notification when the drawer start or ends a scroll.
Below we show how to use of setOnDrawerScrollListener event in android.
SlidingDrawer simpleSlidingDrawer = (SlidingDrawer) findViewById(R.id.simpleSlidingDrawer); // initiate the SlidingDrawer
simpleSlidingDrawer.setOnDrawerScrollListener(new SlidingDrawer.OnDrawerScrollListener() {
@Override
public void onScrollStarted() {
// add code here for the scroll started.
}

@Override
public void onScrollEnded() {
// add code here for the scroll ended.
}
});
Attributes of SliderDrawer:
Now let’s we discuss some common attributes of a SliderDrawer that helps us to configure it in our layout (xml).
1. Id: id attribute is used to uniquely identify a SliderDrawer.
<SlidingDrawer

    android:id="@+id/drawer"
    android:layout_width="match_parent"
    android:layout_height="match_parent"
    android:handle="@+id/handle"
    android:content="@+id/content">

    <!--Define Views Here-->

</SlidingDrawer>
2. handle: This attribute is used as an Identifier for the child that represents the drawer’s handle. This is the one contains handler button that is always visible in the application.
Below we create a button for handle the content and use the id of the button in the handle attribute of SlidingDrawer.
<SlidingDrawer
    android:id="@+id/drawer"
    android:layout_width="fill_parent"
    android:layout_height="wrap_content"
    android:content="@+id/content"
    android:orientation="horizontal"
    android:rotation="180"
    android:handle="@+id/handleImageView"> <!-- set the Id of the handle (ImageView) -->

    <!-- create  a ImageView for handle the content of DrawerLayout -->
    <ImageView
        android:id="@id/handleImageView"
        android:layout_width="wrap_content"
        android:layout_height="wrap_content"
        android:rotation="270"
        android:src="@drawable/ic_launcher" />

<!-- layout for the content of the SLidingDrawer -->
    <LinearLayout
        android:id="@id/content"
        android:layout_width="fill_parent"
        android:layout_height="fill_parent"
        android:orientation="horizontal"
        android:rotation="180">
        <!-- DEFINE ALL YOUR CONTENT,WIDGETS HERE WHICH YOU WANT TO ADD IN SLIDING DRAWER LAYOUT. -->

    </LinearLayout>
</SlidingDrawer>
3. content: This attribute is used as an Identifier for the child that represents the drawer’s content. On click of handle the content become visible.
In the above code we also used content as an identifier for the child which show content on screen.
4. orientation: The orientation attribute is used to set the child horizontally or vertically. In SliderDrawer default orientation is vertical.
5. rotation: This attribute is used to rotate the view in degrees. We set rotate value in degrees to rotate the view in different directions.
In the above code we also used also horizontal orientation and 180 degree rotation for the SliderDrawer.
Sliding Drawer Example In Android Studio:
Below is the example of Sliding Drawer in which we display a SlidingDrawer by using its different attributes. In this we use one Button for the handle of SlidingDrawer and a ListView for displaying the content of the SlidingDrawer.
Firstly we create String array and then ArrayAdapter is used to fill the data in the list. In this we also implement setOnDrawerOpenListener and setOnDrawerCloseListener events for changing the text of handle button.
Below you can download complete Android Studio project code, see final output and step by step explantion of the example:

Step 1: Create a new project and name it SlidingDrawerExample
Step 2: Open res -> layout -> activity_main.xml (or) main.xml and add following code:
In this step we open an xml file and add the code for displaying a SlidingDrawer by using its different attributes. In this we display one Button for the handle of SlidingDrawer and a ListView for the content of the SlidingDrawer.
<LinearLayout xmlns:android="http://schemas.android.com/apk/res/android"
android:id="@+id/layout"
android:layout_width="fill_parent"
android:layout_height="fill_parent">

<SlidingDrawer
android:id="@+id/simpleSlidingDrawer"
android:layout_width="fill_parent"
android:layout_height="wrap_content"
android:content="@+id/content"
android:handle="@+id/handle"
android:orientation="horizontal"
android:rotation="180">
<!-- Button for the handle of SlidingDrawer -->
<Button
android:id="@id/handle"
android:layout_width="wrap_content"
android:layout_height="wrap_content"
android:background="#0f0"
android:rotation="270"
android:text="Open"
android:textColor="#fff" />
<!-- layout for the content of the SLidingDrawer -->
<LinearLayout
android:id="@id/content"
android:layout_width="fill_parent"
android:layout_height="fill_parent"
android:orientation="horizontal"
android:rotation="180">
<!-- DEFINE ALL YOUR CONTENT,WIDGETS HERE WHICH YOU WANT TO ADD IN SLIDING DRAWER LAYOUT. -->
<ListView
android:id="@+id/simpleListView"
android:layout_width="fill_parent"
android:layout_height="fill_parent" />
</LinearLayout>
</SlidingDrawer>
</LinearLayout>
Step 3: Now Create new a new layout Activity. Go to res-> right click on layout -> New -> Activity -> Blank Activity and create list_item.xml and add following code.
Here we are creating items view that will be displayed inside each row.
<?xml version="1.0" encoding="utf-8"?>
<LinearLayout xmlns:android="http://schemas.android.com/apk/res/android"
android:layout_width="match_parent"
android:layout_height="wrap_content"
android:orientation="vertical">
<!-- TextView for the list item -->
<TextView
android:id="@+id/name"
android:layout_width="fill_parent"
android:layout_height="wrap_content"
android:padding="10dp"
android:textColor="#0f0" />
</LinearLayout>
Step 4: Open src -> package -> MainActivity.java
In this step we open MainActivity and add the code for initiate the ListView, SlidingDrawer and a Button. Firstly we create String array and then ArrayAdapter is used to fill the data in the list. Whenever we click on list item the name of the item is displayed by using a toast. In this we also implement setOnDrawerOpenListener and setOnDrawerCloseListener events for changing the text of handle button.
package example.abhiandroid.sliderdrawerexample;

import android.os.Bundle;
import android.support.v7.app.AppCompatActivity;
import android.view.Menu;
import android.view.MenuItem;
import android.widget.ArrayAdapter;
import android.widget.Button;
import android.widget.ListView;
import android.widget.SlidingDrawer;

public class MainActivity extends AppCompatActivity {

    String[] nameArray = {"Aestro", "Blender", "Cupcake", "Donut", "Eclair", "Froyo", "GingerBread", "HoneyComb", "IceCream Sandwich", "JelliBean", "KitKat", "Lollipop", "MarshMallow"};

    @Override
    protected void onCreate(Bundle savedInstanceState) {
        super.onCreate(savedInstanceState);
        setContentView(R.layout.activity_main);
        SlidingDrawer simpleSlidingDrawer = (SlidingDrawer) findViewById(R.id.simpleSlidingDrawer); // initiate the SlidingDrawer
        final Button handleButton = (Button) findViewById(R.id.handle); // inititate a Button which is used for handling the content of SlidingDrawer
        ListView simpleListView = (ListView) findViewById(R.id.simpleListView); // initiate the ListView that is used for content of Sl.idingDrawer
        // adapter for the list view
        ArrayAdapter<String> arrayAdapter = new ArrayAdapter<String>(getApplicationContext(), R.layout.list_item, R.id.name, nameArray);
        // set an adapter to fill the data in the ListView
        simpleListView.setAdapter(arrayAdapter);
        // implement setOnDrawerOpenListener event
        simpleSlidingDrawer.setOnDrawerOpenListener(new SlidingDrawer.OnDrawerOpenListener() {
            @Override
            public void onDrawerOpened() {
                handleButton.setText("Close");
            }
        });
        // implement setOnDrawerCloseListener event
        simpleSlidingDrawer.setOnDrawerCloseListener(new SlidingDrawer.OnDrawerCloseListener() {
            @Override
            public void onDrawerClosed() {
                // change the handle button text
                handleButton.setText("Open");
            }
        });
    }
}
Output:
Now run the App and you will see a Button with open text. Click or slide and content will appear on screen. Again clicking on button will hide the content. This we have done using Sliding Drawer in Android.
DOWNLOAD THIS FREE eBook!

5 thoughts on “Sliding Drawer Tutorial With Example In Android Studio”
Leave a Reply

DOWNLOAD THIS FREE eBook!


Premium Project Source Code:
- Food Ordering Android App Project Source Code
- Ecommerce Store Android App Project Source Code
- Convert Website Into Android App Project Source Code
- Quiz Game Android App Project Source Code
- Radio Streaming Android App Source Code
- City Guide Android App Project Source Code
- QR Barcode Android App Project Source Code
 Hi, I'm Abhishek, founder and owner of this site. I believe in team work and there is a experienced developer team working on AbhiAndroid with a mission to simplify learning of Android App Development.
CONNECT WITH ME:
Hi, I'm Abhishek, founder and owner of this site. I believe in team work and there is a experienced developer team working on AbhiAndroid with a mission to simplify learning of Android App Development.
CONNECT WITH ME:


Superb Tutorials
if i want to make the background of sliding drawer not transparent than what I have to do
Sirs,
I want to develop Android app to show google map with location, using Androdi studio
I am not able to download the source from dropbox. Please can you share the source by email. I will appreciate your help on this.
You need to enter password abhiandroid to download code on Dropbox. I just recheck it is available and you can download free. If you still face problem let me know