RatingBar Tutorial With Example In Android Studio
RatingBar is used to get the rating from the app user. A user can simply touch, drag or click on the stars to set the rating value. The value of rating always returns a floating point number which may be 1.0, 2.5, 4.5 etc.

The getRating() method of android RatingBar class returns the rating number.
RatingBar code in XML:
<RatingBar
android:id="@+id/simpleRatingBar"
android:layout_width="wrap_content"
android:layout_height="wrap_content" />
Table Of Contents
Methods Used in Rating Bar:
getRating():
You can get the rating number from a RatingBar by using getRating() method. This method returns a Floating Point number. Below we get the current rating number from a RatingBar.
/*Add in Oncreate() funtion after setContentView()*/
RatingBar simpleRatingBar = (RatingBar) findViewById(R.id.simpleRatingBar); // initiate a rating bar
Float ratingNumber = simpleRatingBar.getRating(); // get rating number from a rating bar
getNumStars():
You can get the number of stars of a RatingBar by using getNumstars() method. This method returns int value. In below code we get the total number of stars of a RatingBar.
/*Add in Oncreate() funtion after setContentView()*/
RatingBar simpleRatingBar = (RatingBar) findViewById(R.id.simpleRatingBar); // initiate a rating bar
int numberOfStars = simpleRatingBar.getNumStars(); // get total number of stars of rating bar
Attributes Used in RatingBar:
Now let’s we discuss some important attribute that helps us to configure a RatingBar in XML file (layout).
1. id: id is an attribute used to uniquely identify a rating bar.
<RatingBar
android:id="@+id/simpleRatingBar"
android:layout_width="wrap_content"
android:layout_height="wrap_content"/>
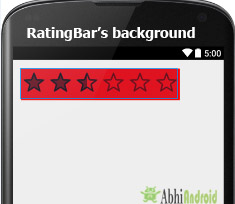
2. background: background attribute is used to set the background of a RatingBar. We can set a color or a drawable in the background of a rating bar.
Below we set the red color for the background of a rating bar.
<RatingBar
    android:id="@+id/simpleRatingBar"
    android:layout_width="wrap_content"
    android:layout_height="wrap_content"
    android:background="#f00"/> <!-- red color for the background of rating bar-->
RatingBar simpleRatingBar = (RatingBar) findViewById(R.id.simpleRatingBar); // initiate a rating bar
simpleRatingBar.setBackgroundColor(Color.RED); // set background color for a rating bar
3. numStars: numStars attribute is used to set the number of stars (or rating items) to be displayed in a rating bar. By default a rating bar shows five stars but we can change it using numStars attribute.
numStars must have a integer number like 1,2 etc.
Below we set num stars value to 7 of RatingBar.
<RatingBar
    android:id="@+id/simpleRatingBar"
    android:layout_width="wrap_content"
    android:layout_height="wrap_content"
    android:numStars="7" /><!-- number of stars to be displayed-->

RatingBar simpleRatingBar = (RatingBar) findViewById(R.id.simpleRatingBar); // initiate a rating bar
simpleRatingBar.setNumStars(7); // set total number of stars
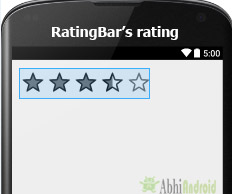
4. rating: Rating attribute set the default rating of a rating bar. It must be a floating point number.
Below we set default rating to 3.5 for a rating bar.
<RatingBar
    android:id="@+id/simpleRatingBar"
    android:layout_width="wrap_content"
    android:layout_height="wrap_content"
    android:rating="3.5" /> <!-- default rating-->
/*Add in Oncreate() funtion after setContentView()*/
RatingBar simpleRatingBar = (RatingBar) findViewById(R.id.simpleRatingBar); // initiate a rating bar
simpleRatingBar.setRating((float) 3.5); // set default rating
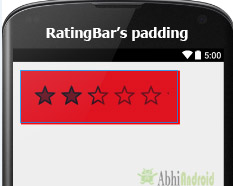
5. padding: padding attribute is used to set the padding from left, right, top or bottom.
- paddingRight: set padding from the right side of the rating bar.
- paddingLeft: set padding from the left side of the rating bar.
- paddingTop: set padding from the top side of the rating bar.
- paddingBottom: set the padding from the bottom side of the rating bar.
- Padding: set the padding from the all side’s of the rating bar.
Below we set the 20dp padding from all the side’s of the rating bar.
<RatingBar
    android:id="@+id/simpleRatingBar"
    android:layout_width="wrap_content"
    android:layout_height="wrap_content"
    android:rating="2.5"
    android:numStars="6"
    android:background="#f00"
    android:padding="20dp"/> <!--20dp padding from all the sides of rating bar-->
RatingBar Example In Android Studio:
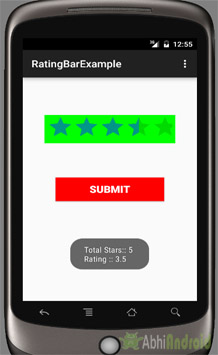
Below is the example of RatingBar in Android where we displayed a RatingBar with five stars and a submit button. Whenever a user click on the button value of total number of stars and value of rating is shown by using a Toast on screen. Below is the final output, download code and step by step tutorial:
Step 1: Create a new project and name it RatingBarExample
Select File -> New -> New Project and Fill the forms and click "Finish" button.
Step 2: Open res -> layout -> activity_main.xml (or) main.xml and add following code
In this step we open an xml file and add the code for displaying a rating bar with five number of stars and “2” value for default rating and one submit button.
<RelativeLayout xmlns:android="http://schemas.android.com/apk/res/android"
    xmlns:tools="http://schemas.android.com/tools"
    android:layout_width="match_parent"
    android:layout_height="match_parent"
    android:paddingBottom="@dimen/activity_vertical_margin"
    android:paddingLeft="@dimen/activity_horizontal_margin"
    android:paddingRight="@dimen/activity_horizontal_margin"
    android:paddingTop="@dimen/activity_vertical_margin"
    tools:context=".MainActivity">

    <RatingBar
        android:id="@+id/simpleRatingBar"
        android:layout_width="wrap_content"
        android:layout_height="wrap_content"
        android:layout_centerHorizontal="true"
        android:layout_marginTop="60dp"
        android:background="#0f0"
        android:paddingLeft="5dp"
        android:paddingRight="5dp"
        android:rating="2" />

    <Button
        android:id="@+id/submitButton"
        android:layout_width="200dp"
        android:layout_height="wrap_content"
        android:layout_centerInParent="true"
        android:background="#f00"
        android:padding="10dp"
        android:text="Submit"
        android:textColor="#fff"
        android:textSize="20sp"
        android:textStyle="bold" />
</RelativeLayout>
Step 3: Open src -> package -> MainActivity.java
In this step we open MainActivity where we add the code to initiate the RatingBar & button and then we perform click event on button and display the total number of stars and rating by using a toast.
package example.gb.ratingbarexample;

import android.support.v7.app.AppCompatActivity;
import android.os.Bundle;
import android.view.Menu;
import android.view.MenuItem;
import android.view.View;
import android.widget.RatingBar;
import android.widget.Button;
import android.widget.Toast;

public class MainActivity extends AppCompatActivity {

    @Override
    protected void onCreate(Bundle savedInstanceState) {
        super.onCreate(savedInstanceState);
        setContentView(R.layout.activity_main);
        // initiate rating bar and a button
        final RatingBar simpleRatingBar = (RatingBar) findViewById(R.id.simpleRatingBar);
        Button submitButton = (Button) findViewById(R.id.submitButton);
        // perform click event on button
        submitButton.setOnClickListener(new View.OnClickListener() {
            @Override
            public void onClick(View v) {
                // get values and then displayed in a toast
                String totalStars = "Total Stars:: " + simpleRatingBar.getNumStars();
                String rating = "Rating :: " + simpleRatingBar.getRating();
                Toast.makeText(getApplicationContext(), totalStars + "\n" + rating, Toast.LENGTH_LONG).show();
            }
        });
    }


}
Output:
Now start the AVD in Emulator and run the App. You will see the rating option on screen. Select your rating and click on Submit. Your rating will be displayed on screen as Toast.

Custom RatingBar Example In Android Studio:
In the below example of custom rating bar in Android, we displayed a rating bar with five custom stars and a submit button. Whenever a user click on the button value of total number of stars and value of rating is shown by using a Toast. Below is the final output, download code and step by step explanation of Custom RatingBar.

Select File -> New -> New Project -> then Fill the forms and click "Finish" button.
Step 2: Open res -> layout -> activity_main.xml (or) main.xml and add following code
In this step we open an xml file and add the code for displaying a custom rating bar with five number of stars and “ 2.5 ” value for default rating and one submit button.
<RelativeLayout xmlns:android="http://schemas.android.com/apk/res/android"
    xmlns:tools="http://schemas.android.com/tools"
    android:layout_width="match_parent"
    android:layout_height="match_parent"
    android:background="#fff"
    android:paddingBottom="@dimen/activity_vertical_margin"
    android:paddingLeft="@dimen/activity_horizontal_margin"
    android:paddingRight="@dimen/activity_horizontal_margin"
    android:paddingTop="@dimen/activity_vertical_margin"
    tools:context=".MainActivity">

    <RatingBar
        android:id="@+id/simpleRatingBar"
        style="@style/customRatingBar"
        android:layout_width="wrap_content"
        android:layout_height="60dp"
        android:layout_centerHorizontal="true"
        android:layout_marginTop="60dp"
        android:background="#0f0"
        android:rating="2.5" />

    <Button
        android:id="@+id/submitButton"
        android:layout_width="200dp"
        android:layout_height="wrap_content"
        android:layout_centerInParent="true"
        android:background="#f40"
        android:padding="10dp"
        android:text="Submit"
        android:textColor="#fff"
        android:textSize="20sp"
        android:textStyle="bold" />
</RelativeLayout>
Step 3: Open src -> package -> MainActivity.java
In this step we open MainActivity where we add the code to initiate the RatingBar & button and then perform click event on button and display the total number of stars and rating by using a Toast.
package example.gb.customratingbarexample;

import android.support.v7.app.AppCompatActivity;
import android.os.Bundle;
import android.view.Menu;
import android.view.MenuItem;
import android.view.View;
import android.widget.RatingBar;
import android.widget.Button;
import android.widget.Toast;

public class MainActivity extends AppCompatActivity {

    @Override
    protected void onCreate(Bundle savedInstanceState) {
        super.onCreate(savedInstanceState);
        setContentView(R.layout.activity_main);
        // initiate rating bar and a button
        final RatingBar simpleRatingBar = (RatingBar) findViewById(R.id.simpleRatingBar);
        Button submitButton = (Button) findViewById(R.id.submitButton);
        // perform click event on button
        submitButton.setOnClickListener(new View.OnClickListener() {
            @Override
            public void onClick(View v) {
                // get values and then displayed in a toast
                String totalStars = "Total Stars:: " + simpleRatingBar.getNumStars();
                String rating = "Rating :: " + simpleRatingBar.getRating();
                Toast.makeText(getApplicationContext(), totalStars + "\n" + rating, Toast.LENGTH_LONG).show();
            }
        });
    }

}
Step 4: Open res ->values ->styles.xml
In this step we add the code for displaying custom stars for rating. To do that in this styles.xml file we set an custom xml file from drawable and set the height and width for that item.
<resources>

    <!-- Base application theme. -->
    <style name="AppTheme" parent="Theme.AppCompat.Light.DarkActionBar">
        <!-- Customize your theme here. -->
    </style>
    <style name="customRatingBar" parent="@android:style/Widget.RatingBar">
        <item name="android:progressDrawable">@drawable/customratingstars</item>
        <item name="android:minHeight">20dip</item>
        <item name="android:maxHeight">20dip</item>
    </style>
</resources>
Step 5: Create a new drawable XML file –> customratingstars.xml
In this step we create a new drawable XML file, in which we set the icons for filled and empty stars. As shown in below code snippet empty and filled are two different icons set from drawable.
<?xml version="1.0" encoding="utf-8"?>
<layer-list xmlns:android="http://schemas.android.com/apk/res/android">
    <item android:id="@android:id/background"
        android:drawable="@drawable/empty" />
    <item android:id="@android:id/secondaryProgress"
        android:drawable="@drawable/empty" />
    <item android:id="@android:id/progress"
        android:drawable="@drawable/filled" />
</layer-list>
Output:
Now start the AVD in Emulator and run the App. You will see custom star rating option on screen.

DOWNLOAD THIS FREE eBook!

One thought on “RatingBar Tutorial With Example In Android Studio”
Leave a Reply

DOWNLOAD THIS FREE eBook!


Premium Project Source Code:
- Food Ordering Android App Project Source Code
- Ecommerce Store Android App Project Source Code
- Convert Website Into Android App Project Source Code
- Quiz Game Android App Project Source Code
- Radio Streaming Android App Source Code
- City Guide Android App Project Source Code
- QR Barcode Android App Project Source Code
 Hi, I'm Abhishek, founder and owner of this site. I believe in team work and there is a experienced developer team working on AbhiAndroid with a mission to simplify learning of Android App Development.
CONNECT WITH ME:
Hi, I'm Abhishek, founder and owner of this site. I believe in team work and there is a experienced developer team working on AbhiAndroid with a mission to simplify learning of Android App Development.
CONNECT WITH ME:


how to save rating bar into firebase? is it int type?