Relative Layout In Android With Example
The Relative Layout is very flexible layout used in android for custom layout designing. It gives us the flexibility to position our component/view based on the relative or sibling component’s position. Just because it allows us to position the component anywhere we want so it is considered as most flexible layout. For the same reason Relative layout is the most used layout after the Linear Layout in Android. It allow its child view to position relative to each other or relative to the container or another container.
In Relative Layout, you can use “above, below, left and right” to arrange the component’s position in relation to other component. For example, in the below image you can see content is placed in related to Heading.
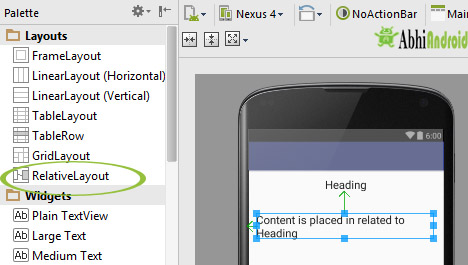
Table Of Contents
Attributes of Relative layout:
Lets see different properties of Relative Layout which will be used while designing Android App UI:
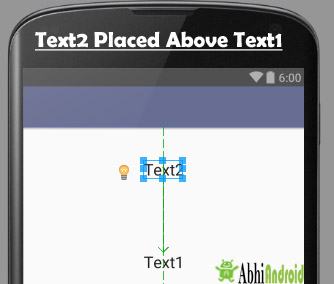
1.above: Position the bottom edge of the view above the given anchor view ID and must be a reference of the another resource in the form of id. Example, android:layout_above=”@+id/textView” .
For example, suppose a view with id textview2 is what we want to place above another view with id textview. Below is the code and layout image.
<!-- textView2 is placed above textView-->
<TextView
        android:layout_width="wrap_content"
        android:layout_height="wrap_content"
        android:textAppearance="?android:attr/textAppearanceLarge"
        android:text="Text2"
        android:id="@+id/textView2"
        android:layout_above="@+id/textView"
        android:layout_marginBottom="100dp"
        android:layout_centerHorizontal="true"/>
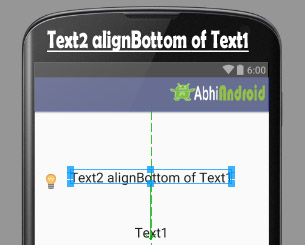
In the below example we have aligned a view with id textView2 Bottom of another view with id textView. Below is the coded and layout image.
<!-- textView2 alignBottom of textView -->
<TextView
    android:layout_width="wrap_content"
    android:layout_height="wrap_content"
    android:textAppearance="?android:attr/textAppearanceLarge"
    android:layout_centerHorizontal="true"
    android:id="@+id/textView2"
    android:layout_alignBottom="@+id/textView"
    android:text="Text2 alignBottom of Text1"
    android:layout_marginBottom="90dp"
/>
Below is the code and layout image in which we have aligned a view with id textView2 left of another view with id textView.
<!-- textView2 alignLeft of textView -->
<TextView
    android:layout_width="wrap_content"
    android:layout_height="wrap_content"
    android:textAppearance="?android:attr/textAppearanceLarge"
    android:id="@+id/textView2"
    android:layout_alignLeft="@+id/textView"
    android:text="Text2 alignLeft of Text1"
    android:layout_below="@+id/textView"
    android:layout_marginTop="20dp"/>

Below is the code and layout image in which we have aligned a view with id textView2 right of another view with id textView.
<!-- textView2 alignRight of textView-->
<TextView
    android:layout_width="wrap_content"
    android:layout_height="wrap_content"
    android:textAppearance="?android:attr/textAppearanceLarge"
    android:id="@+id/textView2"
    android:layout_alignRight="@+id/textView"
    android:text="Text2 alignRight of Text1"
    android:layout_below="@+id/textView"
    android:layout_marginTop="20dp"/>

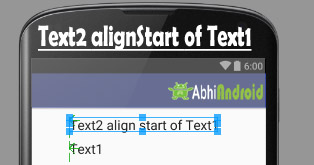
Below is the alignStart code and layout image in which we have aligned a view with id textView2 start of another view with id textView.
<!-- Text2 alignStart-->
<TextView
    android:layout_width="wrap_content"
    android:layout_height="wrap_content"
    android:textAppearance="?android:attr/textAppearanceLarge"
    android:id="@+id/textView2"
    android:text="Text2 align start of Text1"
    android:layout_alignStart="@+id/textView"
 />
Below is the alignTop code and layout image in which we have aligned a view with id textView Top of another image with id imageView.
<!--text is align top on Image-->
<TextView
    android:layout_width="wrap_content"
    android:layout_height="wrap_content"
    android:textAppearance="?android:attr/textAppearanceLarge"
    android:id="@+id/textView"
    android:layout_alignTop="@+id/imageView"
    android:text="Text Here is AlignTop on Image"
     />

Important Note:alignParentBottom and alignBottom are two different properties. In alignBottom we give the reference of another view in the form of id that the view is aligned at the bottom of referenced view but in alignParentBottom the bottom edge of the view matches the bottom edge of the parent.
Below is the alignParentBottom code and layout image in which textView is simply displayed using the alignParentBottom.
<!-- textView is alignParentBottom -->
<TextView
    android:layout_width="wrap_content"
    android:layout_height="wrap_content"
    android:textAppearance="?android:attr/textAppearanceLarge"
    android:id="@+id/textView"
    android:text="Text Here is AlignParentBottom with bottom margin of 120dp"
    android:layout_alignParentBottom="true"
    android:layout_alignParentLeft="true"
    android:layout_alignParentStart="true"
    android:layout_marginBottom="120dp" />

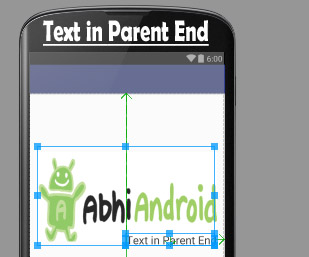
Important Note: In alignParentEnd the bottom edge of the view matches the bottom edge of the parent.
Below is the alignParentEnd code and layout image in which textView is simply displayed on Image in the end.
<!-- Text displayed in the end of parent image-->
<TextView
    android:layout_width="wrap_content"
    android:layout_height="wrap_content"
    android:textAppearance="?android:attr/textAppearanceLarge"
    android:id="@+id/textView"
    android:text="Text in Parent End"
    android:layout_alignBottom="@+id/imageView"
    android:layout_alignParentEnd="true"
 />
Important Note: alignParentLeft and alignLeft are two different properties. In alignLeft we give the reference of another view in the form of id that the view is aligned to the left of the referenced view but in alignParentLeft the left edge of the view matches the left edge of the parent.
Below is the alignParentLeft example code and layout image in which textView is simply displayed on parent Image in the left side.
<!-- align parent left in Android -->
<TextView
    android:layout_width="wrap_content"
    android:layout_height="wrap_content"
    android:textAppearance="?android:attr/textAppearanceLarge"
    android:id="@+id/textView"
    android:text="Text in Parent Left"
    android:layout_alignBottom="@+id/imageView"
    android:layout_alignParentLeft="true"
     />

Important Note: alignParentRight and alignRight are two different properties. In alignRight we give the reference of another view in the form of id that the view is aligned to the right of the referenced view but in alignParentRight the right edge of the view matches the right edge of the parent.
Below is the alignParentRight example code and layout image in which textView is simply displayed on parent Image in the right side.
<!-- alignRightParent Example -->
<TextView
    android:layout_width="wrap_content"
    android:layout_height="wrap_content"
    android:textAppearance="?android:attr/textAppearanceLarge"
    android:id="@+id/textView"
    android:text="Text in Parent Right"
    android:layout_alignBottom="@+id/imageView"
    android:layout_alignParentRight="true"
  />

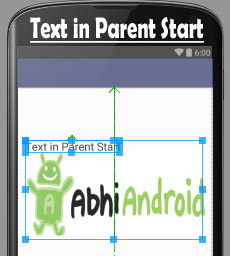
Important Note: alignParentStart and alignStart are two different properties, In alignStart we give the reference of another view in the form of id that the view is aligned at the start of referenced view but in alignParentStart the start edge of the view matches the start edge of the parent(RelativeLayout).
Below is the alignParentStart example code and layout image in which textView is simply displayed on parent Image in the right side.
<!-- alignParentStart Example -->
<TextView
    android:layout_width="wrap_content"
    android:layout_height="wrap_content"
    android:textAppearance="?android:attr/textAppearanceLarge"
    android:id="@+id/textView"
    android:text="Text in Parent Start"
    android:layout_alignTop="@+id/imageView"
    android:layout_alignParentStart="true"
     />
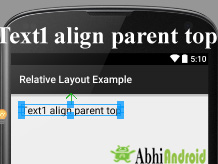
Important Note: alignParentTop and alignTop are two different properties, In alignTop we give the reference of another view in the form of id that the view is aligned to the top of the referenced view but in alignParentTop the top edge of the view matches the top edge of the parent(RelativeLayout).
Below is the example code of alignParentTop property and also layout image.
<!-- alignParentTop example -->
<TextView
    android:layout_width="wrap_content"
    android:layout_height="wrap_content"
    android:text="Text1 align parent top"
    android:layout_alignParentTop="true"
    android:layout_margin="20dp"
    android:textSize="20sp"
    android:textColor="#000"/>
Below is the example code of centerInParent property and also layout image.
<!-- centerInParent example -->
<TextView
    android:layout_width="wrap_content"
    android:layout_height="wrap_content"
    android:text="Text1 center in parent"
    android:layout_centerInParent="true"
    android:textSize="20sp"
    android:textColor="#000"
/>

Below is the example code of centerHorizontal property and also layout image.
<!-- centerHorizontal example -->
<TextView
    android:layout_width="wrap_content"
    android:layout_height="wrap_content"
    android:text="Text1 center Horizontal"
    android:layout_centerHorizontal="true"
    android:textSize="20sp"
    android:textColor="#000"
/>

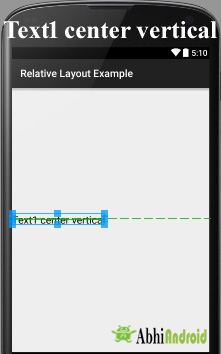
Below is the example code of centerVertical property and also layout image.
<!-- centerVertical example -->
<TextView
    android:layout_width="wrap_content"
    android:layout_height="wrap_content"
    android:text="Text1 center vertical"
    android:layout_centerVertical="true"
    android:textSize="20sp"
    android:textColor="#000"
/>
Relative Layout Examples With Code And Explanation:
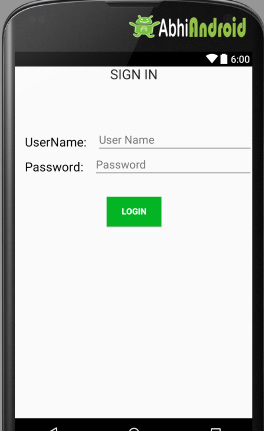
Example 1: Here we are designing a simple log in screen in Android Studio using Relative Layout. Below is the final output:
<?xml version="1.0" encoding="utf-8"?>

<!--Relative Layout Is Used-->

<RelativeLayout xmlns:android="http://schemas.android.com/apk/res/android"
    android:layout_width="match_parent"
    android:layout_height="match_parent">

    <!--Text View for Displaying SIGN IN Text At Top of UI-->

    <TextView
        android:layout_width="wrap_content"
        android:layout_height="wrap_content"
        android:textAppearance="?android:attr/textAppearanceLarge"
        android:text="SIGN IN"
        android:id="@+id/textView3"
        android:layout_alignParentTop="true"
        android:layout_centerHorizontal="true" />

    <!--Text View for Displaying Username-->

    <TextView
        android:id="@+id/userName"
        android:layout_width="wrap_content"
        android:layout_height="wrap_content"
        android:layout_marginLeft="@dimen/activity_horizontal_margin"
        android:layout_marginTop="110dp"
        android:text="UserName:"
        android:textColor="#000000"
        android:textSize="20sp" />

    <!--Text View for Displaying Password-->

    <TextView
        android:id="@+id/password"
        android:layout_width="wrap_content"
        android:layout_height="wrap_content"
        android:layout_below="@+id/userName"
        android:layout_margin="@dimen/activity_horizontal_margin"
        android:text="Password:"
        android:textColor="#000000"
        android:textSize="20sp" />

    <!--Edit Text for Filling Username-->

    <EditText
        android:id="@+id/edt_userName"
        android:layout_width="fill_parent"
        android:layout_height="40dp"
        android:layout_marginLeft="@dimen/activity_horizontal_margin"
        android:layout_marginTop="100dp"
        android:layout_toRightOf="@+id/userName"
        android:hint="User Name" />

    <!--Edit Text for Filling Password-->

    <EditText
        android:layout_width="fill_parent"
        android:layout_height="40dp"
        android:layout_below="@+id/edt_userName"
        android:layout_centerVertical="true"
        android:layout_toRightOf="@+id/password"
        android:hint="Password" />

    <!--Button for Clicking after filling details-->

    <Button
        android:id="@+id/btnLogin"
        android:layout_width="wrap_content"
        android:layout_height="wrap_content"
        android:layout_below="@+id/password"
        android:layout_centerHorizontal="true"
        android:layout_marginTop="20dp"
        android:background="#03B424"
        android:text="Login"
        android:textColor="#ffffff"
        android:textStyle="bold" />


</RelativeLayout>
Output:
Difference between Linear And Relative Layout:
RELATIVE LAYOUT:
- Every element of relative layout arranges itself to the other element or a parent element.
- It is helpful while adding views one next to other etc
- In a relative layout you can give each child a Layout Property that specifies exactly where it should go in relative to the parent or relative to other children.
- Views can be layered on top of each other.
LINEAR LAYOUT:
- In a linear layout, like the name suggests, all the elements are displayed in a linear fashion either vertically or horizontally.
- Either Horizontally or Vertically this behavior is set in android:orientation which is an property of the node Linear Layout.
android:orientation=”horizontal” or android:orientation=”vertical”
- Linear layouts put every child, one after the other, in a line, either horizontally or vertically.
DOWNLOAD THIS FREE eBook!

2 thoughts on “Relative Layout In Android With Example”
Leave a Reply

DOWNLOAD THIS FREE eBook!


Premium Project Source Code:
- Food Ordering Android App Project Source Code
- Ecommerce Store Android App Project Source Code
- Convert Website Into Android App Project Source Code
- Quiz Game Android App Project Source Code
- Radio Streaming Android App Source Code
- City Guide Android App Project Source Code
- QR Barcode Android App Project Source Code
 Hi, I'm Abhishek, founder and owner of this site. I believe in team work and there is a experienced developer team working on AbhiAndroid with a mission to simplify learning of Android App Development.
CONNECT WITH ME:
Hi, I'm Abhishek, founder and owner of this site. I believe in team work and there is a experienced developer team working on AbhiAndroid with a mission to simplify learning of Android App Development.
CONNECT WITH ME:


Nice !
alignParentStart and similar other parameter could not be understanded..