In android studio there is a default icon set by android studio itself. You can change it as per the application requirement.
Changing the Application Icon In Android Studio:
Step 1-
Open your application in Android Studio.
Step 2- Further follow the path to reach the desired folder to add icon (app -> res-> mipmap).
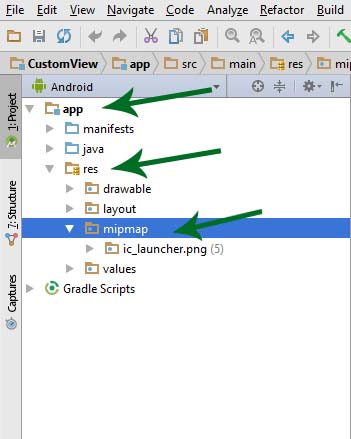
Step 3- Here add you app icon. You can just simply copy and paste the image in mipmap folder.
Step 4- After placing the image in the mipmap folder. You need to rename the default icon name to your icon image name.
Step 5- Go to (app -> manifests) open AndroidManifest.xml file. Here find the following code.
android:icon=”@mipmap/ic_launcher“
Here ic_launcher is the default image name, rename it.
![]()
Important Note: You can make any image as your app icon just define a correct path of the image in AndroidManifest.xml file.
I tried this and also many other things I found on the NET !!!!
but , ALL THIS IS NOT WORKING !!!!!
So , by trial and error I came to the following conclusions :
– The ICON is not picked up from the .png files in the @mipmap directories !!!!!!!
– The ICON is created from the .XML files in the @mipmap-anydpi so it uses : foreground.png
– SO : – changing the .XML file ( ie. delete background line ) has some effect !!!!!!!!
– Making a drawing in the center of : foreground.png also works !!!!!!
– If I remove the @mipmap-anydpi directory , the tool makes a SMALL copy of my icon !!!!!!
HOW can I make the tool to pick up my .png icons ???????