Basically, JAR is a Java Archives Package file, which comprises several Java files to achieve a specific task. The meta data and Resources(text,images etc.) are also comprised with in a file to distribute it as Library files.
All JAR files are archived file which are built on Zip format. JAR files have the .JAR extension. You can add these JAR files to your libs folder under app folder to provide your project some additional functionality.
Lets see the steps involve in importing or adding a JAR file in Android Studio:
How to import or Add External JAR files in Android Studio:
Step 1: Download any JAR file for your Project. For Example: Download three Mail dependency JAR files for Android Studio. Get it from Here

Step 2: Download all the three JAR files in somewhere in your system.
Step 3: Copy these three Files from that folder where you downloaded them, and Paste it in libs folder under app folder of your project.

Important Note: If you are not able to find libs then you must be viewing your project in “Android” view. On the right side of Android tab you will see < > symbol. Click on it and select Project. This option is available in Android Studio 2.1.
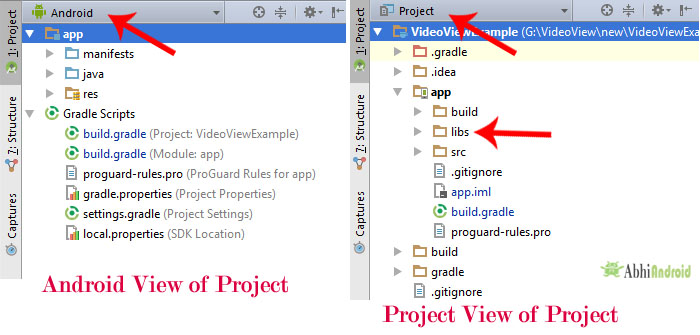
If you are using any older version where you can’t find this, then you simply need to click on Android tab and it will show you a drop down list from that list select project.

Step 5: Now paste jar files here in libs folder

Step 4: Once your JAR files are successfully copied to libs folder and we will add them as dependency files.
Step 5: Click on File > Project Structure >Select app > Dependencies Tab.

Step 6: Click on (+) plus button given on right side and select File Dependency.

Step 7: This will pop up a dialog box for selecting path. Under this open libs folder and add your Jar files one by one.

Steps 8: Once you select all three Jar files then click Ok button and your Gradle will Start building.

This way you need to manually add any thing in build.gradle file. After completion of gradle building everything will be done and you are ready to use your External JAR Library.
how to select path of particular jar file android??
thanks man
this was very helpful, u saved my day
Why does it not work then I create a folder under /libs and place my jar there? I have multiple .jar that I want to include in my project and placing all of them under /libs sort confuses me. I tried creating folders and segregating those jars, but then my app won’t build since it cannot find where these jars are ?