Gallery Tutorial With Example In Android Studio
In Android, Gallery is a view used to show items in a center locked, horizontal scrolling list and user will select a view and then user selected view will be shown in the center of the Horizontal list. The items in Gallery are added using Adapter just like in ListView or GridView.

Important Note: Gallery class was deprecated in API level 16. This widget is no longer supported. Other horizontally scrolling widgets include HorizontalScrollView and ViewPager from the support library.
Table Of Contents
Basic Gallery XML Code:
<Gallery
android:id="@+id/simpleGallery"
android:layout_width="fill_parent"
android:layout_height="wrap_content"/ >
Adapter Used To Fill Images In Gallery:
Adapters works as a bridge between AdapterView and data source. For filling data(images) in Gallery we need to use Adapters. BaseAdapter is parent adapter for all other adapters so we mainly used it for displaying data in Gallery list.

BaseAdapter:
BaseAdapter is a common base class of a general implementation of an Adapter that can be used in ListView, GridView, Gallery etc. Base Adapter can be extended to create a custom Adapter for displaying a custom list items.
Here is the code of Custom Adapter when we extends the BaseAdapter in that:
public class CustomAdapter extends BaseAdapter {

@Override

public int getCount() {

return 0;

}

@Override

public Object getItem(int i) {

return null;

}

@Override

public long getItemId(int i) {

return 0;

}

@Override

public View getView(int i, View view, ViewGroup viewGroup) {

return null;

}
In the above code snippet we see the overrided methods of BaseAdapter which are used to set the data in a list, grid or a Gallery. From there we mainly used two functions getCount() and getView().
- getView(): This method called automatically for all items of Gallery (similar to list view in which getView() method called for each item of ListView)
- getCount(): This method returns the total number of items to be displayed in a list. It counts the value from array list size() method or an array’s length.
Read BaseAdapter tutorial for more details.
Steps For Implementation Of Android Gallery View:
- Get the reference of Gallery in class using findViewById() method, or you can also create an object dynamically.
- Create an array of Images and call the adapter using Gallery view’s object.
- Create a Custom adapter class which extends BaseAdapter to bind the Gallery view with a series of ImageViews.
Important Methods Of Gallery In Android:
Let’s we discuss some important methods of Gallery that may be called in order to manage the Gallery.
1. setAnimationDuration(int): This method is used to set the duration for how long a transition animation should run (in milliseconds) when layout has changed.
Below we set the duration for how long a transition animation should run when layout has changed.
Gallery simpleGallery = (Gallery) findViewById(R.id.simpleGallery); // get the reference of Gallery
simpleGallery.setAnimationDuration(3000); // set 3000 milliseconds for animation duration between items of Gallery

2. setSpacing(int): This method is used to set the spacing between items in a Gallery.
Below we set the spacing between the items of Gallery.
Gallery simpleGallery = (Gallery) findViewById(R.id.simpleGallery); // get the reference of Gallery
simpleGallery.setSpacing(5); // set space between the items of Gallery

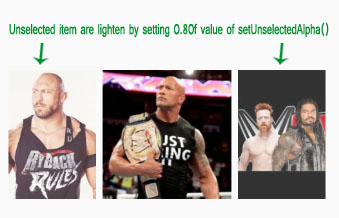
3.setUnselectedAlpha(float): This method is used to set the alpha on the items that are not selected.
Below we set the alpha value for unselected items of Gallery.
Gallery simpleGallery = (Gallery) findViewById(R.id.simpleGallery); // get the reference of Gallery
simpleGallery.setUnselectedAlpha(0.80f); // set 0.25 value for the alpha of unselected items of Gallery
Attributes of Gallery:
Now let’s we discuss some common attributes of a Gallery that helps us to configure it in our layout (xml).
1. id: id attribute is used to uniquely identify a Gallery.
Below we set the id of the Gallery that is used to uniquely identify it.
<Gallery
android:id="@+id/simpleGallery"
android:layout_width="fill_parent"
android:layout_height="wrap_content"/ > < !--  id of Gallery used to uniquely identify it -->
2. padding: This attribute is used to set the padding from left, right, top or bottom side of a Gallery.
- paddingRight: This attribute is used to set the padding from the right side of a Gallery.
- paddingLeft: This attribute is used to set the padding from the left side of a Gallery.
- paddingTop: This attribute is used to set the padding from the top side of a Gallery.
- paddingBottom: This attribute is used to set the padding from the bottom side of a Gallery.
- Padding: This attribute is used to set the padding from the all the side’s of a Gallery.
Below we set the 10dp padding from all the sides of a Gallery
<Gallery
android:id="@+id/simpleGallery"
android:layout_width="fill_parent"
android:layout_height="wrap_content"
android:padding="10dp"/> <!--  10dp padding from all the sides of Gallery -->
3. background: This attribute is used to set the background of a Gallery. We can set a color or a drawable in the background of a Gallery:
Below is the example code with explanation included in which we set the black color in the background of Gallery.
<Gallery
android:id="@+id/simpleGallery"
android:layout_width="fill_parent"
android:layout_height="wrap_content"
android:background="#000" /> <!--   black background color of Gallery -->
Setting padding In Gallery In Java class:
Gallery simpleGallery=(Gallery)findViewById(R.id.simpleGallery); // get the reference of Gallery
simpleGallery.setBackgroundColor(Color.BLACK); // set black color in the background of Gallery
4. animationDuration: This attribute is used to set the duration for how long a transition animation should run (in milliseconds) when layout has changed. We can also set the animation duration programmatically means in java class by using setAnimationDuration(int).
Below we set the duration for how long a transition animation should run when layout has changed.
<Gallery
android:id="@+id/simpleGallery"
android:layout_width="fill_parent"
android:layout_height="wrap_content"
android:animationDuration="3000" />
<!-- set 100 milliseconds for animation duration between items of Gallery -->
5. spacing: This attribute is used to set the spacing between items in a Gallery. We can also set the spacing between items programmatically means in java class by using setSpacing() method.
Below we set the spacing between the items of Gallery.
<Gallery
android:id="@+id/simpleGallery"
android:layout_width="fill_parent"
android:layout_height="wrap_content"
android:spacing="5dp" />
<!-- set 5dp space between the items of Gallery -->
6. unselectedAlpha: This attribute is used to set the alpha on the items that are not selected. Must be a floating point value, such as “5”. We can also set the alpha of items programmatically means in java class by using setUnselectedAlpha(float) method.
Below we set the alpha value for unselected items of Gallery.
<Gallery
android:id="@+id/simpleGallery"
android:layout_width="fill_parent"
android:layout_height="wrap_content"
android:unselectedAlpha="0.25" />
<!-- set 0.25 value for the alpha of unselected items of Gallery -->
Gallery Example In Android Studio:
Below is the example of Gallery in which we display a ImageView and Gallery with number of items(images). Firstly we create an array of images id’s and then set the adapter to fill the data in the Gallery. In this we create custom adapter class in which we extends BaseAdapter class. We also perform setOnItemClickListener event so whenever a user click on any item of Gallery the selectable item(image) is displayed in the ImageView.
Below you can download code, see final output and step by step explanation of example:

Step 1: Create a new project and name it GalleryExample
Step 2: Open res -> layout ->activity_main.xml (or) main.xml and add following code:
<LinearLayout xmlns:android="http://schemas.android.com/apk/res/android"
    xmlns:tools="http://schemas.android.com/tools"
    android:layout_width="match_parent"
    android:layout_height="match_parent"
    android:orientation="vertical"
    android:paddingBottom="@dimen/activity_vertical_margin"
    android:paddingLeft="@dimen/activity_horizontal_margin"
    android:paddingRight="@dimen/activity_horizontal_margin"
    android:paddingTop="@dimen/activity_vertical_margin"
    tools:context=".MainActivity">

    <!-- create a ImageView and Gallery -->
    <ImageView
        android:id="@+id/selectedImageView"
        android:layout_width="fill_parent"
        android:layout_height="200dp"
        android:scaleType="fitXY" />

    <Gallery
        android:id="@+id/simpleGallery"
        android:layout_width="fill_parent"
        android:layout_height="wrap_content"
        android:layout_marginTop="100dp"
        android:unselectedAlpha="0.80" />

</LinearLayout>
Step 3: Open src -> package -> MainActivity.java
In this step we open MainActivity and add the code for initiate the ImageView and Gallery. Firstly we create an array of images id’s and then set the adapter to fill the data in the Gallery. We also perform setOnItemClickListener event so whenever a user click on any item of Gallery the selectable item(image) is displayed in the ImageView.
package example.abhiandroid.galleryexample;

import android.graphics.Color;
import android.support.v7.app.AppCompatActivity;
import android.os.Bundle;
import android.view.Gravity;
import android.view.View;
import android.widget.AdapterView;
import android.widget.Gallery;
import android.widget.ImageView;

public class MainActivity extends AppCompatActivity {

    Gallery simpleGallery;
    CustomGalleryAdapter customGalleryAdapter;
    ImageView selectedImageView;
    // array of images
    int[] images = {R.drawable.image1, R.drawable.image2, R.drawable.image3, R.drawable.image4, R.drawable.image5,
            R.drawable.image6, R.drawable.image7, R.drawable.image8, R.drawable.image9, R.drawable.image10, R.drawable.image11,
            R.drawable.image12, R.drawable.image13};

    @Override
    protected void onCreate(Bundle savedInstanceState) {
        super.onCreate(savedInstanceState);
        setContentView(R.layout.activity_main);
        simpleGallery = (Gallery) findViewById(R.id.simpleGallery); // get the reference of Gallery
        selectedImageView = (ImageView) findViewById(R.id.selectedImageView); // get the reference of ImageView
        customGalleryAdapter = new CustomGalleryAdapter(getApplicationContext(), images); // initialize the adapter
        simpleGallery.setAdapter(customGalleryAdapter); // set the adapter
        simpleGallery.setSpacing(10);
        // perform setOnItemClickListener event on the Gallery
        simpleGallery.setOnItemClickListener(new AdapterView.OnItemClickListener() {
            @Override
            public void onItemClick(AdapterView<?> parent, View view, int position, long id) {
                // set the selected image in the ImageView
                selectedImageView.setImageResource(images[position]);

            }
        });
    }
}
Step 4: Create a new class CustomGalleryAdapter.java inside package and add the following code.
In this step we create a CustomGalleryAdapter in which we extend BaseAdapter and implement the overrided methods. In this we create a ImageView at run time in getView method and finally set the image in the ImageView.
package example.abhiandroid.galleryexample;

import android.content.Context;
import android.view.View;
import android.view.ViewGroup;
import android.widget.BaseAdapter;
import android.widget.Gallery;
import android.widget.ImageView;

public class CustomGalleryAdapter extends BaseAdapter {

    private Context context;
    private int[] images;

    public CustomGalleryAdapter(Context c, int[] images) {
        context = c;
        this.images = images;
    }

    // returns the number of images
    public int getCount() {
        return images.length;
    }

    // returns the ID of an item
    public Object getItem(int position) {
        return position;
    }

    // returns the ID of an item
    public long getItemId(int position) {
        return position;
    }

    // returns an ImageView view
    public View getView(int position, View convertView, ViewGroup parent) {

        // create a ImageView programmatically
        ImageView imageView = new ImageView(context);
        imageView.setImageResource(images[position]); // set image in ImageView
        imageView.setLayoutParams(new Gallery.LayoutParams(200, 200)); // set ImageView param
        return imageView;
    }
}
DOWNLOAD THIS FREE eBook!

8 thoughts on “Gallery Tutorial With Example In Android Studio”
Leave a Reply

DOWNLOAD THIS FREE eBook!


Premium Project Source Code:
- Food Ordering Android App Project Source Code
- Ecommerce Store Android App Project Source Code
- Convert Website Into Android App Project Source Code
- Quiz Game Android App Project Source Code
- Radio Streaming Android App Source Code
- City Guide Android App Project Source Code
- QR Barcode Android App Project Source Code
 Hi, I'm Abhishek, founder and owner of this site. I believe in team work and there is a experienced developer team working on AbhiAndroid with a mission to simplify learning of Android App Development.
CONNECT WITH ME:
Hi, I'm Abhishek, founder and owner of this site. I believe in team work and there is a experienced developer team working on AbhiAndroid with a mission to simplify learning of Android App Development.
CONNECT WITH ME:


Cannot resolve Symbol ‘R’
and Gallery is lined please help
don’t take class name as Gallery choose another name then it’ll work.
how to json set image data in android gallery widgets
Its a good tutorioal…Easy to understand…!!!
hi
i want my gallery app showing pictures of a specific folder of my sd card and nothing else.what can i do?
and what code should i add to your codes?
thanks
when i run this application is stopped unfortunately
Please download code and try to run it. If you still face problem. Let us know.
It is Very good Tutorial, and easily understanding