Intent Filter in Android Manifest Tutorial, Example And Code
Intent Filter are the components which decide the behavior of an intent. As we have read in our previous tutorial of Intent about the navigation of one activity to another, that can be achieve by declaring intent filter. We can declare an Intent Filter for an Activity in manifest file.
Intent filters specify the type of intents that an Activity, service or Broadcast receiver can respond to. It declares the functionality of its parent component (i.e. activity, services or broadcast receiver). It declares the capability of any activity or services or a broadcast receiver.
Intent Filter Code Inside Android Manifest:
The code of Intent Filter is used inside AndroidManifest.xml file for an activity. You can see it: open manifests folder >> open AndroidManifest.xml file
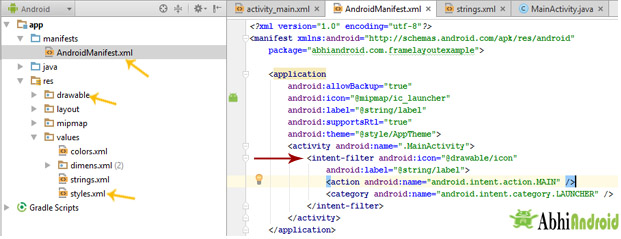
Table Of Contents
Syntax of Intent Filters:
Intent filter is declared inside Manifest file for an Activity.
<!--Here Name of Activity is .MainActivity, image of icon name stored in drawable folder, label present inside string name is label-->
<!--If anything is different please customize the code according to your app-->
<activity android:name=".MainActivity">
 <intent-filter android:icon="@drawable/icon"
  android:label="@string/label"
  >
  <action android:name="android.intent.action.MAIN" />
  <category android:name="android.intent.category.LAUNCHER" />
 </intent-filter>
</activity>
Important Note: If you are using above code make sure below things are correct:
icon: This is displayed as icon for activity. You can check or save png image of name icon in drawable folder. If icon image of any other name is stored please replace @drawable/icon with that image name i.e. @drawable/image_name.
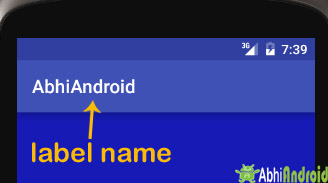
label: The label / title that appears at top in Toolbar of that particular Activity. You can check or edit label name by opening String XML file present inside Values folder (Values -> Strings). Replace @string/label to @string/yourlabel.
priority: This is another important attribute in Intent filter used in broadcasting. We will explain it in future topics of broadcasting.
Attributes of Intent Filter:
Below are the attributes of Intent filter:
1. android:icon
An icon represents the activity, service or broadcast receiver when a user interact with it or when it appears to user in an application. To set an icon you need to give reference of drawable resource as declared android:icon=”@drawable/icon”.
How to add custom icon in your App:
Step 1: Open your android project folder in computer / system
Step 2: Open app>> src >> main >> res >> drawable >> here save custom icon image with name

android:icon="@drawable/icon"
Important Note: If you have not declared any icon for your activity then android sets the icon of parent component by default. And if no icon is defined by parent component then icon is set as the default icon by <application> element (declared in Manifest file).
2. android:label
A label represents the title of an activity on the toolbar. You can have different Labels for different Activities as per your requirement or choice. The label should be set as a reference to a string resource. However, you can also use a raw string to set a label as declared in the below given code snippet
android:label = "@string/label"
or
android:label = "New Activity"
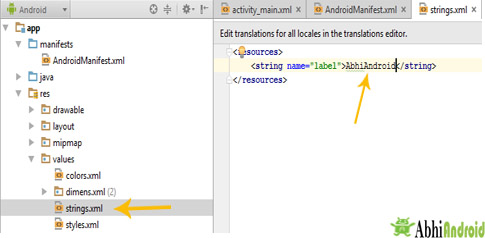
How To Create Custom Label in App:
Step 1: Click on values values
Step 2: Open Strings.xml file present inside values
Step 3: Edit String value to your custom name. For example, we put AbhiAndroid.
Below is sample code of Intent filter for an App having two activity:
<application
android:allowBackup="true"
android:icon="@mipmap/ic_launcher"
android:label="@string/app_name"
android:supportsRtl="true"
android:theme="@style/AppTheme">
<activity android:name=".MainActivity">
<intent-filter>

<!--Add code here for first activity-->

</intent-filter>
</activity>
<activity android:name=".Main2Activity">
<intent-filter>
<!--Add code here for second activity-->
</intent-filter>
</activity>
</application>
Elements In Intent Filter:
There are following three elements in an intent filter:
- Action
- Data
- Category
Important Note: Every intent filter must contain action element in it. Data and category element is optional for it.
1. Action:
It represent an activities action, what an activity is going to do. It is declared with the name attribute as given below
<action android:name = "string" />
An Intent Filter element must contain one or more action element. Action is a string that specifies the action to perform. You can declare your own action as given below. But we usually use action constants defined by Intent class.
<intent-filter>
<action android:name="com.example.android.intentfilters.Main2Activity"/>
</intent-filter>
There are few common actions for starting an activity like ACTION_VIEW
ACTION_VIEW: This is used in an Intent with startActivity(). This helps when you redirect to see any website, photos in gallery app or an address to view in a map app.
For example: As we have done in previous topic of Intent, we started a website using implicit intent in that Intent we used ACTION_VIEW element to view website in the web browser.
Intent intentObj = new Intent(Intent.ACTION_VIEW);
intentObj.setData(Uri.parse("https://www.abhiandroid.com"));
startActivity(intentObj);
There are more actions similar to above like, ACTION_SEND, ACTION_MAIN, ACTION_WEB_SEARCH and many more.
2. Data:
There are two forms in which you can pass the data, using URI(Uniform Resource Identifiers) or MIME type of data. For understanding the concept of URI in better manner check the link.
The syntax of data attribute is as follows:
<data android:scheme="string"
android:host="string"
android:port="string"
android:path="string"
android:pathPattern="string"
android:pathPrefix="string"
android:mimeType="string" />
This specifies the format of data associated with an Intent which you use with component. As explained in above code snippet, data passed through Intent is a type of URI. Check the below given table for better clarification
| ACTION | DATA | MEANING |
| Intent.ACTION_CALL | tel:phone_number | Opens phone application and calls phone number |
| Intent.ACTION_DIAL | tel:phone_number | Opens phone application and dials (but doesn’t call) phone_number |
| Intent.ACTION_DIAL | voicemail: | Opens phone application and dials (but doesn’t call) the voice mail number. |
| Intent.ACTION_VIEW | geo:lat,long | Opens the maps Application centered on (lat, long). |
| Intent.ACTION_VIEW | geo:0,0?q=address | Opens the maps application centered on the specified address. |
| Intent.ACTION_VIEW | http://url
https://url |
Opens the browser application to the specified address. |
| Intent.ACTION_WEB_SEARCH | plain_text | Opens the browser application and uses Google search for given string |
3. Category:
This attribute of Intent filter dictates the behavior or nature of an Intent. There is a string which contains some additional information about the intent which will be handled by a component. The syntax of category is as follows:
<category android:name="string" />
Most of Intents do not require a category for example: CATEGORY_BROWSABLE, CATEGORY_LAUNCHER.
BROWSABLE – Browsable category, activity allows itself to be opened with web browser to open the reference link provided in data.
LAUNCHER – Launcher category puts an activity on the top of stack, whenever application will start, the activity containing this category will be opened first.
<intent-filter>
<!--Code here-->
<category android:name="android.intent.category.LAUNCHER" />
</intent-filter>
<intent-filter>
<!--Code here-->
<category android:name="android.intent.category.BROWSABLE" />
</intent-filter>
Intent Filter Example:
Let’s take an example of Intent filter for an Activity. In this example, we will make an Activity a launcher activity by declaring the intent filter. By launcher we mean this Activity will be launched first out of all activities in App.
Below code snippet gives the details for the same. You have to make changes in Android Manifest file to make your activity launcher activity.
<?xml version="1.0" encoding="utf-8"?>
<manifest xmlns:android="http://schemas.android.com/apk/res/android"
package="com.example.android.intentfilters">
<application
android:allowBackup="true"
android:icon="@mipmap/ic_launcher"
android:label="@string/app_name"
android:supportsRtl="true"
android:theme="@style/AppTheme">
<activity android:name=".MainActivity">
<intent-filter>
<action android:name="android.intent.action.MAIN" />
<category android:name="android.intent.category.LAUNCHER" />
</intent-filter>
</activity>
<activity android:name=".Main2Activity">
<intent-filter>
<action android:name="com.example.android.intentfilters.Main2Activity"/>
<category android:name="android.intent.category.DEFAULT"/>
</intent-filter>
</activity>
</application>
</manifest>
Important Note: In above mentioned code snippet we are using two activities which you have to declare it in the Manifest that which activity has to launch first when your application starts. In above code we have made MainActivity as a Launcher Activity by declaring Intent Filter:

Leave a Reply
Premium Project Source Code:
- Food Ordering Android App Project Source Code
- Ecommerce Store Android App Project Source Code
- Convert Website Into Android App Project Source Code
- Quiz Game Android App Project Source Code
- Radio Streaming Android App Source Code
- City Guide Android App Project Source Code
- QR Barcode Android App Project Source Code