External Storage Tutorial In Android Studio With Example
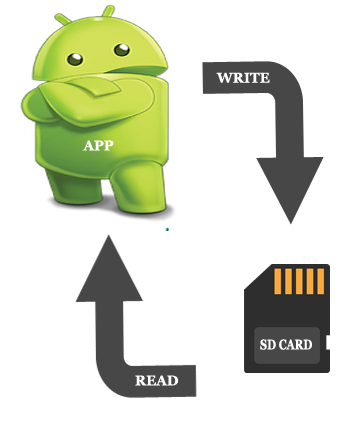
In this tutorial we gonna study about storage of data/files in android external storage or you can say the secondary memory/SD card of your phone. The data is stored in a file specified by the user itself and user can access these file. These files are only accessible till the application exits or you have SD card mounted on your device.
Important Note: It is necessary to add external storage the permission to read and write. For that you need to add permission in android Manifest file.
Open AndroidManifest.xml file and add permissions to it just after the package name.
    <uses-permission android:name="android.permission.WRITE_EXTERNAL_STORAGE" />
    <uses-permission android:name="android.permission.READ_EXTERNAL_STORAGE" />

External Storage Availability In Android Studio
To avoid crashing app it is required to check before whether storage SD card is available for read & write operations. getExternalStorageState() method is used to determine the state of the storage media i.e SD card is mounted, is it readable , it is writable etc.. all this kind of information.
boolean isAvailable= false;
boolean isWritable= false;
boolean isReadable= false;
String state = Environment.getExternalStorageState();
if(Environment.MEDIA_MOUNTED.equals(state)){
// Read and write operation possible
  isAvailable= true;
  isWritable= true;
  isReadable= true;
} else if (Environment.MEDIA_MOUNTED_READ_ONLY.equals(state)){
   // Read operation possible
      isAvailable= true;
      isWritable= false;
      isReadable= true;
  } else {
      // SD card not mounted
      isAvailable = false;
      isWritable= false;
      isReadable= false; }
Methods to Store Data In Android:
- getExternalStorageDirectory() – Older way to access external storage in API Level less than 7. It is absolute now and not recommended. It directly get the reference to the root directory of your external storage or SD Card.
- getExternalFilesDir(String type) – It is recommended way to enable us to create private files specific to app and files are removed as app is uninstalled. Example is app private data.
- getExternalStoragePublicDirectory() : This is current recommended way that enable us to keep files public and are not deleted with the app uninstallation. Example images clicked by the camera exists even we uninstall the camera app.
External Storage Example In Android Studio
Below is the example to show how user can use external memory for data storage. Here we are creating two activities, the first activity contain the form that will store data in file and second is used to load data which is saved.

Step 1: Create a new project and name it ExternalStorageExample.
Step 2: Open res -> layout -> activity_main.xml (or) main.xml and add following code:
In this code simply add textview , edittext and button for onclick functionality.
<?xml version="1.0" encoding="utf-8"?>
<RelativeLayout xmlns:android="http://schemas.android.com/apk/res/android"
    xmlns:tools="http://schemas.android.com/tools"
    android:id="@+id/activity_main"
    android:layout_width="match_parent"
    android:layout_height="match_parent"
    android:paddingBottom="@dimen/activity_vertical_margin"
    android:paddingLeft="@dimen/activity_horizontal_margin"
    android:paddingRight="@dimen/activity_horizontal_margin"
    android:paddingTop="@dimen/activity_vertical_margin"
    tools:context="com.example.externalstorageexample.MainActivity">


    <TextView
        android:id="@+id/textView"
        android:layout_width="match_parent"
        android:layout_height="wrap_content"
        android:layout_alignParentTop="true"
        android:layout_marginTop="46dp"
        android:gravity="center"
        android:text="@string/add_text"
        android:textSize="18sp"
        android:textStyle="bold|italic" />


    <Button
        android:id="@+id/button4"
        android:layout_width="wrap_content"
        android:layout_height="wrap_content"
        android:layout_alignLeft="@+id/button"
        android:layout_alignParentBottom="true"
        android:layout_alignStart="@+id/button"
        android:layout_marginBottom="52dp"
        android:layout_marginLeft="96dp"
        android:layout_marginStart="96dp"
        android:onClick="next"
        android:text="@string/click_to_view" />

    <Button
        android:id="@+id/button2"
        android:layout_width="wrap_content"
        android:layout_height="wrap_content"
        android:layout_above="@+id/button4"
        android:layout_alignParentEnd="true"
        android:layout_alignParentRight="true"
        android:layout_marginBottom="22dp"
        android:layout_marginEnd="32dp"
        android:layout_marginRight="32dp"
        android:onClick="savePublic"
        android:text="@string/save_as_public" />

    <Button
        android:id="@+id/button"
        android:layout_width="wrap_content"
        android:layout_height="wrap_content"
        android:layout_alignBaseline="@+id/button2"
        android:layout_alignBottom="@+id/button2"
        android:layout_alignParentLeft="true"
        android:layout_alignParentStart="true"
        android:layout_marginLeft="24dp"
        android:layout_marginStart="24dp"
        android:onClick="savePrivate"
        android:text="@string/save_as_private" />

    <EditText
        android:id="@+id/editText2"
        android:layout_width="match_parent"
        android:layout_height="wrap_content"
        android:layout_alignParentLeft="true"
        android:layout_alignParentStart="true"
        android:layout_below="@+id/textView"
        android:layout_marginTop="16dp"
        android:ems="10"
        android:gravity="center_vertical|center"
        android:inputType="textMultiLine" />

</RelativeLayout>
Step 3: Open src -> package -> MainActivity.java
In this step we open MainActivity and add the functions defined over buttons onclick. The savePrivate and savePublic function get the data from edittext and save it in byte format in file. Also toast is used to display the path where file is stored with file name. The next function uses intent to move to the next activity associated with it.
Important Note: There is a difference while retrieving data with different API level. The permission concept has changed since API 23. Before API level 23 the user was asked during installation, after API level 23 the user is asked during runtime. So an additional runtime permission is added in the application operating over the API level above 23.
package com.example.externalstorageexample;

import android.Manifest;
import android.content.Intent;
import android.os.Environment;
import android.support.v4.app.ActivityCompat;
import android.support.v7.app.AppCompatActivity;
import android.os.Bundle;
import android.view.View;
import android.widget.EditText;
import android.widget.Toast;
import java.io.File;
import java.io.FileOutputStream;
import java.io.IOException;

public class MainActivity extends AppCompatActivity {
    EditText editText;
    private int STORAGE_PERMISSION_CODE = 23;

    @Override
    protected void onCreate(Bundle savedInstanceState) {
        super.onCreate(savedInstanceState);
        setContentView(R.layout.activity_main);
        editText = (EditText) findViewById(R.id.editText2);
    }

    public void next(View view) {
        Intent intent = new Intent(MainActivity.this, Main2Activity.class);
        startActivity(intent);
    }

    public void savePublic(View view) {
        //Permission to access external storage
        ActivityCompat.requestPermissions(this, new String[]{Manifest.permission.READ_EXTERNAL_STORAGE}, STORAGE_PERMISSION_CODE);
        String info = editText.getText().toString();
        File folder = Environment.getExternalStoragePublicDirectory(Environment.DIRECTORY_ALARMS);// Folder Name
        File myFile = new File(folder, "myData1.txt");// Filename
        writeData(myFile, info);
        editText.setText("");
    }

    public void savePrivate(View view) {
        String info = editText.getText().toString();
        File folder = getExternalFilesDir("AbhiAndroid");// Folder Name
        File myFile = new File(folder, "myData2.txt");// Filename
        writeData(myFile, info);
        editText.setText("");
    }

    private void writeData(File myFile, String data) {
        FileOutputStream fileOutputStream = null;
        try {
            fileOutputStream = new FileOutputStream(myFile);
            fileOutputStream.write(data.getBytes());
            Toast.makeText(this, "Done" + myFile.getAbsolutePath(), Toast.LENGTH_SHORT).show();
        } catch (Exception e) {
            e.printStackTrace();
        } finally {
            if (fileOutputStream != null) {
                try {
                    fileOutputStream.close();
                } catch (IOException e) {
                    e.printStackTrace();
                }
            }
        }
    }
}
Step 4: Open res -> layout -> activity_main2.xml (or) main2.xml and add following code:
In this activity the layout is just similar with the main.xml.
<?xml version="1.0" encoding="utf-8"?>
<RelativeLayout xmlns:android="http://schemas.android.com/apk/res/android"
    xmlns:tools="http://schemas.android.com/tools"
    android:id="@+id/activity_main2"
    android:layout_width="match_parent"
    android:layout_height="match_parent"
    android:paddingBottom="@dimen/activity_vertical_margin"
    android:paddingLeft="@dimen/activity_horizontal_margin"
    android:paddingRight="@dimen/activity_horizontal_margin"
    android:paddingTop="@dimen/activity_vertical_margin"
    tools:context="com.example.externalstorageexample.Main2Activity">

    <TextView
        android:id="@+id/getText"
        android:layout_width="match_parent"
        android:layout_height="wrap_content"
        android:layout_alignParentLeft="true"
        android:layout_alignParentStart="true"
        android:layout_alignParentTop="true"
        android:layout_marginTop="33dp"
        android:gravity="center"
        android:text=""
        android:textSize="18sp"
        android:textStyle="bold|italic" />

    <Button
        android:id="@+id/button3"
        android:layout_width="wrap_content"
        android:layout_height="wrap_content"
        android:layout_above="@+id/button5"
        android:layout_alignParentEnd="true"
        android:layout_alignParentRight="true"
        android:onClick="getPublic"
        android:text="@string/show_public_data" />

    <Button
        android:id="@+id/button2"
        android:layout_width="wrap_content"
        android:layout_height="wrap_content"
        android:layout_alignParentLeft="true"
        android:layout_alignParentStart="true"
        android:layout_below="@+id/getText"
        android:layout_marginTop="178dp"
        android:onClick="getPrivate"
        android:text="@string/show_private_data"
        tools:ignore="UnknownId" />

    <Button
        android:id="@+id/button5"
        android:layout_width="wrap_content"
        android:layout_height="wrap_content"
        android:layout_below="@+id/button2"
        android:layout_centerHorizontal="true"
        android:layout_marginTop="59dp"
        android:onClick="back"
        android:text="@string/back" />

</RelativeLayout>
Step 5: Open src -> package -> MainActivity2.java
In this step we open MainActivity2 and add the functions defined over button’s onclick. The getPrivate and getPublic function retrieve the data from the file, add it to the buffer and further set the text over the textview’s. The back function contain intent to move back to main activity.
package com.example.externalstorageexample;

import android.content.Intent;
import android.os.Environment;
import android.support.v7.app.AppCompatActivity;
import android.os.Bundle;
import android.view.View;
import android.widget.TextView;
import java.io.*;

public class Main2Activity extends AppCompatActivity {
    TextView showText;

    @Override
    protected void onCreate(Bundle savedInstanceState) {
        super.onCreate(savedInstanceState);
        setContentView(R.layout.activity_main2);
        showText = (TextView) findViewById(R.id.getText);

    }

    public void back(View view) {
        Intent intent = new Intent(Main2Activity.this, MainActivity.class);
        startActivity(intent);
    }

    public void getPublic(View view) {
        File folder = Environment.getExternalStoragePublicDirectory(Environment.DIRECTORY_ALARMS); // Folder Name
        File myFile = new File(folder, "myData1.txt"); // Filename
        String text = getdata(myFile);
        if (text != null) {
            showText.setText(text);
        } else {
            showText.setText("No Data");
        }
    }

    public void getPrivate(View view) {
        File folder = getExternalFilesDir("AbhiAndroid"); // Folder Name
        File myFile = new File(folder, "myData2.txt"); // Filename
        String text = getdata(myFile);
        if (text != null) {
            showText.setText(text);
        } else {
            showText.setText("No Data");
        }
    }

    private String getdata(File myfile) {
        FileInputStream fileInputStream = null;
        try {
            fileInputStream = new FileInputStream(myfile);
            int i = -1;
            StringBuffer buffer = new StringBuffer();
            while ((i = fileInputStream.read()) != -1) {
                buffer.append((char) i);
            }
            return buffer.toString();
        } catch (Exception e) {
            e.printStackTrace();
        } finally {
            if (fileInputStream != null) {
                try {
                    fileInputStream.close();
                } catch (IOException e) {
                    e.printStackTrace();
                }
            }
        }
        return null;
    }

}
Output:
Now run the app and you will see form on the screen. Add data in the field and save it. Further click next to move to next activity and get data that is saved before as public or private.
4 thoughts on “External Storage Tutorial In Android Studio With Example”
Leave a Reply to ankit kumar pandey Cancel reply
Premium Project Source Code:
- Food Ordering Android App Project Source Code
- Ecommerce Store Android App Project Source Code
- Convert Website Into Android App Project Source Code
- Quiz Game Android App Project Source Code
- Radio Streaming Android App Source Code
- City Guide Android App Project Source Code
- QR Barcode Android App Project Source Code
Hi, Your site is wonderful!
Unfortunaltey the WriteExternalStorage is not the way to go anymore… did you planned to add the new way to go soon?
I want to join your group .what will be do to me please reply me sir
Geting Error in Save_as_public
not save data into External Storage
so solve this error as soon
Plz do needfull as above
How to save and get audio data or video data??? if u make a tutorial on that then that will be useful..