Internal Storage Tutorial In Android Studio With Example
In this tutorial we are going to learn about internal storage of data/files in Android App using example or you can say the primary memory of your phone. It is also important to note that the data is stored in a file specified by the user but user can not access that file, also this file can only be accessed by the application itself.
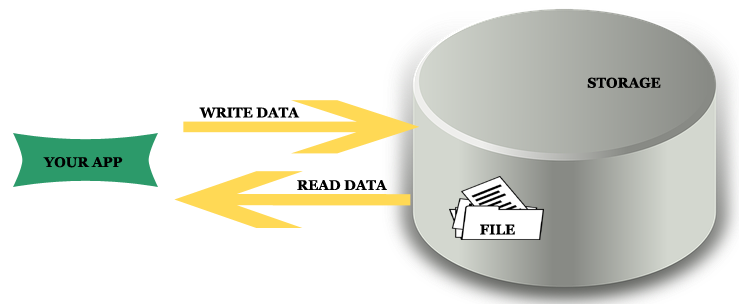
Table of Contents
Important Points About Internal Storage In Android:
- The stored data in memory is allowed to read and write files.
- When files are stored in internal storage these file can only be accessed by the application itself not by other applications.
- These files in storage exist till the application stays over the device, as you uninstall associated files get removed automatically.
- The files are stored in directory data/data which is followed by the application package name.
- User can explicitly grant the permission to other apps to access files.
- To make the data private i.e you can use MODE_PRIVATE as discussed below about the modes.
- Technique is best suited when data can only be access by the application neither by the user nor by other apps.
- The data is stored in a file which contains data in bit format so it’s required to convert data before adding it to a file or before extracting from a file.
Modes of Internal Storage
MODE_PRIVATE — In private mode the data stored earlier is always overridden by the current data i.e every time you try to commit a new write to a file which removes or override the previous content. We have used MODE_PRIVATE in the example at the end of this article.
MODE_APPEND — In this mode the data is append to the existing content i.e keep adding data.
Write data to file in Internal Storage:
- Define the filename as string and also define data you wanna write to file as string or in any format generated from app or any other source.
- Use FileOutputStream method by creating its object as defined.
- Convert data into byte stream before writing over file because file accepts only byte format further close the file using file object.
String File_Name= "Demo.txt"; //gives file name
String Data="Hello!!"; //define data

FileOutputStream fileobj = openFileOutput( File_Name, Context.MODE_PRIVATE);
byte[] ByteArray = Data.getBytes(); //Converts into bytes stream
fileobj.write(ByteArray); //writing to file
fileobj.close(); //File closed
Internal Storage Example In Android Studio
Below is the example to show how user can used internal memory for data storage. Here we are creating two activities, the first activity contain the form that will store data in file and second is used to load data that is saved before.
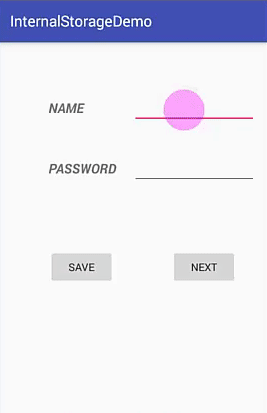
Step 1: Create a new project and name it InternalStorageDemo.
Step 2: Open res -> layout -> activity_main.xml (or) main.xml and add following code:
In this code simply add textview , edittext and button with onclick functionality.
<?xml version="1.0" encoding="utf-8"?>
<RelativeLayout xmlns:android="http://schemas.android.com/apk/res/android"
    xmlns:tools="http://schemas.android.com/tools"
    android:id="@+id/activity_main"
    android:layout_width="match_parent"
    android:layout_height="match_parent"
    android:paddingBottom="@dimen/activity_vertical_margin"
    android:paddingLeft="@dimen/activity_horizontal_margin"
    android:paddingRight="@dimen/activity_horizontal_margin"
    android:paddingTop="@dimen/activity_vertical_margin"
    tools:context="com.example.internalstoragedemo.MainActivity">

    <TextView
        android:text="@string/name"
        android:layout_width="wrap_content"
        android:layout_height="wrap_content"
        android:layout_alignParentTop="true"
        android:layout_alignParentLeft="true"
        android:layout_alignParentStart="true"
        android:layout_marginLeft="51dp"
        android:layout_marginStart="51dp"
        android:layout_marginTop="59dp"
        android:id="@+id/txtname"
        android:textStyle="bold|italic"
        android:textSize="18sp" />

    <TextView
        android:text="@string/password"
        android:layout_width="wrap_content"
        android:layout_height="wrap_content"
        android:layout_below="@+id/txtname"
        android:layout_alignLeft="@+id/txtname"
        android:layout_alignStart="@+id/txtname"
        android:layout_marginTop="56dp"
        android:id="@+id/txtpass"
        android:textStyle="bold|italic"
        android:textSize="18sp" />

    <EditText
        android:layout_width="wrap_content"
        android:layout_height="wrap_content"
        android:inputType="textPersonName"
        android:ems="8"
        android:layout_alignParentTop="true"
        android:layout_toRightOf="@+id/txtpass"
        android:layout_toEndOf="@+id/txtpass"
        android:layout_marginLeft="21dp"
        android:layout_marginStart="21dp"
        android:layout_marginTop="48dp"
        android:id="@+id/editName" />

    <EditText
        android:layout_width="wrap_content"
        android:layout_height="wrap_content"
        android:inputType="textPassword"
        android:ems="10"
        android:layout_below="@+id/editName"
        android:layout_alignLeft="@+id/editName"
        android:layout_alignStart="@+id/editName"
        android:layout_marginTop="35dp"
        android:id="@+id/editPass" />

    <Button
        android:text="@string/save"
        android:layout_width="wrap_content"
        android:layout_height="wrap_content"
        android:layout_below="@+id/editPass"
        android:layout_alignLeft="@+id/txtpass"
        android:layout_alignStart="@+id/txtpass"
        android:layout_marginTop="86dp"
        android:id="@+id/button"
        android:onClick="save"/>  // OnClick "save"

    <Button
        android:text="@string/next"
        android:la
        android:layout_height="wrap_content"
        android:layout_alignTop="@+id/button"
        android:layout_alignRight="@+id/editName"
        android:layout_alignEnd="@+id/editName"
        android:layout_marginRight="25dp"
        android:layout_marginEnd="25dp"
        android:id="@+id/button2"
        android:onClick="next"/> // OnClick "next"
</RelativeLayout>
Step 3: Open src -> package -> MainActivity.java
In this step we open MainActivity and add the functions defined over button onclick i.e save or next. The save function get the data from edittext and save it in byte format inside file. Here we also used Toast to display the path where file is stored with file name. The next function uses intent to move to the next activity associated with it.
package com.example.internalstoragedemo;

import android.content.Context;
import android.content.Intent;
import android.support.v7.app.AppCompatActivity;
import android.os.Bundle;
import android.view.View;
import android.widget.EditText;
import android.widget.Toast;
import java.io.File;
import java.io.FileOutputStream;
import java.io.IOException;

public class MainActivity extends AppCompatActivity {
    EditText editname,editpass;
    @Override
    protected void onCreate(Bundle savedInstanceState) {
        super.onCreate(savedInstanceState);
        setContentView(R.layout.activity_main);
        editname = (EditText) findViewById(R.id.editName);
        editpass= (EditText) findViewById(R.id.editPass);
    }

    public void  save(View view)  // SAVE
    {
        File file= null;
        String name = editname.getText().toString();
        String password = editpass.getText().toString();

            FileOutputStream fileOutputStream = null;
            try {
                name = name + " ";
                file = getFilesDir();
                fileOutputStream = openFileOutput("Code.txt", Context.MODE_PRIVATE); //MODE PRIVATE
                fileOutputStream.write(name.getBytes());
                fileOutputStream.write(password.getBytes());
                Toast.makeText(this, "Saved \n" + "Path --" + file + "\tCode.txt", Toast.LENGTH_SHORT).show();
                editname.setText("");
                editpass.setText("");
                return;
            } catch (Exception ex) {
                ex.printStackTrace();
            } finally {
                try {
                    fileOutputStream.close();
                } catch (IOException e) {
                    e.printStackTrace();
                }
            }
        }

    public void  next( View view)   //NEXT
    {
        Toast.makeText(this,"NEXT", Toast.LENGTH_SHORT).show();
        Intent intent= new Intent(this, Main2Activity.class);
        startActivity(intent);

    }
}
Step 4: Open res -> layout -> activity_main2.xml (or) main2.xml and add following code:
In this activity the layout is just similar with the main.xml.
<?xml version="1.0" encoding="utf-8"?>
<RelativeLayout xmlns:android="http://schemas.android.com/apk/res/android"
    xmlns:tools="http://schemas.android.com/tools"
    android:id="@+id/activity_main2"
    android:layout_width="match_parent"
    android:layout_height="match_parent"
    android:paddingBottom="@dimen/activity_vertical_margin"
    android:paddingLeft="@dimen/activity_horizontal_margin"
    android:paddingRight="@dimen/activity_horizontal_margin"
    android:paddingTop="@dimen/activity_vertical_margin"
    tools:context="com.example.internalstoragedemo.Main2Activity">

    <TextView
        android:text="@string/getname"
        android:layout_width="wrap_content"
        android:layout_height="wrap_content"
        android:layout_alignParentTop="true"
        android:layout_alignRight="@+id/button3"
        android:layout_alignEnd="@+id/button3"
        android:layout_marginRight="11dp"
        android:layout_marginEnd="11dp"
        android:layout_marginTop="76dp"
        android:id="@+id/textView3"
        android:textSize="18sp"
        android:textStyle="bold|italic" />

    <TextView
        android:text="@string/getpassword"
        android:layout_width="wrap_content"
        android:layout_height="wrap_content"
        android:layout_below="@+id/textView3"
        android:layout_alignRight="@+id/textView3"
        android:layout_alignEnd="@+id/textView3"
        android:layout_marginTop="33dp"
        android:id="@+id/textView4"
        android:textStyle="bold|italic"
        android:textSize="18sp" />

    <TextView
        android:layout_width="wrap_content"
        android:layout_height="wrap_content"
        android:layout_above="@+id/textView4"
        android:layout_alignLeft="@+id/button4"
        android:layout_alignStart="@+id/button4"
        android:id="@+id/getname"
        android:textStyle="bold|italic"
        android:textSize="18sp" />

    <TextView
        android:layout_width="wrap_content"
        android:layout_height="wrap_content"
        android:layout_alignBottom="@+id/textView4"
        android:layout_alignLeft="@+id/getname"
        android:layout_alignStart="@+id/getname"
        android:id="@+id/getpass"
        android:textStyle="bold|italic"
        android:textSize="18sp" />

    <Button
        android:text="@string/load"
        android:layout_width="wrap_content"
        android:layout_height="wrap_content"
        android:id="@+id/button3"
        android:layout_marginLeft="35dp"
        android:layout_marginStart="35dp"
        android:onClick="load"
        android:layout_below="@+id/textView4"
        android:layout_alignParentLeft="true"
        android:layout_alignParentStart="true"
        android:layout_marginTop="80dp" />

    <Button
        android:text="@string/back"
        android:layout_width="wrap_content"
        android:layout_height="wrap_content"
        android:layout_marginRight="54dp"
        android:layout_marginEnd="54dp"
        android:id="@+id/button4"
        android:onClick="back"
        android:layout_alignBaseline="@+id/button3"
        android:layout_alignBottom="@+id/button3"
        android:layout_alignParentRight="true"
        android:layout_alignParentEnd="true" />

</RelativeLayout>
Step 5: Open src -> package -> MainActivity2.java
In this step we open MainActivity2 and add the functions defined over button’s onclick i.e load or back. The load function retrieve the data from the file, add it to the StringBuffer and further set the text over the textview’s. The back function contain intent to move back to main activity.
package com.example.internalstoragedemo;

import android.content.Intent;
import android.support.v7.app.AppCompatActivity;
import android.os.Bundle;
import android.util.Log;
import android.view.View;
import android.widget.TextView;
import android.widget.Toast;
import java.io.FileInputStream;

public class Main2Activity extends AppCompatActivity {

    TextView getname, getpass;
    @Override
    protected void onCreate(Bundle savedInstanceState) {
        super.onCreate(savedInstanceState);
        setContentView(R.layout.activity_main2);
        getname = (TextView)findViewById(R.id.getname);
        getpass = (TextView)findViewById(R.id.getpass);
    }
    public void  load(View view)
    {
        try {
           FileInputStream fileInputStream =  openFileInput("Code.txt");
            int read = -1;
            StringBuffer buffer = new StringBuffer();
           while((read =fileInputStream.read())!= -1){
               buffer.append((char)read);
           }
            Log.d("Code", buffer.toString());
            String name = buffer.substring(0,buffer.indexOf(" "));
            String pass = buffer.substring(buffer.indexOf(" ")+1);
            getname.setText(name);
            getpass.setText(pass);
        } catch (Exception e) {
            e.printStackTrace();
        }
        Toast.makeText(this,"Loaded", Toast.LENGTH_SHORT).show();
    }

    public void  back( View view)
    {
        Toast.makeText(this,"Back", Toast.LENGTH_SHORT).show();
        Intent intent= new Intent(this, MainActivity.class);
        startActivity(intent);
    }
}
Output:
Now run the app and you will see login form on the screen. Add data in the fields and save it. Further click next to move to next activity and load data that is saved before.
Bonus Tip
You can view the file which contain data that you stored, if you noticed that while saving a toast appears with the path where file is stored let’s locate that file.
Important Note: The file will only be viewable if you run the App using Android Studio emulator and not in genymotion or any other external alternative emulator.
- Move to Tools -> Android -> Android Device Monitor and open Android Device Monitor.
- Select the process i.e internalstoragedemo, select File Explorer find data/data/[package_name]/files/[file.txt]

- In given example it is data/data/com.example.internalstoragedemo/files/Code.txt.


10 thoughts on “Internal Storage Tutorial In Android Studio With Example”
Leave a Reply to Swas Cancel reply
Premium Project Source Code:
- Food Ordering Android App Project Source Code
- Ecommerce Store Android App Project Source Code
- Convert Website Into Android App Project Source Code
- Quiz Game Android App Project Source Code
- Radio Streaming Android App Source Code
- City Guide Android App Project Source Code
- QR Barcode Android App Project Source Code
Can you please create doc for MODE_APPEND in android. Data should be append every time instead of overriding. And, view report will show all multiple date(More than one username and password).
Hi,
data folder is not showing sub folders/files in my android studio monitor. It’s permission is “drwxrwx__x”. Is there any permission related issue.If yes, please let me know how to change the permission of data folder. Please help me to resolve this issue.
Garima
How can i write the file to a specific location in Internal Stroage!
I am trying to download and save a pdf file to internal memory of app (/data/data/………..) while these demos are usefull for String content. An example of saving a file like .doc or .ppt, .pdf would be more useful. It is kind of confusing for rookies like my self to get the connection and download/save methods right. Then calling those files to another class like PdfRenderer. But this is a good starting point. Thankyou
what does this live do in this code of load
Log.d(“Code”, buffer.toString());
I had a similar code and tried to view the file using API 25 emulator. The DDMS does not work. Only Gennymotuion allowed me to view the file
The app crashes every time i tried to go to the next page what could be the problem?
create activity name second_avtivity_name in manefest.xml
fileOutputStream = openFileOutput(“Code.txt”, Context.MODE_PRIVATE); //MODE PRIVATE
fileOutputStream.write(name.getBytes());
fileOutputStream.write(password.getBytes());
MODE_PRIVATE — In private mode the data stored earlier is always overridden by the current data i.e every time you try to commit a new write to a file which removes or override the previous content.
According to the explanation, it should override the username and only password should exist in that file. But why thats not happening?
hello sir,
can you please solve my one problem. I made an app to change wallpaper, in that i was fetching images from external memory / SD card but when i removed my SD card it is not able to fetch the image. so can i fetch it from internal memory or from my phone memory, how to set the path?