AsyncTask Tutorial With Example Android Studio [Step By Step]
In Android, AsyncTask (Asynchronous Task) allows us to run the instruction in the background and then synchronize again with our main thread. This class will override at least one method i.e doInBackground(Params) and most often will override second method onPostExecute(Result).
AsyncTask class is used to do background operations that will update the UI(user interface). Mainly we used it for short operations that will not effect on our main thread.
AsyncTask class is firstly executed using execute() method. In the first step AsyncTask is called onPreExecute() then onPreExecute() calls doInBackground() for background processes and then doInBackground() calls onPostExecute() method to update the UI.
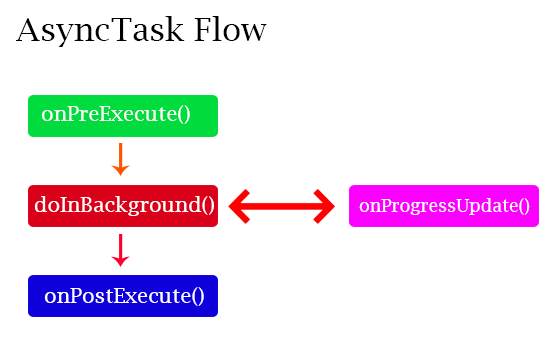
Table Of Contents
Need of AsyncTask In Android:
By default, our application code runs in our main thread and every statement is therefore execute in a sequence. If we need to perform long tasks/operations then our main thread is blocked until the corresponding operation has finished. For providing a good user experience in our application we need to use AsyncTasks class that runs in a separate thread. This class will executes everything in doInBackground() method inside of other thread which doesn’t have access to the GUI where all the views are present. The onPostExecute() method of this class synchronizes itself again with the main UI thread and allows it to make some updating. This method is called automatically after the doInBackground method finished its work.
Syntax of AsyncTask In Android:
To use AsyncTask you must subclass it. The parameters are the following AsyncTask <TypeOfVarArgParams, ProgressValue, ResultValue>. Here is the
Syntax of AsyncTask class:
private class DownloadFilesTask extends AsyncTask<URL, Integer, Long> {
protected Long doInBackground(URL... urls) {
// code that will run in the background
return ;
}

protected void onProgressUpdate(Integer... progress) {
// receive progress updates from doInBackground
}

protected void onPostExecute(Long result) {
// update the UI after background processes completes
}
}
Executions of AsyncTask class from main thread:
Here is the Syntax for execution of AsyncTasks classs.
new DownloadFilesTask().execute(url1, url2, url3);
AsyncTask’s generic types In Android:
The three types used by Asynchronous task are the following:
AsyncTask <TypeOfVarArgParams, ProgressValue, ResultValue>
1. TypeOfVarArgParams: Params is the type of the parameters sent to the task upon execution.
2. ProgressValue: Progress is the type of the progress units published during the background computation.
3. ResultValue: ResultValue is the type of the result of the background computation.
Method of AsyncTask In Android:
In Android, AsyncTask is executed and goes through four different steps or method. Here are these four methods of AsyncTasks.
1. onPreExecute() – It invoked on the main UI thread before the task is executed. This method is mainly used to setup the task for instance by showing a ProgressBar or ProgressDialog in the UI(user interface).
2. doInBackground(Params) – This method is invoked on the background thread immediately after onPreExecute() finishes its execution. Main purpose of this method is to perform the background operations that can take a long time. The parameters of the Asynchronous task are passed to this step for execution. The result of the operations must be returned by this step and it will be passed back to the last step/method i.e onPostExecutes(). This method can also use publishProgress(Progress…) to publish one or more units of progress. These values will be published on the main UI thread in the onProgressUpdate(Progress…) method.
3. onProgressUpdate(Progress…) – This method is invoked on the main UI thread after a call to publishProgress(Progress…). Timing of the execution is undefined. This method is used to display any form of progress in the user interface while the background operations are executing. We can also update our progress status for good user experience.
4. onPostExecute(Result) – This method is invoked on the main UI thread after the background operation finishes in the doInBackground method. The result of the background operation is passed to this step as a parameter and then we can easily update our UI to show the results.
Rules of AsyncTask:
There are a few threading rules that must be followed for this class to work properly:
1. This class must be loaded on the UI thread. This is done automatically as from JELLY_BEAN.
2. The task instance must be created on the UI thread.
3. execute(Params…) method that executes it, must be invoked on the UI thread.
4. Do not call onPreExecute(), onPostExecute(Result), doInBackground(Params…), onProgressUpdate(Progress…) manually, just executes the class and then will call automatically for good user experience.
AsyncTask Example In Android Studio:
In this step by step example, we are using AsyncTask class for performing network operations. Here first we are going to fetch some data from API(Web service) and display it in our UI. For that firstly we create a Button and on click of it we are executing our AsyncTasks class that fetches the data in background and after getting response from API in postExecute() method we are displaying the same data in our UI.
Our API url: http://mobileappdatabase.in/demo/smartnews/app_dashboard/jsonUrl/single-article.php?article-id=71
Below you can download code, see final output and follow step by step explanation of the example:
Step 1: Create a new project and name it AsyncTasksExample.
Step 2: Open build.gradle and add Picasso library dependency.
apply plugin: 'com.android.application'

android {
    compileSdkVersion 25
    buildToolsVersion "25.0.3"
    defaultConfig {
        applicationId "com.abhiandroid.asynctasksexample"
        minSdkVersion 15
        targetSdkVersion 25
        versionCode 1
        versionName "1.0"
        testInstrumentationRunner "android.support.test.runner.AndroidJUnitRunner"
    }
    buildTypes {
        release {
            minifyEnabled false
            proguardFiles getDefaultProguardFile('proguard-android.txt'), 'proguard-rules.pro'
        }
    }
}

dependencies {
    compile fileTree(dir: 'libs', include: ['*.jar'])
    androidTestCompile('com.android.support.test.espresso:espresso-core:2.2.2', {
        exclude group: 'com.android.support', module: 'support-annotations'
    })
    compile 'com.android.support:appcompat-v7:25.3.1'
    compile 'com.android.support.constraint:constraint-layout:1.0.2'
    compile 'com.squareup.picasso:picasso:2.5.2'
    testCompile 'junit:junit:4.12'
}
Step 3: Open res -> layout ->activity_main.xml (or) main.xml and add following code:
In this step firstly we create Button to perform click event and TextView‘s and ImageView to display the fetched API data.
<?xml version="1.0" encoding="utf-8"?>
<LinearLayout xmlns:android="http://schemas.android.com/apk/res/android"
    xmlns:tools="http://schemas.android.com/tools"
    android:layout_width="match_parent"
    android:layout_height="match_parent"
    android:orientation="vertical"
    android:padding="30dp"
    tools:context="com.abhiandroid.asynctasksexample.MainActivity">

    <Button
        android:id="@+id/displayData"
        android:layout_width="200dp"
        android:layout_height="wrap_content"
        android:layout_gravity="center"
        android:layout_marginTop="20dp"
        android:background="@color/colorPrimary"
        android:text="Display Data"
        android:textColor="#fff"
        android:textSize="20sp" />

    <TextView
        android:id="@+id/titleTextView"
        android:layout_width="wrap_content"
        android:layout_height="wrap_content"
        android:layout_marginTop="50dp"
        android:text="Title: "
        android:textColor="#000"
        android:textSize="18sp" />

    <TextView
        android:id="@+id/categoryTextView"
        android:layout_width="wrap_content"
        android:layout_height="wrap_content"
        android:layout_marginTop="5dp"
        android:text="Category: "
        android:textColor="#000"
        android:textSize="18sp" />

    <ImageView
        android:id="@+id/imageView"
        android:scaleType="centerCrop"
        android:layout_width="match_parent"
        android:layout_height="200dp"
        android:layout_gravity="center"
        android:layout_marginTop="20dp" />

</LinearLayout>
Step 4: Open src -> package -> MainActivity.java
In this step firstly we get the reference of Button, TextView‘s and ImageView. After that we perform setOnClickListener event on button and execute AsyncTasks class. In AsyncTasks class firstly we display a Progress Dialog in onPreExecute Method then we implement the API in doInBackground method and after getting response in postExecute method we simply parse the JSON data and display the title, category and Image in UI. In this, we also used Picasso Library to fetch the image from URL.
package com.abhiandroid.asynctasksexample;

import android.app.ProgressDialog;
import android.os.AsyncTask;
import android.os.Bundle;
import android.support.v7.app.AppCompatActivity;
import android.util.Log;
import android.view.View;
import android.widget.Button;
import android.widget.ImageView;
import android.widget.TextView;

import com.squareup.picasso.Picasso;

import org.json.JSONArray;
import org.json.JSONException;
import org.json.JSONObject;

import java.io.InputStream;
import java.io.InputStreamReader;
import java.net.HttpURLConnection;
import java.net.URL;

public class MainActivity extends AppCompatActivity {

    String apiUrl = "http://mobileappdatabase.in/demo/smartnews/app_dashboard/jsonUrl/single-article.php?article-id=71";
    String title, image, category;
    TextView titleTextView, categoryTextView;
    ProgressDialog progressDialog;
    Button displayData;
    ImageView imageView;

    @Override
    protected void onCreate(Bundle savedInstanceState) {
        super.onCreate(savedInstanceState);
        setContentView(R.layout.activity_main);
        // get the reference of View's
        titleTextView = (TextView) findViewById(R.id.titleTextView);
        categoryTextView = (TextView) findViewById(R.id.categoryTextView);
        displayData = (Button) findViewById(R.id.displayData);
        imageView = (ImageView) findViewById(R.id.imageView);
        // implement setOnClickListener event on displayData button
        displayData.setOnClickListener(new View.OnClickListener() {
            @Override
            public void onClick(View v) {
                // create object of MyAsyncTasks class and execute it
                MyAsyncTasks myAsyncTasks = new MyAsyncTasks();
                myAsyncTasks.execute();
            }
        });
    }

    public class MyAsyncTasks extends AsyncTask<String, String, String> {


        @Override
        protected void onPreExecute() {
            super.onPreExecute();
            // display a progress dialog for good user experiance
            progressDialog = new ProgressDialog(MainActivity.this);
            progressDialog.setMessage("Please Wait");
            progressDialog.setCancelable(false);
            progressDialog.show();
        }

        @Override
        protected String doInBackground(String... params) {

            // implement API in background and store the response in current variable
            String current = "";
            try {
                URL url;
                HttpURLConnection urlConnection = null;
                try {
                    url = new URL(apiUrl);

                    urlConnection = (HttpURLConnection) url
                            .openConnection();

                    InputStream in = urlConnection.getInputStream();

                    InputStreamReader isw = new InputStreamReader(in);

                    int data = isw.read();
                    while (data != -1) {
                        current += (char) data;
                        data = isw.read();
                        System.out.print(current);

                    }
                    // return the data to onPostExecute method
                    return current;

                } catch (Exception e) {
                    e.printStackTrace();
                } finally {
                    if (urlConnection != null) {
                        urlConnection.disconnect();
                    }
                }

            } catch (Exception e) {
                e.printStackTrace();
                return "Exception: " + e.getMessage();
            }
            return current;
        }

        @Override
        protected void onPostExecute(String s) {

            Log.d("data", s.toString());
            // dismiss the progress dialog after receiving data from API
            progressDialog.dismiss();
            try {
                // JSON Parsing of data
                JSONArray jsonArray = new JSONArray(s);

                JSONObject oneObject = jsonArray.getJSONObject(0);
                // Pulling items from the array
                title = oneObject.getString("title");
                category = oneObject.getString("category");
                image = oneObject.getString("image");
                // display the data in UI
                titleTextView.setText("Title: "+title);
                categoryTextView.setText("Category: "+category);
                // Picasso library to display the image from URL
                Picasso.with(getApplicationContext())
                        .load(image)
                        .into(imageView);


            } catch (JSONException e) {
                e.printStackTrace();
            }


        }

    }
}
Step 5: Open AndroidManifest.xml file and add Internet Permission.
In this step we define the Internet permission.
<?xml version="1.0" encoding="utf-8"?>
<manifest xmlns:android="http://schemas.android.com/apk/res/android"
    package="com.abhiandroid.asynctasksexample">

    <uses-permission android:name="android.permission.INTERNET"/>

    <application
        android:allowBackup="true"
        android:icon="@mipmap/ic_launcher"
        android:label="@string/app_name"
        android:roundIcon="@mipmap/ic_launcher_round"
        android:supportsRtl="true"
        android:theme="@style/AppTheme">
        <activity android:name=".MainActivity">
            <intent-filter>
                <action android:name="android.intent.action.MAIN" />

                <category android:name="android.intent.category.LAUNCHER" />
            </intent-filter>
        </activity>
    </application>

</manifest>
18 thoughts on “AsyncTask Tutorial With Example Android Studio [Step By Step]”
Leave a Reply to zohaib khan Cancel reply
Premium Project Source Code:
- Food Ordering Android App Project Source Code
- Ecommerce Store Android App Project Source Code
- Convert Website Into Android App Project Source Code
- Quiz Game Android App Project Source Code
- Radio Streaming Android App Source Code
- City Guide Android App Project Source Code
- QR Barcode Android App Project Source Code
how we display a data in ui?
Nice tutorial 🙂
I have a question. Is it mandatory to write the MyAsynctask class in the same file as MyActivity? If I use a separate file for MyAsynctask, will there be any problem (memory leakage, for example) ?
Thanks 🙂
[P.S.]: Sorry if this question has been posted twice.
need async task code
thank you so much for the full explanation of AsyncTask can we also pass in Arraylist and how can I use that with Firebase as in can I call Firebase inside doInbackground
Thank you so much,I’m always following you up..I appreciate you tutorials
Please do more tutorials on how to send a POST request to a server..
Thank you
I’m getting error at below code,
Picasso.with(getApplicationContext())
.load(image)
.into(imageView);
Thanks a lot ,This way of Explanation easily digest Once again Thank you 🙂
Nice
Nice tutorial and easy to understand by beginners… Appreciated
Tutorial is great.Everything is ok, but displaying data is very,very slow.I do not know why.Thank you for tutorial.
tank you very much for this tutorial
very good
wow this topic is awesome i made an application using AsyncTask to CRUD data via php, i used OnPostExecute to do it the only problem i had on this app was the server my server is localhost i don’t have a public server to save mysql data.
You can consider buying server because it is very cheap. Go for 3 year plan and always buy in offer.
Thanks for the tutorial. Published right time for me.
nice tutorial,easy way ,how to use AsyncTask
Great tutorial on AsyncTask by Mr Abhi Android. Your book “Master Android App Development”also has been very helpful.Thanks and God bless you sir.
Your friend in the school of learning android app development.
Henry Erabor
Please share webview coding for android app.
Please read http://abhiandroid.com/ui/webview and http://abhiandroid.com/createandroidapp/webview-android-app