Google Maps Tutorial With Example In Android Studio [Step by Step]
Android allows us to integrate Google Maps in our application. For this Google provides us a library via Google Play Services for using maps. In order to use the Google Maps API, you must register your application on the Google Developer Console and enable the API.
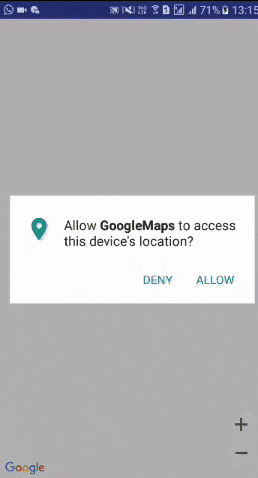
Table Of Contents
Steps For Getting The Google Maps Api Key:
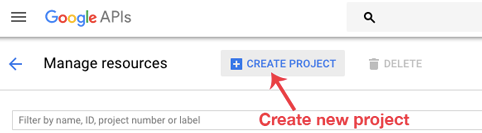
An API key is needed to access the Google Maps servers. This key is free and you can use it with any of your applications. If you haven’t created project, you can follow the below steps to get started:
Step 1: Open Google developer console and signin with your gmail account: https://console.developers.google.com/project
Step 2: Now create new project. You can create new project by clicking on the Create Project button and give name to your project.
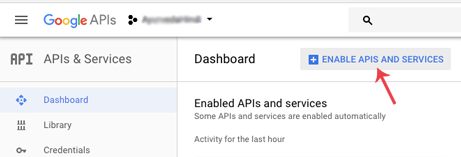
Step 3: Now click on APIs & Services and open Dashboard from it.

Step 4: In this open Enable APIS AND SERICES.
Step 5: Now open Google Map Android API.
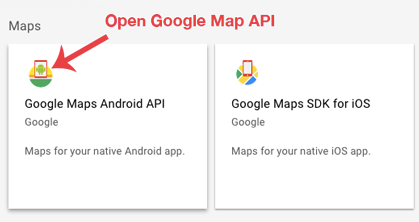
Step 6: Now enable the Google Maps Android API.

Step 6: Now go to Credentials

Step 7: Here click on Create credentials and choose API key
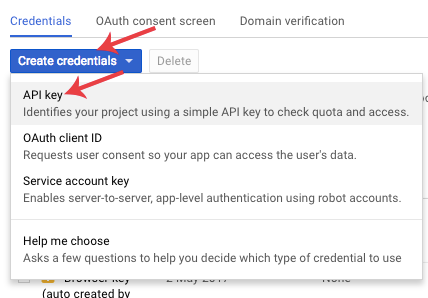
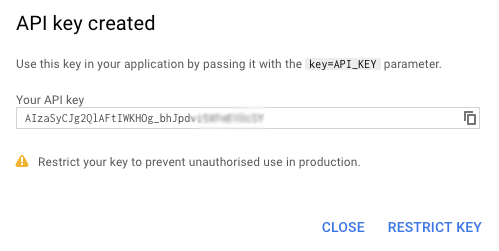
Step 8: Now API your API key will be generated. Copy it and save it somewhere as we will need it when implementing Google Map in our Android project.
Google Maps Example To Access User Current Location In Android Studio:
In the below Google Map example we will show user current location in Map. We also example different map types, methods and lots more details required while implementing Map in Android.
Below you can download code, see final output and step by step explanation of example:
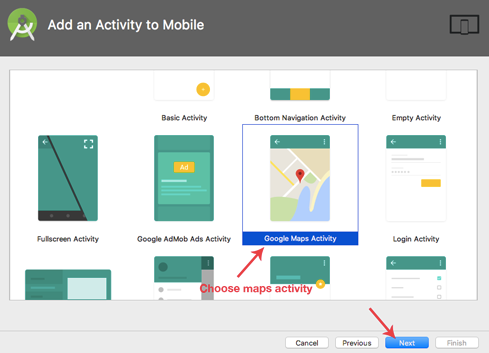
Step 1: Create a New Android Project and name it GoogleMaps.
Step 2: Now select Google Maps Activity and then click Next and finish.
Step 3: Now open google_maps_api.xml (debug) in values folder
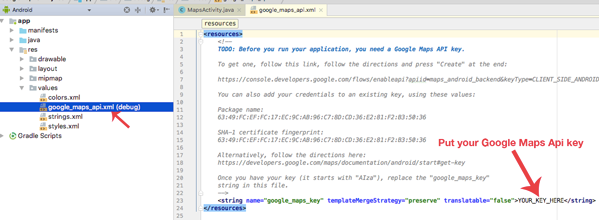
Step 4: Here enter your Google Maps API key in place of YOUR_KEY_HERE. In case you skip article, earlier we have guided how to get your own Google Maps Api key:
<resources>
    <!--
    TODO: Before you run your application, you need a Google Maps API key.

    To get one, follow this link, follow the directions and press "Create" at the end:

    https://console.developers.google.com/flows/enableapi?apiid=maps_android_backend&keyType=CLIENT_SIDE_ANDROID&r=8B:49:70:2A:08:F2:23:14:CF:A1:FC:6F:6D:5B:60:3C:B6:85:98:F2%3Bcom.example.abhishek.googlemaps

    You can also add your credentials to an existing key, using these values:

    Package name:
    8B:49:70:2A:08:F2:23:14:CF:A1:FC:6F:6D:5B:60:3C:B6:85:98:F2

    SHA-1 certificate fingerprint:
    8B:49:70:2A:08:F2:23:14:CF:A1:FC:6F:6D:5B:60:3C:B6:85:98:F2

    Alternatively, follow the directions here:
    https://developers.google.com/maps/documentation/android/start#get-key

    Once you have your key (it starts with "AIza"), replace the "google_maps_key"
    string in this file.
    -->
    <string name="google_maps_key" templateMergeStrategy="preserve" translatable="false">AIzaSyDV2_xy58r15K6TskZy4KWMuhUDVq67jqM</string>
</resources>
Step 5: Now open build.gradle and add compile ‘com.google.android.gms:play-services:8.4.0’ in dependencies
build.gradle code
apply plugin: 'com.android.application'

android {
    compileSdkVersion 26
    buildToolsVersion "26.0.2"
    defaultConfig {
        applicationId "com.abhiandroid.GoogleMaps.googlemaps"
        minSdkVersion 15
        targetSdkVersion 26
        versionCode 1
        versionName "1.0"
        testInstrumentationRunner "android.support.test.runner.AndroidJUnitRunner"
    }
    buildTypes {
        release {
            minifyEnabled false
            proguardFiles getDefaultProguardFile('proguard-android.txt'), 'proguard-rules.pro'
        }
    }
}

dependencies {
    compile fileTree(dir: 'libs', include: ['*.jar'])
    androidTestCompile('com.android.support.test.espresso:espresso-core:2.2.2', {
        exclude group: 'com.android.support', module: 'support-annotations'
    })
    compile 'com.android.support:appcompat-v7:26.+'
    compile 'com.google.android.gms:play-services:8.4.0'
    testCompile 'junit:junit:4.12'
}
Step 6: Now open activity_maps.xml and add a fragment code in it
Here add a fragment element to the activity’s layout file to define a Fragment object. In this element, set the android:name attribute to “com.google.android.gms.maps.MapFragment”. This automatically attaches a MapFragment to the activity. The following layout file contains a fragment element:
activity_maps.xml code
<fragment android:id="@+id/map"
    android:name="com.google.android.gms.maps.SupportMapFragment"
    xmlns:android="http://schemas.android.com/apk/res/android"
    xmlns:map="http://schemas.android.com/apk/res-auto"
    xmlns:tools="http://schemas.android.com/tools"
    android:layout_width="match_parent"
    android:layout_height="match_parent"
    tools:context="com.abhiandroid.GoogleMaps.googlemaps.MapsActivity"/>
Step 6: Now define internet and location permissions in Android Manifest
INTERNET – To determine if we are connected to Internet or not.
ACCESS_FINE_LOCATION – To determine user’s location using GPS. It will give us precise location.
AndroidManifest.xml code:
<?xml version="1.0" encoding="utf-8"?>
<manifest package="com.abhiandroid.GoogleMaps.googlemaps"
    xmlns:android="http://schemas.android.com/apk/res/android">
    <uses-permission android:name="android.permission.ACCESS_FINE_LOCATION"/>
    <uses-permission android:name="android.permission.INTERNET"/>
    <application
        android:allowBackup="true"
        android:icon="@mipmap/ic_launcher"
        android:label="@string/app_name"
        android:supportsRtl="true"
        android:theme="@style/AppTheme">
        <meta-data
            android:name="com.google.android.geo.API_KEY"
            android:value="@string/google_maps_key"/>
        <activity
            android:name="com.abhiandroid.GoogleMaps.googlemaps.MapsActivity"
            android:label="@string/title_activity_maps">
            <intent-filter>
                <action android:name="android.intent.action.MAIN"/>
                <category android:name="android.intent.category.LAUNCHER"/>
            </intent-filter>
        </activity>
    </application>
</manifest>
Step 7: Now we will code MapsActivity.java file for inserting callbacks in Google Maps:
-OnMapReadyCallback: This callback is called when the map is ready to be used
@Override
public void onMapReady(GoogleMap googleMap) {}
-GoogleApiClient.ConnectionCallbacks: This callback is called whenever device is connected and disconnected and implement onConnected() and onConnectionSuspended() functions.
//When the connect request has successfully completed
@Override
public void onConnected(Bundle bundle) {}
//Called when the client is temporarily in a disconnected state.
@Override
public void onConnectionSuspended(int i) {
}
-GoogleApiClient.OnConnectionFailedListener: Provides callbacks for scenarios that result in a failed attempt to connect the client to the service. Whenever connection is failed onConnectionFailed() will be called.
@Override
public void onConnectionFailed(ConnectionResult connectionResult) {
}
-LocationListener: This callback have function onLocationChanged() that will be called whenever there is change in location of device.
@Override
public void onLocationChanged(Location location) {}
-onMapReady(): This function is called when the map is ready to be used.
-buildGoogleApiClient(): This method is used to initialize the Google Play Services.
@Override
public void onMapReady(GoogleMap googleMap) {
    mMap = googleMap;
    mMap.setMapType(GoogleMap.MAP_TYPE_NORMAL);
    mMap.getUiSettings().setZoomControlsEnabled(true);
    mMap.getUiSettings().setZoomGesturesEnabled(true);
    mMap.getUiSettings().setCompassEnabled(true);

    //Initialize Google Play Services
    if (android.os.Build.VERSION.SDK_INT >= Build.VERSION_CODES.M) {
        if (ContextCompat.checkSelfPermission(this,
                Manifest.permission.ACCESS_FINE_LOCATION)
                == PackageManager.PERMISSION_GRANTED) {
            buildGoogleApiClient();
            mMap.setMyLocationEnabled(true);
        }
    } else {
        buildGoogleApiClient();
        mMap.setMyLocationEnabled(true);
    }
}
-addConnectionCallbacks(): You need to call registers a listener to receive connection events from this GoogleApiClient.
-addOnConnectionFailedListener(): This methods adds a listener to register to receive connection failed events from this GoogleApiClient.
-GoogleApiClient.Builder: Builder is used to help construct the GoogleApiClient object and addApi () specify which Apis are requested by your app.
-mGoogleApiClient.connect(): A client must be connected before executing any operation.
protected synchronized void buildGoogleApiClient() {
 mGoogleApiClient = new GoogleApiClient.Builder(this)
 .addConnectionCallbacks(this)
 .addOnConnectionFailedListener(this)
 .addApi(LocationServices.API)
 .build();
 mGoogleApiClient.connect();
}
-Zoom Controls: The Maps API provides built-in zoom controls that appear in the bottom right hand corner of the map. These can be enabled by calling:
mMap.getUiSettings().setZoomControlsEnabled(true);
-Zoom Gestures:
ZoomIn: Double tap to increase the zoom level by 1.
Zoom Out: Two finger tap to decrease the zoom level by 1.
mMap.getUiSettings().setZoomGesturesEnabled(true);
-Compass: You can set compass by calling below method:
mMap.getUiSettings().setCompassEnabled(true);
-Changing the Map Type:
The Android Maps API provides normal, satellite, terrain and hybrid map types to help you out:
mMap.setMapType(GoogleMap.MAP_TYPE_NORMAL);
mMap.setMapType(GoogleMap.MAP_TYPE_SATELLITE);
mMap.setMapType(GoogleMap.MAP_TYPE_TERRAIN);
mMap.setMapType(GoogleMap.MAP_TYPE_HYBRID);
MAP_TYPE_NORMAL : Represents a typical road map with street names and labels.
MAP_TYPE_SATELLITE: Represents a Satellite View Area without street names and labels.
MAP_TYPE_TERRAIN: Topographic data. The map includes colors, contour lines and labels, and perspective shading. Some roads and labels are also visible.
MAP_TYPE_HYBRID : Combines a satellite View Area and Normal mode displaying satellite images of an area with all labels.
Map_TYPE_NONE : No tiles. It is similar to a normal map, but doesn’t display any labels or coloration for the type of environment in an area.
Add the following inside setUpMap() just below the setMyLocationEnabled() call:
The location of the user is updated at the regular intervals. We have used FusedLocationProvider. We have used requestLocationUpdates() method to get regular updates about a device’s location. Do this in the onConnected() callback provided by Google API Client, which is called when the client is ready.
LocationRequest mLocationRequest is used to get quality of service for location updates from the FusedLocationProviderApi using requestLocationUpdates.
@Override
public void onConnected(Bundle bundle) {
    mLocationRequest = new LocationRequest();
    mLocationRequest.setInterval(1000);
    mLocationRequest.setFastestInterval(1000);
    mLocationRequest.setPriority(LocationRequest.PRIORITY_BALANCED_POWER_ACCURACY);
    if (ContextCompat.checkSelfPermission(this,
            Manifest.permission.ACCESS_FINE_LOCATION)
            == PackageManager.PERMISSION_GRANTED) {
     LocationServices.FusedLocationApi.requestLocationUpdates(mGoogleApiClient,
                mLocationRequest, this);
    }
}
Whenever user’s location is changed. For that Google has predefined function onLocationChanged that will be called as soon as user’s location change. Here we are getting the coordinates of current location using getLatitude() and getLongitude() and we are also adding Marker.
Complete code of MapsActivity.java class:
package com.abhiandroid.GoogleMaps.googlemaps;
import android.Manifest;
import android.content.Context;
import android.content.pm.PackageManager;
import android.location.Address;
import android.location.Criteria;
import android.location.Geocoder;
import android.location.Location;
import android.location.LocationManager;
import android.os.Build;
import android.os.Bundle;
import android.support.v4.app.ActivityCompat;
import android.support.v4.app.FragmentActivity;
import android.support.v4.content.ContextCompat;
import android.widget.Toast;
import com.google.android.gms.common.ConnectionResult;
import com.google.android.gms.common.api.GoogleApiClient;
import com.google.android.gms.location.LocationListener;
import com.google.android.gms.location.LocationRequest;
import com.google.android.gms.location.LocationServices;
import com.google.android.gms.maps.CameraUpdateFactory;
import com.google.android.gms.maps.GoogleMap;
import com.google.android.gms.maps.OnMapReadyCallback;
import com.google.android.gms.maps.SupportMapFragment;
import com.google.android.gms.maps.model.BitmapDescriptorFactory;
import com.google.android.gms.maps.model.LatLng;
import com.google.android.gms.maps.model.Marker;
import com.google.android.gms.maps.model.MarkerOptions;
import com.abhiandroid.GoogleMaps.googlemaps.R;

import java.io.IOException;
import java.util.List;
import java.util.Locale;
public class MapsActivity extends FragmentActivity implements OnMapReadyCallback,
        GoogleApiClient.ConnectionCallbacks,
        GoogleApiClient.OnConnectionFailedListener,
        LocationListener {
    public static final int MY_PERMISSIONS_REQUEST_LOCATION = 99;
    GoogleApiClient mGoogleApiClient;
    Location mLastLocation;
    Marker mCurrLocationMarker;
    LocationRequest mLocationRequest;
    private GoogleMap mMap;
    @Override
    protected void onCreate(Bundle savedInstanceState) {
        super.onCreate(savedInstanceState);
        setContentView(R.layout.activity_maps);

        if (android.os.Build.VERSION.SDK_INT >= Build.VERSION_CODES.M) {
            checkLocationPermission();
        }
        SupportMapFragment mapFragment = (SupportMapFragment)
                getSupportFragmentManager()
                        .findFragmentById(R.id.map);

        mapFragment.getMapAsync(this);
    }
    @Override
    public void onMapReady(GoogleMap googleMap) {
        mMap = googleMap;
        mMap.setMapType(GoogleMap.MAP_TYPE_NORMAL);
        mMap.getUiSettings().setZoomControlsEnabled(true);
        mMap.getUiSettings().setZoomGesturesEnabled(true);
        mMap.getUiSettings().setCompassEnabled(true);
        //Initialize Google Play Services
        if (android.os.Build.VERSION.SDK_INT >= Build.VERSION_CODES.M) {
            if (ContextCompat.checkSelfPermission(this,
                    Manifest.permission.ACCESS_FINE_LOCATION)
                    == PackageManager.PERMISSION_GRANTED) {
                buildGoogleApiClient();
                mMap.setMyLocationEnabled(true);
            }
        } else {
            buildGoogleApiClient();
            mMap.setMyLocationEnabled(true);
        }
    }
    protected synchronized void buildGoogleApiClient() {
        mGoogleApiClient = new GoogleApiClient.Builder(this)
                .addConnectionCallbacks(this)
                .addOnConnectionFailedListener(this)
                .addApi(LocationServices.API)
                .build();
        mGoogleApiClient.connect();
    }
    @Override
    public void onConnected(Bundle bundle) {
        mLocationRequest = new LocationRequest();
        mLocationRequest.setInterval(1000);
        mLocationRequest.setFastestInterval(1000);
        mLocationRequest.setPriority(LocationRequest.PRIORITY_BALANCED_POWER_ACCURACY);
        if (ContextCompat.checkSelfPermission(this,
                Manifest.permission.ACCESS_FINE_LOCATION)
                == PackageManager.PERMISSION_GRANTED) {
            LocationServices.FusedLocationApi.requestLocationUpdates(mGoogleApiClient,
                    mLocationRequest, this);
        }
    }
    @Override
    public void onConnectionSuspended(int i) {
    }
    @Override
    public void onLocationChanged(Location location) {
        mLastLocation = location;
        if (mCurrLocationMarker != null) {
            mCurrLocationMarker.remove();
        }
//Showing Current Location Marker on Map
        LatLng latLng = new LatLng(location.getLatitude(), location.getLongitude());
        MarkerOptions markerOptions = new MarkerOptions();
        markerOptions.position(latLng);
        LocationManager locationManager = (LocationManager)
                getSystemService(Context.LOCATION_SERVICE);
        String provider = locationManager.getBestProvider(new Criteria(), true);
        if (ActivityCompat.checkSelfPermission(this,
                Manifest.permission.ACCESS_FINE_LOCATION) != PackageManager.PERMISSION_GRANTED &&
                ActivityCompat.checkSelfPermission(this, Manifest.permission.ACCESS_COARSE_LOCATION)
                        != PackageManager.PERMISSION_GRANTED) {
            return;
        }
        Location locations = locationManager.getLastKnownLocation(provider);
        List<String> providerList = locationManager.getAllProviders();
        if (null != locations && null != providerList && providerList.size() > 0) {
            double longitude = locations.getLongitude();
            double latitude = locations.getLatitude();
            Geocoder geocoder = new Geocoder(getApplicationContext(),
                    Locale.getDefault());
            try {
                List<Address> listAddresses = geocoder.getFromLocation(latitude,
                        longitude, 1);
                if (null != listAddresses && listAddresses.size() > 0) {
                    String state = listAddresses.get(0).getAdminArea();
                    String country = listAddresses.get(0).getCountryName();
                    String subLocality = listAddresses.get(0).getSubLocality();
                    markerOptions.title("" + latLng + "," + subLocality + "," + state
                            + "," + country);
                }
            } catch (IOException e) {
                e.printStackTrace();
            }
        }
        markerOptions.icon(BitmapDescriptorFactory.defaultMarker(BitmapDescriptorFactory.HUE_BLUE));
        mCurrLocationMarker = mMap.addMarker(markerOptions);
        mMap.moveCamera(CameraUpdateFactory.newLatLng(latLng));
        mMap.animateCamera(CameraUpdateFactory.zoomTo(11));
        if (mGoogleApiClient != null) {
            LocationServices.FusedLocationApi.removeLocationUpdates(mGoogleApiClient,
                    this);
        }
    }
    @Override
    public void onConnectionFailed(ConnectionResult connectionResult) {
    }
    public boolean checkLocationPermission() {
        if (ContextCompat.checkSelfPermission(this,
                Manifest.permission.ACCESS_FINE_LOCATION)
                != PackageManager.PERMISSION_GRANTED) {

            if (ActivityCompat.shouldShowRequestPermissionRationale(this,
                    Manifest.permission.ACCESS_FINE_LOCATION)) {
                ActivityCompat.requestPermissions(this,
                        new String[]{Manifest.permission.ACCESS_FINE_LOCATION},
                        MY_PERMISSIONS_REQUEST_LOCATION);
            } else {
                ActivityCompat.requestPermissions(this,
                        new String[]{Manifest.permission.ACCESS_FINE_LOCATION},
                        MY_PERMISSIONS_REQUEST_LOCATION);
            }
            return false;
        } else {
            return true;
        }
    }
    @Override
    public void onRequestPermissionsResult(int requestCode,
                                           String permissions[], int[] grantResults) {
        switch (requestCode) {
            case MY_PERMISSIONS_REQUEST_LOCATION: {
                if (grantResults.length > 0
                        && grantResults[0] == PackageManager.PERMISSION_GRANTED) {
                    if (ContextCompat.checkSelfPermission(this,
                            Manifest.permission.ACCESS_FINE_LOCATION)
                            == PackageManager.PERMISSION_GRANTED) {
                        if (mGoogleApiClient == null) {
                            buildGoogleApiClient();
                        }
                        mMap.setMyLocationEnabled(true);
                    }
                } else {
                    Toast.makeText(this, "permission denied",
                            Toast.LENGTH_LONG).show();
                }
                return;
            }
        }
    }
}
Output:
Now run the App. If you are connected to internet and provide access to your location then in Map you will see your current location.
Google Map Example To Draw A Route Between Two Locations In Android Studio:
In this example, we are drawing path between two locations using Polylines. In this we define origin and dest latlng. After that we get direction urls and then execute AsyncTask class to get data from direction API. In the end, we parse direction data and then use PolylineOptions to draw the path between two locations.
AsyncTask is used to perform long running operations and show its result on the UI thread.
Below you can download code, see final output and step by step explanation of example:

Step 1: Create a new project and name It MapExample.
Step 2: Open Gradle Scripts > build.gradle and add Retrofit and RecyclerView Library dependency in it.
apply plugin: 'com.android.application'

android {
    compileSdkVersion 23
    buildToolsVersion "23.0.2"

    defaultConfig {
        applicationId "com.abhiandroid.MapRouteExample"
        minSdkVersion 15
        targetSdkVersion 23
        versionCode 1
        versionName "1.0"
    }
    buildTypes {
        release {
            minifyEnabled false
            proguardFiles getDefaultProguardFile('proguard-android.txt'), 'proguard-rules.pro'
        }
    }
}

dependencies {
    compile fileTree(dir: 'libs', include: ['*.jar'])
    testCompile 'junit:junit:4.12'
    compile 'com.android.support:appcompat-v7:23.1.1'
    compile 'com.android.support:design:23.1.1'
    compile 'com.google.android.gms:play-services:7.8.0'
}
Step 3: Add Internet Permission in the AndroidManifest.xml:
For network transactions we need to define Internet and other map permissions in our Manifest file. Add meta-data with the google map key you get from google console.
<?xml version="1.0" encoding="utf-8"?>
<manifest xmlns:android="http://schemas.android.com/apk/res/android"
    package="com.abhiandroid.MapRouteExample">


    <uses-permission android:name="android.permission.INTERNET" />
    <uses-permission android:name="android.permission.ACCESS_NETWORK_STATE" />
    <uses-permission android:name="android.permission.ACCESS_FINE_LOCATION" />
    <uses-permission android:name="android.permission.ACCESS_COARSE_LOCATION" />


    <application
        android:allowBackup="true"
        android:icon="@mipmap/ic_launcher"
        android:label="@string/app_name"
        android:supportsRtl="true"
        android:theme="@style/AppTheme">
        <activity
            android:name="com.abhiandroid.MapRouteExample.MainActivity"
            android:label="@string/app_name"
            android:theme="@style/AppTheme.NoActionBar">
            <intent-filter>
                <action android:name="android.intent.action.MAIN" />

                <category android:name="android.intent.category.LAUNCHER" />
            </intent-filter>
        </activity>

        <meta-data
            android:name="com.google.android.maps.v2.API_KEY"
            android:value="AIzaSyDagu1__IQVkCjlGIGYkbdUf-JcJ0hofZ0" />

        <meta-data
            android:name="com.google.android.gms.version"
            android:value="@integer/google_play_services_version" />

    </application>

</manifest>
Step 4: Open res -> layout -> activity_main.xml (or) main.xml and add following code:
In this step we create a support fragment in our XML file.
<?xml version="1.0" encoding="utf-8"?>
<RelativeLayout xmlns:android="http://schemas.android.com/apk/res/android"
    xmlns:app="http://schemas.android.com/apk/res-auto"
    xmlns:tools="http://schemas.android.com/tools"
    android:layout_width="match_parent"
    android:layout_height="match_parent"
    app:layout_behavior="@string/appbar_scrolling_view_behavior"
    tools:context="com.abhiandroid.MapRouteExample.MainActivity"
    tools:showIn="@layout/activity_main">

    <fragment
        android:id="@+id/map"
        android:name="com.google.android.gms.maps.SupportMapFragment"
        android:layout_width="match_parent"
        android:layout_gravity="center"
        android:layout_height="match_parent"
        />

</RelativeLayout>
Step 5: Create a new class DirectionsJSONParser.java in which we have parse method to parse the data which we get from direction API.
package com.abhiandroid.MapRouteExample;

import com.google.android.gms.maps.model.LatLng;

import org.json.JSONArray;
import org.json.JSONException;
import org.json.JSONObject;

import java.util.ArrayList;
import java.util.HashMap;
import java.util.List;

public class DirectionsJSONParser {

    /** Receives a JSONObject and returns a list of lists containing latitude and longitude */
    public List<List<HashMap<String,String>>> parse(JSONObject jObject){

        List<List<HashMap<String, String>>> routes = new ArrayList<List<HashMap<String,String>>>() ;
        JSONArray jRoutes = null;
        JSONArray jLegs = null;
        JSONArray jSteps = null;

        try {

            jRoutes = jObject.getJSONArray("routes");

            /** Traversing all routes */
            for(int i=0;i<jRoutes.length();i++){
                jLegs = ( (JSONObject)jRoutes.get(i)).getJSONArray("legs");
                List path = new ArrayList<HashMap<String, String>>();

                /** Traversing all legs */
                for(int j=0;j<jLegs.length();j++){
                    jSteps = ( (JSONObject)jLegs.get(j)).getJSONArray("steps");

                    /** Traversing all steps */
                    for(int k=0;k<jSteps.length();k++){
                        String polyline = "";
                        polyline = (String)((JSONObject)((JSONObject)jSteps.get(k)).get("polyline")).get("points");
                        List list = decodePoly(polyline);

                        /** Traversing all points */
                        for(int l=0;l <list.size();l++){
                            HashMap<String, String> hm = new HashMap<String, String>();
                            hm.put("lat", Double.toString(((LatLng)list.get(l)).latitude) );
                            hm.put("lng", Double.toString(((LatLng)list.get(l)).longitude) );
                            path.add(hm);
                        }
                    }
                    routes.add(path);
                }
            }

        } catch (JSONException e) {
            e.printStackTrace();
        }catch (Exception e){
        }

        return routes;
    }

    private List decodePoly(String encoded) {

        List poly = new ArrayList();
        int index = 0, len = encoded.length();
        int lat = 0, lng = 0;

        while (index < len) {
            int b, shift = 0, result = 0;
            do {
                b = encoded.charAt(index++) - 63;
                result |= (b & 0x1f) << shift;
                shift += 5;
            } while (b >= 0x20);
            int dlat = ((result & 1) != 0 ? ~(result >> 1) : (result >> 1));
            lat += dlat;

            shift = 0;
            result = 0;
            do {
                b = encoded.charAt(index++) - 63;
                result |= (b & 0x1f) << shift;
                shift += 5;
            } while (b >= 0x20);
            int dlng = ((result & 1) != 0 ? ~(result >> 1) : (result >> 1));
            lng += dlng;

            LatLng p = new LatLng((((double) lat / 1E5)),
                    (((double) lng / 1E5)));
            poly.add(p);
        }

        return poly;
    }
}
Step 6: Now open app -> java -> package -> MainActivity.java and add the below code.
In this step, firstly we get reference of Support Map Fragment that we defined in our xml file and then set the marker on both locations in onMapReady callback. After that we get direction urls and then execute AsyncTask class to get data from direction API. In the end, we parse direction data and then use PolylineOptions to draw the path between two locations.
package com.abhiandroid.MapRouteExample;

import android.app.ProgressDialog;
import android.graphics.Color;
import android.os.AsyncTask;
import android.os.Bundle;
import android.support.v7.app.AppCompatActivity;
import android.util.Log;
import android.view.Menu;
import android.view.MenuItem;

import com.google.android.gms.maps.CameraUpdateFactory;
import com.google.android.gms.maps.GoogleMap;
import com.google.android.gms.maps.OnMapReadyCallback;
import com.google.android.gms.maps.SupportMapFragment;
import com.google.android.gms.maps.model.BitmapDescriptorFactory;
import com.google.android.gms.maps.model.LatLng;
import com.google.android.gms.maps.model.MarkerOptions;
import com.google.android.gms.maps.model.PolylineOptions;

import org.json.JSONObject;

import java.io.BufferedReader;
import java.io.IOException;
import java.io.InputStream;
import java.io.InputStreamReader;
import java.net.HttpURLConnection;
import java.net.URL;
import java.util.ArrayList;
import java.util.HashMap;
import java.util.List;


public class MainActivity extends AppCompatActivity implements OnMapReadyCallback {

    SupportMapFragment mapFragment;
    GoogleMap mMap;
    LatLng origin = new LatLng(30.739834, 76.782702);
    LatLng dest = new LatLng(30.705493, 76.801256);
    ProgressDialog progressDialog;
    @Override
    protected void onCreate(Bundle savedInstanceState) {
        super.onCreate(savedInstanceState);
        setContentView(R.layout.activity_main);
        mapFragment = (SupportMapFragment) getSupportFragmentManager()
                .findFragmentById(R.id.map);
        mapFragment.getMapAsync(this);
        drawPolylines();

    }

    private void drawPolylines() {
        progressDialog = new ProgressDialog(MainActivity.this);
        progressDialog.setMessage("Please Wait, Polyline between two locations is building.");
        progressDialog.setCancelable(false);
        progressDialog.show();

        // Checks, whether start and end locations are captured
        // Getting URL to the Google Directions API
        String url = getDirectionsUrl(origin, dest);
        Log.d("url", url + "");
        DownloadTask downloadTask = new DownloadTask();
        // Start downloading json data from Google Directions API
        downloadTask.execute(url);
    }
    @Override
    public boolean onCreateOptionsMenu(Menu menu) {
        // Inflate the menu; this adds items to the action bar if it is present.
        getMenuInflater().inflate(R.menu.menu_main, menu);
        return true;
    }

    @Override
    public boolean onOptionsItemSelected(MenuItem item) {
        // Handle action bar item clicks here. The action bar will
        // automatically handle clicks on the Home/Up button, so long
        // as you specify a parent activity in AndroidManifest.xml.
        int id = item.getItemId();

        //noinspection SimplifiableIfStatement
        if (id == R.id.action_settings) {
            return true;
        }

        return super.onOptionsItemSelected(item);
    }

    @Override
    public void onMapReady(GoogleMap googleMap) {
        mMap = googleMap;
        mMap.setMapType(GoogleMap.MAP_TYPE_NORMAL);
      googleMap.addMarker(new MarkerOptions()
              .position(origin)
              .title("LinkedIn")
              .icon(BitmapDescriptorFactory.defaultMarker(BitmapDescriptorFactory.HUE_GREEN)));

        googleMap.addMarker(new MarkerOptions()
                .position(dest));

        googleMap.animateCamera(CameraUpdateFactory.newLatLngZoom(origin, 15));

    }


    private class DownloadTask extends AsyncTask<String, Void, String> {

        @Override
        protected String doInBackground(String... url) {

            String data = "";

            try {
                data = downloadUrl(url[0]);
            } catch (Exception e) {
                Log.d("Background Task", e.toString());
            }
            return data;
        }

        @Override
        protected void onPostExecute(String result) {
            super.onPostExecute(result);

            ParserTask parserTask = new ParserTask();


            parserTask.execute(result);

        }
    }


    /**
     * A class to parse the Google Places in JSON format
     */
    private class ParserTask extends AsyncTask<String, Integer, List<List<HashMap<String, String>>>> {

        // Parsing the data in non-ui thread
        @Override
        protected List<List<HashMap<String, String>>> doInBackground(String... jsonData) {

            JSONObject jObject;
            List<List<HashMap<String, String>>> routes = null;

            try {
                jObject = new JSONObject(jsonData[0]);
                DirectionsJSONParser parser = new DirectionsJSONParser();

                routes = parser.parse(jObject);
            } catch (Exception e) {
                e.printStackTrace();
            }
            return routes;
        }

        @Override
        protected void onPostExecute(List<List<HashMap<String, String>>> result) {

            progressDialog.dismiss();
            Log.d("result", result.toString());
            ArrayList points = null;
            PolylineOptions lineOptions = null;

            for (int i = 0; i < result.size(); i++) {
                points = new ArrayList();
                lineOptions = new PolylineOptions();

                List<HashMap<String, String>> path = result.get(i);

                for (int j = 0; j < path.size(); j++) {
                    HashMap<String, String> point = path.get(j);

                    double lat = Double.parseDouble(point.get("lat"));
                    double lng = Double.parseDouble(point.get("lng"));
                    LatLng position = new LatLng(lat, lng);

                    points.add(position);
                }

                lineOptions.addAll(points);
                lineOptions.width(12);
                lineOptions.color(Color.RED);
                lineOptions.geodesic(true);

            }

// Drawing polyline in the Google Map for the i-th route
            mMap.addPolyline(lineOptions);
        }
    }

    private String getDirectionsUrl(LatLng origin, LatLng dest) {

        // Origin of route
        String str_origin = "origin=" + origin.latitude + "," + origin.longitude;

        // Destination of route
        String str_dest = "destination=" + dest.latitude + "," + dest.longitude;

        // Sensor enabled
        String sensor = "sensor=false";
        String mode = "mode=driving";
        // Building the parameters to the web service
        String parameters = str_origin + "&" + str_dest + "&" + sensor + "&" + mode;

        // Output format
        String output = "json";

        // Building the url to the web service
        String url = "https://maps.googleapis.com/maps/api/directions/" + output + "?" + parameters;


        return url;
    }

    /**
     * A method to download json data from url
     */
    private String downloadUrl(String strUrl) throws IOException {
        String data = "";
        InputStream iStream = null;
        HttpURLConnection urlConnection = null;
        try {
            URL url = new URL(strUrl);

            urlConnection = (HttpURLConnection) url.openConnection();

            urlConnection.connect();

            iStream = urlConnection.getInputStream();

            BufferedReader br = new BufferedReader(new InputStreamReader(iStream));

            StringBuffer sb = new StringBuffer();

            String line = "";
            while ((line = br.readLine()) != null) {
                sb.append(line);
            }

            data = sb.toString();

            br.close();
            Log.d("data", data);

        } catch (Exception e) {
            Log.d("Exception", e.toString());
        } finally {
            iStream.close();
            urlConnection.disconnect();
        }
        return data;
    }
}
Output:
Now run the App. If you are connected to internet and provide access to your location then in Map you will see route layout draws in Map.
28 thoughts on “Google Maps Tutorial With Example In Android Studio [Step by Step]”
Leave a Reply to Sam V Cancel reply
Premium Project Source Code:
- Food Ordering Android App Project Source Code
- Ecommerce Store Android App Project Source Code
- Convert Website Into Android App Project Source Code
- Quiz Game Android App Project Source Code
- Radio Streaming Android App Source Code
- City Guide Android App Project Source Code
- QR Barcode Android App Project Source Code
Greate Tuto.Thank abhiandroid.
Great tutorial, THX!
But I cant download the Code.
Best regards, Jo
com.google.android.gms.maps.SupportMapFragment( sir unresolve package)can you tell me why am getting this error
the market doesnt get updated to the new location when the location changes…
the blue dot of current location changes with change in position but the marker remains constant and doesnt get updated to the new current location
Nice tutorial but i have a question. If i move and change the location the latLng does not take the new location but it still has the first coordinates. How can i change the latLng in every location change
found nullPointerException at mapFragment.getMapAsync(MapsActivity.this);
please tell with details where to add types
sir how to download u r ebook tell me sir .. i am not able to download it..send me pdf format..plz it need u r ebook
Very informative tutorial. Can you, Dear Sir, make a tutorial that gets the same result or similar but with Webview and and Google Map in HTML.
Thank you very much for your valuable help.
Abder
Thanks for the tutorial, interesting to create a route between two points, to be able to navigate. Could you do the same thing by loading a map from a local HTML web page? I ask because it is still easier to create buttons with the coordinates already set for the second destination point, and the first point would be the current position we are at.
Tanks Bro, this tutorial is very nice
Really It is very helpfull.
Thank You.
hi
answer is for ex 40.0010456,52.6632914
I wanna this answer 40.001045600000000,52.663291400000000
I mean I wanna more accurate of location
i changed most of cods to get more accurate but i didnt get that answer i want
what have i do ?
very good example
One addtion this -> compile ‘com.google.android.gms:play-services:8.4.0’
can be replaced by compile ‘com.google.android.gms:play-services-maps:8.4.0’
Thanks a lot brother… Awesome tutorial to learn integration of Google Map and it shows current location of user…
Abhishek, Good one…!
Thanks Sir for sharing this useful tutorial.
Great job, it help’s a lot….
very nice tutorial
Thanks for sharing tutorial… Nice tutorial… it’s very useful…
Waiting for next tutorial.. 🙂
thanx…
sir this is awesome tutorial for both fresher as well as experience…..
Hi, Thanks for the detailed information on utilizing the google map. Your website is informative and very handy to look for .
In case I want to draw a route map based on the historical latitude and longitude present in external database,
How do I do it?
The scenario is, I will have the latitude and longitude of the mobile devices location captured in external DB
for every 2 Or mins interval. Based on the data, I need to draw the line in the map, to showcase the movement.
Thanks in advance for your help
Thank you.
Really awesome
Hi very interesting tutorial very useful, Thanks a lot for sharing. keep doing great jobs 🙂
Thanks for sharing this tutorial 🙂
Many thanks for a great tutorial .. very informative. However I am struggling to get the example to compile. I keep getting errors related to mLocationRequest:
1) Error:(91, 25) error: cannot access SafeParcelable
class file for com.google.android.gms.common.internal.safeparcel.SafeParcelable not found
2) Error:Execution failed for task ‘:app:compileDebugJavaWithJavac’.
Any ideas?
your tutorials is very helipful bro..please share more tutorials with examples..
u r god to android for freshers..please share more tutorials with examples
your information is very helpful to my carrer…….