Retrofit Tutorial With Example In Android Studio [Step by Step]
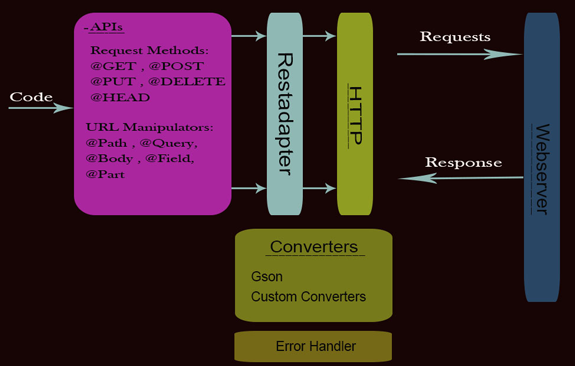
In Android, Retrofit is a REST Client for Java and Android by Square inc under Apache 2.0 license. Its a simple network library that used for network transactions. By using this library we can seamlessly capture JSON response from web service/web API. It’s easy and fast library to retrieve and upload the data(JSON or any other structured data) via a REST based web service.
Table Of Contents
Need of Retrofit In Android:
We have a lot of network libraries that used to fetch and send the data from/to server. In our previous article we use Volley library for network transactions but Retrofit is an ultimate replacement of Volley and all other libraries. Retrofit is better alternative of other libraries in terms of performance, ease of use, extensibility and others.
Difference Between Retrofit and other libraries:
In Android, retrofit library is different from other network libraries because it gives us an easy to use platform through which we don’t need to parse JSON responses as they are done by library itself. It used GSON library in the background to parser the response data. What we need to do is define a POJO (Plain Old Java Object) to parse the response.
Performance benchmarks for Android AsyncTask, Volley and Retrofit (in milliseconds, lower value is better):
Here is the main difference between our three mainly used techniques for implementing API’s is our android app. You can see the difference in performance that for one discussion means for one network request and response they will take how much time.
1. AsyncTask:
one(1) discussion: 941 ms
Seven(7) discussions: 4539 ms
Twenty Five(25) discussions: 13957 ms
2. Volley:
one(1) discussion: 560 ms
Seven(7) discussions: 2202 ms
Twenty Five(25) discussions: 4275 ms
3. Retrofit:
one(1) discussion: 312 ms
Seven(7) discussions: 889 ms
Twenty Five(25) discussions: 1059 ms
Steps to Integrate Retrofit 1.9 in our Android Studio Project.
Here are the main steps to integrate Retrofit in our project.
1.Add dependency file in gradle:
Firsly add this library in your build.gradle file in app module.
compile ‘com.squareup.retrofit:retrofit:1.9.0’
Add Internet Permission in the AndroidManifest.xml:
For network transactions we need to define Internet permission in our Manifest file.
<manifest xmlns:android="http://schemas.android.com/apk/res/android"
package="com.abhiandroid.retroiftexample">

<uses-permission android:name="android.permission.INTERNET" />

<application>
3. POJO/Model Class:
For fetching response we need create POJO class that automatically parse the JSON data using Gson in background. We just need to create this POJO class. For creating POJO class first method is defining each and every variable by ourself and other best and fast method is using http://www.jsonschema2pojo.org/ platform. By using this platform you can easily convert your JSON response to POJO class, for this we need to copy our JSON response and paste it in jsonschema2pojo and it will create setter getter methods as per our requirement.
Sample POJO class:

public class SamplePojo {

private int userId;
private String name;

public int getUserId() {
return userId;
}

public String getName() {
return name;
}
}
4. Add downloaded POJO class in your project.
5. API Interface :
Now we need to create an Interface to define our different methods that will be used for network transactions. Here is the sample of API Interface.
public interface ApiInterface {


// For POST request

    @FormUrlEncoded    // annotation that used with POST type request
    @POST("/demo/login.php") // specify the sub url for our base url
    public void login(
            @Field("user_email") String user_email,
            @Field("user_pass") String user_pass, Callback<SignUpResponse> callback);

//user_email and user_pass are the post parameters and SignUpResponse is a POJO class which recieves the response of this API


// for GET request

    @GET("/demo/countrylist.php") // specify the sub url for our base url
    public void getVideoList(Callback<List<CountryResponse>> callback);

// CountryResponse is a POJO class which receives the response of this API

}
6. RestAdapter:
We need to define RestAdapter to implement API’s. Suppose we have to implement login API then we need to build RestAdapter, setting root url and create connection between our adapter and API Interface. For this, its better to create a class in which we have a method that create the connection and then returns the API Interface object. You can create this RestAdapter where you want to implement API but its better to create a common class/method and use it where you want.
 public class Api {

    public static ApiInterface getClient() {

        RestAdapter adapter = new RestAdapter.Builder()
                .setEndpoint("http://healthyblackmen.org") //Setting the Root URL
                .build(); //Finally building the adapter

        //Creating object for our interface
        ApiInterface api = adapter.create(ApiInterface.class);
        return api;
    }
}
Example Of Retrofit 1.9 For POST Type In Android Studio:
Below is the example of Retrofit in which we have implement the POST type request. In this we are implementing sign up api. In this example firstly we create sign up page design with 3 EditText name, email and password and one sign up Button. After that in our MainActivity we are getting our EditText and Button and on click of sign up Button the data in EditText is validate and then we are implementing signup api to save the data in our database. After getting response from api we are displaying the message on the screen by using a Toast.
Below you can download code, see final output and step by step explanation of example:
Step 1: Create a new project And Name It RetrofitExample.
Step 2: Open Gradle Scripts > build.gradle and add Retrofit and RecyclerView Library dependency in it.
apply plugin: 'com.android.application'

android {
    compileSdkVersion 26
    defaultConfig {
        applicationId "com.abhiandroid.retrofitexample"
        minSdkVersion 15
        targetSdkVersion 26
        versionCode 1
        versionName "1.0"
        testInstrumentationRunner "android.support.test.runner.AndroidJUnitRunner"
    }
    buildTypes {
        release {
            minifyEnabled false
            proguardFiles getDefaultProguardFile('proguard-android.txt'), 'proguard-rules.pro'
        }
    }
}

dependencies {
    implementation fileTree(dir: 'libs', include: ['*.jar'])
    implementation 'com.android.support:appcompat-v7:26.1.0'
    compile 'com.squareup.retrofit:retrofit:1.9.0' // dependency for Retrofit
}
Step 3: Add Internet Permission in the AndroidManifest.xml:
For network transactions we need to define Internet permission in our Manifest file.
<?xml version="1.0" encoding="utf-8"?>
<manifest xmlns:android="http://schemas.android.com/apk/res/android"
    package="com.abhiandroid.retrofitexample">

    <uses-permission android:name="android.permission.INTERNET" />
    <application
        android:allowBackup="true"
        android:icon="@mipmap/ic_launcher"
        android:label="@string/app_name"
        android:roundIcon="@mipmap/ic_launcher_round"
        android:supportsRtl="true"
        android:theme="@style/AppTheme">
        <activity android:name=".MainActivity">
            <intent-filter>
                <action android:name="android.intent.action.MAIN" />

                <category android:name="android.intent.category.LAUNCHER" />
            </intent-filter>
        </activity>
    </application>

</manifest>
Step 4: Open res -> layout -> activity_main.xml (or) main.xml and add following code:
In this step we create a RecyclerView in our XML file.
<?xml version="1.0" encoding="utf-8"?>
<RelativeLayout xmlns:android="http://schemas.android.com/apk/res/android"
    android:layout_width="match_parent"
    android:layout_height="match_parent">


    <ScrollView
        android:layout_width="match_parent"
        android:layout_height="match_parent"
        android:scrollbars="none">


        <LinearLayout
            android:layout_width="match_parent"
            android:layout_height="wrap_content"
            android:layout_gravity="center"
            android:orientation="vertical"
            android:padding="20dp">


            <EditText
                android:id="@+id/username"
                android:layout_width="match_parent"
                android:layout_height="wrap_content"
                android:backgroundTint="#000"
                android:hint="Full Name"
                android:imeOptions="actionNext"
                android:inputType="text"
                android:paddingBottom="15dp"
                android:paddingLeft="5dp"
                android:singleLine="true"
                android:textColor="#000"
                android:textColorHint="#000" />


            <EditText
                android:id="@+id/email"
                android:layout_width="match_parent"
                android:layout_height="wrap_content"
                android:backgroundTint="#000"
                android:hint="Email Address"
                android:imeOptions="actionNext"
                android:inputType="textEmailAddress"
                android:paddingBottom="15dp"
                android:paddingLeft="5dp"
                android:singleLine="true"
                android:textColor="#000"
                android:textColorHint="#000" />


            <EditText
                android:id="@+id/password"
                android:layout_width="match_parent"
                android:layout_height="wrap_content"
                android:backgroundTint="#000"
                android:hint="Password"
                android:imeOptions="actionDone"
                android:inputType="textPassword"
                android:paddingBottom="15dp"
                android:paddingLeft="5dp"
                android:singleLine="true"
                android:textColor="#000"
                android:textColorHint="#000" />


            <Button
                android:id="@+id/signUp"
                android:layout_width="match_parent"
                android:layout_height="wrap_content"
                android:layout_marginTop="10dp"
                android:backgroundTint="@color/colorPrimary"
                android:text="Sign Up"
                android:textColor="#fff"
                android:textSize="17sp" />

        </LinearLayout>
    </ScrollView>
</RelativeLayout>
Step 5: Create a new POJO class SignUpResponse.java in which we have setter/getter method to get the data from API.
package com.abhiandroid.retrofitexample;

import java.util.HashMap;
import java.util.Map;

public class SignUpResponse {

    private String success;
    private String message;
    private Integer userid;
    private Map<String, Object> additionalProperties = new HashMap<String, Object>();

    public String getSuccess() {
        return success;
    }

    public void setSuccess(String success) {
        this.success = success;
    }

    public String getMessage() {
        return message;
    }

    public void setMessage(String message) {
        this.message = message;
    }

    public Integer getUserid() {
        return userid;
    }

    public void setUserid(Integer userid) {
        this.userid = userid;
    }

    public Map<String, Object> getAdditionalProperties() {
        return this.additionalProperties;
    }

    public void setAdditionalProperty(String name, Object value) {
        this.additionalProperties.put(name, value);
    }

}
Step 6: Create an Interface and name it ApiInterface.java and paste the following code in it.
In this step we create an Interface in which we have registration post request method to send the data using api to our server.
package com.abhiandroid.retrofitexample;

import java.util.List;

import retrofit.Callback;
import retrofit.http.Field;
import retrofit.http.FormUrlEncoded;
import retrofit.http.POST;

public interface ApiInterface {

    @FormUrlEncoded // annotation used in POST type requests
    @POST("/retrofit/register.php")     // API's endpoints
    public void registration(@Field("name") String name,
                             @Field("email") String email,
                             @Field("password") String password,
                             @Field("logintype") String logintype,
                             Callback<SignUpResponse> callback);
// In registration method @Field used to set the keys and String data type is representing its a string type value and callback is used to get the response from api and it will set it in our POJO class
}
Step 7: Create a new Class Api.java and paste the following code in it.
In this step we create a new class to set the RestAdapter. In this class getClient method returns the Api Interface class object which we are using in our MainActivity.
package com.abhiandroid.retrofitexample;

import retrofit.RestAdapter;

public class Api {

    public static ApiInterface getClient() {

        // change your base URL
        RestAdapter adapter = new RestAdapter.Builder()
                .setEndpoint("http://mobileappdatabase.in/") //Set the Root URL
                .build(); //Finally building the adapter

        //Creating object for our interface
        ApiInterface api = adapter.create(ApiInterface.class);
        return api; // return the APIInterface object
    }
}
Step 8: Now open app -> java -> package -> MainActivity.java and add the below code.
In this step Firstly we are getting reference of EditText and Button.After that we implement setOnClickListener event on Button and on click of sign up Button the data in EditText is validate and then we are implementing signup api to save the data in our database. After getting response from api we are displaying the message on the screen by using a Toast.
package com.abhiandroid.retrofitexample;

import android.Manifest;
import android.app.ProgressDialog;
import android.support.v7.app.AppCompatActivity;
import android.os.Bundle;
import android.view.View;
import android.widget.Button;
import android.widget.EditText;
import android.widget.Toast;

import java.util.List;

import retrofit.Callback;
import retrofit.RetrofitError;
import retrofit.client.Response;

public class MainActivity extends AppCompatActivity {

    SignUpResponse signUpResponsesData;
    EditText email, password, name;
    Button signUp;

    @Override
    protected void onCreate(Bundle savedInstanceState) {
        super.onCreate(savedInstanceState);
        setContentView(R.layout.activity_main);
        // init the EditText and Button
        name = (EditText) findViewById(R.id.username);
        email = (EditText) findViewById(R.id.email);
        password = (EditText) findViewById(R.id.password);
        signUp = (Button) findViewById(R.id.signUp);
        // implement setOnClickListener event on sign up Button
        signUp.setOnClickListener(new View.OnClickListener() {
            @Override
            public void onClick(View view) {
                // validate the fields and call sign method to implement the api
                if (validate(name) && validate(email) && validate(password)) {
                    signUp();
                }
            }
        });
    }

    private boolean validate(EditText editText) {
        // check the lenght of the enter data in EditText and give error if its empty
        if (editText.getText().toString().trim().length() > 0) {
            return true; // returs true if field is not empty
        }
        editText.setError("Please Fill This");
        editText.requestFocus();
        return false;
    }

    private void signUp() {
        // display a progress dialog
        final ProgressDialog progressDialog = new ProgressDialog(MainActivity.this);
        progressDialog.setCancelable(false); // set cancelable to false
        progressDialog.setMessage("Please Wait"); // set message
        progressDialog.show(); // show progress dialog

        // Api is a class in which we define a method getClient() that returns the API Interface class object
        // registration is a POST request type method in which we are sending our field's data
        Api.getClient().registration(name.getText().toString().trim(),
                email.getText().toString().trim(),
                password.getText().toString().trim(),
                "email", new Callback<SignUpResponse>() {
                    @Override
                    public void success(SignUpResponse signUpResponse, Response response) {
                        // in this method we will get the response from API
                        progressDialog.dismiss(); //dismiss progress dialog
                        signUpResponsesData = signUpResponse;
                        // display the message getting from web api
                        Toast.makeText(MainActivity.this, signUpResponse.getMessage(), Toast.LENGTH_SHORT).show();
                    }

                    @Override
                    public void failure(RetrofitError error) {
                        // if error occurs in network transaction then we can get the error in this method.
                        Toast.makeText(MainActivity.this, error.toString(), Toast.LENGTH_LONG).show();
                        progressDialog.dismiss(); //dismiss progress dialog

                    }
                });
    }
}
Retrofit 1.9 Example For GET type Request In Android Studio:
Below is the example of Retrofit in which we have implement the GET type request. In this we are displaying a list of items by using RecyclerView. Firstly we declare a RecyclerView in our XML file and then get the reference of it in our Activity. After that we create POJO Class, API Interface, Rest Adapter and then implement the API in our onCreate method of MainActivity. After getting the success response from server we are calling our adapter to set the data in RecyclerView.
Below you can download code, see final output and step by step explanation of example:
Step 1: Create A New Project And Name It RetrofitExample.
Step 2: Open Gradle Scripts > build.gradle and add Retrofit and RecyclerView Library dependency in it.
apply plugin: 'com.android.application'

android {
    compileSdkVersion 26
    defaultConfig {
        applicationId "com.abhiandroid.retrofitexample"
        minSdkVersion 15
        targetSdkVersion 26
        versionCode 1
        versionName "1.0"
        testInstrumentationRunner "android.support.test.runner.AndroidJUnitRunner"
    }
    buildTypes {
        release {
            minifyEnabled false
            proguardFiles getDefaultProguardFile('proguard-android.txt'), 'proguard-rules.pro'
        }
    }
}

dependencies {
    implementation fileTree(dir: 'libs', include: ['*.jar'])
    implementation 'com.android.support:appcompat-v7:26.1.0'
    compile 'com.android.support:recyclerview-v7:24.1.1' // dependency for RecyclerView
    compile 'com.squareup.retrofit:retrofit:1.9.0' // dependency for Retrofit
}
Step 3: Add Internet Permission in the AndroidManifest.xml:
For network transactions we need to define Internet permission in our Manifest file.
<?xml version="1.0" encoding="utf-8"?>
<manifest xmlns:android="http://schemas.android.com/apk/res/android"
    package="com.abhiandroid.retrofitexample">

    <uses-permission android:name="android.permission.INTERNET" />
    <application
        android:allowBackup="true"
        android:icon="@mipmap/ic_launcher"
        android:label="@string/app_name"
        android:roundIcon="@mipmap/ic_launcher_round"
        android:supportsRtl="true"
        android:theme="@style/AppTheme">
        <activity android:name=".MainActivity">
            <intent-filter>
                <action android:name="android.intent.action.MAIN" />

                <category android:name="android.intent.category.LAUNCHER" />
            </intent-filter>
        </activity>
    </application>

</manifest>
Step 4: Open res -> layout -> activity_main.xml (or) main.xml and add following code:
In this step we create a RecyclerView in our XML file.
<?xml version="1.0" encoding="utf-8"?>
<RelativeLayout xmlns:android="http://schemas.android.com/apk/res/android"
    xmlns:tools="http://schemas.android.com/tools"
    android:layout_width="match_parent"
    android:layout_height="match_parent">

    <android.support.v7.widget.RecyclerView
        android:id="@+id/recyclerView"
        android:layout_width="match_parent"
        android:layout_height="match_parent" />
</RelativeLayout>
Step 5: Create a new XML file user_list_items.xml for item of RecyclerView and paste the following code in it.
In this step we create a new xml file for item row in which we creates two TextView to show the data.
<?xml version="1.0" encoding="utf-8"?>

<LinearLayout android:layout_width="match_parent"
    android:layout_height="wrap_content"
    android:padding="6dp"
    android:gravity="center_vertical"
    android:background="#f2f2f2"
    android:orientation="vertical"
    xmlns:android="http://schemas.android.com/apk/res/android">
        <!--
        create Textview's for user name and email id
        -->
        <TextView
            android:id="@+id/name"
            android:layout_width="match_parent"
            android:layout_height="wrap_content"
            android:text="Name:"
            android:textColor="@color/colorPrimary"
            android:textSize="17sp" />


        <TextView
            android:id="@+id/email"
            android:layout_width="match_parent"
            android:layout_height="wrap_content"
            android:text="Email:"
            android:textColor="@color/colorPrimary"
            android:textSize="16sp" />
    <View
        android:layout_width="match_parent"
        android:layout_height="1dp"
        android:layout_marginTop="2dp"
        android:layout_marginBottom="2dp"
        android:background="@color/colorPrimary"/>
    </LinearLayout>
Step 6: Create a new POJO class UserListResponse.java in which we have setter/getter method to get the data from API.
package com.abhiandroid.retrofitexample;

import java.util.HashMap;
import java.util.Map;

public class UserListResponse {

    // POJO class to get the data from web api
private String id;
private String name;
private String email;
private String password;
private String com_code;
private String status;
private String forgot;
private Map<String, Object> additionalProperties = new HashMap<String, Object>();

public String getId() {
return id;
}

public void setId(String id) {
this.id = id;
}

public String getName() {
return name;
}

public void setName(String name) {
this.name = name;
}

public String getEmail() {
return email;
}

public void setEmail(String email) {
this.email = email;
}

public String getPassword() {
return password;
}

public void setPassword(String password) {
this.password = password;
}

public String getCom_code() {
return com_code;
}

public void setCom_code(String com_code) {
this.com_code = com_code;
}

public String getStatus() {
return status;
}

public void setStatus(String status) {
this.status = status;
}

public String getForgot() {
return forgot;
}

public void setForgot(String forgot) {
this.forgot = forgot;
}

public Map<String, Object> getAdditionalProperties() {
return this.additionalProperties;
}

public void setAdditionalProperty(String name, Object value) {
this.additionalProperties.put(name, value);
}

}
Step 7: Create an Interface and name it ApiInterface.java and paste the following code in it.
In this step we create an Interface in which we have getUserList method to get the data from web api.
package com.abhiandroid.retrofitexample;

import java.util.List;

import retrofit.Callback;
import retrofit.http.GET;

public interface ApiInterface {

    // API's endpoints
    @GET("/retrofit/getuser.php")
    public void getUsersList(
            Callback<List<UserListResponse>> callback);

// UserListResponse is POJO class to get the data from API, In above method we use List<UserListResponse> because the data in our API is starting from JSONArray and callback is used to get the response from api and it will set it in our POJO class

}
Step 8: Create a new Class Api.java and paste the following code in it.
In this step we create a new class to set the RestAdapter. In this class getClient method returns the Api Interface class object which we are using in our MainActivity.
package com.abhiandroid.retrofitexample;

import retrofit.RestAdapter;

public class Api {

    public static ApiInterface getClient() {

        // change your base URL
        RestAdapter adapter = new RestAdapter.Builder()
                .setEndpoint("http://mobileappdatabase.in/") //Set the Root URL
                .build(); //Finally building the adapter

        //Creating object for our interface
        ApiInterface api = adapter.create(ApiInterface.class);
        return api; // return the APIInterface object
    }
}
Step 9: Now open app -> java -> package -> MainActivity.java and add the below code.
In this step Firstly we get the reference of RecyclerView in our Activity. After that we implement the API in our onCreate method. Finally After getting the success response from server we are calling our adapter to set the data in RecyclerView. In this step we show a Progress dialog while implementing API and after getting response or error we dismiss it.
package com.abhiandroid.retrofitexample;

import android.Manifest;
import android.app.ProgressDialog;
import android.support.v7.app.AppCompatActivity;
import android.os.Bundle;
import android.support.v7.widget.LinearLayoutManager;
import android.support.v7.widget.RecyclerView;
import android.widget.Toast;

import java.util.List;

import retrofit.Callback;
import retrofit.RetrofitError;
import retrofit.client.Response;

public class MainActivity extends AppCompatActivity {

    RecyclerView recyclerView;
    List<UserListResponse> userListResponseData;

    @Override
    protected void onCreate(Bundle savedInstanceState) {
        super.onCreate(savedInstanceState);
        setContentView(R.layout.activity_main);
        recyclerView = (RecyclerView) findViewById(R.id.recyclerView);
        getUserListData(); // call a method in which we have implement our GET type web API
    }

    private void getUserListData() {
        // display a progress dialog
        final ProgressDialog progressDialog = new ProgressDialog(MainActivity.this);
        progressDialog.setCancelable(false); // set cancelable to false
        progressDialog.setMessage("Please Wait"); // set message
        progressDialog.show(); // show progress dialog

        // Api is a class in which we define a method getClient() that returns the API Interface class object
        // getUsersList() is a method in API Interface class, in this method we define our API sub url
        Api.getClient().getUsersList(new Callback<List<UserListResponse>>() {
            @Override
            public void success(List<UserListResponse> userListResponses, Response response) {
                // in this method we will get the response from API
                progressDialog.dismiss(); //dismiss progress dialog
                userListResponseData = userListResponses;
                setDataInRecyclerView(); // call this method to set the data in adapter
            }

            @Override
            public void failure(RetrofitError error) {
                // if error occurs in network transaction then we can get the error in this method.
                Toast.makeText(MainActivity.this, error.toString(), Toast.LENGTH_LONG).show();
                progressDialog.dismiss(); //dismiss progress dialog

            }
        });
    }

    private void setDataInRecyclerView() {
        // set a LinearLayoutManager with default vertical orientation
        LinearLayoutManager linearLayoutManager = new LinearLayoutManager(MainActivity.this);
        recyclerView.setLayoutManager(linearLayoutManager);
        // call the constructor of UsersAdapter to send the reference and data to Adapter
        UsersAdapter usersAdapter = new UsersAdapter(MainActivity.this, userListResponseData);
        recyclerView.setAdapter(usersAdapter); // set the Adapter to RecyclerView
    }
}
Step 10: Create a new class UsersAdapter.java inside package and add the following code.
In this step we create a UsersAdapter class and extends RecyclerView.Adapter class with View Holder in it. After that we implement the overrided methods and create a constructor for getting the data from Activity. In this custom Adapter two methods are more important first is onCreateViewHolder in which we inflate the layout item xml and pass it to View Holder and other is onBindViewHolder in which we set the data in the view’s with the help of View Holder. Finally we implement the setOnClickListener event on itemview and on click of item we display the name of the user with the help of Toast.
package com.abhiandroid.retrofitexample;

import android.content.Context;
import android.support.v7.widget.RecyclerView;
import android.view.LayoutInflater;
import android.view.View;
import android.view.ViewGroup;
import android.widget.TextView;
import android.widget.Toast;

import java.util.List;


public class UsersAdapter extends RecyclerView.Adapter<UsersAdapter.UsersViewHolder> {

    Context context;
    List<UserListResponse> userListResponseData;

    public UsersAdapter(Context context, List<UserListResponse> userListResponseData) {
        this.userListResponseData = userListResponseData;
        this.context = context;
    }

    @Override
    public UsersViewHolder onCreateViewHolder(ViewGroup parent, int viewType) {

        View view = LayoutInflater.from(context).inflate(R.layout.users_list_items, null);
        UsersViewHolder usersViewHolder = new UsersViewHolder(view);
        return usersViewHolder;
    }

    @Override
    public void onBindViewHolder(UsersViewHolder holder, final int position) {
        // set the data
        holder.name.setText("Name: " + userListResponseData.get(position).getName());
        holder.email.setText("Email: " + userListResponseData.get(position).getEmail());
        // implement setONCLickListtener on itemView
        holder.itemView.setOnClickListener(new View.OnClickListener() {
            @Override
            public void onClick(View view) {
                // display a toast with user name
                Toast.makeText(context, userListResponseData.get(position).getName(), Toast.LENGTH_SHORT).show();
            }
        });
    }

    @Override
    public int getItemCount() {
        return userListResponseData.size(); // size of the list items
    }

    class UsersViewHolder extends RecyclerView.ViewHolder {
        // init the item view's
        TextView name, email;

        public UsersViewHolder(View itemView) {
            super(itemView);
            // get the reference of item view's
            name = (TextView) itemView.findViewById(R.id.name);
            email = (TextView) itemView.findViewById(R.id.email);
        }
    }
}
Difference between Retrofit 1.9 and 2.x in android:
1. Gradle Dependencies – In retrofit 1.9 version we need to import the HTTP client but in 2.x OKHHttp dependency is already defined.
2. RestAdapter and Retrofit – In retrofit 1.9 we use RestAdapter but in 2.x we use Retrofit. The builder pattern using these two is still same.
Retrofit 1.9
RestAdapter.Builder builder = new RestAdapter.Builder();
Retrofit 2.x
Retrofit.Builder builder = new Retrofit.Builder();
3. setEndpoint and baseUrl method – In Retrofit 1.9, the setEndpoint(String url) method defines the API’s base url but in 2.x baseUrl(API_BASE_URL) is used to set the base url.
4. Dynamic Urls – One of the best feature in retrofit 2.x is dynamic urls. Lets take a use-case, we need to download file from internet source and files will have different urls. The files are either stored on Amazon;s S3 server or somewhere else on the web. So the main problem in 1.9 is we need to create RestAdapter with base url every time we wanted to load a file but in 2.x we can use dynamic urls, for implementing it we can leave the HTTP verb annotation empty and use the @url annotation as a parameter of method. Retrofit will automatically map the provided url string and do the job for us.
 @GET
    public Call<File> getZipFile(@Url String url);
5. Synchronous & Asynchronous Requests – In 1.9 synchronous methods required return type. In contrast asynchronous method required a generic callback as the last method parameter. In 2.x there is no differentiation for synchronous and asynchronous requests. Requests are now wrapped into generic call class using the desired response type.
6. Cancel Requests – In 1.9 version there was no way to cancel the requests even if they weren’t executed yet but in 2.x we can cancel requests if Http scheduler didn’t executed it already.
7. Default Converter – In previous version GSON is default integrated for JSON converter but in 2.x we don’t have any default converter for JSON. We need to define GSON converter dependency in our project. We can use the following gradle import to define the sibling module:
compile 'com.squareup.retrofit2:converter-gson:2.1.0’
Steps to Integrate Retrofit 2.x in our Android Studio Project
Here are the main steps to integrate Retrofit in our project.
1. Add dependencies file in gradle: Firstly add these libraries in your build.gradle file in app module.
// Retrofit
compile 'com.squareup.retrofit2:retrofit:2.1.0'
 // JSON Parsing
compile 'com.google.code.gson:gson:2.6.1'
compile 'com.squareup.retrofit2:converter-gson:2.1.0'
2. Add Internet Permission in the AndroidManifest.xml: For network transactions we need to define Internet permission in our Manifest file.
<manifest xmlns:android="http://schemas.android.com/apk/res/android"
package="com.abhiandroid.retroiftexample">

<uses-permission android:name="android.permission.INTERNET" />

<application>
3. POJO/Model Class: For fetching response we need create POJO class that automatically parse the JSON data using Gson in background. We just need to create this POJO class. For creating POJO class first method is defining each and every variable by ourself and other best and fast method is using http://www.jsonschema2pojo.org/ platform. By using this platform you can easily convert your JSON response to POJO class, for this we need to copy our JSON response and paste it in jsonschema2pojo and it will create setter getter methods as per our requirement.
Sample POJO class:
public class SamplePojo {

    private int userId;
    private String name;

    public int getUserId() {
        return userId;
    }

    public String getName() {
        return name;
    }
}
4. Add downloaded POJO class in your project.
5. API Interface : Now we need to create an Interface to define our different methods that will be used for network transactions. Here is the sample of API Interface.
 public interface ApiInterface {


// For POST request

   @FormUrlEncoded // annotation used in POST type requests
    @POST("/retrofit/register.php")     // API's endpoints
    Call<SignUpResponse> registration(@Field("name") String name,
                                      @Field("email") String email);//user_email and user_pass are the post parameters and SignUpResponse is a POJO class which receives the response of this API


// for GET request

    @GET("/retrofit/getuser.php")
        // API's endpoints
    Call<List<UserListResponse>> getUsersList();

// UserListResponse is POJO class to get the data from API, we use List<UserListResponse> in callback because the data in our API is starting from JSONArray

}
6. Creating the Retrofit Instance: For network requests with Retrofit we need to create instance using retrofit builder class and then configure it with base URL. Suppose we have to implement login API then we need to build retrofit instance, setting base url and create connection between our retrofit instance and API Interface. For this, its better to create a class in which we have a method that create the connection and then returns the API Interface object. You can create this Retrofit instance where you want to implement API but its better to create a common class/method and use it where you want.
 public class Api {
    private static Retrofit retrofit = null;
    public static ApiInterface getClient() {

        // change your base URL
        if (retrofit==null) {
            retrofit = new Retrofit.Builder()
                    .baseUrl(BASE_URL)
                    .addConverterFactory(GsonConverterFactory.create())
                    .build();
        }
        //Creating object for our interface
        ApiInterface api = retrofit.create(ApiInterface.class);
        return api; // return the APIInterface object
    }

}
Example Of Retrofit 2.x (Post Type) In Android Studio:
Below is the example of Retrofit 2.x in which we have implement the POST type request. In this we are implementing sign up api. In this example firstly we create sign up page design with 3 EditText name, email and password and one sign up Button. After that in our MainActivity we are getting our EditText and Button and on click of sign up Button the data in EditText is validate and then we are implementing signup api to save the data in our database. After getting response from api we are displaying the message on the screen by using a Toast.
Below you can download code, see final output and step by step explanation of example:
Step 1: Create A New Project And Name It RetrofitExample.
Step 2: Open Gradle Scripts > build.gradle and add Retrofit and RecyclerView Library dependency in it.
 apply plugin: 'com.android.application'

android {
    compileSdkVersion 26
    defaultConfig {
        applicationId "com.abhiandroid.retrofitexample"
        minSdkVersion 15
        targetSdkVersion 26
        versionCode 1
        versionName "1.0"
        testInstrumentationRunner "android.support.test.runner.AndroidJUnitRunner"
    }
    buildTypes {
        release {
            minifyEnabled false
            proguardFiles getDefaultProguardFile('proguard-android.txt'), 'proguard-rules.pro'
        }
    }
}

dependencies {
    implementation fileTree(include: ['*.jar'], dir: 'libs')
    implementation 'com.android.support:appcompat-v7:26.1.0'
    // dependency for Retrofit
    compile 'com.squareup.retrofit2:retrofit:2.1.0'
    // JSON Parsing
    compile 'com.google.code.gson:gson:2.6.1'
    compile 'com.squareup.retrofit2:converter-gson:2.1.0'
}
Step 3: Add Internet Permission in the AndroidManifest.xml:
For network transactions we need to define Internet permission in our Manifest file.
 <?xml version="1.0" encoding="utf-8"?>
<manifest xmlns:android="http://schemas.android.com/apk/res/android"
    package="com.abhiandroid.retrofitexample">

    <uses-permission android:name="android.permission.INTERNET" />
    <application
        android:allowBackup="true"
        android:icon="@mipmap/ic_launcher"
        android:label="@string/app_name"
        android:roundIcon="@mipmap/ic_launcher_round"
        android:supportsRtl="true"
        android:theme="@style/AppTheme">
        <activity android:name=".MainActivity">
            <intent-filter>
                <action android:name="android.intent.action.MAIN" />

                <category android:name="android.intent.category.LAUNCHER" />
            </intent-filter>
        </activity>
    </application>

</manifest>
Step 4: Open res -> layout -> activity_main.xml (or) main.xml and add following code:
In this step we create a RecyclerView in our XML file.
 <?xml version="1.0" encoding="utf-8"?>
<RelativeLayout xmlns:android="http://schemas.android.com/apk/res/android"
    android:layout_width="match_parent"
    android:layout_height="match_parent">


    <ScrollView
        android:layout_width="match_parent"
        android:layout_height="match_parent"
        android:scrollbars="none">


        <LinearLayout
            android:layout_width="match_parent"
            android:layout_height="wrap_content"
            android:layout_gravity="center"
            android:orientation="vertical"
            android:padding="20dp">


            <EditText
                android:id="@+id/username"
                android:layout_width="match_parent"
                android:layout_height="wrap_content"
                android:backgroundTint="#000"
                android:hint="Full Name"
                android:imeOptions="actionNext"
                android:inputType="text"
                android:paddingBottom="15dp"
                android:paddingLeft="5dp"
                android:singleLine="true"
                android:textColor="#000"
                android:textColorHint="#000" />


            <EditText
                android:id="@+id/email"
                android:layout_width="match_parent"
                android:layout_height="wrap_content"
                android:backgroundTint="#000"
                android:hint="Email Address"
                android:imeOptions="actionNext"
                android:inputType="textEmailAddress"
                android:paddingBottom="15dp"
                android:paddingLeft="5dp"
                android:singleLine="true"
                android:textColor="#000"
                android:textColorHint="#000" />


            <EditText
                android:id="@+id/password"
                android:layout_width="match_parent"
                android:layout_height="wrap_content"
                android:backgroundTint="#000"
                android:hint="Password"
                android:imeOptions="actionDone"
                android:inputType="textPassword"
                android:paddingBottom="15dp"
                android:paddingLeft="5dp"
                android:singleLine="true"
                android:textColor="#000"
                android:textColorHint="#000" />


            <Button
                android:id="@+id/signUp"
                android:layout_width="match_parent"
                android:layout_height="wrap_content"
                android:layout_marginTop="10dp"
                android:backgroundTint="@color/colorPrimary"
                android:text="Sign Up"
                android:textColor="#fff"
                android:textSize="17sp" />

        </LinearLayout>
    </ScrollView>
</RelativeLayout>
Step 5: Create a new POJO class SignUpResponse.java in which we have setter/getter method to get the data from API.
 package com.abhiandroid.retrofitexample;

public class SignUpResponse {

    private String success;

    private String message;
    private Integer userid;

    public String getSuccess() {
        return success;
    }

    public void setSuccess(String success) {
        this.success = success;
    }

    public String getMessage() {
        return message;
    }

    public void setMessage(String message) {
        this.message = message;
    }

    public Integer getUserid() {
        return userid;
    }

    public void setUserid(Integer userid) {
        this.userid = userid;
    }

}
Step 6: Create an Interface and name it ApiInterface.java and paste the following code in it.
In this step we create an Interface in which we have registration post request method to send the data using api to our server.
 package com.abhiandroid.retrofitexample;


import retrofit2.Call;
import retrofit2.http.Field;
import retrofit2.http.FormUrlEncoded;
import retrofit2.http.POST;

public interface ApiInterface {

    @FormUrlEncoded // annotation used in POST type requests
    @POST("/retrofit/register.php")
        // API's endpoints
    Call<SignUpResponse> registration(@Field("name") String name,
                                      @Field("email") String email,
                                      @Field("password") String password,
                                      @Field("logintype") String logintype);

    // In registration method @Field used to set the keys and String data type is representing its a string type value and callback is used to get the response from api and it will set it in our POJO class
}
Step 7: Create a new Class Api.java and paste the following code in it.
In this step we create a new class to set the Retrofit. In this class getClient method returns the Api Interface class object which we are using in our MainActivity.
 package com.abhiandroid.retrofitexample;

import retrofit2.Retrofit;
import retrofit2.converter.gson.GsonConverterFactory;


public class Api {
    private static Retrofit retrofit = null;
    public static ApiInterface getClient() {

        // change your base URL
        if (retrofit==null) {
            retrofit = new Retrofit.Builder()
                    .baseUrl("http://mobileappdatabase.in/")
                    .addConverterFactory(GsonConverterFactory.create())
                    .build();
        }
        //Creating object for our interface
        ApiInterface api = retrofit.create(ApiInterface.class);
        return api; // return the APIInterface object
    }

}
Step 8: Now open app -> java -> package -> MainActivity.java and add the below code.
In this step Firstly we are getting reference of EditText and Button.After that we implement setOnClickListener event on Button and on click of sign up Button the data in EditText is validate and then we are implementing signup api to save the data in our database. After getting response from api we are displaying the message on the screen by using a Toast.
 package com.abhiandroid.retrofitexample;

import android.Manifest;
import android.app.ProgressDialog;
import android.support.v7.app.AppCompatActivity;
import android.os.Bundle;
import android.text.TextUtils;
import android.util.Log;
import android.view.View;
import android.widget.Button;
import android.widget.EditText;
import android.widget.Toast;


import retrofit2.Call;
import retrofit2.Callback;
import retrofit2.Response;

public class MainActivity extends AppCompatActivity {

    SignUpResponse signUpResponsesData;
    EditText emailId, password, name;
    Button signUp;

    @Override
    protected void onCreate(Bundle savedInstanceState) {
        super.onCreate(savedInstanceState);
        setContentView(R.layout.activity_main);
        // init the EditText and Button
        name = (EditText) findViewById(R.id.username);
        emailId = (EditText) findViewById(R.id.email);
        password = (EditText) findViewById(R.id.password);
        signUp = (Button) findViewById(R.id.signUp);
        // implement setOnClickListener event on sign up Button
        signUp.setOnClickListener(new View.OnClickListener() {
            @Override
            public void onClick(View view) {
                // validate the fields and call sign method to implement the api
                if (validate(name) && validateEmail() && validate(password)) {
                    signUp();
                }
            }
        });
    }

    private boolean validateEmail() {
        String email = emailId.getText().toString().trim();

        if (email.isEmpty() || !isValidEmail(email)) {
            emailId.setError("Email is not valid.");
            emailId.requestFocus();
            return false;
        }

        return true;
    }

    private static boolean isValidEmail(String email) {
        return !TextUtils.isEmpty(email) && android.util.Patterns.EMAIL_ADDRESS.matcher(email).matches();
    }

    private boolean validate(EditText editText) {
        // check the lenght of the enter data in EditText and give error if its empty
        if (editText.getText().toString().trim().length() > 0) {
            return true; // returns true if field is not empty
        }
        editText.setError("Please Fill This");
        editText.requestFocus();
        return false;
    }

    private void signUp() {
        // display a progress dialog
        final ProgressDialog progressDialog = new ProgressDialog(MainActivity.this);
        progressDialog.setCancelable(false); // set cancelable to false
        progressDialog.setMessage("Please Wait"); // set message
        progressDialog.show(); // show progress dialog

        // Api is a class in which we define a method getClient() that returns the API Interface class object
        // registration is a POST request type method in which we are sending our field's data
        // enqueue is used for callback response and error
        (Api.getClient().registration(name.getText().toString().trim(),
                emailId.getText().toString().trim(),
                password.getText().toString().trim(),
                "email")).enqueue(new Callback<SignUpResponse>() {
            @Override
            public void onResponse(Call<SignUpResponse> call, Response<SignUpResponse> response) {
                signUpResponsesData = response.body();
                Toast.makeText(getApplicationContext(), response.body().getMessage(), Toast.LENGTH_SHORT).show();
                progressDialog.dismiss();

            }

            @Override
            public void onFailure(Call<SignUpResponse> call, Throwable t) {
                Log.d("response", t.getStackTrace().toString());
                progressDialog.dismiss();

            }
        });
    }


}
Example Of Retrofit 2.x (GET Type) In Android Studio:
Below is the example of Retrofit 2.x in which we have implement the GET type request. In this we are displaying a list of items by using RecyclerView. Firstly we declare a RecyclerView in our XML file and then get the reference of it in our Activity. After that we create POJO Class, API Interface, Retrofit builder and then implement the API in our onCreate method of MainActivity. After getting the success response from server we are calling our adapter to set the data in RecyclerView.
Step 1: Create A New Project And Name It RetrofitExample.
Step 2: Open Gradle Scripts > build.gradle and add Retrofit and RecyclerView Library dependency in it.
 apply plugin: 'com.android.application'

android {
    compileSdkVersion 26
    defaultConfig {
        applicationId "com.abhiandroid.retrofitexample"
        minSdkVersion 15
        targetSdkVersion 26
        versionCode 1
        versionName "1.0"
        testInstrumentationRunner "android.support.test.runner.AndroidJUnitRunner"
    }
    buildTypes {
        release {
            minifyEnabled false
            proguardFiles getDefaultProguardFile('proguard-android.txt'), 'proguard-rules.pro'
        }
    }
}

dependencies {
    implementation fileTree(include: ['*.jar'], dir: 'libs')
    implementation 'com.android.support:appcompat-v7:26.1.0'
    // dependency for Retrofit
    compile 'com.squareup.retrofit2:retrofit:2.1.0'
    // JSON Parsing
    compile 'com.google.code.gson:gson:2.6.1'
    compile 'com.squareup.retrofit2:converter-gson:2.1.0'
    // dependency for RecyclerView
    compile 'com.android.support:recyclerview-v7:24.1.1'
}
Step 3: Add Internet Permission in the AndroidManifest.xml:
For network transactions we need to define Internet permission in our Manifest file.
 <?xml version="1.0" encoding="utf-8"?>
<manifest xmlns:android="http://schemas.android.com/apk/res/android"
    package="com.abhiandroid.retrofitexample">

    <uses-permission android:name="android.permission.INTERNET" />
    <application
        android:allowBackup="true"
        android:icon="@mipmap/ic_launcher"
        android:label="@string/app_name"
        android:roundIcon="@mipmap/ic_launcher_round"
        android:supportsRtl="true"
        android:theme="@style/AppTheme">
        <activity android:name=".MainActivity">
            <intent-filter>
                <action android:name="android.intent.action.MAIN" />

                <category android:name="android.intent.category.LAUNCHER" />
            </intent-filter>
        </activity>
    </application>

</manifest>
Step 4: Open res -> layout -> activity_main.xml (or) main.xml and add following code:
In this step we create a RecyclerView in our XML file.
 <?xml version="1.0" encoding="utf-8"?>
<RelativeLayout xmlns:android="http://schemas.android.com/apk/res/android"
    xmlns:tools="http://schemas.android.com/tools"
    android:layout_width="match_parent"
    android:layout_height="match_parent">

    <android.support.v7.widget.RecyclerView
        android:id="@+id/recyclerView"
        android:layout_width="match_parent"
        android:layout_height="match_parent" />
</RelativeLayout>
Step 5: Create a new XML file user_list_items.xml for item of RecyclerView and paste the following code in it.
In this step we create a new xml file for item row in which we creates two TextView to show the data.
 <?xml version="1.0" encoding="utf-8"?>

<LinearLayout android:layout_width="match_parent"
    android:layout_height="wrap_content"
    android:padding="6dp"
    android:gravity="center_vertical"
    android:background="#f2f2f2"
    android:orientation="vertical"
    xmlns:android="http://schemas.android.com/apk/res/android">
        <!--
        create Textview's for user name and email id
        -->
        <TextView
            android:id="@+id/name"
            android:layout_width="match_parent"
            android:layout_height="wrap_content"
            android:text="Name:"
            android:textColor="@color/colorPrimary"
            android:textSize="17sp" />


        <TextView
            android:id="@+id/email"
            android:layout_width="match_parent"
            android:layout_height="wrap_content"
            android:text="Email:"
            android:textColor="@color/colorPrimary"
            android:textSize="16sp" />
    <View
        android:layout_width="match_parent"
        android:layout_height="1dp"
        android:layout_marginTop="2dp"
        android:layout_marginBottom="2dp"
        android:background="@color/colorPrimary"/>
    </LinearLayout>
Step 6: Create a new POJO class UserListResponse.java in which we have setter/getter method to get the data from API.
 package com.abhiandroid.retrofitexample;

import java.util.HashMap;
import java.util.Map;

public class UserListResponse {

    // POJO class to get the data from web api
private String id;
private String name;
private String email;
private String password;
private String com_code;
private String status;
private String forgot;
private Map<String, Object> additionalProperties = new HashMap<String, Object>();

public String getId() {
return id;
}

public void setId(String id) {
this.id = id;
}

public String getName() {
return name;
}

public void setName(String name) {
this.name = name;
}

public String getEmail() {
return email;
}

public void setEmail(String email) {
this.email = email;
}

public String getPassword() {
return password;
}

public void setPassword(String password) {
this.password = password;
}

public String getCom_code() {
return com_code;
}

public void setCom_code(String com_code) {
this.com_code = com_code;
}

public String getStatus() {
return status;
}

public void setStatus(String status) {
this.status = status;
}

public String getForgot() {
return forgot;
}

public void setForgot(String forgot) {
this.forgot = forgot;
}

public Map<String, Object> getAdditionalProperties() {
return this.additionalProperties;
}

public void setAdditionalProperty(String name, Object value) {
this.additionalProperties.put(name, value);
}

}
Step 7: Create an Interface and name it ApiInterface.java and paste the following code in it.
In this step we create an Interface in which we have getUserList method to get the data from web api.
 package com.abhiandroid.retrofitexample;


import java.util.List;

import retrofit2.Call;
import retrofit2.http.GET;

public interface ApiInterface {

    @GET("/retrofit/getuser.php")
        // API's endpoints
    Call<List<UserListResponse>> getUsersList();

// UserListResponse is POJO class to get the data from API, we use List<UserListResponse> in callback because the data in our API is starting from JSONArray
}
Step 8: Create a new Class Api.java and paste the following code in it.
In this step we create a new class to set the Retrofit builder. In this class getClient method returns the Api Interface class object which we are using in our MainActivity.
 package com.abhiandroid.retrofitexample;

import retrofit2.Retrofit;
import retrofit2.converter.gson.GsonConverterFactory;

/**
 * Created by AbhiAndroid
 */
public class Api {
    private static Retrofit retrofit = null;
    public static ApiInterface getClient() {

        // change your base URL
        if (retrofit==null) {
            retrofit = new Retrofit.Builder()
                    .baseUrl("http://mobileappdatabase.in/")
                    .addConverterFactory(GsonConverterFactory.create())
                    .build();
        }
        //Creating object for our interface
        ApiInterface api = retrofit.create(ApiInterface.class);
        return api; // return the APIInterface object
    }

}
Step 9: Now open app -> java -> package -> MainActivity.java and add the below code.
In this step Firstly we get the reference of RecyclerView in our Activity. After that we implement the API in our onCreate method. Finally After getting the success response from server we are calling our adapter to set the data in RecyclerView. In this step we show a Progress dialog while implementing API and after getting response or error we dismiss it.
 package com.abhiandroid.retrofitexample;

import android.app.ProgressDialog;
import android.support.v7.app.AppCompatActivity;
import android.os.Bundle;
import android.support.v7.widget.LinearLayoutManager;
import android.support.v7.widget.RecyclerView;
import android.util.Log;
import android.widget.Toast;

import java.util.List;

import retrofit2.Call;
import retrofit2.Callback;
import retrofit2.Response;

public class MainActivity extends AppCompatActivity {
    RecyclerView recyclerView;
    List<UserListResponse> userListResponseData;

    @Override
    protected void onCreate(Bundle savedInstanceState) {
        super.onCreate(savedInstanceState);
        setContentView(R.layout.activity_main);
        recyclerView = (RecyclerView) findViewById(R.id.recyclerView);
        getUserListData(); // call a method in which we have implement our GET type web API
    }

    private void getUserListData() {
        // display a progress dialog
        final ProgressDialog progressDialog = new ProgressDialog(MainActivity.this);
        progressDialog.setCancelable(false); // set cancelable to false
        progressDialog.setMessage("Please Wait"); // set message
        progressDialog.show(); // show progress dialog


        (Api.getClient().getUsersList()).enqueue(new Callback<List<UserListResponse>>() {
            @Override
            public void onResponse(Call<List<UserListResponse>> call, Response<List<UserListResponse>> response) {
                Log.d("responseGET", response.body().get(0).getName());
                progressDialog.dismiss(); //dismiss progress dialog
                userListResponseData = response.body();
                setDataInRecyclerView();
            }

            @Override
            public void onFailure(Call<List<UserListResponse>> call, Throwable t) {
                // if error occurs in network transaction then we can get the error in this method.
                Toast.makeText(MainActivity.this, t.toString(), Toast.LENGTH_LONG).show();
                progressDialog.dismiss(); //dismiss progress dialog
            }
        });
    }

    private void setDataInRecyclerView() {
        // set a LinearLayoutManager with default vertical orientation
        LinearLayoutManager linearLayoutManager = new LinearLayoutManager(MainActivity.this);
        recyclerView.setLayoutManager(linearLayoutManager);
        // call the constructor of UsersAdapter to send the reference and data to Adapter
        UsersAdapter usersAdapter = new UsersAdapter(MainActivity.this, userListResponseData);
        recyclerView.setAdapter(usersAdapter); // set the Adapter to RecyclerView
    }
}
Step 10: Create a new class UsersAdapter.java inside package and add the following code.
In this step we create a UsersAdapter class and extends RecyclerView.Adapter class with View Holder in it. After that we implement the overrided methods and create a constructor for getting the data from Activity. In this custom Adapter two methods are more important first is onCreateViewHolder in which we inflate the layout item xml and pass it to View Holder and other is onBindViewHolder in which we set the data in the view’s with the help of View Holder. Finally we implement the setOnClickListener event on itemview and on click of item we display the name of the user with the help of Toast.
 package com.abhiandroid.retrofitexample;

import android.content.Context;
import android.support.v7.widget.RecyclerView;
import android.view.LayoutInflater;
import android.view.View;
import android.view.ViewGroup;
import android.widget.TextView;
import android.widget.Toast;

import java.util.List;


public class UsersAdapter extends RecyclerView.Adapter<UsersAdapter.UsersViewHolder> {

    Context context;
    List<UserListResponse> userListResponseData;

    public UsersAdapter(Context context, List<UserListResponse> userListResponseData) {
        this.userListResponseData = userListResponseData;
        this.context = context;
    }

    @Override
    public UsersViewHolder onCreateViewHolder(ViewGroup parent, int viewType) {

        View view = LayoutInflater.from(context).inflate(R.layout.users_list_items, null);
        UsersViewHolder usersViewHolder = new UsersViewHolder(view);
        return usersViewHolder;
    }

    @Override
    public void onBindViewHolder(UsersViewHolder holder, final int position) {
        // set the data
        holder.name.setText("Name: " + userListResponseData.get(position).getName());
        holder.email.setText("Email: " + userListResponseData.get(position).getEmail());
        // implement setONCLickListtener on itemView
        holder.itemView.setOnClickListener(new View.OnClickListener() {
            @Override
            public void onClick(View view) {
                // display a toast with user name
                Toast.makeText(context, userListResponseData.get(position).getName(), Toast.LENGTH_SHORT).show();
            }
        });
    }

    @Override
    public int getItemCount() {
        return userListResponseData.size(); // size of the list items
    }

    class UsersViewHolder extends RecyclerView.ViewHolder {
        // init the item view's
        TextView name, email;

        public UsersViewHolder(View itemView) {
            super(itemView);
            // get the reference of item view's
            name = (TextView) itemView.findViewById(R.id.name);
            email = (TextView) itemView.findViewById(R.id.email);
        }
    }
}
20 thoughts on “Retrofit Tutorial With Example In Android Studio [Step by Step]”
Leave a Reply to Earbaj Cancel reply
Premium Project Source Code:
- Food Ordering Android App Project Source Code
- Ecommerce Store Android App Project Source Code
- Convert Website Into Android App Project Source Code
- Quiz Game Android App Project Source Code
- Radio Streaming Android App Source Code
- City Guide Android App Project Source Code
- QR Barcode Android App Project Source Code
Neatly explained. It is great help to learn concept of retrofit networking library as well as, well explained difference in between retrofit and other network library.
I want to suggest to add one more concept in that, How we can upload one or multiple images via multipart. Because it uses once in every project.
Keep writing technical blog, I am specially fan of our web site.
Thanks.
How to Write php code for show all record in Recycler view?
So Awesome, Good tutorial to understand and very helpful.
Thanks Abhi.
awesome man.. please keep it updated.. great job
nice and helpful tutorial for beginners
How to write PHP code for Get and Post Request
what is the php code for get & post request?
I am getting this error Use JsonReader.setLenient(true) to accept malformed JSON at line 1 column 1 path $
Can you please upload the serversite php code for the register.php file?
Thank You
how i can implement my api url in this tutorial? this is api key https://api.themoviedb.org/3/movie/550?api_key=06f10fc8741a672af455421c239a1ffc
how to use it in this tutorial
Its amazingly written step by step.
Thanks a lot for this tutorial
Registration response is coming null
how to connect android app and oracle db for a simple login page
Thanks this is awoseme tutorial.
Thank you so much bhai for this awesome tutorial… Gbu always….
Hi abhisek,
can you tell me how to write server file in php.
Thanks,
Basuki
Wow!! this tutorial is easy and comprehensible. Good work to you sir!! I wished i have met you before now.
Hello Abhi,
Thank you so much for sharing Retrofit tutorial.This is best guide for beginners also to learn Retrofit library.
Hello Abhi @geniusAndroid can u please provide the backend code means php code for the above example.Also,If u have time please teach how to write php code.
Hi, first comment 🙂
I’ve tried to use it, everyone says it’s the best one, but it looks kinda of verbose for me, so I’m still using VolleyPlus (not Volley) with full image caching, and I don’t need Gson because I’m using JsonSlurper with Groovy in @StaticCompile approach, I can easily cast any JSON object to POJO (just as: userJson as User) with third party libraries, have you tried it? and as suggestion can you add Kotlin code because looks like a lot of developers are using Kotlin for Android now (I know this is more work for you, but it keeps you up to date with Android developers), and last thing can you make the code in your blog nicer with Syntax highlighter?
Regards
it’s a good tutorial and helpful