Shared Preference Tutorial With Example In Android Studio
Shared Preference in Android are used to save data based on key-value pair. If we go deep into understanding of word: shared means to distribute data within and preference means something important or preferable, so SharedPreferences data is shared and preferred data.
Shared Preference can be used to save primitive data type: string, long, int, float and Boolean.
What Is Preference File?
Before we begin explaining shared preference, it is important to understand preference file.
A preference file is actually a xml file saved in internal memory of device. Every application have some data stored in memory in a directory data/data/application package name i.e data/data/com.abhiandroid.abhiapp so whenever getSharedPreferences(String name,int mode) function get called it validates the file that if it exists or it doesn’t then a new xml is created with passed name.
Table Of Contents
There are two different ways to save data in Android through Shared Preferences – One is using Activity based preferences and other is creating custom preferences.
Activity Preferences:
- For activity preferences developer have to call function getPreferences (int mode) available in Activity class
- Use only when one preference file is needed in Activity
- It doesn’t require name as it will be the only preference file for this activity
- Developer doesn’t usually prefer using this even if they need only one preference file in Activity. They prefer using custom getSharedPreferences(String name,int mode).
To use activity preferences developer have to call function getPreferences (int mode) available in Activity class. The function getPreferences(int mode) call the other function used to create custom preferences i.e getSharedPreferences(String name,int mode). Just because Activity contains only one preference file so getPreferences(int mode) function simply pass the name of Activity class to create a preference file.
Important Note: Mode are discussed in Custom preferences.
Custom Preferences:
- Developer needs to use getSharedPreferences(String name,int mode) for custom preferences
- Used in cases when more than one preference file required in Activity
- Name of the preference file is passed in first parameter
Custom Preferences can be created by calling function getSharedPreferences(String name,int mode), it can be called from anywhere in the application with reference of Context. Here name is any preferred name for example: User,Book etc. and mode is used to set kind of privacy for file.
To create activity based preferences or custom preferences developer have to pass mode to let the system know about privacy of preference file.
Before we begin a brief discussion on Context
Context is an abstract class used to get global information in Android Application resources like strings, values, drawables, assets etc. Here modes are declared and static final constant in Context class.
There are three types of Mode in Shared Preference:
- Context.MODE_PRIVATE – default value (Not accessible outside of your application)
- Context.MODE_WORLD_READABLE – readable to other apps
- Context.MODE_WORLD_WRITEABLE – read/write to other apps
MODE_PRIVATE – It is a default mode. MODE_PRIVATE means that when any preference file is created with private mode then it will not be accessible outside of your application. This is the most common mode which is used.
MODE_WORLD_READABLE – If developer creates a shared preference file using mode world readable then it can be read by anyone who knows it’s name, so any other outside application can easily read data of your app. This mode is very rarely used in App.
MODE_WORLD_WRITEABLE – It’s similar to mode world readable but with both kind of accesses i.e read and write. This mode is never used in App by Developer.
Important Google Recommend Naming Convention For Preference File:
Please make sure to follow recommendation by Google while giving preference file name. Google recommends to give name as application package name + preferred name.
For example: if your application package name is com.abhiandroid.abhiapp then preference could be com.abhiandroid.abhiapp.User where com.abhiandroid.abhiapp.User is the name of preference file.
As discussed above, to create shared preference developer needs to call getPreferences(int mode) or getSharedPreferences(String name,int mode) method. Both of the function return SharedPreferences object to deal with save and get values from preference file.
SharedPreferences is a singleton class means this class will only have a single object throughout the application lifecycle. However there can multiple preference files so all the preference files can be read and write using SharedPreferences class.
Step 1:
To save data in SharedPreferences developer need to called edit() function of SharedPreferences class which returns Editor class object.
Step 2:
Editor class provide different function to save primitive time data. For example, Editor have all primitive data function including String type data as putInt(String keyName,int value).
Common primitive function format is: put + Primitive Type name (String keyname, Primitive Type value)
Step 3:
Now make sure that key name should be unique for any values you save otherwise it will be overrided. To exactly save the values you put in different primitive functions you must call commit() function of Editor.
Step 1: To read data first developer have to get reference of SharedPreferences object by calling getPreferences (int mode) or getSharedPreferences (String name,int mode).
Step 2: Then developer can get values using SharedPreferences object by calling different primitive type function starting with get+Primitive Type name. Here every function has an additional parameter for every Primitive Type as default value in case there is no value found corresponding to passed key.
For example, to get saved int value just call getInt(“GameScore”,-1) function where “GameScore” is key and -1 is a default value in case no value was saved for GameScore.
Remove Data Or Clear All Data
Similar to save data there is a function remove(String key) in SharedPreferences.Editor to remove a particular key based data from preference file
To clear all data just call function clear() available in SharedPreferences.Editor. Make sure to call commit() method to save changes. So clear data will never delete the preference file but make it empty.
public static final String PREFS_GAME ="com.abhiandroid.abhiapp.GamePlay";
public static final String GAME_SCORE= "GameScore";

//======== Code to save data ===================

SharedPreferences sp = getSharedPreferences(PREFS_GAME ,Context.MODE_PRIVATE);
sp.edit().putInt(GAME_SCORE,100).commit();

//========= Code to get saved/ retrieve data ==============

SharedPreferences sp = getSharedPreferences(PREFS_GAME ,Context.MODE_PRIVATE);
int sc  = sp.getInt(GAME_SCORE,0);
Log.d("AbhiAndroid","achieved score  is "+ sc);
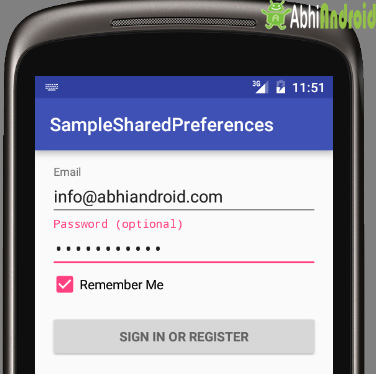
Let’s use Shared Preference for a very basic purpose of saving login details of a person i.e. email and password on his device. So he don’t have to re-enter his login details every time he opens the App.
Below is the final output we will create and use Shared Preference to save Signin Details:
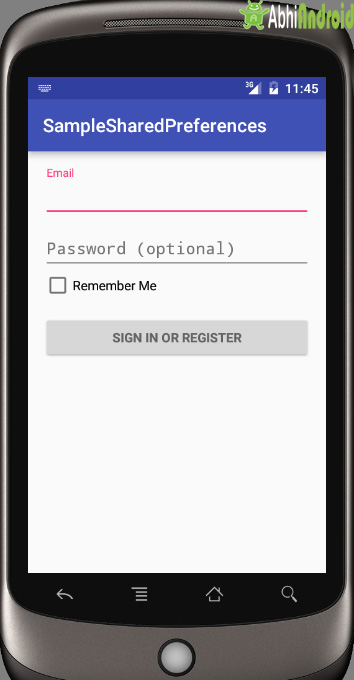
Below is the complete code login UI activity_login.xml
<LinearLayout xmlns:android="http://schemas.android.com/apk/res/android"
              xmlns:tools="http://schemas.android.com/tools"
              android:layout_width="match_parent"
              android:layout_height="match_parent"
              android:gravity="center_horizontal"
              android:orientation="vertical"
              android:paddingBottom="@dimen/activity_vertical_margin"
              android:paddingLeft="@dimen/activity_horizontal_margin"
              android:paddingRight="@dimen/activity_horizontal_margin"
              android:paddingTop="@dimen/activity_vertical_margin"
              tools:context="com.samplesharedpreferences.LoginActivity">

    <!-- Login progress -->
    <ProgressBar
        android:id="@+id/login_progress"
        style="?android:attr/progressBarStyleLarge"
        android:layout_width="wrap_content"
        android:layout_height="wrap_content"
        android:layout_marginBottom="8dp"
        android:visibility="gone"/>

    <ScrollView
        android:id="@+id/login_form"
        android:layout_width="match_parent"
        android:layout_height="match_parent">

        <LinearLayout
            android:id="@+id/email_login_form"
            android:layout_width="match_parent"
            android:layout_height="wrap_content"
            android:orientation="vertical">

            <android.support.design.widget.TextInputLayout
                android:layout_width="match_parent"
                android:layout_height="wrap_content">

                <EditText
                    android:id="@+id/email"
                    android:layout_width="match_parent"
                    android:layout_height="wrap_content"
                    android:hint="@string/prompt_email"
                    android:inputType="textEmailAddress"
                    android:maxLines="1"
                    android:singleLine="true"/>

            </android.support.design.widget.TextInputLayout>

            <android.support.design.widget.TextInputLayout
                android:layout_width="match_parent"
                android:layout_height="wrap_content">

                <EditText
                    android:id="@+id/password"
                    android:layout_width="match_parent"
                    android:layout_height="wrap_content"
                    android:hint="@string/prompt_password"
                    android:imeActionId="@+id/login"
                    android:imeActionLabel="@string/action_sign_in_short"
                    android:imeOptions="actionUnspecified"
                    android:inputType="textPassword"
                    android:maxLines="1"
                    android:singleLine="true"/>

            </android.support.design.widget.TextInputLayout>

            <CheckBox
                android:layout_width="match_parent"
                android:layout_height="wrap_content"
                android:text="Remember Me"
                android:id="@+id/checkBoxRememberMe"/>

            <Button
                android:id="@+id/email_sign_in_button"
                style="?android:textAppearanceSmall"
                android:layout_width="match_parent"
                android:layout_height="wrap_content"
                android:layout_marginTop="16dp"
                android:text="@string/action_sign_in"
                android:textStyle="bold"/>

        </LinearLayout>
    </ScrollView>
</LinearLayout>
Step 2: Now lets code the LoginActivity.java where we will create a Login form. Below is the complete code of LoginActivity.java with explanation included in comment.
package com.samplesharedpreferences;

import android.animation.Animator;
import android.animation.AnimatorListenerAdapter;
import android.annotation.TargetApi;
import android.content.Context;
import android.content.Intent;
import android.content.SharedPreferences;
import android.content.pm.PackageManager;
import android.support.annotation.NonNull;
import android.support.design.widget.Snackbar;
import android.support.v7.app.AppCompatActivity;
import android.app.LoaderManager.LoaderCallbacks;
import android.content.ContentResolver;
import android.content.CursorLoader;
import android.content.Loader;
import android.database.Cursor;
import android.net.Uri;
import android.os.AsyncTask;
import android.os.Build.VERSION;
import android.os.Build;
import android.os.Bundle;
import android.provider.ContactsContract;
import android.text.TextUtils;
import android.view.KeyEvent;
import android.view.View;
import android.view.View.OnClickListener;
import android.view.inputmethod.EditorInfo;
import android.widget.ArrayAdapter;
import android.widget.AutoCompleteTextView;
import android.widget.Button;
import android.widget.CheckBox;
import android.widget.EditText;
import android.widget.TextView;

import java.util.ArrayList;
import java.util.List;

import static android.Manifest.permission.READ_CONTACTS;

/**
 * A login screen that offers login via email/password.
 */
public class LoginActivity extends AppCompatActivity {


    // UI references.
    private EditText mEmailView;
    private EditText mPasswordView;

    private CheckBox checkBoxRememberMe;

    @Override
    protected void onCreate(Bundle savedInstanceState) {
        super.onCreate(savedInstanceState);
        setContentView(R.layout.activity_login);
        // Set up the login form.
        mEmailView = (EditText) findViewById(R.id.email);
        mPasswordView = (EditText) findViewById(R.id.password);
        mPasswordView.setOnEditorActionListener(new TextView.OnEditorActionListener() {
            @Override
            public boolean onEditorAction(TextView textView, int id, KeyEvent keyEvent) {
                if (id == R.id.login || id == EditorInfo.IME_NULL) {
                    attemptLogin();
                    return true;
                }
                return false;
            }
        });

        Button mEmailSignInButton = (Button) findViewById(R.id.email_sign_in_button);
        mEmailSignInButton.setOnClickListener(new OnClickListener() {
            @Override
            public void onClick(View view) {
                attemptLogin();
            }
        });

        checkBoxRememberMe = (CheckBox) findViewById(R.id.checkBoxRememberMe);
        //Here we will validate saved preferences
        if (!new PrefManager(this).isUserLogedOut()) {
            //user's email and password both are saved in preferences
            startHomeActivity();
        }

    }


    /**
     * Attempts to sign in or register the account specified by the login form.
     * If there are form errors (invalid email, missing fields, etc.), the
     * errors are presented and no actual login attempt is made.
     */
    private void attemptLogin() {

        // Reset errors.
        mEmailView.setError(null);
        mPasswordView.setError(null);

        // Store values at the time of the login attempt.
        String email = mEmailView.getText().toString();
        String password = mPasswordView.getText().toString();

        boolean cancel = false;
        View focusView = null;

        // Check for a valid password, if the user entered one.
        if (!TextUtils.isEmpty(password) && !isPasswordValid(password)) {
            mPasswordView.setError(getString(R.string.error_invalid_password));
            focusView = mPasswordView;
            cancel = true;
        }

        // Check for a valid email address.
        if (TextUtils.isEmpty(email)) {
            mEmailView.setError(getString(R.string.error_field_required));
            focusView = mEmailView;
            cancel = true;
        } else if (!isEmailValid(email)) {
            mEmailView.setError(getString(R.string.error_invalid_email));
            focusView = mEmailView;
            cancel = true;
        }

        if (cancel) {
            // There was an error; don't attempt login and focus the first
            // form field with an error.
            focusView.requestFocus();
        } else {
            // save data in local shared preferences
            if (checkBoxRememberMe.isChecked())
                saveLoginDetails(email, password);
            startHomeActivity();
        }
    }

    private void startHomeActivity() {
        Intent intent = new Intent(this, HomeActivity.class);
        startActivity(intent);
        finish();
    }

    private void saveLoginDetails(String email, String password) {
        new PrefManager(this).saveLoginDetails(email, password);
    }


    private boolean isEmailValid(String email) {
        //TODO: Replace this with your own logic
        return email.contains("@");
    }

    private boolean isPasswordValid(String password) {
        //TODO: Replace this with your own logic
        return password.length() > 4;
    }
}
Step 3: Create a new java class for Shared Preference PrefManager. Below is the code of PrefManager.java
package com.samplesharedpreferences;

import android.content.Context;
import android.content.SharedPreferences;

/**
 * Class for Shared Preference
 */
public class PrefManager {

    Context context;

    PrefManager(Context context) {
        this.context = context;
    }

    public void saveLoginDetails(String email, String password) {
        SharedPreferences sharedPreferences = context.getSharedPreferences("LoginDetails", Context.MODE_PRIVATE);
        SharedPreferences.Editor editor = sharedPreferences.edit();
        editor.putString("Email", email);
        editor.putString("Password", password);
        editor.commit();
    }

    public String getEmail() {
        SharedPreferences sharedPreferences = context.getSharedPreferences("LoginDetails", Context.MODE_PRIVATE);
        return sharedPreferences.getString("Email", "");
    }

    public boolean isUserLogedOut() {
        SharedPreferences sharedPreferences = context.getSharedPreferences("LoginDetails", Context.MODE_PRIVATE);
        boolean isEmailEmpty = sharedPreferences.getString("Email", "").isEmpty();
        boolean isPasswordEmpty = sharedPreferences.getString("Password", "").isEmpty();
        return isEmailEmpty || isPasswordEmpty;
    }
}
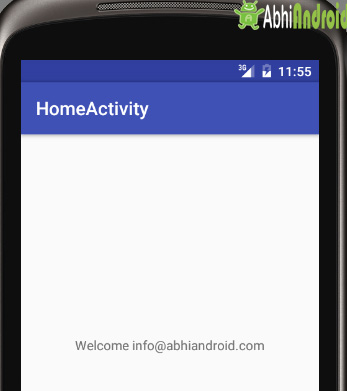
Step 4: Design the simple Home UI where we will display Welcome message along with his saved email address in Shared preference. Below is the code of content_home.xml
<?xml version="1.0" encoding="utf-8"?>
<RelativeLayout
    xmlns:android="http://schemas.android.com/apk/res/android"
    xmlns:app="http://schemas.android.com/apk/res-auto"
    xmlns:tools="http://schemas.android.com/tools"
    android:layout_width="match_parent"
    android:layout_height="match_parent"
    android:paddingBottom="@dimen/activity_vertical_margin"
    android:paddingLeft="@dimen/activity_horizontal_margin"
    android:paddingRight="@dimen/activity_horizontal_margin"
    android:paddingTop="@dimen/activity_vertical_margin"
    app:layout_behavior="@string/appbar_scrolling_view_behavior"
    tools:context="com.samplesharedpreferences.HomeActivity"
    tools:showIn="@layout/activity_home">

    <TextView
        android:id="@+id/textViewUser"
        android:layout_width="wrap_content"
        android:layout_height="wrap_content"
        android:layout_centerInParent="true"
        android:gravity="center"
        android:text="Welcome"/>


</RelativeLayout>
Step 5: Manifest file
Make sure in your AndroidManifest.xml Intent Filter for Main and Launcher is set inside .LoginActivity because then only that Activity will open first.
<?xml version="1.0" encoding="utf-8"?>
<manifest package="com.samplesharedpreferences"
          xmlns:android="http://schemas.android.com/apk/res/android">

    <!-- To auto-complete the email text field in the login form with the user's emails -->
    <uses-permission android:name="android.permission.GET_ACCOUNTS"/>
    <uses-permission android:name="android.permission.READ_PROFILE"/>
    <uses-permission android:name="android.permission.READ_CONTACTS"/>

    <application
        android:allowBackup="true"
        android:icon="@mipmap/ic_launcher"
        android:label="@string/app_name"
        android:supportsRtl="true"
        android:theme="@style/AppTheme">
        <activity
            android:name=".LoginActivity"
            android:label="@string/app_name">
            <intent-filter>
                <action android:name="android.intent.action.MAIN"/>

                <category android:name="android.intent.category.LAUNCHER"/>
            </intent-filter>
        </activity>
        <activity
            android:name=".HomeActivity"
            android:label="@string/title_activity_home"
            android:theme="@style/AppTheme.NoActionBar">
        </activity>
    </application>

</manifest>
Output:
Step 1: Now run the App in Emulator. You will see the below output screen

Importance:
During application development there are many situation where we need to store or save some data in a file. So rather than creating your own file and then managing it, Android provides mechanism to save data using SharedPreferences. To save some little amount of data SharedPreferences can be used like username and password of user, However if there is need to save large amount of data the always prefer to save data using sqlite.
7 thoughts on “Shared Preference Tutorial With Example In Android Studio”
Leave a Reply to Rushika Cancel reply
Premium Project Source Code:
- Food Ordering Android App Project Source Code
- Ecommerce Store Android App Project Source Code
- Convert Website Into Android App Project Source Code
- Quiz Game Android App Project Source Code
- Radio Streaming Android App Source Code
- City Guide Android App Project Source Code
- QR Barcode Android App Project Source Code
“Shared Preference can be used to save primitive data type: string, long, int, float and Boolean.”
sir string is non-primitive data type.
so may be you can save here primitive and non-primitive data like string.
I want a complete source code for Shared preference in my email.
thanks.
really useful sir. thanku somuch
android:imeActionId=”@+id/login”
invalid resource type,expected integer value.
public boolean Logout(){
SharedPreferences sp=context.getSharedPreferences(“LoginDetail”,Context.MODE_PRIVATE);
SharedPreferences.Editor editor=sp.edit();
editor.remove(“email”);
editor.remove(“password”);
editor.commit();
return true;
}
public void onClick(View v) {
PrefManager p=new PrefManager(getApplicationContext());
boolean ans=p.Logout();
if(ans){
logoutActivity();
}
else {
Toast.makeText(getApplicationContext(),”something goes wrong”,Toast.LENGTH_SHORT);
}
}
this is my code for logoutbutton but when i click this button my app is first display unfortunately stop error please give me solution
hi abhi,
why we give permissions of read profile,acounts and contacts in shared pref ?
im a bigner TIA
where is HomeActivity please?