Volley Tutorial With Example In Android Studio
Volley is a HTTP library developed by Google and was first introduced during Google I/O 2013. This library is used to transmit data over the network. It actually makes networking faster and easier for Apps. It is available through AOSP(Android Open Source Project) repository.

The volley library has the features like automatic scheduling of network request, multiple concurrent connections, request prioritization, cancel/block a request, easier management of UI with data fetched asynchronously from the network and also offers easier customization.
Important Note: Volley uses cache to improve the App performance by saving memory and bandwidth of remote server.
Table Of Contents
Volley Uses Caches To Improve Performance In Android:
Volley uses caches concept to improve the performance of App. For example, lets say you are using Asynctask to fetch image and description from a JSON array created in server API. The content is fetched in the portrait mode and now user rotate screen to change it to landscape mode. The activity is destroyed and so the content will be fetched again. Since the user is calling the same resource again to server so it is a waste of resource and ultimately a poor user experience.
Volley provide solution to this problem as it caches the data. When user request the same data, instead of calling from server Volley directly shows it from cache saving resource and thus improving user experience.
Below is the basic diagram of Volley:

Understanding RequestQueue & Working With Volley In Android:
Volley is a networking library managed by the RequestQueue and mainly used for smaller Networking purposes in Android. To use it, first you need to instantiate the RequestQueue and later on you can start or stop request, add or cancel request and access the response cache(s).
RequestQueue queue = Volley.newRequestQueue(this);
After instantiating RequestQueue, a request must be created. The default request classes already included in Volley library are String request, JSON request, and image request. You can also create custom request by extending Volley’s request class.
Request Constructors used in Volley takes 4 parameter:
JsonObjectRequest request = JsonObjectRequest(Request.Method.GET, url, new ResponseListener(), new ErrorListener();
First Parameter: Request.Method.GET – The GET is used to read. You can also use POST (to create), PUT (To update/replace), DELETE (to delete), PATCH (to update/modify) and more.
Second Parameter: URL – The url that will response to the HTTP request.
Third Parameter: Successful Response Listener – Where your data will go after the request is successfully complete.
private class ResponseListener implements Response.Listener{
@Override
public void onResponse(JSONObject response){

}
}
Fourth Parameter: Error Listener – What will be told if there was a problem with your request. For example, you can display it in Log to see the error.
private class ErrorListener implements Response.ErrorListener{
@Override
public void onErrorResponse(VolleyError error){

}
}
Now the last step is to add your request to Request queue and rest volley will handle for you.
queue.add(request);
Here you can also add more requests to the queue that you would like at one time and the response will be send to their respective response/error classes.

Volley Basic HTTP Example In Android Studio:
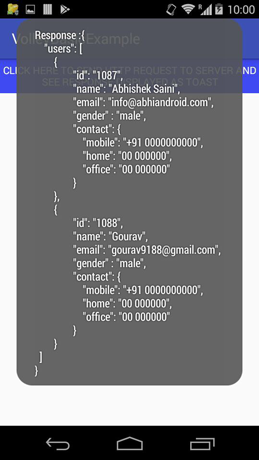
In this example we have created a button and on click of a button a HTTP request will be send to server. The response from the server is then displayed using Toast on the screen.
Below you can download code, see final output and step by step explanation of example.
Step 1: Create a new project and name it VolleyBasicExample.
Step 2: Open res -> layout -> activity_main.xml (or) main.xml and add following code:
In this step we create one Button which will be used to fire an HTTP request to server.
<?xml version="1.0" encoding="utf-8"?>
<RelativeLayout xmlns:android="http://schemas.android.com/apk/res/android"
    xmlns:tools="http://schemas.android.com/tools"
    android:layout_width="match_parent"
    android:layout_height="match_parent"
    tools:context="abhiandroid.com.volleybasicexample.MainActivity">


    <Button
        android:id="@+id/buttonRequest"
        android:layout_width="wrap_content"
        android:layout_height="wrap_content"
        android:background="#414af4"
        android:text="Click Here To Send HTTP Request To Server And See Response Displayed As Toast"
        android:textColor="#ffffff"
        android:layout_alignParentTop="true"
        android:layout_marginTop="50dp" />
</RelativeLayout>
Step 3: To use volley library you will need to add the below dependency in your gradle build. Open build.gradle (Module: app) and add the below line in dependencies and click sync now:
apply plugin: 'com.android.application'

android {
    compileSdkVersion 25
    buildToolsVersion "25.0.3"
    defaultConfig {
        applicationId "abhiandroid.com.volleybasicexample"
        minSdkVersion 15
        targetSdkVersion 25
        versionCode 1
        versionName "1.0"
        testInstrumentationRunner "android.support.test.runner.AndroidJUnitRunner"
    }
    buildTypes {
        release {
            minifyEnabled false
            proguardFiles getDefaultProguardFile('proguard-android.txt'), 'proguard-rules.pro'
        }
    }
}

dependencies {
    compile fileTree(dir: 'libs', include: ['*.jar'])
    androidTestCompile('com.android.support.test.espresso:espresso-core:2.2.2', {
        exclude group: 'com.android.support', module: 'support-annotations'
    })
    compile 'com.android.support:appcompat-v7:25.3.1'
    testCompile 'junit:junit:4.12'
    compile 'com.android.volley:volley:1.0.0' // dependency file for Volley
}
Step 4: As our App will be sending request to the server and receiving response on button click which means it requires internet. So define internet permission in Android Manifest file.
Manifest.xml code:
<?xml version="1.0" encoding="utf-8"?>
<manifest xmlns:android="http://schemas.android.com/apk/res/android"
    package="abhiandroid.com.volleybasicexample">

    <uses-permission android:name="android.permission.INTERNET" />

    <application
        android:allowBackup="true"
        android:icon="@mipmap/ic_launcher"
        android:label="@string/app_name"
        android:roundIcon="@mipmap/ic_launcher_round"
        android:supportsRtl="true"
        android:theme="@style/AppTheme">
        <activity android:name=".MainActivity">
            <intent-filter>
                <action android:name="android.intent.action.MAIN" />

                <category android:name="android.intent.category.LAUNCHER" />
            </intent-filter>
        </activity>
    </application>

</manifest>
Step 5: Now we will need to generate an HTTP request for our App. Below are the simple steps to generate it:
a) First we will need sample JSON code. Below is the code I am using:
Related Read: JSON Parsing Tutorial With Example in Android Studio
{
    "users": [
        {
                "id": "1087",
                "name": "Abhishek Saini",
                "email": "info@abhiandroid.com",
                "gender" : "male",
                "contact": {
                    "mobile": "+91 0000000000",
                    "home": "00 000000",
                    "office": "00 000000"
                }
        },
        {
                "id": "1088",
                "name": "Gourav",
                "email": "gourav9188@gmail.com",
                "gender" : "male",
                "contact": {
                    "mobile": "+91 0000000000",
                    "home": "00 000000",
                    "office": "00 000000"
                }
        }
  ]
}
b) Now we will open the mocky.io and put the JSON code in it.
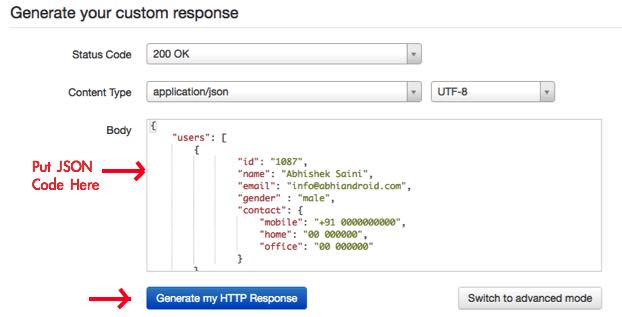
c) Now click on the Generate My HTTP Response
d) It will generate the link url which we will use in next step for sending request and getting HTTP response.

Step 6: Now open app -> java -> package -> MainActivity.java and add the below code.
In this step we will initialize the button and set on click listener on it. When the button is click, it will send HTTP request to the url that we generated in the previous step and display the response as Toast on the screen.
Here we have used simple StringRequest and default RequestQueue that volley provide us.
package abhiandroid.com.volleybasicexample;

import android.support.v7.app.AppCompatActivity;
import android.os.Bundle;
import android.util.Log;
import android.view.View;
import android.widget.Button;
import android.widget.Toast;

import com.android.volley.Request;
import com.android.volley.RequestQueue;
import com.android.volley.Response;
import com.android.volley.VolleyError;
import com.android.volley.toolbox.StringRequest;
import com.android.volley.toolbox.Volley;

public class MainActivity extends AppCompatActivity {

    private static final String TAG = MainActivity.class.getName();
    private Button btnRequest;

    private RequestQueue mRequestQueue;
    private StringRequest mStringRequest;
    private String url = "http://www.mocky.io/v2/597c41390f0000d002f4dbd1";

    @Override
    protected void onCreate(Bundle savedInstanceState) {
        super.onCreate(savedInstanceState);
        setContentView(R.layout.activity_main);

        btnRequest = (Button) findViewById(R.id.buttonRequest);

        btnRequest.setOnClickListener(new View.OnClickListener() {
            @Override
            public void onClick(View v){

                sendAndRequestResponse();

            }
        }

        );

    }

    private void sendAndRequestResponse() {

        //RequestQueue initialized
        mRequestQueue = Volley.newRequestQueue(this);

        //String Request initialized
        mStringRequest = new StringRequest(Request.Method.GET, url, new Response.Listener<String>() {
            @Override
            public void onResponse(String response) {

                Toast.makeText(getApplicationContext(),"Response :" + response.toString(), Toast.LENGTH_LONG).show();//display the response on screen

            }
        }, new Response.ErrorListener() {
            @Override
            public void onErrorResponse(VolleyError error) {

                Log.i(TAG,"Error :" + error.toString());
            }
        });

        mRequestQueue.add(mStringRequest);
    }
}
Output:
Now run the App and click on the button. You will see HTTP response from server on click of it.
Volley Advance Example in Android Studio:
This is an advance example of Volley in which we will fetch data from server API using Volley. Our API contains three things title, image and category details which we will fetch in App using Volley.
Our Json API URL –
http://mobileappdatabase.in/demo/smartnews/app_dashboard/jsonUrl/single-article.php?article-id=71

Creating New Project: Create a new Project File -> New ->Android Application Project
Step 1: Open your layout file of main activity and add a ListView element.
actvity_main.xml
<?xml version="1.0" encoding="utf-8"?>

<RelativeLayout xmlns:android="http://schemas.android.com/apk/res/android"
 xmlns:tools="http://schemas.android.com/tools"
 android:layout_width="match_parent"
 android:layout_height="match_parent"
 tools:context=".MainActivity" >

<ListView
 android:id="@+id/list"
 android:layout_width="fill_parent"
 android:layout_height="wrap_content"
 android:dividerHeight="1dp"
 />

</RelativeLayout>
Step 2: We will now create another layout file for ListView row and name this file as list_row.xml
 <?xml version="1.0" encoding="utf-8"?/>
 <RelativeLayout xmlns:android="http://schemas.android.com/apk/res/android"
 android:layout_width="fill_parent"
 android:layout_height="wrap_content"
 android:padding="8dp" >

<!-- Title -->
 <TextView
 android:id="@+id/title"
 android:layout_width="match_parent"
 android:layout_height="wrap_content"
 android:textSize="@dimen/title"
 android:layout_marginTop="10dp"
 android:layout_marginBottom="20dp"
 android:textColor="@color/title"/>

<!-- category-->
 <TextView
 android:id="@+id/category"
 android:layout_width="fill_parent"
 android:layout_height="wrap_content"
 android:textColor="@color/category"
 android:textSize="@dimen/category"
 android:textStyle="bold"
 android:layout_below="@+id/title"
 android:layout_marginTop="20dp"
 android:layout_marginLeft="1dp" />

<!-- Thumbnail Image -->
 <com.android.volley.toolbox.NetworkImageView
 android:id="@+id/thumbnail"
 android:layout_width="280dp"
 android:layout_height="280dp"
 android:layout_below="@+id/category"
 />
</RelativeLayout>
Step 3: Create a ImageClass.java and add the following code:
This class takes care of caching images on disk. A memory and disk cache allow components to quickly reload processed images.
A memory cache offers fast access to bitmaps at the cost of taking up valuable application memory. The LruCache class is particularly well suited to the task of caching bitmaps.
package com.example.abhishek.json;

import android.graphics.Bitmap;
import android.support.v4.util.LruCache;

import com.android.volley.toolbox.ImageLoader.ImageCache;

public class ImageClass extends LruCache<String, Bitmap> implements
        ImageCache {
    public static int getDefaultLruCacheSize() {
        final int maxMemory = (int) (Runtime.getRuntime().maxMemory() / 1024);
        final int cacheSize = maxMemory / 8;

        return cacheSize;
    }

    public ImageClass() {
        this(getDefaultLruCacheSize());
    }

    public ImageClass(int sizeInKiloBytes) {
        super(sizeInKiloBytes);
    }

    @Override
    protected int sizeOf(String key, Bitmap value) {
        return value.getRowBytes() * value.getHeight() / 1024;
    }

    @Override
    public Bitmap getBitmap(String url) {
        return get(url);
    }

    @Override
    public void putBitmap(String url, Bitmap bitmap) {
        put(url, bitmap);
    }
}
Step 4: Next create a AppController class and add it in the AndroidManifest.xml to your <application> using name property to execute this class on starting of the application. Also add INTERNET permission as we are going to make network calls.
AppController.java
 package com.example.abhishek.json;

 import android.app.Application;
 import android.text.TextUtils;

 import com.android.volley.Request;
 import com.android.volley.RequestQueue;
 import com.android.volley.toolbox.ImageLoader;
 import com.android.volley.toolbox.Volley;

 public class AppController extends Application {

 public static final String TAG = AppController.class.getSimpleName();

 private RequestQueue mRequestQueue;
 private ImageLoader mImageLoader;

 private static AppController mInstance;

 @Override
 public void onCreate() {
 super.onCreate();
 mInstance = this;
 }

public static synchronized AppController getInstance() {
 return mInstance;
 }

public RequestQueue getRequestQueue() {
 if (mRequestQueue == null) {
 mRequestQueue = Volley.newRequestQueue(getApplicationContext());
 }

return mRequestQueue;
 }

public ImageLoader getImageLoader() {
 getRequestQueue();
 if (mImageLoader == null) {
 mImageLoader = new ImageLoader(this.mRequestQueue,
 new ImageClass());
 }
 return this.mImageLoader;
 }

public  void addToRequestQueue(Request req, String tag) {
 // set the default tag if tag is empty
 req.setTag(TextUtils.isEmpty(tag) ? TAG : tag);
 getRequestQueue().add(req);
 }

public  void addToRequestQueue(Request req) {
 req.setTag(TAG);
 getRequestQueue().add(req);
 }

public void cancelPendingRequests(Object tag) {
 if (mRequestQueue != null) {
 mRequestQueue.cancelAll(tag);
 }
 }
 }
Step 5: Define internet permission and add AppController class in AndroidManifest.xml
<?xml version="1.0" encoding="utf-8"?>
 <manifest xmlns:android="http://schemas.android.com/apk/res/android"
 package="com.example.abhishek.json">
 <uses-permission android:name="android.permission.INTERNET" />
 <application
 android:allowBackup="true"
 android:name=".AppController"
 android:icon="@mipmap/ic_launcher"
 android:label="@string/app_name"
 android:roundIcon="@mipmap/ic_launcher_round"
 android:supportsRtl="true"
 android:theme="@style/AppTheme">
 <activity android:name=".MainActivity">
 <intent-filter>
 <action android:name="android.intent.action.MAIN" />

<category android:name="android.intent.category.LAUNCHER" />
 </intent-filter>
 </activity>
 </application>

</manifest>
Step 6: Open build.gradle and add Volley library dependency.
compile ‘com.android.volley:volley:1.0.0’
 apply plugin: 'com.android.application'
 android {
 compileSdkVersion 26
 buildToolsVersion "26.0.2"
 defaultConfig {
 applicationId "com.example.abhishek.jsonvolleyexample"
 minSdkVersion 15
 targetSdkVersion 26
 versionCode 1
 versionName "1.0"
 testInstrumentationRunner "android.support.test.runner.AndroidJUnitRunner"
 }
 buildTypes {
 release {
 minifyEnabled false
 proguardFiles getDefaultProguardFile('proguard-android.txt'), 'proguard-rules.pro'
 }
 }
 }

dependencies {
 compile fileTree(dir: 'libs', include: ['*.jar'])
 androidTestCompile('com.android.support.test.espresso:espresso-core:2.2.2', {
 exclude group: 'com.android.support', module: 'support-annotations'
 })
 compile 'com.android.support:appcompat-v7:26.+'
 compile 'com.android.support.constraint:constraint-layout:1.0.2'
 testCompile 'junit:junit:4.12'
 compile 'com.android.volley:volley:1.0.0'
 }
Step 7: Create Model.java. This model class will be used to provide data to list view after parsing the json.
 package com.example.abhishek.json;

 public class Model {
 private String title, category ,thumbnailUrl;

 public Model() {
 }
 public Model(String title, String category, String thumbnailUrl) {
 this.title=title;
 this.category=category;
 this.thumbnailUrl = thumbnailUrl;
 }

 public String getTitle() {
 return title;
 }

 public void setTitle(String title) {
 this.title = title;
 }

 public String getCategory() {
 return category;
 }

 public void setCategory(String category) {
 this.category = category;
 }

 public String getThumbnailUrl() {
 return thumbnailUrl;
 }

 public void setThumbnailUrl(String thumbnailUrl) {
 this.thumbnailUrl = thumbnailUrl;
 }
 }
Step 8: Create a class CustomAdapter.java with below code. This is a custom adapter class which provides data to ListView
 package com.example.abhishek.json;
 import android.app.Activity;
 import android.content.Context;
 import android.view.LayoutInflater;
 import android.view.View;
 import android.view.ViewGroup;
 import android.widget.BaseAdapter;
 import android.widget.TextView;

 import com.android.volley.toolbox.ImageLoader;
 import com.android.volley.toolbox.NetworkImageView;
 import java.util.List;

 public class CustomAdapter extends BaseAdapter {
 private Activity activity;
 private LayoutInflater inflater;
 private List modelItems;
 ImageLoader imageLoader = AppController.getInstance().getImageLoader();

 public CustomAdapter(Activity activity, List modelItems) {
 this.activity = activity;
 this.modelItems = modelItems;
 }

 @Override
 public int getCount() {
 return modelItems.size();
 }

 @Override
 public Object getItem(int location) {
 return modelItems.get(location);
 }

 @Override
 public long getItemId(int position) {
 return position;
 }

 @Override
 public View getView(int position, View convertView, ViewGroup parent) {

 if (inflater == null)
 inflater = (LayoutInflater) activity
 .getSystemService(Context.LAYOUT_INFLATER_SERVICE);
 if (convertView == null)
 convertView = inflater.inflate(R.layout.list_row, null);

 if (imageLoader == null)
 imageLoader = AppController.getInstance().getImageLoader();

 TextView title = (TextView) convertView.findViewById(R.id.title);
 TextView category = (TextView) convertView.findViewById(R.id.category);

 NetworkImageView thumbNail = (NetworkImageView) convertView
 .findViewById(R.id.thumbnail);

 // getting model data for the row
 Model m = modelItems.get(position);

 // title
 title.setText("Title: " + String.valueOf(m.getTitle()));

 // category
 category.setText("Category: "+ String.valueOf(m.getCategory()));

 // thumbnail image
 thumbNail.setImageUrl(m.getThumbnailUrl(), imageLoader);

 return convertView;
 }}
Step 9: Now open your main activity class (MainActivity.java) and add the below code. We created volley’s JsonArrayRequest to get the json from url. Upon parsing the json, we stored all the json data into an ArrayList as Model objects.
 package com.example.abhishek.json;
 import java.util.ArrayList;
 import java.util.List;
 import org.json.JSONArray;
 import org.json.JSONException;
 import org.json.JSONObject;

 import android.app.Activity;
 import android.app.ProgressDialog;
 import android.os.Bundle;
 import android.util.Log;
 import android.view.Menu;
 import android.widget.ListView;

 import com.android.volley.Response;
 import com.android.volley.VolleyError;
 import com.android.volley.VolleyLog;
 import com.android.volley.toolbox.JsonArrayRequest;

 public class MainActivity extends Activity {
  // Log tag
 private static final String TAG = MainActivity.class.getSimpleName();

 private static final String url ="  http://mobileappdatabase.in/demo/smartnews/app_dashboard/jsonUrl/single-article.php?article-id=71";
 private ProgressDialog pDialog;

 private List modelList = new ArrayList();
 private ListView listView;
 private CustomAdapter adapter;

 @Override
 protected void onCreate(Bundle savedInstanceState) {
 super.onCreate(savedInstanceState);
 setContentView(R.layout.activity_main);

 listView = (ListView) findViewById(R.id.list);
 adapter = new CustomAdapter(this, modelList);
 listView.setAdapter(adapter);

 pDialog = new ProgressDialog(this);
 // Showing progress dialog before making http request
 pDialog.setMessage("Loading...");
 pDialog.show();

 // Creating volley request obj
 JsonArrayRequest movieReq = new JsonArrayRequest(url,
 new Response.Listener() {
 @Override
 public void onResponse(JSONArray response) {
 Log.d(TAG, response.toString());
 hidePDialog();

 // Parsing json
 for (int i = 0; i < response.length(); i++) {
 try {

 JSONObject obj = response.getJSONObject(i);
 Model model = new Model();
 model.setTitle(obj.getString("title"));
 model.setCategory(obj.getString("category"));
 model.setThumbnailUrl(obj.getString("image"));

 modelList.add(model);

} catch (JSONException e) {
 e.printStackTrace();
 }

}
 // notifying list adapter about data changes so that it renders the list view with updated data
 adapter.notifyDataSetChanged();
 }
 }, new Response.ErrorListener() {
 @Override
 public void onErrorResponse(VolleyError error) {
 VolleyLog.d(TAG, "Error: " + error.getMessage());
 hidePDialog();

}
 });

// Adding request to request queue
 AppController.getInstance().addToRequestQueue(movieReq);
 }

 @Override
 public void onDestroy() {
 super.onDestroy();
 hidePDialog();
 }

 private void hidePDialog() {
 if (pDialog != null) {
 pDialog.dismiss();
 pDialog = null;
 }
 }

 @Override
 public boolean onCreateOptionsMenu(Menu menu) {
 // Inflate the menu; this adds items to the action bar if it is present.
 getMenuInflater().inflate(R.menu.main, menu);
 return true;
 }}
Step 10: Add the following code in xml files
values -> colors.xml
<?xml version="1.0" encoding="utf-8"?>
<resources>

    <color name="category">#b932ca</color>
    <color name="title">#6b2cd9</color>

</resources>
values ->dimens.xml
<resources>

    <dimen name="title">22dp</dimen>
    <dimen name="category">20dip</dimen>

</resources>
values -> strings.xml
<?xml version="1.0" encoding="utf-8"?>
<resources>

    <string name="app_name">VolleyExample</string>

</resources>
values -> styles.xml
<resources>

    <style name="AppBaseTheme" parent="android:Theme.Light">
    </style>
    <style name="AppTheme" parent="AppBaseTheme">
    </style>

</resources>
Output:
Now run the App and test it once. You will see title, category and image in App which are fetched from server.
Volley Custom RequestQueue Example in Android Studio:
In the previous example we used newRequestQueue method which uses default values to create RequestQueue and can be used for String Request. Now in this thrid method we will customized the request queue.
Below you can download code, see final output and step by step explanation of example.
Step 1: Create a new project and name it VolleyCustomRequestQueueExample.
Step 2: Open res -> layout -> activity_main.xml (or) main.xml and add following code:
In this step we create one Button which will be used to fire an HTTP request to server.
<?xml version="1.0" encoding="utf-8"?>
<RelativeLayout xmlns:android="http://schemas.android.com/apk/res/android"
    xmlns:tools="http://schemas.android.com/tools"
    android:layout_width="match_parent"
    android:layout_height="match_parent"
    tools:context="abhiandroid.com.volleycustomrequestqueueexample.MainActivity">


    <Button
        android:id="@+id/btnRequest"
        android:layout_width="wrap_content"
        android:layout_height="wrap_content"
        android:background="#414af4"
        android:text="Click Here To Send HTTP Request To Server And See Response Displayed As Toast"
        android:textColor="#ffffff"
        android:layout_alignParentTop="true"
        android:layout_marginTop="50dp" />
</RelativeLayout>
Step 3: To use volley library you will need to add the below dependency in your gradle build. Open build.gradle (Module: app) and add the below line in dependencies and click sync now:
apply plugin: 'com.android.application'

android {
    compileSdkVersion 25
    buildToolsVersion "25.0.3"
    defaultConfig {
        applicationId "abhiandroid.com.volleycustomrequestqueueexample"
        minSdkVersion 15
        targetSdkVersion 25
        versionCode 1
        versionName "1.0"
        testInstrumentationRunner "android.support.test.runner.AndroidJUnitRunner"
    }
    buildTypes {
        release {
            minifyEnabled false
            proguardFiles getDefaultProguardFile('proguard-android.txt'), 'proguard-rules.pro'
        }
    }
}

dependencies {
    compile fileTree(dir: 'libs', include: ['*.jar'])
    androidTestCompile('com.android.support.test.espresso:espresso-core:2.2.2', {
        exclude group: 'com.android.support', module: 'support-annotations'
    })
    compile 'com.android.support:appcompat-v7:25.3.1'
    compile 'com.android.support.constraint:constraint-layout:1.0.2'
    testCompile 'junit:junit:4.12'

    compile 'com.android.volley:volley:1.0.0' // dependency file for Volley
}
Step 4: As our App will be sending request to the server and receiving response on button click which means it requires internet. So define internet permission in Android Manifest file.
<?xml version="1.0" encoding="utf-8"?>
<manifest xmlns:android="http://schemas.android.com/apk/res/android"
    package="abhiandroid.com.volleycustomrequestqueueexample">

    <uses-permission android:name="android.permission.INTERNET" />

    <application
        android:allowBackup="true"
        android:icon="@mipmap/ic_launcher"
        android:label="@string/app_name"
        android:roundIcon="@mipmap/ic_launcher_round"
        android:supportsRtl="true"
        android:theme="@style/AppTheme">
        <activity android:name=".MainActivity">
            <intent-filter>
                <action android:name="android.intent.action.MAIN" />

                <category android:name="android.intent.category.LAUNCHER" />
            </intent-filter>
        </activity>
    </application>

</manifest>
Step 5: Now we will need to generate an HTTP request for our App. Below are the simple steps to generate it:
a) First we will need sample JSON code. Below is the code I am using:
{
    "users": [
        {
                "id": "1087",
                "name": "Abhishek Saini",
                "email": "info@abhiandroid.com",
                "gender" : "male",
                "contact": {
                    "mobile": "+91 0000000000",
                    "home": "00 000000",
                    "office": "00 000000"
                }
        },
        {
                "id": "1088",
                "name": "Gourav",
                "email": "gourav9188@gmail.com",
                "gender" : "male",
                "contact": {
                    "mobile": "+91 0000000000",
                    "home": "00 000000",
                    "office": "00 000000"
                }
        }
  ]
}
b) Now we will open the mocky.io and put the JSON code in it.
c) Now click on the Generate My HTTP Response
d) It will generate the link url which we will use in next step for sending request and getting HTTP response.
Step 5: Now open app -> java -> package -> MainActivity.java and add the below code.
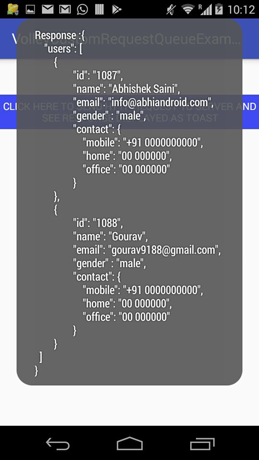
In this step we will initialize the button and set on click listener on it. When the button is click, it will send HTTP request to the url that we created in the previous step and display the response as Toast on the screen.
Here we have used custom StringRequest and default RequestQueue that volley provide us.
package abhiandroid.com.volleycustomrequestqueueexample;

import android.support.v7.app.AppCompatActivity;
import android.os.Bundle;
import android.util.Log;
import android.view.View;
import android.widget.Button;
import android.widget.Toast;

import com.android.volley.Cache;
import com.android.volley.Network;
import com.android.volley.Request;
import com.android.volley.RequestQueue;
import com.android.volley.Response;
import com.android.volley.VolleyError;
import com.android.volley.toolbox.BasicNetwork;
import com.android.volley.toolbox.DiskBasedCache;
import com.android.volley.toolbox.HurlStack;
import com.android.volley.toolbox.StringRequest;

public class MainActivity extends AppCompatActivity {

    private String server_url = "http://www.mocky.io/v2/597c41390f0000d002f4dbd1";
    Button btnRequest;
    RequestQueue requestQueue;
    private static final String TAG = MainActivity.class.getName();

    @Override
    protected void onCreate(Bundle savedInstanceState) {
        super.onCreate(savedInstanceState);
        setContentView(R.layout.activity_main);

        btnRequest = (Button) findViewById(R.id.btnRequest);
        Cache cache = new DiskBasedCache(getCacheDir(),1024*1024);
        Network network = new BasicNetwork(new HurlStack());
        requestQueue = new RequestQueue(cache,network);
        requestQueue.start();

        btnRequest.setOnClickListener(new View.OnClickListener(){
            @Override
            public void onClick (View v){

                StringRequest stringRequest = new StringRequest(Request.Method.GET, server_url, new Response.Listener<String>() {
                    @Override
                    public void onResponse(String response) {
                        Toast.makeText(getApplicationContext(),"Response :" + response.toString(), Toast.LENGTH_LONG).show();//display the response on screen
                        requestQueue.stop();
                    }
                }, new Response.ErrorListener() {
                    @Override
                    public void onErrorResponse(VolleyError error) {
                        Log.i(TAG,"Error :" + error.toString());
                    }
                });

                requestQueue.add(stringRequest);
                    }
                });
            }

    }
Output:
Now run the App and click on button. You will see http response from server on click of it.
9 thoughts on “Volley Tutorial With Example In Android Studio”
Leave a Reply to Ibrahim Cancel reply
Premium Project Source Code:
- Food Ordering Android App Project Source Code
- Ecommerce Store Android App Project Source Code
- Convert Website Into Android App Project Source Code
- Quiz Game Android App Project Source Code
- Radio Streaming Android App Source Code
- City Guide Android App Project Source Code
- QR Barcode Android App Project Source Code
how make volley response synchronize
Thanks Abhishek Saini for the Excelent work you are doing !
Regards
Thanks.
How to pass parameters with volley GET Request
Can u give tutorial on compress an image while uploading it into the server
Good one…… plz send more and more source codes…..I am thank ful to ……keep doing this
Hi abhi,
I just have one suggestion if you can do it in order to improve the quality of the tutorials, just make the code little more cleaner by adding Syntax Highlighter (java/xml) and format the code before post it.
Regards.
tank you AbhiAndroid can you add tutorial for kotlin Android
like if trying to login in any app so we have to give some parameter like username, name, email, password in json parsing (in your Step 5 ). so please tell me where we will give parameter and how?
thank you Abhi sir . I always refer your tutorials.