SQLite Tutorial With Example In Android Studio
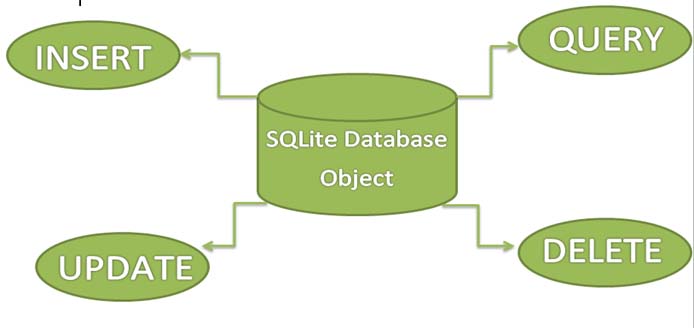
SQLite is a Structure query base database, open source, light weight, no network access and standalone database. It support embedded relational database features.

Whenever an application needs to store large amount of data then using sqlite is more preferable than other repository system like SharedPreferences or saving data in files.
Android has built in SQLite database implementation. It is available locally over the device(mobile & tablet) and contain data in text format. It carry light weight data and suitable with many languages. So, it doesn’t required any administration or setup procedure of the database.
Important Note – The database created is saved in a directory: data/data/APP_Name/databases/DATABASE_NAME.
Table of Contents
Creating And Updating Database In Android
For creating, updating and other operations you need to create a subclass or SQLiteOpenHelper class. SQLiteOpenHelper is a helper class to manage database creation and version management. It provides two methods onCreate(SQLiteDatabase db), onUpgrade(SQLiteDatabase db, int oldVersion, int newVersion).
The SQLiteOpenHelper is responsible for opening database if exist, creating database if it does not exists and upgrading if required. The SQLiteOpenHelper only require the DATABASE_NAME to create database. After extending SQLiteOpenHelper you will need to implement its methods onCreate, onUpgrade and constructor.
onCreate(SQLiteDatabase sqLiteDatabase) method is called only once throughout the application lifecycle. It will be called whenever there is a first call to getReadableDatabase() or getWritableDatabase() function available in super SQLiteOpenHelper class. So SQLiteOpenHelper class call the onCreate() method after creating database and instantiate SQLiteDatabase object. Database name is passed in constructor call.
onUpgrade(SQLiteDatabase db,int oldVersion, int newVersion) is only called whenever there is a updation in existing version. So to update a version we have to increment the value of version variable passed in the superclass constructor.
In onUpgrade method we can write queries to perform whatever action is required. In most example you will see that existing table(s) are being dropped and again onCreate() method is being called to create tables again. But it’s not mandatory to do so and it all depends upon your requirements.
We have to change database version if we have added a new row in the database table. If we have requirement that we don’t want to lose existing data in the table then we can write alter table query in the onUpgrade(SQLiteDatabase db,int oldVersion, int newVersion) method.
For more details read: Insert, Read, Delete & Update Operation In SQLite
SQLite Example In Android Studio
Get Better Understanding of Sqlite Before You Read Example – To get better understanding of SQlite database, it is recommended you read below article first:
- Introduction To SQLite And Installation
- List Of All Operators In SQLite
- Data Type And Commands In SQLite
- List Of All Clauses In SQLite For Defining Specific Condition
- Insert, Read, Delete & Update Operation In SQLite
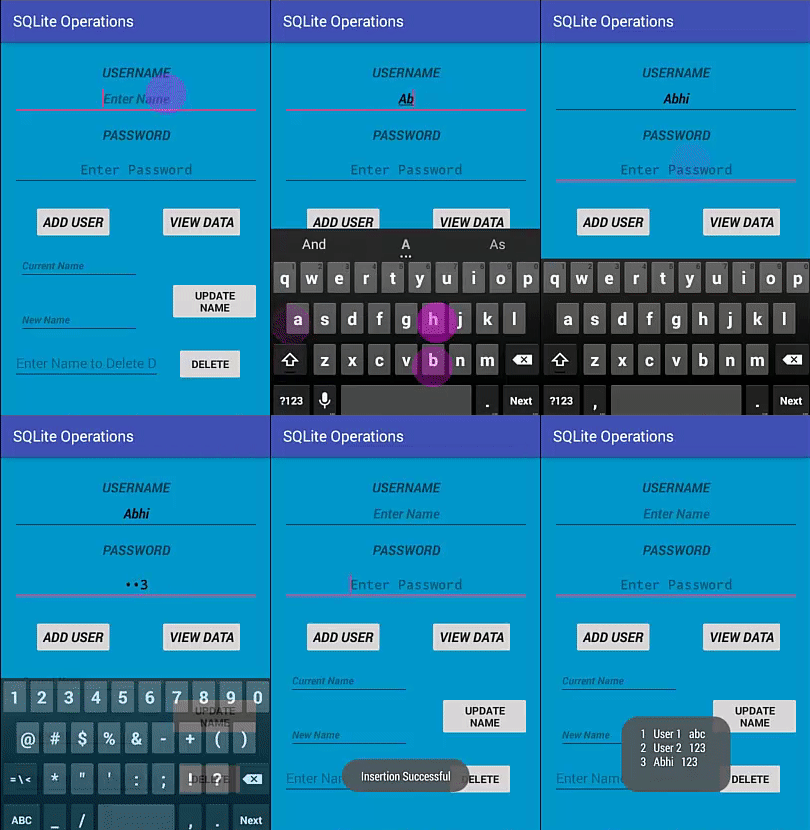
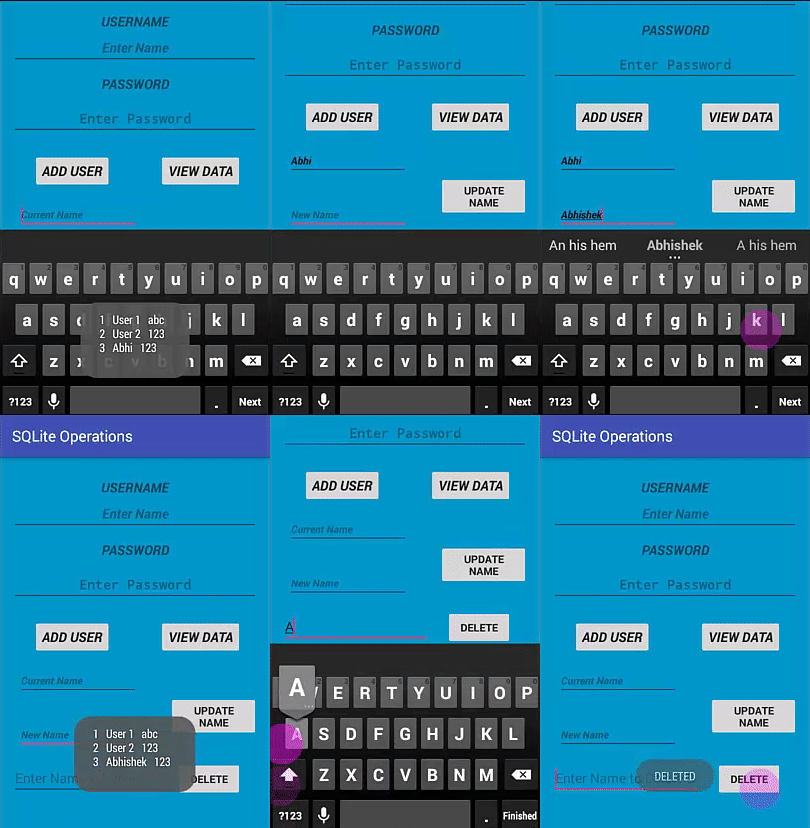
In this example we simply want to illustrate the insert, update, delete and more operations of SQLite over a table in Android Studi. We created a activity having textview, button and edittext over it. Another class which extends SQLiteOpenHelper where the create and insert operations will be carried out. The example contain proper validation like you need to enter data before executing any operation.
Below you can download code, see final output and step by step explanation:

Step 1: Create a New Project and Name it SQLiteOperations.
Step 2: Open res -> layout -> activity_main.xml (or) main.xml and add following code:
In this step we create a layout in our XML file adding textbox, buttons, edittext. On button onclick is defined which associate it with related function.
<?xml version="1.0" encoding="utf-8"?>
<RelativeLayout xmlns:android="http://schemas.android.com/apk/res/android"
    xmlns:tools="http://schemas.android.com/tools"
    android:id="@+id/activity_main"
    android:layout_width="match_parent"
    android:layout_height="match_parent"
    android:paddingBottom="@dimen/activity_vertical_margin"
    android:paddingLeft="@dimen/activity_horizontal_margin"
    android:paddingRight="@dimen/activity_horizontal_margin"
    android:paddingTop="@dimen/activity_vertical_margin"
    tools:context="com.example.sqliteoperations.MainActivity"
    android:background="@android:color/holo_blue_dark">

    <TextView
        android:text="@string/username"
        android:layout_width="match_parent"
        android:layout_height="wrap_content"
        android:layout_alignParentTop="true"
        android:layout_marginTop="12dp"
        android:id="@+id/textView"
        android:textSize="18sp"
        android:textStyle="bold|italic"
        android:layout_alignParentLeft="true"
        android:layout_alignParentStart="true"
        android:gravity="center" />

    <EditText
        android:layout_width="match_parent"
        android:layout_height="wrap_content"
        android:inputType="textPersonName"
        android:ems="10"
        android:id="@+id/editName"
        android:textStyle="bold|italic"
        android:layout_below="@+id/textView"
        android:layout_alignParentRight="true"
        android:layout_alignParentEnd="true"
        android:hint="Enter Name"
        android:gravity="center_vertical|center" />

    <TextView
        android:text="@string/password"
        android:layout_width="match_parent"
        android:layout_height="wrap_content"
        android:layout_marginTop="13dp"
        android:id="@+id/textView2"
        android:textStyle="bold|italic"
        android:textSize="18sp"
        android:layout_below="@+id/editName"
        android:layout_alignParentRight="true"
        android:layout_alignParentEnd="true"
        android:gravity="center"
        android:hint="Enter Password" />

    <Button
        android:text="@string/view_data"
        android:layout_width="wrap_content"
        android:layout_height="wrap_content"
        android:id="@+id/button2"
        android:textSize="18sp"
        android:onClick="viewdata"
        android:textStyle="bold|italic"
        android:layout_alignBaseline="@+id/button"
        android:layout_alignBottom="@+id/button"
        android:layout_alignRight="@+id/button4"
        android:layout_alignEnd="@+id/button4" />

    <Button
        android:text="@string/add_user"
        android:layout_width="wrap_content"
        android:layout_height="wrap_content"
        android:id="@+id/button"
        android:textStyle="bold|italic"
        android:textSize="18sp"
        android:onClick="addUser"
        android:layout_marginLeft="28dp"
        android:layout_marginStart="28dp"
        android:layout_below="@+id/editPass"
        android:layout_alignParentLeft="true"
        android:layout_alignParentStart="true"
        android:layout_marginTop="23dp" />

    <Button
        android:text="@string/update"
        android:layout_width="wrap_content"
        android:layout_height="wrap_content"
        android:id="@+id/button3"
        android:onClick="update"
        android:textStyle="normal|bold"
        android:layout_below="@+id/editText3"
        android:layout_alignLeft="@+id/button4"
        android:layout_alignStart="@+id/button4"
        android:layout_marginTop="13dp" />

    <EditText
        android:layout_width="wrap_content"
        android:layout_height="wrap_content"
        android:inputType="textPersonName"
        android:ems="10"
        android:id="@+id/editText6"
        android:layout_alignTop="@+id/button4"
        android:layout_alignParentLeft="true"
        android:layout_alignParentStart="true"
        android:freezesText="false"
        android:hint="Enter Name to Delete Data"
        android:layout_toLeftOf="@+id/button2"
        android:layout_toStartOf="@+id/button2" />

    <Button
        android:text="@string/delete"
        android:layout_width="wrap_content"
        android:layout_height="wrap_content"
        android:layout_marginRight="21dp"
        android:layout_marginEnd="21dp"
        android:id="@+id/button4"
        android:onClick="delete"
        android:textStyle="normal|bold"
        tools:ignore="RelativeOverlap"
        android:layout_marginBottom="41dp"
        android:layout_alignParentBottom="true"
        android:layout_alignParentRight="true"
        android:layout_alignParentEnd="true" />

    <EditText
        android:layout_width="wrap_content"
        android:layout_height="wrap_content"
        android:inputType="textPersonName"
        android:ems="10"
        android:layout_marginTop="47dp"
        android:id="@+id/editText3"
        android:textStyle="bold|italic"
        android:textSize="14sp"
        android:layout_below="@+id/button"
        android:layout_alignParentLeft="true"
        android:layout_alignParentStart="true"
        android:layout_marginLeft="7dp"
        android:layout_marginStart="7dp"
        android:hint="Current Name" />

    <EditText
        android:layout_width="match_parent"
        android:layout_height="wrap_content"
        android:inputType="textPassword"
        android:ems="10"
        android:layout_marginTop="11dp"
        android:id="@+id/editPass"
        android:hint="Enter Password"
        android:gravity="center_vertical|center"
        android:textSize="18sp"
        android:layout_below="@+id/textView2"
        android:layout_alignParentLeft="true"
        android:layout_alignParentStart="true"
        android:textAllCaps="false"
        android:textStyle="normal|bold" />

    <EditText
        android:layout_width="wrap_content"
        android:layout_height="wrap_content"
        android:inputType="textPersonName"
        android:ems="10"
        android:id="@+id/editText5"
        android:textStyle="bold|italic"
        android:textSize="14sp"
        android:hint="New Name"
        android:layout_alignTop="@+id/button3"
        android:layout_alignLeft="@+id/editText3"
        android:layout_alignStart="@+id/editText3"
        android:layout_marginTop="32dp" />
</RelativeLayout>
Step 3 : Now open app -> java -> package -> MainActivity.java and add the below code.
In this step we used the functions that linked via the button click. These functions are defined in other class and are used here. Each function return value that define no of rows updated, using that we defined whether operation is successful or not. Also user need to define valid data to perform operation empty fields will not be entertained and return error .
package com.example.sqliteoperations;

import android.support.v7.app.AppCompatActivity;
import android.os.Bundle;
import android.view.View;
import android.widget.EditText;

public class MainActivity extends AppCompatActivity {
    EditText Name, Pass , updateold, updatenew, delete;
    myDbAdapter helper;
    @Override
    protected void onCreate(Bundle savedInstanceState) {
        super.onCreate(savedInstanceState);
        setContentView(R.layout.activity_main);
        Name= (EditText) findViewById(R.id.editName);
        Pass= (EditText) findViewById(R.id.editPass);
        updateold= (EditText) findViewById(R.id.editText3);
        updatenew= (EditText) findViewById(R.id.editText5);
        delete = (EditText) findViewById(R.id.editText6);

        helper = new myDbAdapter(this);
    }
    public void addUser(View view)
    {
        String t1 = Name.getText().toString();
        String t2 = Pass.getText().toString();
        if(t1.isEmpty() || t2.isEmpty())
        {
            Message.message(getApplicationContext(),"Enter Both Name and Password");
        }
        else
        {
            long id = helper.insertData(t1,t2);
            if(id<=0)
            {
                Message.message(getApplicationContext(),"Insertion Unsuccessful");
                Name.setText("");
                Pass.setText("");
            } else
            {
                Message.message(getApplicationContext(),"Insertion Successful");
                Name.setText("");
                Pass.setText("");
            }
        }
    }

    public void viewdata(View view)
    {
        String data = helper.getData();
        Message.message(this,data);
    }

    public void update( View view)
    {
        String u1 = updateold.getText().toString();
        String u2 = updatenew.getText().toString();
        if(u1.isEmpty() || u2.isEmpty())
        {
            Message.message(getApplicationContext(),"Enter Data");
        }
        else
        {
            int a= helper.updateName( u1, u2);
            if(a<=0)
            {
                Message.message(getApplicationContext(),"Unsuccessful");
                updateold.setText("");
                updatenew.setText("");
            } else {
                Message.message(getApplicationContext(),"Updated");
                updateold.setText("");
                updatenew.setText("");
            }
        }

    }
    public void delete( View view)
    {
        String uname = delete.getText().toString();
        if(uname.isEmpty())
        {
            Message.message(getApplicationContext(),"Enter Data");
        }
        else{
            int a= helper.delete(uname);
            if(a<=0)
            {
                Message.message(getApplicationContext(),"Unsuccessful");
                delete.setText("");
            }
            else
            {
                Message.message(this, "DELETED");
                delete.setText("");
            }
        }
    }
}
Step 4: In this step create a java class myDbAdapter. java.
In this we define the functions that are used to perform the operations insert, update and delete operations in SQLite. Further this class create another class that will extend the SQLiteOpenHelper. Each function carry equivalent methods that perform operations.
Important Note – According to naming convention it is suggested to define primary key starting with underscore example: _id.
package com.example.sqliteoperations;

import android.content.ContentValues;
import android.content.Context;
import android.database.Cursor;
import android.database.sqlite.SQLiteDatabase;
import android.database.sqlite.SQLiteOpenHelper;


public class myDbAdapter {
    myDbHelper myhelper;
    public myDbAdapter(Context context)
    {
        myhelper = new myDbHelper(context);
    }

    public long insertData(String name, String pass)
    {
        SQLiteDatabase dbb = myhelper.getWritableDatabase();
        ContentValues contentValues = new ContentValues();
        contentValues.put(myDbHelper.NAME, name);
        contentValues.put(myDbHelper.MyPASSWORD, pass);
        long id = dbb.insert(myDbHelper.TABLE_NAME, null , contentValues);
        return id;
    }

    public String getData()
    {
        SQLiteDatabase db = myhelper.getWritableDatabase();
        String[] columns = {myDbHelper.UID,myDbHelper.NAME,myDbHelper.MyPASSWORD};
        Cursor cursor =db.query(myDbHelper.TABLE_NAME,columns,null,null,null,null,null);
        StringBuffer buffer= new StringBuffer();
        while (cursor.moveToNext())
        {
            int cid =cursor.getInt(cursor.getColumnIndex(myDbHelper.UID));
            String name =cursor.getString(cursor.getColumnIndex(myDbHelper.NAME));
            String  password =cursor.getString(cursor.getColumnIndex(myDbHelper.MyPASSWORD));
            buffer.append(cid+ "   " + name + "   " + password +" \n");
        }
        return buffer.toString();
    }

    public  int delete(String uname)
    {
        SQLiteDatabase db = myhelper.getWritableDatabase();
        String[] whereArgs ={uname};

        int count =db.delete(myDbHelper.TABLE_NAME ,myDbHelper.NAME+" = ?",whereArgs);
        return  count;
    }

    public int updateName(String oldName , String newName)
    {
        SQLiteDatabase db = myhelper.getWritableDatabase();
        ContentValues contentValues = new ContentValues();
        contentValues.put(myDbHelper.NAME,newName);
        String[] whereArgs= {oldName};
        int count =db.update(myDbHelper.TABLE_NAME,contentValues, myDbHelper.NAME+" = ?",whereArgs );
        return count;
    }

    static class myDbHelper extends SQLiteOpenHelper
    {
        private static final String DATABASE_NAME = "myDatabase";    // Database Name
        private static final String TABLE_NAME = "myTable";   // Table Name
        private static final int DATABASE_Version = 1;.    // Database Version
        private static final String UID="_id";     // Column I (Primary Key)
        private static final String NAME = "Name";    //Column II
        private static final String MyPASSWORD= "Password";    // Column III
        private static final String CREATE_TABLE = "CREATE TABLE "+TABLE_NAME+
                " ("+UID+" INTEGER PRIMARY KEY AUTOINCREMENT, "+NAME+" VARCHAR(255) ,"+ MyPASSWORD+" VARCHAR(225));";
        private static final String DROP_TABLE ="DROP TABLE IF EXISTS "+TABLE_NAME;
        private Context context;

        public myDbHelper(Context context) {
            super(context, DATABASE_NAME, null, DATABASE_Version);
            this.context=context;
        }

        public void onCreate(SQLiteDatabase db) {

            try {
                db.execSQL(CREATE_TABLE);
            } catch (Exception e) {
                Message.message(context,""+e);
            }
        }

        @Override
        public void onUpgrade(SQLiteDatabase db, int oldVersion, int newVersion) {
            try {
                Message.message(context,"OnUpgrade");
                db.execSQL(DROP_TABLE);
                onCreate(db);
            }catch (Exception e) {
                Message.message(context,""+e);
            }
        }
    }
}
Step 5: In this step create another java class Message.class
In this just simply add toast for displaying message. This is optional, it is just added to again and again defining toast in the example.
package com.example.sqliteoperations;

import android.content.Context;
import android.widget.Toast;

public class Message {
    public static void message(Context context, String message) {
        Toast.makeText(context, message, Toast.LENGTH_LONG).show();
    }
}
Output
Now run the app and view the functionality added over the buttons.

Add & Retrieve Image From SQLite Database:
To understand how to add or retrieve image from phone external storage to application using SQLite Database. Please read our step by step add & retrieve image from SQLite tutorial.
43 thoughts on “SQLite Tutorial With Example In Android Studio”
Leave a Reply to Mani Cancel reply
Premium Project Source Code:
- Food Ordering Android App Project Source Code
- Ecommerce Store Android App Project Source Code
- Convert Website Into Android App Project Source Code
- Quiz Game Android App Project Source Code
- Radio Streaming Android App Source Code
- City Guide Android App Project Source Code
- QR Barcode Android App Project Source Code
I had a few problems to resolve as mentioned about in res not properly declared
but mainly with the support.v7.appcompa
Finally I found the solution by copying the code from this page and copied it into the window of Android Studio containing the code and allowed the conversion to Kotlin = it did the trick to get the app running on the connecte mobile
Thank you. It was tough analysing the code but I got there eventually and learnt a lot on the way.
i get a error of insertion unsuccessfull
Contrary to what is said in the comments, the code is **not** working “out of the box”. There’s dimensions and strings missing. Not that this is a big issue, it’s extremely easy to solve. But since this is a tutorial, it should build straight away.
I also wonder why there’s a “values-night” resource directory. Has no added value for a tutorial and is also not used. On the contrary, there was even a warning message in the dimens.xml file of the values-night directory saying the “activity_horizontal_margin” was not defined in the default dimens.xml file in the values directory (which should…)
app keeps stopping. What to do?
good code everthing works
thank you so much you saved me for assignment
He say error string password
Were string
there is a error in “.message ” part.
Great tutorial and awesome example. I noticed the menu button is not working on your site though, shame really I was hoping to read I to the android camera post. Seriously good code, will be referencing your tutorial in my code.
Thank you very much.
May god bless you
Ace! Worked first time.
Hello,
I want to assign fetched sqlite database records in list view how should I will do it.
Please give me suggestion on the above issue.
can you please help me out with this error?
if(t1.isEmpty() || t2.isEmpty())
{
Message.message(getApplicationContext(),”Enter Both Name and Password”);
}
else
{
long id = helper.insertData(t1,t2);
if(id<=0)
{
Message.message(getApplicationContext(),"Insertion Unsuccessful");
Name.setText("");
Pass.setText("");
} else
{
Message.message(getApplicationContext(),"Insertion Successful");
Name.setText("");
Pass.setText("");
}
}
}
i am getting error for "message"
hey..
i am also getting error in “.message” part..
how did you solved that error?
YOu can write this like
Toast.maketext(getApplicationContext(),”Insertion success”,Toast.LENGTH.SHORT).show
it is a pop up message
He make a class of Message where he perform this task
instead of message you can use Toast for showing message.
you replace your table , and add given below line:
private static final String CREATE_TABLE = “CREATE TABLE ” + TABLE_NAME + ” ( ” + UID + ” INTEGER PRIMARY KEY AUTOINCREMENT, ” + NAME + ” TEXT ,” + MyPASSWORD + ” TEXT)”;
I hope it working.
good code !!
im getting issue while insertion, rid<0 ; what could be the solution? can you suggest some?
plz help me i m getting an error AAPT2 error: check logs for details
you saved me
One of the best tutorials on sqlite… Really helpful for a beginner!!!
Thanks!! It works!
very helpful ,precise ,simple and complete. Thank you brother!!!
open values strings.xml
UserLoginDatabase
UserName
Password
View Data3
Add User
Update
Delete
Thank you
Very helpfull for registration app
Hi,
Link to dowload codes.
Please
Very good Tutorial for beginners. Abhishek you are doing well. Keep it up.
How to view the input data in text view instead of toast
Great tutorial, and adapted it easily for my project
Thankyou for this, it helped me!
Hai abhi i’v tried this tutorial and i got an error with cursor window when i tried to click view data…
Would u help me to fix this error
Excellent tutorial, it is what i am searching for :), thanks Abhiandroid
i have a error in Message.”message”(getApplicationContext(),”enter data”);
the quoted line has shown error how to fix it
private static final int DATABASE_Version = 1.; // Database Version << There's an error found. You were using a point there.
I had to change several things to get the downloaded source code to run.
There was an error in the CREATE_TABLE string that was generated (some spaces and a comma were missing). And in the addUser method there is a null value passed to the message method of the Message class.
created a database file . Everything is working fine but it is not shown in the local db
Hi, how to set path of sqlite database in android.. can u pls share the code because i couldn’t able to find data/data/APP_Name/databases/DATABASE_NAME in my device
thanks in advance
waiting for ur reply
Please define
android:paddingBottom=”@dimen/activity_vertical_margin”
android:paddingLeft=”@dimen/activity_horizontal_margin”
android:paddingRight=”@dimen/activity_horizontal_margin”
android:paddingTop=”@dimen/activity_vertical_margin”
Hello,
Thanks for your tutorial! But I’ve a problem. It says that it “cannot resolve method ‘message(android.content.Context, java.lang.String)”.
What should I do?
Thanks!!
You have not shared the dependency for string.xml and other file linkage from activity_main.xml