ImageView Tutorial With Example In Android
In Android, ImageView class is used to display an image file in application. Image file is easy to use but hard to master in Android, because of the various screen sizes in Android devices. An android is enriched with some of the best UI design widgets that allows us to build good looking and attractive UI based application.
Important Note: ImageView comes with different configuration options to support different scale types. Scale type options are used for scaling the bounds of an image to the bounds of the imageview. Some of them scaleTypes configuration properties are center, center_crop, fit_xy, fitStart etc. You can read our ScaleType tutorial to learn all details on it.
Below is an ImageView code in XML:
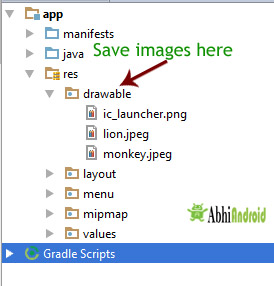
Make sure to save lion image in drawable folder
<ImageView
android:id="@+id/simpleImageView"
android:layout_width="fill_parent"
android:layout_height="wrap_content"
android:src="@drawable/lion" />

Table Of Contents
Attributes of ImageView:
Now let’s we discuss some important attributes that helps us to configure a ImageView in your xml file.
1. id: id is an attribute used to uniquely identify a image view in android. Below is the example code in which we set the id of a image view.
<ImageView
android:id="@+id/simpleImageView"
android:layout_width="fill_parent"
android:layout_height="wrap_content"
/>
2. src: src is an attribute used to set a source file or you can say image in your imageview to make your layout attractive.
Below is the example code in which we set the source of a imageview lion which is saved in drawable folder.
<ImageView
android:id="@+id/simpleImageView"
android:layout_width="fill_parent"
android:layout_height="wrap_content"
android:src="@drawable/lion" /><!--set the source of an image view-->
In Java:
We can also set the source image at run time programmatically in java class. For that we use setImageResource() method as shown in below example code.
/*Add in Oncreate() funtion after setContentView()*/
ImageView simpleImageView=(ImageView) findViewById(R.id.simpleImageView);
simpleImageView.setImageResource(R.drawable.lion);//set the source in java class

Below is the example code in which we set the black color in the background and an image in the src attribute of image view.
<ImageView
    android:id="@+id/simpleImageView"
    android:layout_width="fill_parent"
    android:layout_height="wrap_content"
    android:src="@drawable/lion"
    android:background="#000"/><!--black color in background of a image view-->

We can also set the background at run time programmatically in java class. In below example code we set the black color in the background of a image view.
/*Add in Oncreate() funtion after setContentView()*/
ImageView simpleImageView=(ImageView) findViewById(R.id.simpleImageView);
simpleImageView.setBackgroundColor(Color.BLACK);//set black color in background of a image view in java class
4. padding: padding attribute is used to set the padding from left, right, top or bottom of the Imageview.
- paddingRight: set the padding from the right side of the image view.
- paddingLeft: set the padding from the left side of the image view.
- paddingTop: set the padding from the top side of the image view.
- paddingBottom: set the padding from the bottom side of the image view.
- padding: set the padding from the all side’s of the image view.
Below is the example code of padding attribute in which we set the 30dp padding from all the side’s of a image view.
<ImageView
    android:id="@+id/simpleImageView"
    android:layout_width="fill_parent"
    android:layout_height="wrap_content"
    android:background="#000"
    android:src="@drawable/lion"
    android:padding="30dp"/><!--set 30dp padding from all the sides-->

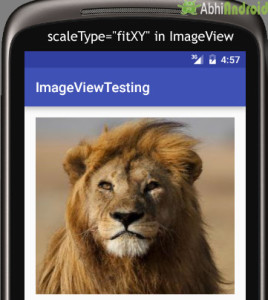
Below is the example code of scale type in which we set the scale type of image view to fit_xy.
<ImageView
android:id="@+id/simpleImageView"
android:layout_width="fill_parent"
android:layout_height="wrap_content"
android:src="@drawable/lion"
android:scaleType="fitXY"/><!--set scale type fit xy-->

In below example code we set the value for scale type “fitStart” which is used to fit the image in the start of the image view as shown below:
<ImageView
    android:id="@+id/simpleImageView"
    android:layout_width="fill_parent"
    android:layout_height="wrap_content"
    android:src="@drawable/lion"
    android:scaleType="fitStart"/><!--set scale type fit start of image view-->

Example of ImageView:
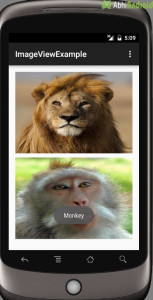
Below is the example of imageview in which we display two animal images of Lion and Monkey. And whenever user click on an image Animal name is displayed as toast on screen. Below is the final output and code:

In this step we create a new project in android studio by filling all the necessary details of the app like app name, package name, api versions etc.
Select File -> New -> New Project and Fill the forms and click "Finish" button.
Step 2: Download two images lion and monkey from the web. Now save those images in the drawable folder of your project.

In this step we add the code for displaying an image view on the screen in a relative layout. Here make sure you have already saved two images name lion and monkey in your drawable folder.
<RelativeLayout xmlns:android="http://schemas.android.com/apk/res/android"
    xmlns:tools="http://schemas.android.com/tools"
    android:layout_width="match_parent"
    android:layout_height="match_parent"
    android:paddingBottom="@dimen/activity_vertical_margin"
    android:paddingLeft="@dimen/activity_horizontal_margin"
    android:paddingRight="@dimen/activity_horizontal_margin"
    android:paddingTop="@dimen/activity_vertical_margin"
    tools:context=".MainActivity">


    <ImageView
        android:id="@+id/simpleImageViewLion"
        android:layout_width="fill_parent"
        android:layout_height="200dp"
        android:scaleType="fitXY"
        android:src="@drawable/lion" />

    <ImageView
    android:id="@+id/simpleImageViewMonkey"
    android:layout_width="fill_parent"
    android:layout_height="200dp"
    android:layout_below="@+id/simpleImageViewLion"
    android:layout_marginTop="10dp"
    android:scaleType="fitXY"
    android:src="@drawable/monkey" />

</RelativeLayout>
Step 4: Now open app -> java -> package -> MainActivity.java and add the following code:
In this step we add the code to initiate the image view’s and then perform click event on them.
package example.abhiandriod.imageviewexample;

import android.graphics.Color;
import android.support.v7.app.AppCompatActivity;
import android.os.Bundle;
import android.view.Menu;
import android.view.MenuItem;
import android.view.View;
import android.widget.ImageView;
import android.widget.Toast;

public class MainActivity extends AppCompatActivity {

    @Override
    protected void onCreate(Bundle savedInstanceState) {
        super.onCreate(savedInstanceState);
        setContentView(R.layout.activity_main);
        ImageView simpleImageViewLion = (ImageView) findViewById(R.id.simpleImageViewLion);//get the id of first image view
        ImageView simpleImageViewMonkey = (ImageView) findViewById(R.id.simpleImageViewMonkey);//get the id of second image view
        simpleImageViewLion.setOnClickListener(new View.OnClickListener() {
            @Override
            public void onClick(View view) {
                Toast.makeText(getApplicationContext(), "Lion", Toast.LENGTH_LONG).show();//display the text on image click event
            }
        });
        simpleImageViewMonkey.setOnClickListener(new View.OnClickListener() {
            @Override
            public void onClick(View view) {
                Toast.makeText(getApplicationContext(), "Monkey", Toast.LENGTH_LONG).show();//display the text on image click event
            }
        });
    }


}
Output:
Now start AVD in Emulator and run the App. You will see the images of Lion and Monkey displayed on screen. Click on any Animal image and his name will appear on Screen. We clicked on Lion.

4 thoughts on “ImageView Tutorial With Example In Android”
Leave a Reply
Premium Project Source Code:
- Food Ordering Android App Project Source Code
- Ecommerce Store Android App Project Source Code
- Convert Website Into Android App Project Source Code
- Quiz Game Android App Project Source Code
- Radio Streaming Android App Source Code
- City Guide Android App Project Source Code
- QR Barcode Android App Project Source Code
how can I set other format of images like jpeg,jpg?
Hello abhi do you have an example of uploading image to facebook through android app?
very good explanation
thanks for help
what if i want to change the photo with other on click