AutoCompleteTextView Tutorial With Example In Android Studio
In Android, AutoCompleteTextView is a view i.e similar to EditText, except that it displays a list of completion suggestions automatically while the user is typing. A list of suggestions is displayed in drop down menu from which user can choose an item which actually replace the content of Editbox with that.
AutoCompleteTextView code in XML:
<AutoCompleteTextView
android:id="@+id/simpleAutoCompleteTextView"
android:layout_width="fill_parent"
android:layout_height="wrap_content"
android:text="This is an AutoCompleteTextView"/>
Table Of Contents
Using Array Adapter To Display Text Values In AutoCompleteTextView:
To display the Array content in an autocompletetextview we need to implement Adapter. In AutoCompleteTextView we mainly display text values so we use Array Adapter for that.
ArrayAdapter In Android:
ArrayAdapter is used when we need list of single type of items which is backed by an Array. For example, list of phone contacts, countries or names.
ArrayAdapter code:
ArrayAdapter(Context context, int resource, int textViewResourceId, T[] objects)
For more details on ArrayAdapter,parameter used and more details please read ArrayAdapter tutorial.
Retrieving the Value From AutoCompleteTextView In Java Class:
Below code retrieve the value from a AutoCompleteTextView in Java class.
AutoCompleteTextView simpleAutoCompleteTextView = (AutoCompleteTextView) findViewById(R.id.simpleAutoCompleteTextView);

String AutoCompleteTextViewValue = simpleAutoCompleteTextView.getText().toString();
Attributes of AutoCompleteTextView:
Now let’s we discuss about the attributes that helps us to configure a AutoCompleteTextView in your xml file.
1. id: id is an attribute used to uniquely identify a text AutoCompleteTextView.
<AutoCompleteTextView
android:id="@+id/simpleAutoCompleteTextView"
android:layout_height="wrap_content"
android:layout_width="match_parent"/>
2. text: text attribute is used to set the text in a AutoCompleteTextView. We can set the text in XML as well as in the java class.
Below we set the text “Country” in a AutoCompleteTextView.
<AutoCompleteTextView
    android:id="@+id/simpleAutoCompleteTextView"
    android:layout_width="fill_parent"
    android:layout_height="wrap_content"
    android:text="Country"/><!--display text "Country"-->

Below we set the right gravity for text of a AutoCompleteTextView.
<AutoCompleteTextView
    android:id="@+id/simpleAutoCompleteTextView"
    android:layout_width="fill_parent"
    android:layout_height="wrap_content"
    android:text="Country"
    android:gravity="right"/><!--right gravity for text-->

/*Add in Oncreate() funtion after setContentView()*/
AutoCompleteTextView autoCompleteTextView = (AutoCompleteTextView)findViewById(R.id.simpleAutoCompleteTextView);

//display text Country
autoCompleteTextView.setText("Country");
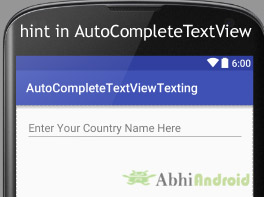
4. hint: hint attribute gives the hint to the user that what should he Enter in this AutoCompleteTextView. Whenever he start to type in AutoCompleteTextView the hint will automatically disappear.
<AutoCompleteTextView
android:id="@+id/simpleAutoCompleteTextView"
android:layout_width="fill_parent"
android:layout_height="wrap_content"
android:hint="Enter Your Country Name Here" /><!--display hint-->
/*Add in Oncreate() funtion after setContentView()*/
AutoCompleteTextView autoCompleteTextView = (AutoCompleteTextView)findViewById(R.id.simpleAutoCompleteTextView);

autoCompleteTextView.setHint("Enter Your Name Here");//display hint
5. textColor: This attribute set the color of a text in AutoCompleteTextView. Color value can be in the form of “#argb”, “#rgb”, “#rrggbb”, or “#aarrggbb”.
<AutoCompleteTextView
android:id="@+id/simpleAutoCompleteTextView"
android:layout_width="fill_parent"
android:layout_height="wrap_content"
android:text="Country"
android:textColor="#f00"/><!--red color for text-->

/*Add in Oncreate() funtion after setContentView()*/
AutoCompleteTextView simpleAutoCompleteTextView=(AutoCompleteTextView)findViewById(R.id.simpleAutoCompleteTextView);

simpleAutoCompleteTextView.setTextColor(Color.RED);//red color for text
6. textColorHint: This attribute is used to set the color of displayed hint.
<AutoCompleteTextView
android:id="@+id/simpleAutoCompleteTextView"
android:layout_width="fill_parent"
android:layout_height="wrap_content"
android:hint="Enter Your Name Here"
android:textColorHint="#0f0"/><!--green color for hint-->

/*Add in Oncreate() funtion after setContentView()*/
AutoCompleteTextView simpleAutoCompleteTextView=(AutoCompleteTextView)findViewById(R.id.simpleAutoCompleteTextView);

//green color for displayed hint
simpleAutoCompleteTextView.setHintTextColor(Color.green(0));
7. textSize: This attribute set the size of text in AutoCompleteTextView. We can set the text size in sp(scale independent pixel) or dp(density pixel).
<AutoCompleteTextView
android:id="@+id/simpleAutoCompleteTextView"
android:layout_width="fill_parent"
android:layout_height="wrap_content"
android:text="Country"
android:textSize="25sp" /><!--set the text size-->

/*Add in Oncreate() funtion after setContentView()*/
AutoCompleteTextView simpleAutoCompleteTextView=(AutoCompleteTextView)findViewById(R.id.simpleAutoCompleteTextView);
//set the text size
simpleAutoCompleteTextView.setTextSize(25);
8. textStyle: textStyle attribute is used to give text style of a AutoCompleteTextView. We can add bold, italic and normal style. If we want to use two or more styles for a AutoCompleteTextView then “|” operator is used for that.
<AutoCompleteTextView
    android:id="@+id/simpleAutoCompleteTextView"
    android:layout_width="fill_parent"
    android:layout_height="wrap_content"
    android:text="Country"
    android:textSize="25sp"
    android:textStyle="bold|italic"/><!--bold and italic text style-->

padding attribute is used to set the padding from left, right, top or bottom.
Below we set black color as background, white color as displayed hint and set 15dp padding from all the side’s for AutoCompleteTextView.
<AutoCompleteTextView
android:id="@+id/simpleAutoCompleteTextView"
android:layout_width="fill_parent"
android:layout_height="wrap_content"
android:background="#000"
android:hint="Enter Your Name Here"
android:padding="15dp"
android:textColorHint="#fff"
android:textStyle="bold|italic" />

/*Add in Oncreate() funtion after setContentView()*/
AutoCompleteTextView simpleAutoCompleteTextView=(AutoCompleteTextView)findViewById(R.id.simpleAutoCompleteTextView);

simpleAutoCompleteTextView.setBackgroundColor(Color.BLACK);//set black background color
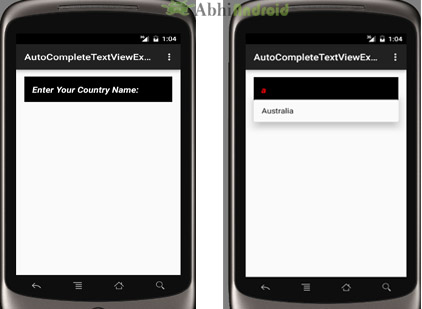
AutoCompleteTextView Example in Android Studio:
In the example of AutoCompleteTextView we display a auto complete text view with suggestion list which include country list. To fill the data in country list we implement an Array Adapter. Below is the final output, download code and step by step tutorial:
Step 2: Open res -> layout -> activity_mail.xml (or) main.xml and add following code:
In this step we open an xml file and add the code for displaying an auto complete text view by using different attributes as we discussed earlier in this article.
<?xml version="1.0" encoding="utf-8"?>
<RelativeLayout xmlns:android="http://schemas.android.com/apk/res/android"
    xmlns:tools="http://schemas.android.com/tools"
    android:layout_width="match_parent"
    android:layout_height="match_parent"
    android:paddingBottom="@dimen/activity_vertical_margin"
    android:paddingLeft="@dimen/activity_horizontal_margin"
    android:paddingRight="@dimen/activity_horizontal_margin"
    android:paddingTop="@dimen/activity_vertical_margin"
    tools:context="abhiandroid.com.autocompletetextviewtexting.MainActivity">

    <AutoCompleteTextView
        android:id="@+id/simpleAutoCompleteTextView"
        android:layout_width="fill_parent"
        android:layout_height="wrap_content"
        android:background="#000"
        android:hint="Enter Your Name Here"
        android:padding="15dp"
        android:textColorHint="#fff"
        android:textStyle="bold|italic" />
</RelativeLayout>
Step 3: Open app -> package -> MainActivity.java
In this step we open MainActivity where we add the code to initiate the auto complete text view and then fill the data in the suggestion list by using an Array Adapter.
package example.abhiandriod.autocompletetextviewexample;

import android.support.v7.app.AppCompatActivity;
import android.os.Bundle;
import android.view.Menu;
import android.view.MenuItem;
import android.widget.ArrayAdapter;
import android.widget.AutoCompleteTextView;

public class MainActivity extends AppCompatActivity {

    String[] countryNameList = {"India", "China", "Australia", "New Zealand", "England", "Pakistan"};

    @Override
    protected void onCreate(Bundle savedInstanceState) {
        super.onCreate(savedInstanceState);
        setContentView(R.layout.activity_main);
        //initiate an auto complete text view
        AutoCompleteTextView simpleAutoCompleteTextView = (AutoCompleteTextView) findViewById(R.id.simpleAutoCompleteTextView);
        ArrayAdapter adapter = new ArrayAdapter(this, android.R.layout.simple_list_item_1, countryNameList);

        simpleAutoCompleteTextView.setAdapter(adapter);
        simpleAutoCompleteTextView.setThreshold(1);//start searching from 1 character
        simpleAutoCompleteTextView.setAdapter(adapter);   //set the adapter for displaying country name list
    }


}
Output:
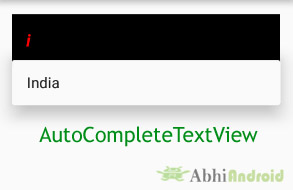
Now start the AVD in Emulator and run the App. Type ‘i’ & it will show ‘India’ as suggestion, type ‘A’ & it will show ‘Australia’ as suggestion and so on. This is done using AutoCompleteTextView.

6 thoughts on “AutoCompleteTextView Tutorial With Example In Android Studio”
Leave a Reply to Zakir Hussain Cancel reply
Premium Project Source Code:
- Food Ordering Android App Project Source Code
- Ecommerce Store Android App Project Source Code
- Convert Website Into Android App Project Source Code
- Quiz Game Android App Project Source Code
- Radio Streaming Android App Source Code
- City Guide Android App Project Source Code
- QR Barcode Android App Project Source Code
Thanks
How to add click listener according to its string not position
Why have you used this “android.R.layout.simple_list_item_1” in array adapter there is no such file named “simple_list_item_1”.
It present in android SDK.
sir I have a auto complete textview in my project . like your above example whenever i select India , after selecting india there should be open a activity like India which holds the flag of india in a image how can i do this
thanks in andvance
you can apply listeners to the list item and get the position and perform accordingly