The custom dialog uses DIALOG to create custom alert in android studio. Dialog display a small window i.e a popup which draws the user attention over the activity before they continue moving forward. The dialog appears over the current window and display the content defined in it.
AlertDialog Vs Custom AlertDialog:
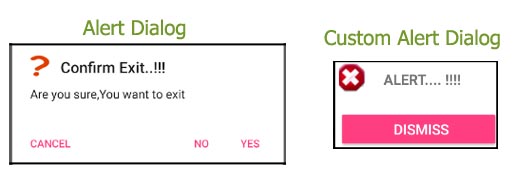
The Alert Dialog and Custom Alert Dialog both prompts a small window to make decision. The AlertDialog make use of the defined components or methods like setIcon, setTitle, setmessage etc but with Custom AlertDialog we can have the dialog customised and can define the layout of dialog as required. You can read more about it in alert dialog tutorial.
Custom Alert Dialog Example In Android Studio:
Below is the example of Custom Alert Dialog in which the functionality of Alert Dialog is defined over button click. In this example we have used a simple button and over that button click the alert dialog window will appear.
Below you can download code, see final output and step by step explanation of Custom Alert Dialog example in Android Studio.
Download Code (Password: abhiandroid)
 Step 1:
Create a new project and name it CustomAlertDialog.
Step 2: Open res -> layout -> activity_main.xml (or) main.xml and add following code:
Here we create XML for button and textview. On button click custom alert dialog will appear & textview is for asking user to click on button.
<?xml version="1.0" encoding="utf-8"?>
<RelativeLayout xmlns:android="http://schemas.android.com/apk/res/android"
    xmlns:tools="http://schemas.android.com/tools"
    android:id="@+id/activity_main"
    android:layout_width="match_parent"
    android:layout_height="match_parent"
    android:paddingBottom="@dimen/activity_vertical_margin"
    android:paddingLeft="@dimen/activity_horizontal_margin"
    android:paddingRight="@dimen/activity_horizontal_margin"
    android:paddingTop="@dimen/activity_vertical_margin"
    tools:context="com.example.customalertdialog.MainActivity">

    <Button
        android:layout_width="wrap_content"
        android:layout_height="wrap_content"
        android:id="@+id/buttonShowCustomDialog"
        android:onClick="exit"
        android:textStyle="normal|bold"
        style="@android:style/Widget.DeviceDefault.Button.Inset"
        android:layout_alignParentBottom="true"
        android:layout_centerHorizontal="true"
        android:layout_marginBottom="131dp"
        android:text="@string/click"/>

    <TextView
        android:text="CLICK TO VIEW CUSTOM ALERT DIALOG"
        android:layout_width="match_parent"
        android:layout_height="wrap_content"
        android:layout_above="@+id/buttonShowCustomDialog"
        android:layout_centerHorizontal="true"
        android:layout_marginBottom="86dp"
        android:id="@+id/textView"
        android:gravity="center"
        android:textStyle="normal|bold"
        android:textSize="18sp"
        tools:ignore="HardcodedText" />
</RelativeLayout>
Step 3 :
Now create a layout file name as custom.xml .
In this file we are going to define the XML for custom dialog appearance. A textbox , imageview and a button.
<?xml version="1.0" encoding="utf-8"?>
<RelativeLayout xmlns:android="http://schemas.android.com/apk/res/android"
    xmlns:app="http://schemas.android.com/apk/res-auto"
    xmlns:tools="http://schemas.android.com/tools"
    android:orientation="vertical" android:layout_width="match_parent"
    android:layout_height="match_parent">

    <TextView
        android:text="@string/alert"
        android:layout_width="wrap_content"
        android:layout_height="wrap_content"
        android:id="@+id/text"
        android:textStyle="normal|bold"
        android:textSize="18sp"
        android:layout_alignParentTop="true"
        android:layout_toRightOf="@+id/image"
        android:layout_toEndOf="@+id/image"
        android:layout_marginLeft="21dp"
        android:layout_marginStart="21dp"
        android:layout_marginTop="12dp" />

    <ImageButton
        android:layout_width="35dp"
        android:layout_height="35dp"
        app:srcCompat="@drawable/stop"
        android:id="@+id/image"
        android:layout_alignParentLeft="true"
        android:layout_alignParentStart="true"
        android:layout_marginLeft="5dp"
        android:layout_marginTop="5dp"
        tools:ignore="ContentDescription,RtlHardcoded" />

    <Button
        android:id="@+id/dialogButtonOK"
        android:layout_width="200dp"
        android:layout_height="wrap_content"
        android:text="@string/dismiss"
        android:layout_marginTop="23dp"
        android:paddingRight="5dp"
        android:layout_below="@+id/image"
        android:layout_alignLeft="@+id/image"
        android:layout_alignStart="@+id/image"
        android:textSize="18sp"
        style="@style/Widget.AppCompat.Button.Colored"
        tools:ignore="RtlHardcoded,RtlSymmetry" />

</RelativeLayout>
Step 4 :
Now open app -> java -> package -> MainActivity.java and add the below code.
In this code onclick is added over the button click and Dialog is used to create the custom alert dialog.
package com.example.customalertdialog;

import android.app.Dialog;
import android.content.Context;
import android.support.v7.app.AppCompatActivity;
import android.os.Bundle;
import android.view.View;
import android.widget.Button;
import android.widget.ImageView;
import android.widget.TextView;

public class MainActivity extends AppCompatActivity {
    final Context context = this;
    private Button button;

    public void onCreate(Bundle savedInstanceState) {
        super.onCreate(savedInstanceState);
        setContentView(R.layout.activity_main);
        button = (Button) findViewById(R.id.buttonShowCustomDialog);
        // add button listener
        button.setOnClickListener(new View.OnClickListener() {
            @Override
            public void onClick(View arg0) {
                // custom dialog
                final Dialog dialog = new Dialog(context);
                dialog.setContentView(R.layout.custom);
                Button dialogButton = (Button) dialog.findViewById(R.id.dialogButtonOK);
                // if button is clicked, close the custom dialog
                dialogButton.setOnClickListener(new View.OnClickListener() {
                    @Override
                    public void onClick(View v) {
                        dialog.dismiss();
                        Toast.makeText(getApplicationContext(),"Dismissed..!!",Toast.LENGTH_SHORT).show();
                    }
                });
                dialog.show();
            }
        });
    }
}
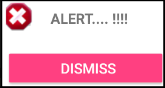
Output:
Now run the App and when you will click on the button. The custom alert dialog will appear on the screen.
I removed the dimbackground and I want to add the elevation/shadow under the alert dialog how can I do that.
Thanks,
i love your work sir Abhi,,,,,,you are very great sir,,,now i no need ant instructor for Android