Fragment Tutorial With Example In Android Studio
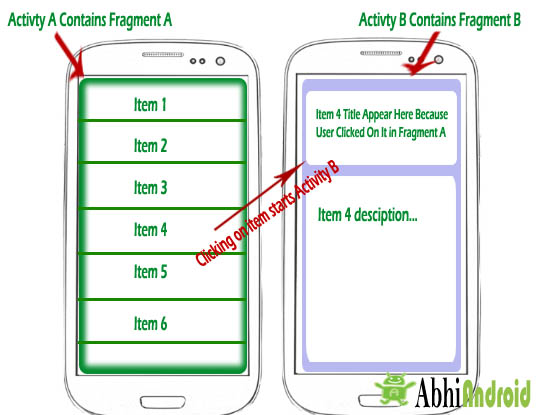
In Android, Fragment is a part of an activity which enable more modular activity design. It will not be wrong if we say a fragment is a kind of sub-activity. It represents a behaviour or a portion of user interface in an Activity. We can combine multiple Fragments in Single Activity to build a multi panel UI and reuse a Fragment in multiple Activities. We always need to embed Fragment in an activity and the fragment lifecycle is directly affected by the host activity’s lifecycle.
Important Related Read: Fragment Lifecycle

We can create Fragments by extending Fragment class or by inserting a Fragment into our Activity layout by declaring the Fragment in the activity’s layout file, as a <fragment> element. We can manipulate each Fragment independently, such as add or remove them.
While performing Fragment Transaction we can add a Fragment into back stack that’s managed by the Activity. back stack allow us to reverse a Fragment transaction on pressing Back button of device. For Example if we replace a Fragment and add it in back stack then on pressing the Back button on device it display the previous Fragment.
Table Of Contents
Some Important Points About Fragment In Android:
1. Fragments were added in Honeycomb version of Android i.e API version 11.
2. We can add, replace or remove Fragment’s in an Activity while the activity is running. For performing these operations we need a Layout(Relative Layout, FrameLayout or any other layout) in xml file and then replace that layout with the required Fragment.
3. Fragments has its own layout and its own behaviour with its own life cycle callbacks.
4. Fragment can be used in multiple activities.
5. We can also combine multiple Fragments in a single activity to build a multi-plane UI.
Need Of Fragments In Android:
Before the introduction of Fragment’s we can only show a single Activity on the screen at one given point of time so we were not able to divide the screen and control different parts separately. With the help of Fragment’s we can divide the screens in different parts and controls different parts separately.
By using Fragments we can comprise multiple Fragments in a single Activity. Fragments have their own events, layouts and complete life cycle. It provide flexibility and also removed the limitation of single Activity on the screen at a time.
Basic Fragment Code In XML:
<fragment
android:id="@+id/fragments"
android:layout_width="match_parent"
android:layout_height="match_parent" />
Create A Fragment Class In Android Studio:
For creating a Fragment firstly we extend the Fragment class, then override key lifecycle methods to insert our app logic, similar to the way we would with an Activity class. While creating a Fragment we must use onCreateView() callback to define the layout and in order to run a Fragment.
import android.os.Bundle;
import android.support.v4.app.Fragment;
import android.view.LayoutInflater;
import android.view.ViewGroup;

public class FirstFragment extends Fragment {
@Override
public View onCreateView(LayoutInflater inflater, ViewGroup container,
Bundle savedInstanceState) {
// Inflate the layout for this fragment
return inflater.inflate(R.layout.fragment_first, container, false);
}
}
Here the inflater parameter is a LayoutInflater used to inflate the layout, container parameter is the parent ViewGroup (from the activity’s layout) in which our Fragment layout will be inserted.
The savedInstanceState parameter is a Bundle that provides data about the previous instance of the Fragment. The inflate() method has three arguments first one is the resource layout which we want to inflate, second is the ViewGroup to be the parent of the inflated layout. Passing the container is important in order for the system to apply layout parameters to the root view of the inflated layout, specified by the parent view in which it’s going and the third parameter is a boolean value indicating whether the inflated layout should be attached to the ViewGroup (the second parameter) during inflation.
Implementation of Fragment In Android Require Honeycomb (3.0) or Later:
Fragments were added in in Honeycomb version of Android i.e API version 11. There are some primary classes related to Fragment’s are:
1. FragmentActivity: The base class for all activities using compatibility based Fragment (and loader) features.
2. Fragment: The base class for all Fragment definitions
3. FragmentManager: The class for interacting with Fragment objects inside an activity
4. FragmentTransaction: The class for performing an atomic set of Fragment operations such as Replace or Add a Fragment.
Fragment Example 1 In Android Studio:
Below is the example of Fragment’s. In this example we create two Fragments and load them on the click of Button’s. We display two Button’s and a FrameLayout in our Activity and perform setOnClickListener event on both Button’s. On the click of First Button we replace the First Fragment and on click of Second Button we replace the Second Fragment with the layout(FrameLayout). In the both Fragment’s we display a TextView and a Button and onclick of Button we display the name of the Fragment with the help of Toast.
Below you can download code, see final output and read step by step explanation:
Step 1: Create a new project and name it FragmentExample
Step 2: Open res -> layout ->activity_main.xml (or) main.xml and add following code:
<LinearLayout xmlns:android="http://schemas.android.com/apk/res/android"
xmlns:tools="http://schemas.android.com/tools"
android:layout_width="match_parent"
android:layout_height="match_parent"
android:orientation="vertical"
android:paddingBottom="@dimen/activity_vertical_margin"
android:paddingLeft="@dimen/activity_horizontal_margin"
android:paddingRight="@dimen/activity_horizontal_margin"
android:paddingTop="@dimen/activity_vertical_margin"
tools:context=".MainActivity">
<!-- display two Button's and a FrameLayout to replace the Fragment's  -->
<Button
android:id="@+id/firstFragment"
android:layout_width="match_parent"
android:layout_height="wrap_content"
android:background="@color/button_background_color"
android:text="First Fragment"
android:textColor="@color/white"
android:textSize="20sp" />

<Button
android:id="@+id/secondFragment"
android:layout_width="match_parent"
android:layout_height="wrap_content"
android:layout_marginTop="10dp"
android:background="@color/button_background_color"
android:text="Second Fragment"
android:textColor="@color/white"
android:textSize="20sp" />

<FrameLayout
android:id="@+id/frameLayout"
android:layout_width="match_parent"
android:layout_height="match_parent"
android:layout_marginTop="10dp" />
</LinearLayout>
Step 3: Open src -> package -> MainActivity.java
In this step we open MainActivity and add the code for initiate the Button’s. After that we perform setOnClickListener event on both Button’s. On the click of First Button we replace the First Fragment and on click of Second Button we replace the Second Fragment with the layout(FrameLayout). For replacing a Fragment with FrameLayout firstly we create a Fragment Manager and then begin the transaction using Fragment Transaction and finally replace the Fragment with the layout i.e FrameLayout.
package com.abhiandroid.fragmentexample;

import android.app.Fragment;
import android.app.FragmentManager;
import android.app.FragmentTransaction;
import android.support.v7.app.AppCompatActivity;
import android.os.Bundle;
import android.view.View;
import android.widget.Button;

public class MainActivity extends AppCompatActivity {

Button firstFragment, secondFragment;

@Override
protected void onCreate(Bundle savedInstanceState) {
super.onCreate(savedInstanceState);
setContentView(R.layout.activity_main);
// get the reference of Button's
firstFragment = (Button) findViewById(R.id.firstFragment);
secondFragment = (Button) findViewById(R.id.secondFragment);

// perform setOnClickListener event on First Button
firstFragment.setOnClickListener(new View.OnClickListener() {
@Override
public void onClick(View v) {
// load First Fragment
loadFragment(new FirstFragment());
}
});
// perform setOnClickListener event on Second Button
secondFragment.setOnClickListener(new View.OnClickListener() {
@Override
public void onClick(View v) {
// load Second Fragment
loadFragment(new SecondFragment());
}
});

}

private void loadFragment(Fragment fragment) {
// create a FragmentManager
FragmentManager fm = getFragmentManager();
// create a FragmentTransaction to begin the transaction and replace the Fragment
FragmentTransaction fragmentTransaction = fm.beginTransaction();
// replace the FrameLayout with new Fragment
fragmentTransaction.replace(R.id.frameLayout, fragment);
fragmentTransaction.commit(); // save the changes
}
}
Step 4: Now we need 2 fragments and 2 xml layouts. So create two fragments by right click on your package folder and create classes and name them as FirstFragment and SecondFragment and add the following code respectively.
FirstFragment.class
In this Fragment firstly we inflate the layout and get the reference of Button. After that we perform setOnClickListener event on Button so whenever a user click on the button a message “First Fragment“ is displayed on the screen by using a Toast.
package com.abhiandroid.fragmentexample;

import android.app.Fragment;
import android.os.Bundle;
import android.view.LayoutInflater;
import android.view.View;
import android.view.ViewGroup;
import android.widget.Button;
import android.widget.Toast;

public class FirstFragment extends Fragment {


View view;
Button firstButton;

@Override
public View onCreateView(LayoutInflater inflater, ViewGroup container,
Bundle savedInstanceState) {
// Inflate the layout for this fragment
view = inflater.inflate(R.layout.fragment_first, container, false);
// get the reference of Button
firstButton = (Button) view.findViewById(R.id.firstButton);
// perform setOnClickListener on first Button
firstButton.setOnClickListener(new View.OnClickListener() {
@Override
public void onClick(View v) {
// display a message by using a Toast
Toast.makeText(getActivity(), "First Fragment", Toast.LENGTH_LONG).show();
}
});
return view;
}
}
SecondFragment.class
In this Fragment firstly we inflate the layout and get the reference of Button. After that we perform setOnClickListener event on Button so whenever a user click on the button a message “Second Fragment“ is displayed on the screen by using a Toast.
package com.abhiandroid.fragmentexample;

import android.app.Fragment;
import android.os.Bundle;
import android.view.LayoutInflater;
import android.view.View;
import android.view.ViewGroup;
import android.widget.Button;
import android.widget.Toast;


public class SecondFragment extends Fragment {

View view;
Button secondButton;

@Override
public View onCreateView(LayoutInflater inflater, ViewGroup container,
Bundle savedInstanceState) {
// Inflate the layout for this fragment
view = inflater.inflate(R.layout.fragment_second, container, false);
// get the reference of Button
secondButton = (Button) view.findViewById(R.id.secondButton);
// perform setOnClickListener on second Button
secondButton.setOnClickListener(new View.OnClickListener() {
@Override
public void onClick(View v) {
// display a message by using a Toast
Toast.makeText(getActivity(), "Second Fragment", Toast.LENGTH_LONG).show();
}
});
return view;
}
}
Step 5: Now create 2 xml layouts by right clicking on res/layout -> New -> Layout Resource File and name them as fragment_first and fragment_second and add the following code in respective files.
Here we will design the basic simple UI by using TextView and Button in both xml’s.
fragment_first.xml
<RelativeLayout xmlns:android="http://schemas.android.com/apk/res/android"
xmlns:tools="http://schemas.android.com/tools"
android:layout_width="match_parent"
android:layout_height="match_parent"
tools:context="com.abhiandroid.fragmentexample.FirstFragment">

<!--TextView and Button displayed in First Fragment -->
<TextView
android:layout_width="wrap_content"
android:layout_height="wrap_content"
android:layout_centerHorizontal="true"
android:layout_marginTop="100dp"
android:text="This is First Fragment"
android:textColor="@color/black"
android:textSize="25sp" />

<Button
android:id="@+id/firstButton"
android:layout_width="fill_parent"
android:layout_height="wrap_content"
android:layout_centerInParent="true"
android:layout_marginLeft="20dp"
android:layout_marginRight="20dp"
android:background="@color/green"
android:text="First Fragment"
android:textColor="@color/white"
android:textSize="20sp"
android:textStyle="bold" />
</RelativeLayout>
fragment_second.xml
<RelativeLayout xmlns:android="http://schemas.android.com/apk/res/android"
xmlns:tools="http://schemas.android.com/tools"
android:layout_width="match_parent"
android:layout_height="match_parent"
tools:context="com.abhiandroid.fragmentexample.SecondFragment">

<!--TextView and Button displayed in Second Fragment -->
<TextView
android:layout_width="wrap_content"
android:layout_height="wrap_content"
android:layout_centerHorizontal="true"
android:layout_marginTop="100dp"
android:text="This is Second Fragment"
android:textColor="@color/black"
android:textSize="25sp" />

<Button
android:id="@+id/secondButton"
android:layout_width="fill_parent"
android:layout_height="wrap_content"
android:layout_centerInParent="true"
android:layout_marginLeft="20dp"
android:layout_marginRight="20dp"
android:background="@color/green"
android:text="Second Fragment"
android:textColor="@color/white"
android:textSize="20sp"
android:textStyle="bold" />

</RelativeLayout>
Step 6: Open res ->values ->colors.xml
In this step we define the color’s that used in our xml file.
<?xml version="1.0" encoding="utf-8"?>
<resources>
<!-- color's used in our project -->
<color name="black">#000</color>
<color name="green">#0f0</color>
<color name="white">#fff</color>
<color name="button_background_color">#925</color>
</resources>
Step 7: Open AndroidManifest.xml
In this step we show the Android Manifest file in which do nothing because we need only one Activitty i.e MainActivity which is already defined in it. In our project we create two Fragment’s but we don’t need to define the Fragment’s in manifest because Fragment is a part of an Activity.
<?xml version="1.0" encoding="utf-8"?>
<manifest xmlns:android="http://schemas.android.com/apk/res/android"
package="com.abhiandroid.fragmentexample" >

<application
android:allowBackup="true"
android:icon="@mipmap/ic_launcher"
android:label="@string/app_name"
android:theme="@style/AppTheme" >
<activity
android:name=".MainActivity"
android:label="@string/app_name" >
<intent-filter>
<action android:name="android.intent.action.MAIN" />

<category android:name="android.intent.category.LAUNCHER" />
</intent-filter>
</activity>
</application>
</manifest>
Step 8: Now run the App and you will two button. Clicking on first button shows First Fragment and on click of Second Button shows the Second Fragment which is actually replacing layout(FrameLayout).
Fragment Example 2 In Android Studio:
Below is the example of Simple Fragment. In this example we create a simple Fragment and display it in our Activity by declaring a <fragment> element in our xml file. We also display a Button in our activity’s xml and perform click event so whenever a user click on it a message is displayed on the screen by using a Toast. In the Fragment we display a TextView and a Button and perform click event of Button so whenever a user click on the Button a message is displayed on the screen with the help of Toast.
Below you can download code, see final output and read step by step explanation:

Step 1: Create a new project and name it FragmentExample
Step 2: Open res -> layout ->activity_main.xml (or) main.xml and add following code:
<LinearLayout xmlns:android="http://schemas.android.com/apk/res/android"
xmlns:tools="http://schemas.android.com/tools"
android:layout_width="match_parent"
android:layout_height="match_parent"
android:orientation="vertical"
android:paddingBottom="@dimen/activity_vertical_margin"
android:paddingLeft="@dimen/activity_horizontal_margin"
android:paddingRight="@dimen/activity_horizontal_margin"
android:paddingTop="@dimen/activity_vertical_margin"
tools:context=".MainActivity">
<!-- display a Button and a Fragment  -->

<Button
android:id="@+id/activity_button"
android:layout_width="match_parent"
android:layout_height="wrap_content"
android:layout_marginTop="10dp"
android:background="@color/button_background_color"
android:text="Activity's Button"
android:textColor="@color/white"
android:textSize="20sp" />

<fragment
android:id="@+id/fragments"
android:name="com.abhiandroid.fragmentexample.SimpleFragment"
android:layout_width="match_parent"
android:layout_height="match_parent"
android:layout_marginTop="10dp" />
</LinearLayout>
Step 3: Open src -> package -> MainActivity.java
In this step we open MainActivity and add the code for initiate the Button. After that we perform setOnClickListener on Button so whenever a user click on Button a message is displayed on the screen with the help of Toast.
package com.abhiandroid.fragmentexample;

import android.app.Fragment;
import android.app.FragmentManager;
import android.app.FragmentTransaction;
import android.support.v7.app.AppCompatActivity;
import android.os.Bundle;
import android.view.View;
import android.widget.Button;
import android.widget.Toast;

public class MainActivity extends AppCompatActivity {

Button activityButton;

@Override
protected void onCreate(Bundle savedInstanceState) {
super.onCreate(savedInstanceState);
setContentView(R.layout.activity_main);
// get the reference of Button
activityButton = (Button) findViewById(R.id.activity_button);

// perform setOnClickListener event on Button
activityButton.setOnClickListener(new View.OnClickListener() {
@Override
public void onClick(View v) {
// display a message by using a Toast
Toast.makeText(getApplicationContext(), "Activity's Button", Toast.LENGTH_LONG).show();
}
});
}
}
Step 4: Now we create a fragment by right click on your package folder and create classes and name it SimpleFragment and add the following code.
In this Fragment firstly we inflate the layout and get the reference of Button. After that we perform setOnClickListener event on Button so whenever a user click on the button a message “Fragment’s Button“ is displayed on the screen by using a Toast.
package com.abhiandroid.fragmentexample;

import android.app.Fragment;
import android.os.Bundle;
import android.view.LayoutInflater;
import android.view.View;
import android.view.ViewGroup;
import android.widget.Button;
import android.widget.Toast;


public class SimpleFragment extends Fragment {

View view;
Button firstButton;

@Override
public View onCreateView(LayoutInflater inflater, ViewGroup container,
Bundle savedInstanceState) {
// Inflate the layout for this fragment
view = inflater.inflate(R.layout.fragment_simple, container, false);
// get the reference of Button
firstButton = (Button) view.findViewById(R.id.firstButton);
// perform setOnClickListener on first Button
firstButton.setOnClickListener(new View.OnClickListener() {
@Override
public void onClick(View v) {
// display a message by using a Toast
Toast.makeText(getActivity(), "Fragment's Button", Toast.LENGTH_LONG).show();
}
});
return view;
}
}
Step 5: Now create a xml layouts by right clicking on res/layout -> New -> Layout Resource File and name fragment_simple and add the following code in it.
Here we will design the basic simple UI by using TextView and Button
<RelativeLayout xmlns:android="http://schemas.android.com/apk/res/android"
xmlns:tools="http://schemas.android.com/tools"
android:layout_width="match_parent"
android:layout_height="match_parent"
tools:context="com.abhiandroid.fragmentexample.SimpleFragment">

<!--TextView and Button displayed in Simple Fragment -->
<TextView
android:layout_width="wrap_content"
android:layout_height="wrap_content"
android:layout_centerHorizontal="true"
android:layout_marginTop="100dp"
android:text="Simple Fragment"
android:textColor="@color/black"
android:textSize="25sp" />

<Button
android:id="@+id/firstButton"
android:layout_width="fill_parent"
android:layout_height="wrap_content"
android:layout_centerInParent="true"
android:layout_marginLeft="20dp"
android:layout_marginRight="20dp"
android:background="@color/green"
android:text="Fragment's Button"
android:textColor="@color/white"
android:textSize="20sp"
android:textStyle="bold" />
</RelativeLayout>
Step 6: Open res ->values ->colors.xml
In this step we define the color’s that used in our xml file.
<?xml version="1.0" encoding="utf-8"?>
<resources>
<!-- color's used in our project -->
<color name="black">#000</color>
<color name="green">#0f0</color>
<color name="white">#fff</color>
<color name="button_background_color">#925</color>
</resources>
Step 7: Open AndroidManifest.xml
In this step we show the Android Manifest file in which do nothing because we need only one Activitty i.e MainActivity which is already defined in it. In our project we a Fragment’s but we don’t need to define the it in manifest because Fragment is a part of an Activity.
<?xml version="1.0" encoding="utf-8"?>
<manifest xmlns:android="http://schemas.android.com/apk/res/android"
package="com.abhiandroid.fragmentexample" >

<application
android:allowBackup="true"
android:icon="@mipmap/ic_launcher"
android:label="@string/app_name"
android:theme="@style/AppTheme" >
<activity
android:name=".MainActivity"
android:label="@string/app_name" >
<intent-filter>
<action android:name="android.intent.action.MAIN" />

<category android:name="android.intent.category.LAUNCHER" />
</intent-filter>
</activity>
</application>

</manifest>
21 thoughts on “Fragment Tutorial With Example In Android Studio”
Leave a Reply to Manafa Cancel reply
Premium Project Source Code:
- Food Ordering Android App Project Source Code
- Ecommerce Store Android App Project Source Code
- Convert Website Into Android App Project Source Code
- Quiz Game Android App Project Source Code
- Radio Streaming Android App Source Code
- City Guide Android App Project Source Code
- QR Barcode Android App Project Source Code
thank you sir,
awesomely explained.
your tutorials are the beast explained ever.
thanks Abhi.
how to move one fragment to another fragment using this example
easy to understand.Very Helpful and Thank you.
Best tutorial on the net to explain all the essential details about android studio
Thanks so much bro
superb explaination bro. it helped me to learn . i need methods present and it s explanation in FragementTrasaction classes
getting errors in first tutorial
Please download code and import in Android Studio.
It is very helpful. Thank you.
Got an Error on loadFragment it says invalid operation
Thanks abhi, great tutorails 🙂 keep doing good things.
Thanks for the tutorial with example. I am easily able to see how the basics work and now I can implement this into my application.
Hi sir,
Very Good explanation its very helpful as, but how can u communicate the fragment in to activity can you please give examples
Hello Pls I got it to the stage of Toast, {
Toast.makeText(getActivity(), “Fragment’s Button”, Toast.LENGTH_LONG).show();
}
but now I dont want the button to toast I want it to send it to another activity…. Pls there anybody that can be of help as a matter of urgency.
easy to understand…..thank you
Good tutorial, properly explained 😀
Easy to Understand
easy to understand but can be longer for more details.
Thank you! This was so helpful because you kept it simple!
Easy to understand .Thank You