Linear Layout Tutorial With Examples In Android
Linear layout is a simple layout used in android for layout designing. In the Linear layout all the elements are displayed in linear fashion means all the childs/elements of a linear layout are displayed according to its orientation. The value for orientation property can be either horizontal or vertical.

Table Of Contents
Types Of Linear Layout Orientation
There are two types of linear layout orientation:
- Vertical
- Horizontal
As the name specified these two orientations are used to arrange there child one after the other, in a line, either vertically or horizontally. Let’s we describe these in detail.
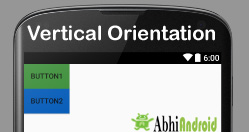
1.Vertical:
In this all the child are arranged vertically in a line one after the other. In below code snippets we have specified orientation “vertical” so the childs/views of this layout are displayed vertically.
<LinearLayout xmlns:android="http://schemas.android.com/apk/res/android"
    android:layout_width="fill_parent"
    android:layout_height="wrap_content"
    android:orientation="vertical"> <!-- Vertical Orientation set -->

    <!-- Child Views(In this case 2 Button) are here -->


    <Button
        android:layout_width="wrap_content"
        android:layout_height="wrap_content"
        android:text="Button1"
        android:id="@+id/button"
        android:background="#358a32" />

    <Button
        android:layout_width="wrap_content"
        android:layout_height="wrap_content"
        android:text="Button2"
        android:id="@+id/button2"
        android:background="#0058b6" />


</LinearLayout>
In this all the child are arranged horizontally in a line one after the other. In below code snippets we have specified orientation “horizontal” so the childs/views of this layout are displayed horizontally.
<LinearLayout xmlns:android="http://schemas.android.com/apk/res/android"
    android:layout_width="fill_parent"
    android:layout_height="wrap_content"
    android:orientation="horizontal"> <!-- Horizontal Orientation set -->

    <!-- Child Views(In this case 2 Button) are here -->


    <Button
        android:layout_width="wrap_content"
        android:layout_height="wrap_content"
        android:text="Button1"
        android:id="@+id/button"
        android:background="#358a32" />

    <Button
        android:layout_width="wrap_content"
        android:layout_height="wrap_content"
        android:text="Button2"
        android:id="@+id/button2"
        android:background="#0058b6" />


</LinearLayout>

Main Attributes In Linear Layout:
Now let’s we discuss about the attributes that helps us to configure a linear layout and its child controls. Some of the most important attributes you will use with linear layout include:
1. orientation: The orientation attribute used to set the childs/views horizontally or vertically. In Linear layout default orientation is vertical.
Example: Orientation vertical:
<LinearLayout xmlns:android="http://schemas.android.com/apk/res/android"
    android:layout_width="fill_parent"
    android:layout_height="wrap_content"
    android:orientation="vertical"> <!-- Vertical Orientation set -->

    <!-- Put Child Views like Button here -->
</LinearLayout>
Example: Orientation Horizontal:
<LinearLayout xmlns:android="http://schemas.android.com/apk/res/android"
    android:layout_width="fill_parent"
    android:layout_height="wrap_content"
    android:orientation="horizontal"> <!-- Horizontal Orientation set -->

    <!-- Child Views are here -->

</LinearLayout>
Example: We have set gravity right for linear layout. So the buttons gets align from right side in Horizontal orientation.
<LinearLayout xmlns:android="http://schemas.android.com/apk/res/android"
    android:layout_width="match_parent"
    android:layout_height="match_parent"
    android:gravity="right"
    android:orientation="horizontal">


<!--Button Child View Here--->

    <Button
        android:layout_width="wrap_content"
        android:layout_height="wrap_content"
        android:text="Button2"
        android:id="@+id/button2"
        android:background="#0e7d0d" />

    <Button
        android:layout_width="wrap_content"
        android:layout_height="wrap_content"
        android:text="Button1"
        android:id="@+id/button"
        android:background="#761212" />
</LinearLayout>

Example: weight property for button in linear layout. In the below example one button is of weight 2 and other is of weight 1.
<?xml version="1.0" encoding="utf-8"?>
<LinearLayout xmlns:android="http://schemas.android.com/apk/res/android"
    android:layout_width="match_parent"
    android:layout_height="match_parent"
    android:orientation="horizontal">


<!--Add Child View Here--->

    <Button
        android:layout_width="wrap_content"
        android:layout_height="wrap_content"
        android:text="Weight 2"
        android:background="#761212"
        android:layout_margin="5dp"
        android:id="@+id/button"
        android:layout_weight="2" />

    <Button
        android:layout_width="wrap_content"
        android:layout_height="wrap_content"
        android:background="#761212"
        android:layout_margin="5dp"
        android:layout_weight="1"
        android:text="Weight 1" />
</LinearLayout>
In the layout image you can notice Button with weight 2 gets more size related the other.

Example: In the same above example of weight, we can define weightSum value 3.
<LinearLayout xmlns:android="http://schemas.android.com/apk/res/android"
    android:layout_width="match_parent"
    android:layout_height="match_parent"
    android:weightSum="3"
    android:orientation="horizontal">
    <!--Add Child View Here--->

</LinearLayout>
Example of Linear Layout:
Now lets design 2 linear layout UI. First we have designed using weight attribute and second without using it. So below layout output will clear the difference between them:
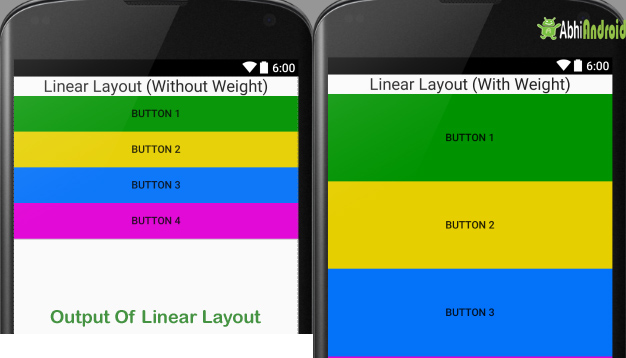
In this example we have used one TextView and 4 Button. The orientation is set to vertical.
Below is the code of activity_main.xml
<!-- Vertical Orientation is set -->
<LinearLayout xmlns:android="http://schemas.android.com/apk/res/android"
    android:layout_width="match_parent"
    android:layout_height="match_parent"
    android:orientation="vertical">

    <!-- Text Displayed At Top -->

    <TextView
        android:layout_width="wrap_content"
        android:layout_height="wrap_content"
        android:textAppearance="?android:attr/textAppearanceLarge"
        android:text="Linear Layout (Without Weight)"
        android:id="@+id/textView"
        android:layout_gravity="center_horizontal" />

    <!-- Button Used -->

    <Button
        android:layout_width="fill_parent"
        android:layout_height="wrap_content"
        android:text="Button 1"
        android:background="#009300" />

    <Button
        android:layout_width="fill_parent"
        android:layout_height="wrap_content"
        android:text="Button 2"
        android:background="#e6cf00" />

    <Button
        android:layout_width="fill_parent"
        android:layout_height="wrap_content"
        android:text="Button 3"
        android:background="#0472f9" />

    <Button
        android:layout_width="fill_parent"
        android:layout_height="wrap_content"
        android:text="Button 4"
        android:background="#e100d5" />
</LinearLayout>
Output Screen:

Below is the code of activity_main.xml with explanation included
<!-- Vertical Orientation is set  with weightSum-->
<LinearLayout xmlns:android="http://schemas.android.com/apk/res/android"
    android:layout_width="match_parent"
    android:layout_height="match_parent"
    android:weightSum="5"
    android:orientation="vertical">

    <!-- Text Displayed At Top -->

    <TextView
        android:layout_width="wrap_content"
        android:layout_height="wrap_content"
        android:textAppearance="?android:attr/textAppearanceLarge"
        android:text="Linear Layout (With Weight)"
        android:id="@+id/textView"
        android:layout_gravity="center_horizontal"
        android:layout_weight="0"/>

    <!-- Button Used -->

    <Button
        android:layout_width="fill_parent"
        android:layout_height="wrap_content"
        android:text="Button 1"
        android:background="#009300"
        android:layout_weight="1"/>

    <Button
        android:layout_width="fill_parent"
        android:layout_height="wrap_content"
        android:text="Button 2"
        android:background="#e6cf00"
        android:layout_weight="1"/>

    <Button
        android:layout_width="fill_parent"
        android:layout_height="wrap_content"
        android:text="Button 3"
        android:background="#0472f9"
        android:layout_weight="1"/>

    <Button
        android:layout_width="fill_parent"
        android:layout_height="wrap_content"
        android:text="Button 4"
        android:background="#e100d5"
        android:layout_weight="1"/>
</LinearLayout>
Output Screen:

6 thoughts on “Linear Layout Tutorial With Examples In Android”
Leave a Reply to Pooja Gupta Cancel reply
Premium Project Source Code:
- Food Ordering Android App Project Source Code
- Ecommerce Store Android App Project Source Code
- Convert Website Into Android App Project Source Code
- Quiz Game Android App Project Source Code
- Radio Streaming Android App Source Code
- City Guide Android App Project Source Code
- QR Barcode Android App Project Source Code
Just Super Tutorial Series,,Thanks a lot,,,
very nice explanation Abhi sir you did a good job for fresher and beginner .thank you
I am using recycleview in app programming but I have got some error and error from dependencies but I have set dependencies 25.3.1 in all but error is coming so plz tell me how to solve his error
You didn’t explain what the weight values mean! What does a weight of zero mean and why does it put the TextView at the top?
Hi First he mentioned android:weightSum=”5″ at Linear Layout and it means, entire screen will be divided into 5 parts vertically, and if you watch the button height is large than last Linear Layout example without weight. Hope, you understand it.
Hi this tutorial is very good for android developers .
Can u please add the facebook integration and twitter integration concepts