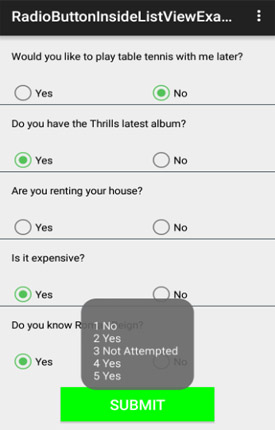
Here is the example of using RadioButton Inside ListView. In this example we create a list of Questions with two options yes or no. For providing these options we use Radio Buttons with Radio Group inside our list item. Firstly we create an String array for questions and then set an adapter to fill the data in the ListView. In this example we also display a Submit button and perform setOnClickListener event on Button so whenever a user click on this Button the selected answers of questions is displayed by using a Toast.
If you are new here then first read our RadioButton tutorial and ListView tutorial.
Step 1: Create a new project and name it RadioButtonInsideListView.
Step 2: Open res -> layout ->activity_main.xml (or) main.xml and add following code:
In this step we open xml file and add code for displaying ListView.
<?xml version="1.0" encoding="utf-8"?>
<RelativeLayout xmlns:android="http://schemas.android.com/apk/res/android"
android:layout_width="match_parent"
android:layout_height="match_parent"
android:orientation="vertical">
<!-- ListView and Submit Button-->
<ListView
android:id="@+id/simpleListView"
android:layout_width="fill_parent"
android:layout_height="wrap_content"
android:layout_above="@+id/submit"
android:divider="@color/material_blue_grey_800"
android:dividerHeight="1dp"
android:footerDividersEnabled="false" />

<Button
android:id="@+id/submit"
android:layout_width="200dp"
android:layout_height="wrap_content"
android:layout_alignParentBottom="true"
android:layout_centerHorizontal="true"
android:layout_margin="20dp"
android:background="#0f0"
android:text="Submit"
android:textColor="#fff"
android:textSize="20sp" />
</RelativeLayout>
Step 3:
Create a new xml file i.e list_items.xml inside layout and add the below code:In this step we create a new xml file and add the code for displaying a TextView and RadioButton’s.
<?xml version="1.0" encoding="utf-8"?>
<LinearLayout xmlns:android="http://schemas.android.com/apk/res/android"
android:layout_width="match_parent"
android:layout_height="wrap_content"
android:orientation="vertical">
<!-- TextView for displaying question-->
<TextView
android:id="@+id/question"
android:layout_width="fill_parent"
android:layout_height="wrap_content"
android:layout_gravity="center"
android:padding="@dimen/activity_horizontal_margin"
android:textColor="#000" />
<!-- RadioGroup for grouping of RadioButton-->
<RadioGroup
android:layout_width="match_parent"
android:layout_height="wrap_content"
android:layout_marginTop="10dp"
android:orientation="horizontal"
android:weightSum="2">

<RadioButton
android:id="@+id/yes"
android:layout_width="0dp"
android:layout_height="wrap_content"
android:layout_marginLeft="15dp"
android:layout_weight="1"
android:text="Yes"
android:textColor="#000" />

<RadioButton
android:id="@+id/no"
android:layout_width="0dp"
android:layout_height="wrap_content"
android:layout_marginLeft="15dp"
android:layout_weight="1"
android:text="No"
android:textColor="#000" />
</RadioGroup>
</LinearLayout>
Step 4:
Open src -> package -> MainActivity.java
In this step Firstly we get the reference of Button and ListView. After that we create an String array for questions and then set an adapter to fill the data in the ListView. Finally we perform setOnClickListener event on Button so whenever a user click on Button the selected answers of questions is displayed by using a Toast.
package com.abhiandroid.radiobuttoninsidelistviewexample;

import android.os.Bundle;
import android.support.v7.app.AppCompatActivity;
import android.view.Menu;
import android.view.MenuItem;
import android.view.View;
import android.widget.Button;
import android.widget.ListView;
import android.widget.Toast;

public class MainActivity extends AppCompatActivity {

ListView simpleList;
String[] questions;
Button submit;

@Override
protected void onCreate(Bundle savedInstanceState) {
super.onCreate(savedInstanceState);
setContentView(R.layout.activity_main);
// get the string array from string.xml file
questions = getResources().getStringArray(R.array.questions);
// get the reference of ListView and Button
simpleList = (ListView) findViewById(R.id.simpleListView);
submit = (Button) findViewById(R.id.submit);
// set the adapter to fill the data in the ListView
CustomAdapter customAdapter = new CustomAdapter(getApplicationContext(), questions);
simpleList.setAdapter(customAdapter);
// perform setOnClickListerner event on Button
submit.setOnClickListener(new View.OnClickListener() {
@Override
public void onClick(View v) {
String message = "";
// get the value of selected answers from custom adapter
for (int i = 0; i < CustomAdapter.selectedAnswers.size(); i++) {
message = message + "\n" + (i + 1) + " " + CustomAdapter.selectedAnswers.get(i);
}
// display the message on screen with the help of Toast.
Toast.makeText(getApplicationContext(), message, Toast.LENGTH_LONG).show();
}
});
}

@Override
public boolean onCreateOptionsMenu(Menu menu) {
// Inflate the menu; this adds items to the action bar if it is present.
getMenuInflater().inflate(R.menu.menu_main, menu);
return true;
}

@Override
public boolean onOptionsItemSelected(MenuItem item) {
// Handle action bar item clicks here. The action bar will
// automatically handle clicks on the Home/Up button, so long
// as you specify a parent activity in AndroidManifest.xml.
int id = item.getItemId();

//noinspection SimplifiableIfStatement
if (id == R.id.action_settings) {
return true;
}

return super.onOptionsItemSelected(item);
}
}
Step 5:
Create a new class CustomAdapter.java inside package and add the following code
In this step we create a custom adapter class and extends BaseAdapter in this class. In this step we firstly set the data in the list and then perform setOnCheckedChangeListener event on RadioButton.
package com.abhiandroid.radiobuttoninsidelistviewexample;

import android.content.Context;
import android.view.LayoutInflater;
import android.view.View;
import android.view.ViewGroup;
import android.widget.BaseAdapter;
import android.widget.CompoundButton;
import android.widget.RadioButton;
import android.widget.TextView;

import java.util.ArrayList;


public class CustomAdapter extends BaseAdapter {
Context context;
String[] questionsList;
LayoutInflater inflter;
public static ArrayList<String> selectedAnswers;

public CustomAdapter(Context applicationContext, String[] questionsList) {
this.context = context;
this.questionsList = questionsList;
// initialize arraylist and add static string for all the questions
selectedAnswers = new ArrayList<>();
for (int i = 0; i < questionsList.length; i++) {
selectedAnswers.add("Not Attempted");
}
inflter = (LayoutInflater.from(applicationContext));
}

@Override
public int getCount() {
return questionsList.length;
}

@Override
public Object getItem(int i) {
return null;
}

@Override
public long getItemId(int i) {
return 0;
}

@Override
public View getView(final int i, View view, ViewGroup viewGroup) {
view = inflter.inflate(R.layout.list_items, null);
// get the reference of TextView and Button's
TextView question = (TextView) view.findViewById(R.id.question);
RadioButton yes = (RadioButton) view.findViewById(R.id.yes);
RadioButton no = (RadioButton) view.findViewById(R.id.no);
// perform setOnCheckedChangeListener event on yes button
yes.setOnCheckedChangeListener(new CompoundButton.OnCheckedChangeListener() {
@Override
public void onCheckedChanged(CompoundButton buttonView, boolean isChecked) {
// set Yes values in ArrayList if RadioButton is checked
if (isChecked)
selectedAnswers.set(i, "Yes");
}
});
// perform setOnCheckedChangeListener event on no button
no.setOnCheckedChangeListener(new CompoundButton.OnCheckedChangeListener() {
@Override
public void onCheckedChanged(CompoundButton buttonView, boolean isChecked) {
// set No values in ArrayList if RadioButton is checked
if (isChecked)
selectedAnswers.set(i, "No");

}
});
// set the value in TextView
question.setText(questionsList[i]);
return view;
}
}
Sorry, I’m poor in English
For people with problems. Slide up/down in ListView And
RadioButton check is cleared.
This class CustomAdapter.java , Your change getView Method.
By add source code under line get reference TextView and Button
I hope it is helpful With those who come to study further.
Goodluck.
——————————————————
if(selectedAnswers.get(i).equals(“Yes”)){
yes.setChecked(true);
}else if(selectedAnswers.get(i).equals(“No”)){
no.setChecked(true);
}
——————————————————–
thanks for the information. How can i save the answers in a postgres database? Could you explain about it?
Verry good, Thanks!
Verry good, Thanks!
How to generate dynamic radio button group inside ListView with a multi item option? like this image “https://i.staHow to generate dynamic radio button group inside ListView with a multi item option? like this image “https://i.stack.imgur.com/6AtPI.png” There are two choices and three choices?ck.imgur.com/6AtPI.png” There are two choices and three choices?
i am using list view with custom adapter having 1 text view and four radio button in a radio group. i have a problem when i selected radio button and scroll down and again i scroll up list view the selected radio button has deselected by itself. i try your example. but same problem. i got a solution “you have to save the checked position of the radio button with your adapter data” but i don’t know how to do that. please give me any solution.
thanks
Same problem bro… did u try asking this in stack overflow??
Hey abhi,
It was really a very nice tutorial.
It helped me.
Keep posting such tutorials man!
Happy coding!
hello abhi,
i need calender view with checkbox to select multiple date in a different weak, if i select that checkbox i need exat that date down side,dumi text need to be display,and remaining next column date comes down,
very god