CheckBox Tutorial With Example In Android Studio
In Android, CheckBox is a type of two state button either unchecked or checked in Android. Or you can say it is a type of on/off switch that can be toggled by the users. You should use checkbox when presenting a group of selectable options to users that are not mutually exclusive. CompoundButton is the parent class of CheckBox class.
CheckBox code in XML:
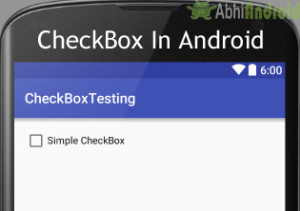
<CheckBox
android:id="@+id/simpleCheckBox"
android:layout_width="wrap_content"
android:layout_height="wrap_content"
android:text="Simple CheckBox"/>
//initiate a check box
CheckBox simpleCheckBox = (CheckBox) findViewById(R.id.simpleCheckBox);

//check current state of a check box (true or false)
Boolean checkBoxState = simpleCheckBox.isChecked();
Table Of Contents
Attributes of CheckBox:
Now let’s we discuss important attributes that helps us to configure a check box in XML file (layout).
1.id: id is an attribute used to uniquely identify a check box. Below we set the id of a image button.
<CheckBox
android:id="@+id/simpleCheckBox"
android:layout_width="wrap_content"
android:layout_height="wrap_content"
android:text="Simple CheckBox"/>
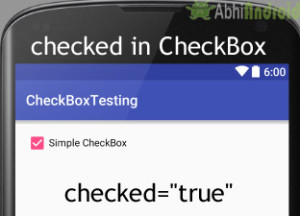
2. checked: checked is an attribute of check box used to set the current state of a check box. The value should be true or false where true shows the checked state and false shows unchecked state of a check box. The default value of checked attribute is false. We can also set the current state programmatically.
Below is an example code in which we set true value for checked attribute that sets the current state to checked.
<CheckBox
    android:id="@+id/simpleCheckBox"
    android:layout_width="wrap_content"
    android:layout_height="wrap_content"
    android:text="Simple CheckBox"
    android:checked="true"/> <!--set the current state of the check box-->
Below we set the current state of CheckBox in java class.
/*Add in Oncreate() funtion after setContentView()*/
// initiate a check box
CheckBox simpleCheckBox = (CheckBox) findViewById(R.id.simpleCheckBox);

// set the current state of a check box
simpleCheckBox.setChecked(true);
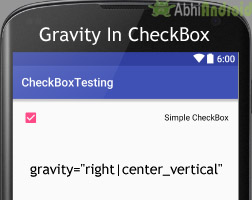
3. gravity: The gravity attribute is an optional attribute which is used to control the alignment of the text in CheckBox like left, right, center, top, bottom, center_vertical, center_horizontal etc.
Below we set the right and center_vertical gravity for the text of a check box.
<CheckBox
    android:id="@+id/simpleCheckBox"
    android:layout_width="fill_parent"
    android:layout_height="wrap_content"
    android:text="Simple CheckBox"
    android:checked="true"
    android:gravity="right|center_vertical"/>  <!-- gravity of the check box-->
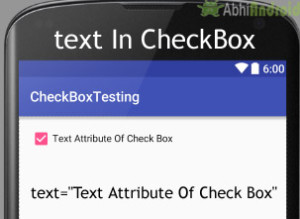
Below is the example code with explanation included in which we set the text “Text Attribute Of Check Box” for a check box.
<CheckBox
    android:id="@+id/simpleCheckBox"
    android:layout_width="wrap_content"
    android:layout_height="wrap_content"
    android:checked="true"
    android:text="Text Attribute Of Check Box"/> <!--displayed text of the check box-->
Below is the example code in which we set the text of a check box programmatically means in java class.
/*Add in Oncreate() funtion after setContentView()*/
// initiate check box
CheckBox simpleCheckBox = (CheckBox) findViewById(R.id.simpleCheckBox);

// displayed text of the check box
simpleCheckBox.setText("Text Attribute Of Check Box");
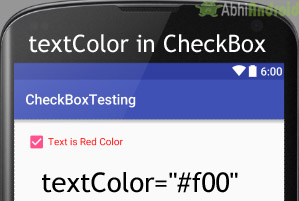
5. textColor: textColor attribute is used to set the text color of a check box. Color value is in form of “#argb”, “#rgb”, “#rrggbb”, or “#aarrggbb”.
Below we set the red color for the displayed text of a check box.
<CheckBox
    android:id="@+id/simpleCheckBox"
    android:layout_width="wrap_content"
    android:layout_height="wrap_content"
    android:text="Text is Red Color"
    android:textColor="#f00"
    android:checked="true"/> <!-- red color for the text of check box-->
Below we set the text color of a check box programmatically.
/*Add in Oncreate() funtion after setContentView()*/
//initiate the checkbox
CheckBox simpleCheckBox = (CheckBox) findViewById(R.id.simpleCheckBox);

//red color for displayed text
simpleCheckBox.setTextColor(Color.RED);
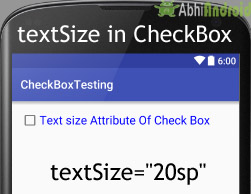
6. textSize: textSize attribute is used to set the size of text of a check box. We can set the text size in sp(scale independent pixel) or dp(density pixel).
Below is the example code in which we set the 20sp size for the text of a check box.
<CheckBox
    android:id="@+id/simpleCheckBox"
    android:layout_width="wrap_content"
    android:layout_height="wrap_content"
    android:text="Text size Attribute Of Check Box"
    android:textColor="#00f"
    android:checked="false"
    android:textSize="20sp"/><!--set Text Size of text in CheckBox-->
Below we set the text size of a check box in java class.
/*Add in Oncreate() funtion after setContentView()*/
CheckBox simpleCheckBox = (CheckBox) findViewById(R.id.simpleCheckBox);
//set 20sp displayed text size
simpleCheckBox.setTextSize(20);
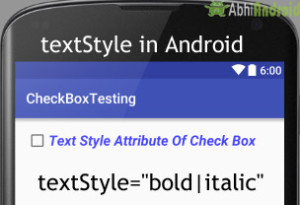
7. textStyle: textStyle attribute is used to set the text style of the text of a check box. The possible text styles are bold, italic and normal. If we need to use two or more styles for a text view then “|” operator is used for that.
Below we set the bold and italic text styles for text of a check box.
<CheckBox
    android:id="@+id/simpleCheckBox"
    android:layout_width="wrap_content"
    android:layout_height="wrap_content"
    android:text="Text Style Attribute Of Check Box"
    android:textColor="#44f"
    android:textSize="20sp"
    android:checked="false"
    android:textStyle="bold|italic"/>
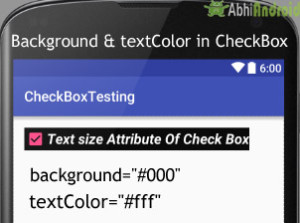
Below we set the black color for the background, white color for the displayed text of a check box.
<CheckBox
    android:id="@+id/simpleCheckBox"
    android:layout_width="wrap_content"
    android:layout_height="wrap_content"
    android:text="Text size Attribute Of Check Box"
    android:textColor="#fff"
    android:textSize="20sp"
    android:textStyle="bold|italic"
    android:checked="true"
    android:background="#000" /><!-- black background for the background of check box-->
Below is the example code in which we set the background color of a check box programmatically means in java class.
/*Add in Oncreate() funtion after setContentView()*/
CheckBox simpleCheckBox = (CheckBox) findViewById(R.id.simpleCheckBox);
// set background in CheckBox
simpleCheckBox.setBackgroundColor(Color.BLACK);
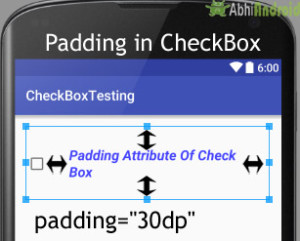
9. padding: padding attribute is used to set the padding from left, right, top or bottom.
- paddingRight :set the padding from the right side of the check box.
- paddingLeft :set the padding from the left side of the check box.
- paddingTop :set the padding from the top side of the check box.
- paddingBottom :set the padding from the bottom side of the check box.
- Padding :set the padding from the all side’s of the check box.
Below is the example code of padding where we set the 30dp padding from all the side’s of the check box.
<CheckBox
    android:id="@+id/simpleCheckBox"
    android:layout_width="wrap_content"
    android:layout_height="wrap_content"
    android:text="Padding Attribute Of Check Box"
    android:textColor="#44f"
    android:textSize="20sp"
    android:textStyle="bold|italic"
    android:checked="false"
    android:padding="30dp"/> <!--30dp padding from all side’s-->
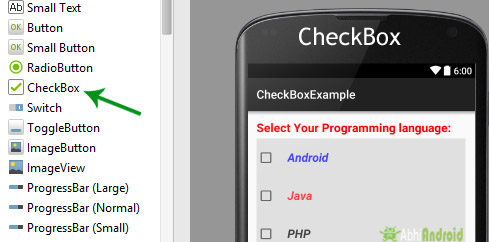
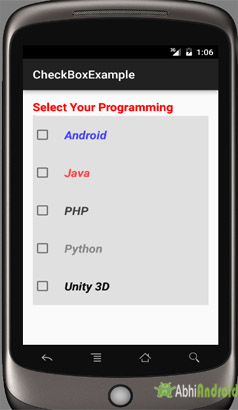
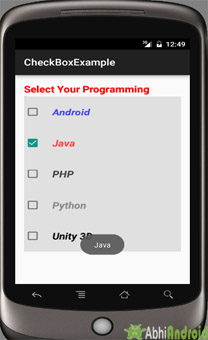
Example of CheckBox In Android Studio:
Below is the example of CheckBox in Android, in which we display five check boxes using background and other attributes we discusses earlier in this post. Every check box represents a different subject name and whenever you click on a check box then text of that checked check box is displayed in a toast. Below is the final output, code and step by step explanation of the example:
In this step we create a new project in android studio by filling all the necessary details of the app like app name, package name, api versions etc.
Select File -> New -> New Project and Fill the forms and click "Finish" button.
Step 2: Now Open res -> layout -> activity_main.xml (or) main.xml and add the following code:
In this step we open an xml file and add the code for displaying five one TextView and check boxes.
<RelativeLayout xmlns:android="http://schemas.android.com/apk/res/android"
    xmlns:tools="http://schemas.android.com/tools"
    android:layout_width="match_parent"
    android:layout_height="match_parent"
    android:paddingBottom="@dimen/activity_vertical_margin"
    android:paddingLeft="@dimen/activity_horizontal_margin"
    android:paddingRight="@dimen/activity_horizontal_margin"
    android:paddingTop="@dimen/activity_vertical_margin"
    tools:context=".MainActivity">

    <TextView
        android:layout_width="wrap_content"
        android:layout_height="wrap_content"
        android:text="Select Your Programming language: "
        android:textColor="#f00"
        android:textSize="20sp"
        android:textStyle="bold" />

    <LinearLayout
        android:id="@+id/linearLayout"
        android:layout_width="fill_parent"
        android:layout_height="wrap_content"
        android:layout_marginTop="30dp"
        android:background="#e0e0e0"
        android:orientation="vertical">

        <CheckBox
            android:id="@+id/androidCheckBox"
            android:layout_width="wrap_content"
            android:layout_height="wrap_content"
            android:layout_centerHorizontal="true"
            android:checked="false"
            android:padding="20dp"
            android:text="@string/android"
            android:textColor="#44f"
            android:textSize="20sp"
            android:textStyle="bold|italic" />

        <CheckBox
            android:id="@+id/javaCheckBox"
            android:layout_width="wrap_content"
            android:layout_height="wrap_content"
            android:layout_centerHorizontal="true"
            android:checked="false"
            android:padding="20dp"
            android:text="@string/java"
            android:textColor="#f44"
            android:textSize="20sp"
            android:textStyle="bold|italic" />

        <CheckBox
            android:id="@+id/phpCheckBox"
            android:layout_width="wrap_content"
            android:layout_height="wrap_content"
            android:layout_centerHorizontal="true"
            android:checked="false"
            android:padding="20dp"
            android:text="@string/php"
            android:textColor="#444"
            android:textSize="20sp"
            android:textStyle="bold|italic" />

        <CheckBox
            android:id="@+id/pythonCheckBox"
            android:layout_width="wrap_content"
            android:layout_height="wrap_content"
            android:layout_centerHorizontal="true"
            android:checked="false"
            android:padding="20dp"
            android:text="@string/python"
            android:textColor="#888"
            android:textSize="20sp"
            android:textStyle="bold|italic" />

        <CheckBox
            android:id="@+id/unityCheckBox"
            android:layout_width="wrap_content"
            android:layout_height="wrap_content"
            android:layout_centerHorizontal="true"
            android:checked="false"
            android:padding="20dp"
            android:text="@string/unity"
            android:textColor="#101010"
            android:textSize="20sp"
            android:textStyle="bold|italic" />
    </LinearLayout>

</RelativeLayout>
Step 3: Now Open app -> java-> package -> MainActivity.java
In this step we add the code to initiate the check boxes we created. And then we perform click event on button and display the text for selected check boxes using a toast.
package example.abhiandriod.checkboxexample;

import android.graphics.Color;
import android.support.v7.app.AppCompatActivity;
import android.os.Bundle;
import android.view.Menu;
import android.view.MenuItem;
import android.view.View;
import android.widget.Button;
import android.widget.CheckBox;
import android.widget.Toast;

public class MainActivity extends AppCompatActivity implements View.OnClickListener {

    CheckBox android, java, python, php, unity3D;

    @Override
    protected void onCreate(Bundle savedInstanceState) {
        super.onCreate(savedInstanceState);
        setContentView(R.layout.activity_main);
        // initiate views
        android = (CheckBox) findViewById(R.id.androidCheckBox);
        android.setOnClickListener(this);
        java = (CheckBox) findViewById(R.id.javaCheckBox);
        java.setOnClickListener(this);
        python = (CheckBox) findViewById(R.id.pythonCheckBox);
        python.setOnClickListener(this);
        php = (CheckBox) findViewById(R.id.phpCheckBox);
        php.setOnClickListener(this);
        unity3D = (CheckBox) findViewById(R.id.unityCheckBox);
        unity3D.setOnClickListener(this);
    }

    @Override
    public void onClick(View view) {

        switch (view.getId()) {
            case R.id.androidCheckBox:
                if (android.isChecked())
                    Toast.makeText(getApplicationContext(), "Android", Toast.LENGTH_LONG).show();
                break;
            case R.id.javaCheckBox:
                if (java.isChecked())
                    Toast.makeText(getApplicationContext(), "Java", Toast.LENGTH_LONG).show();
                break;
            case R.id.phpCheckBox:
                if (php.isChecked())
                    Toast.makeText(getApplicationContext(), "PHP", Toast.LENGTH_LONG).show();
                break;
            case R.id.pythonCheckBox:
                if (python.isChecked())
                    Toast.makeText(getApplicationContext(), "Python", Toast.LENGTH_LONG).show();
                break;
            case R.id.unityCheckBox:
                if (unity3D.isChecked())
                    Toast.makeText(getApplicationContext(), "Unity 3D", Toast.LENGTH_LONG).show();
                break;
        }
    }
}
Step 5: Open res ->values -> strings.xml
In this step we show string file which is used to store string data of an app.
<resources>
    <string name="app_name">CheckBoxExample</string>
    <string name="hello_world">Hello world!</string>
    <string name="action_settings">Settings</string>
    <string name="android">Android</string>
    <string name="java">Java</string>
    <string name="php">PHP</string>
    <string name="python" >Python</string>
    <string name="unity">Unity 3D</string>
</resources>
Output:
Now start the AVD in Emulator and run the App. You will see 5 checkbox option asking you to choose your programming language. Select and the text of that particular CheckBox will appear on Screen.
12 thoughts on “CheckBox Tutorial With Example In Android Studio”
Leave a Reply to No Name Cancel reply
Premium Project Source Code:
- Food Ordering Android App Project Source Code
- Ecommerce Store Android App Project Source Code
- Convert Website Into Android App Project Source Code
- Quiz Game Android App Project Source Code
- Radio Streaming Android App Source Code
- City Guide Android App Project Source Code
- QR Barcode Android App Project Source Code
put r id in bracket to remove error
I have check boxes in main activity they have selected and submit button they selected checkedbox display second activity
What if there is a button along with checkbox in this UI then how will the onClick event be mapped?
I want to store data into One Array String Variable and show into toast how can i do this please Help me to do this .
ArrayList selchkboxlist;
CheckBox[] cbs;
cbs = new CheckBox[20];
for(k=0; k<List3.size(); k++)
{
arr = List3.get(k);
cbs[k] = new CheckBox(getContext());
Rl.addView(cbs[k]);
cbs[k].setText((CharSequence) arr.get(2));
cbs[k].setTextColor(Color.parseColor("#000000"));
cbs[k].setId(k);
cbs[k].setOnClickListener( new View.OnClickListener()
{
public void onClick(View v)
{
CheckBox cb = (CheckBox) v ;
if (((CheckBox) v).isChecked()) {
chk = Integer.toString(v.getId());
selchkboxlist = new ArrayList();
selchkboxlist.add(chk);
Toast.makeText(Select1.this, “Selected CheckBox ID” + v.getId(), Toast.LENGTH_SHORT).show();
} else {
selchkboxlist.remove(chk);
Toast.makeText(Select1.this, “Not selected”, Toast.LENGTH_SHORT).show();
}
}
});
}
Hi,
I have multiple check boxes in multiple activities, as i click on multiple check boxes and go to next activity and come back to the previously checked check boxes are reseted. how can i preserve the previously checked check boxes status and how can i send the checked data to sqlite.
How to insert data of checkbox? Is there any tutorial or any reference about it.
I tried using your code to create check boxes but Android Studio returns with “error: package R does not exist” and the build fails. I have a feeling this is old information so I’ll look elsewhere. In any event, I appreciated your tutorial. A side comment, because editing is one of my skills–you might want to get your pages proofed, as I found lots of minor errors. I could still understand, so your English is really very good, but it would be better to have your pages error-free! 🙂 (I wish *I* knew another language as well as you know English! BRAVO!)
Please download code. It will work.
tyr to gradle build with internet connection or create new project.
Can checkbox has value? for example,there have series of questions,. in each questions has yes and no answer. if user answer yes, it will have 1 mark. and if user answer no, it will have 0 mark. then we will sum up the value. is it possible in checkbox?
good