ArrayAdapter is a type of Adapter which acts a bridge between UI component and data source that helps us to fill data in UI component. It expects a Layout with a single TextView and for more customization in grid items or list items, we use custom adapters.
- ArrayAdapter is also an implementation of BaseAdapter so if we want more customization then we create a custom adapter and extend ArrayAdapter in that.
- We override all the function’s of BaseAdapter in our custom adapter to give more customization to ArrayAdapter.
Android Custom adapter code when we extends ArrayAdapter in that:
public class MyAdapter extends ArrayAdapter {

public MyAdapter(Context context, int resource, int textViewResourceId, List objects) {
super(context, resource, textViewResourceId, objects);
}

@Override
public int getCount() {
return super.getCount();
}

@Override
public View getView(int position, View convertView, ViewGroup parent) {
return super.getView(position, convertView, parent);
}
}
In the above code snippet we see the overrided functions of ArrayAdapter which are used to set the data in a list, grid or a spinner. From there we mainly used two functions getCount() and getView() .
1. getCount():
The getCount() function returns the total number of items to be displayed in a list. It counts the value from arraylist size or an array’s length. For example if we have an list of elements in a array list and we have to display the items in a list view then we can count the total number of elements using the size function and then that integer value is returned by the function getCount() as shown below.
@Override
public int getCount() {

int count=arrayList.size(); //counts the total number of elements from the arrayList.
return count;//returns the total count to adapter
}
2. getView(int i, View view, ViewGroup viewGroup):
This function is automatically called when the list item view is ready to be displayed or about to be displayed. In this function we set the layout for list items using LayoutInflater class and then add the data to the views like ImageView, TextView etc.
Below is the getView function’s example code with explanation included in which we set the layout using LayoutInflater and then get the view’s id and implement them.
@Override
public View getView(int i, View view, ViewGroup viewGroup) {
view = inflter.inflate(R.layout.activity_list_view, null);//set layout for displaying items
ImageView icon = (ImageView) view.findViewById(R.id.icon);//get id for image view
icon.setImageResource(countryFlags[i]);//set image of the item’s
return view;
}
Example of Custom ArrayAdapter:
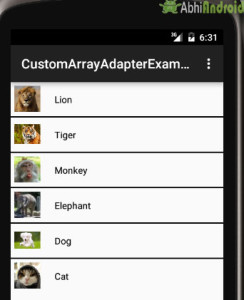
Below is the example, in which we displays a list of animal names with images in a list view using simple array adapter. Below is the final output and code:

Create a new project and name it ArrayAdapterExample.
Select File -> New -> New Project -> and Fill the forms and click "Finish" button
Step 2:
Now open res -> layout -> xml (or) activity_main.xml and add following code:
<RelativeLayout xmlns:android="http://schemas.android.com/apk/res/android"
    xmlns:tools="http://schemas.android.com/tools"
    android:layout_width="match_parent"
    android:layout_height="match_parent"
    tools:context=".MainActivity">

    <ListView
        android:id="@+id/simpleListView"
        android:layout_width="match_parent"
        android:layout_height="wrap_content"
        android:divider="#000"
        android:dividerHeight="2dp"/>

</RelativeLayout>
Step 3:
Create a new layout in res-> layout and name it list_view_items.xml. Here add the following code:
<?xml version="1.0" encoding="utf-8"?>
<LinearLayout xmlns:android="http://schemas.android.com/apk/res/android"
    android:layout_width="match_parent"
    android:layout_height="wrap_content"
    android:orientation="horizontal">

    <ImageView
        android:id="@+id/imageView"
        android:layout_width="50dp"
        android:layout_height="50dp"
        android:padding="5dp"
        android:src="@drawable/ic_launcher" />

    <TextView
        android:id="@+id/textView"
        android:layout_width="fill_parent"
        android:layout_height="wrap_content"
        android:layout_gravity="center"
        android:padding="@dimen/activity_horizontal_margin"
        android:text="Demo"
        android:textColor="#000" />
</LinearLayout>
Step 4:
Now open app – > java -> package -> MainActivity.java and add the below code.
package example.abhiandriod.customarrayadapterexample;

import android.support.v7.app.AppCompatActivity;
import android.os.Bundle;
import android.widget.ArrayAdapter;
import android.widget.ListView;

import java.util.ArrayList;

public class MainActivity extends AppCompatActivity {

    ListView simpleList;
    ArrayList<Item> animalList=new ArrayList<>();
    @Override
    protected void onCreate(Bundle savedInstanceState) {
        super.onCreate(savedInstanceState);
        setContentView(R.layout.activity_main);
        simpleList = (ListView) findViewById(R.id.simpleListView);
        animalList.add(new Item("Lion",R.drawable.lion));
        animalList.add(new Item("Tiger",R.drawable.tiger));
        animalList.add(new Item("Monkey",R.drawable.monkey));
        animalList.add(new Item("Elephant",R.drawable.elephant));
        animalList.add(new Item("Dog",R.drawable.dog));
        animalList.add(new Item("Cat",R.drawable.cat));

        MyAdapter myAdapter=new MyAdapter(this,R.layout.list_view_items,animalList);
        simpleList.setAdapter(myAdapter);
       }
}
Step 5:
Create a new Class app -> java ->package->MyAdapter.java and add the below code. Here in Custom Adapter class we override the function’s of BaseAdapter.
package example.abhiandriod.customarrayadapterexample;

import android.content.Context;
import android.view.LayoutInflater;
import android.view.View;
import android.view.ViewGroup;
import android.widget.ArrayAdapter;
import android.widget.ImageView;
import android.widget.TextView;

import java.util.ArrayList;
import java.util.HashMap;

public class MyAdapter extends ArrayAdapter<Item> {

    ArrayList<Item> animalList = new ArrayList<>();

    public MyAdapter(Context context, int textViewResourceId, ArrayList<Item> objects) {
        super(context, textViewResourceId, objects);
        animalList = objects;
    }

    @Override
    public int getCount() {
        return super.getCount();
    }

    @Override
    public View getView(int position, View convertView, ViewGroup parent) {

        View v = convertView;
        LayoutInflater inflater = (LayoutInflater) getContext().getSystemService(Context.LAYOUT_INFLATER_SERVICE);
        v = inflater.inflate(R.layout.list_view_items, null);
        TextView textView = (TextView) v.findViewById(R.id.textView);
        ImageView imageView = (ImageView) v.findViewById(R.id.imageView);
        textView.setText(animalList.get(position).getAnimalName());
        imageView.setImageResource(animalList.get(position).getAnimalImage());
        return v;

    }

}
Step 6:
Create a new Class src-> package-> Item.java and add the below code:
package example.abhiandriod.customarrayadapterexample;


public class Item {

    String animalName;
    int animalImage;

    public Item(String animalName,int animalImage)
    {
        this.animalImage=animalImage;
        this.animalName=animalName;
    }
    public String getAnimalName()
    {
        return animalName;
    }
    public int getAnimalImage()
    {
        return animalImage;
    }
}
Output:
Now run the App in Emulator and you will see the animals name listed with images. For this we have used custom ArrayAdapter.
Example 2:
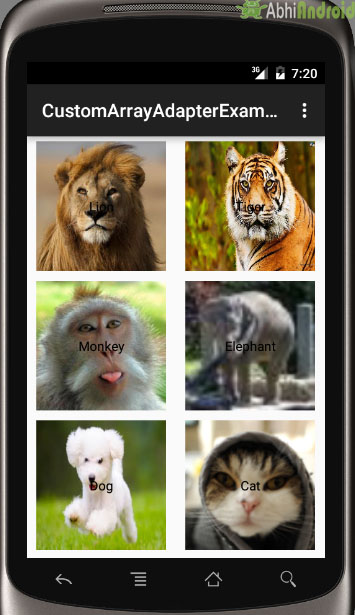
Below is the example in which we display the animal images in grid’s of a grid view by using custom ArrayAdapter. Below is the final output and code:
Create a new project and name it ArrayAdapterExample.
Select File -> New -> New Project. Fill the forms and click "Finish" button.
Step 2:
Now open app -> res -> layout -> activity_main.xml (or) main.xml and add following code :
<RelativeLayout xmlns:android="http://schemas.android.com/apk/res/android"
    xmlns:tools="http://schemas.android.com/tools"
    android:layout_width="match_parent"
    android:layout_height="match_parent"
    tools:context=".MainActivity">

    <GridView
        android:id="@+id/simpleGridView"
        android:layout_width="match_parent"
        android:layout_height="wrap_content"
       android:numColumns="2"/>

</RelativeLayout>
Step 3:
Create a new layout Activity in app -> res-> layout-> new activity and name it grid_view_items.xml and add following code:
<?xml version="1.0" encoding="utf-8"?>
<RelativeLayout xmlns:android="http://schemas.android.com/apk/res/android"
    android:layout_width="match_parent"
    android:layout_height="match_parent"
    android:orientation="horizontal">

    <ImageView
        android:id="@+id/imageView"
        android:layout_width="150dp"
        android:layout_height="150dp"
        android:layout_centerInParent="true"
        android:padding="5dp"
        android:scaleType="fitXY"
        android:src="@drawable/ic_launcher" />

    <TextView
        android:id="@+id/textView"
        android:layout_width="wrap_content"
        android:layout_height="wrap_content"
        android:layout_centerInParent="true"
        android:padding="@dimen/activity_horizontal_margin"
        android:text="Demo"
        android:textColor="#000" />
</RelativeLayout>
Step 4:
Now open app -> java -> package -> MainActivity.java
package example.abhiandriod.customarrayadapterexample;

import android.support.v7.app.AppCompatActivity;
import android.os.Bundle;
import android.widget.GridView;
import java.util.ArrayList;

public class MainActivity extends AppCompatActivity {

    GridView simpleList;
    ArrayList<Item> animalList=new ArrayList<>();
    @Override
    protected void onCreate(Bundle savedInstanceState) {
        super.onCreate(savedInstanceState);
        setContentView(R.layout.activity_main);
        simpleList = (GridView) findViewById(R.id.simpleGridView);
        animalList.add(new Item("Lion",R.drawable.lion));
        animalList.add(new Item("Tiger",R.drawable.tiger));
        animalList.add(new Item("Monkey",R.drawable.monkey));
        animalList.add(new Item("Elephant",R.drawable.elephant));
        animalList.add(new Item("Dog",R.drawable.dog));
        animalList.add(new Item("Cat",R.drawable.cat));

        MyAdapter myAdapter=new MyAdapter(this,R.layout.grid_view_items,animalList);
        simpleList.setAdapter(myAdapter);
    }
}
Step 5:
Create a new Class src -> package -> MyAdapter.java and add the following code:
package example.abhiandriod.customarrayadapterexample;

import android.content.Context;
import android.view.LayoutInflater;
import android.view.View;
import android.view.ViewGroup;
import android.widget.ArrayAdapter;
import android.widget.ImageView;
import android.widget.TextView;

import java.util.ArrayList;

public class MyAdapter extends ArrayAdapter<Item> {

    ArrayList<Item> animalList = new ArrayList<>();

    public MyAdapter(Context context, int textViewResourceId, ArrayList<Item> objects) {
        super(context, textViewResourceId, objects);
        animalList = objects;
    }

    @Override
    public int getCount() {
        return super.getCount();
    }

    @Override
    public View getView(int position, View convertView, ViewGroup parent) {

        View v = convertView;
        LayoutInflater inflater = (LayoutInflater) getContext().getSystemService(Context.LAYOUT_INFLATER_SERVICE);
        v = inflater.inflate(R.layout.grid_view_items, null);
        TextView textView = (TextView) v.findViewById(R.id.textView);
        ImageView imageView = (ImageView) v.findViewById(R.id.imageView);
        textView.setText(animalList.get(position).getAnimalName());
        imageView.setImageResource(animalList.get(position).getAnimalImage());
        return v;

    }

}
Step 6:
Create a new Class src -> package -> Item.java and add the below code:
package example.abhiandriod.customarrayadapterexample;

/**
 * Created by Gourav on 10-01-2016.
 */
public class Item {

    String animalName;
    int animalImage;

    public Item(String animalName,int animalImage)
    {
        this.animalImage=animalImage;
        this.animalName=animalName;
    }
    public String getAnimalName()
    {
        return animalName;
    }
    public int getAnimalImage()
    {
        return animalImage;
    }
}
You have saved my uni project (and my life) THANK YOU!!!!!
thank u so much
Hi,
My requirement is like when I click currencyName so i will get currencyName and CurrencyRate
could you please suggest me how to do that?
Thanks in advance!!!
When i run the project on emulator it shows blank screen and exits even i run your source code but the result was same.
Please Help sir??
public MyAdapter(Context context, int textViewResourceId, ArrayList objects) {
super(context, textViewResourceId, objects);
animalList = objects;
}
What is super function used for ??
How can i make this list clickable ? Help me please.
i also want this..please reply
MyAdapter seems to be using both the “R.layout.grid_view_items” (in getView()) and “R.layout.grid_view_items” (when an instance of MyAdapter is created). Could this be a mistake?
I meant, we shouldn’t need to pass in the same layout resource twice, otherwise what’s the point of passing it into the super’s constructor?
thank u so much ,,
this is simply superb, very useful(to whose are started learning).
The code is very good and understandable by everyone…..
thanks a lot