Whenever we have to create a custom list we need to implement custom adapter. As we discuss earlier ArrayAdapter is used when we have a list of single item’s backed by an Array. So if we need customization in a ListView or a GridView we need to implement simpleadapter but when we need even more customization in list or grid items where we have many view’s in a list item and also we have to perform any event like click or any other event to a particular view then we need to implement a custom adapter which fulfills our requirement. It is quite easy to implement.
Before moving further, it is important to do quick revision of Android SimpleAdapter which is an easy adapter to map static data to views defined in an XML file(layout). In android you can specify the data backing to a list as an ArrayList of Maps(hashmap or other). Each entry in an ArrayList is corresponding to one row of a list. The Maps contains the data for each row. You also specify an XML file(custom list items file) that defines the views used to display the row, and a mapping from keys in the Map to specific views.
Important Note: We can’t perform events like click and other event on child item of a list or grid but if we have some requirements to do that then we can create our own custom adapter and extends the simpleadapter in that.
Table Of Contents
Custom SimpleAdapter
is the parent adapter for all other adapters so if we extends a SimpleAdapter then we can override the base adapter’s function in that class.
Android CustomAdapter code when we extends SimpleAdapter in that:
public class CustomAdapter extends SimpleAdapter {
public CustomAdapter(Context context, List<? extends Map<String, ?>> data, int resource, String[] from, int[] to) {
super(context, data, resource, from, to);

}

@Override
public View getView(int position, View convertView, ViewGroup parent) {
return super.getView(position, convertView, parent);

}

@Override
public int getCount() {
return super.getCount();
}
}
In above code snippet we override functions of SimpleAdapter which are used to set the data in a list, grid or a spinner. There are few more methods but we mainly use these two method getCount() and getView().
1. getCount():
The getCount() function returns the total number of items to be displayed in a list. It counts the value from arraylist size or an array’s length. For example if we have a list of elements in a array list and we want to display the items in a listview then we can count the total number of those elements using the size function and that integer value is returned by the function getCount() as shown below.
@Override
public int getCount() {

int count=arrayList.size(); //counts the total number of elements from the arrayList.
return count;//returns the total count to adapter
}
2. getView(int i, View view, ViewGroup viewGroup):
This function is automatically called when the list item view is ready to be display or about to be display. In this function we set the layout for list items from the second parameter of this function i.e view.
Below is the getView function’s example code with explanation included. Here we set the layout and then perform the click event on a image view from that layout.
@Override
public View getView(int i, View view, ViewGroup viewGroup) {

View view=super.getView(position, convertView, parent);
ImageView imageView=(ImageView) view.findViewById(R.id.imageView);
imageView.setOnClickListener(new View.OnClickListener() {
@Override
public void onClick(View view) {
Toast.makeText(context, arrayList.get(position).get("name"), Toast.LENGTH_SHORT).show();
}
});
return view;
}
Example Of Custom SimpleAdapter in Android Studio:
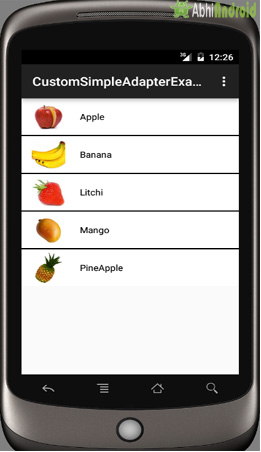
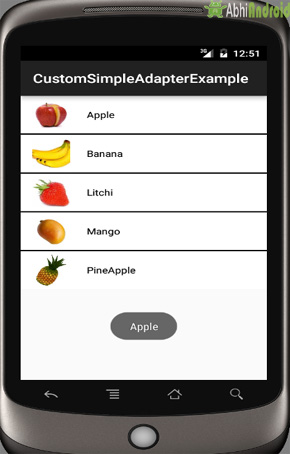
In the below example of custom simple adapter we display the custom list of fruit names with their images in a list view where fruit image is displayed in the left side of the screen and the name is displayed to the right side of the image. When we click on a fruit image the name of the fruit is displayed.
Create a new project in Android Studio and name it CustomSimpleAdapterExample.
Select File -> New -> New Project and Fill the forms and click "Finish" button.
Step 2: Open app -> res -> layout -> xml (or) activity_main.xml and add following code. Here we are creating ListView inside RelativeLayout.
<RelativeLayout xmlns:android="http://schemas.android.com/apk/res/android"
xmlns:tools="http://schemas.android.com/tools"
android:layout_width="match_parent"
android:layout_height="match_parent"
tools:context=".MainActivity">

<ListView
android:id="@+id/simpleListView"
android:layout_width="match_parent"
android:layout_height="wrap_content"
android:divider="#000"
android:dividerHeight="2dp" />

</RelativeLayout>
Step 3:
Now Create new a new layout Activity. Go to res-> right click on layout -> New -> Activity -> Blank Activity and create list_view_items.xml and add following code. Here we are creating items view that will be displayed inside each row.
<?xml version="1.0" encoding="utf-8"?>
<LinearLayout xmlns:android="http://schemas.android.com/apk/res/android"
android:layout_width="match_parent"
android:layout_height="wrap_content"
android:background="#fff">

<ImageView
android:id="@+id/imageView"
android:layout_width="60dp"
android:layout_height="60dp"
android:layout_marginLeft="10dp"
android:padding="5dp"
android:src="@drawable/ic_launcher" />

<TextView
android:id="@+id/textView"
android:layout_width="wrap_content"
android:layout_height="wrap_content"
android:layout_gravity="center"
android:padding="@dimen/activity_horizontal_margin"
android:text="Demo"
android:textColor="#000" />
</LinearLayout>
Step 4:
Now open app -> java -> package -> MainActivity.java and add the following code. Explanation is added in the code itself:
package example.abhiandriod.customsimpleadapterexample;

import android.support.v7.app.AppCompatActivity;
import android.os.Bundle;
import android.view.Menu;
import android.view.MenuItem;
import android.view.View;
import android.widget.AdapterView;
import android.widget.ListView;
import android.widget.Toast;

import java.util.ArrayList;
import java.util.HashMap;

public class MainActivity extends AppCompatActivity {

    //initialize view's
    ListView simpleListView;
    String[] fruitsNames = {"Apple", "Banana", "Litchi", "Mango", "PineApple"};//fruit names array
    int[] fruitsImages = {R.drawable.apple, R.drawable.banana, R.drawable.litchi, R.drawable.mango, R.drawable.pineapple};//fruits images array

    @Override
    protected void onCreate(Bundle savedInstanceState) {
        super.onCreate(savedInstanceState);
        setContentView(R.layout.activity_main);
        simpleListView = (ListView) findViewById(R.id.simpleListView);

        ArrayList<HashMap<String, String>> arrayList = new ArrayList<>();
        for (int i = 0; i < fruitsNames.length; i++) {
            HashMap<String, String> hashMap = new HashMap<>();//create a hashmap to store the data in key value pair
            hashMap.put("name", fruitsNames[i]);
            hashMap.put("image", fruitsImages[i] + "");
            arrayList.add(hashMap);//add the hashmap into arrayList
        }
        String[] from = {"name", "image"};//string array
        int[] to = {R.id.textView, R.id.imageView};//int array of views id's
        CustomAdapter simpleAdapter = new CustomAdapter(this, arrayList, R.layout.list_view_items, from, to);//Create object and set the parameters for simpleAdapter
        simpleListView.setAdapter(simpleAdapter);//sets the adapter for listView

        //perform listView item click event
        simpleListView.setOnItemClickListener(new AdapterView.OnItemClickListener() {
            @Override
            public void onItemClick(AdapterView<?> adapterView, View view, int i, long l) {
                Toast.makeText(getApplicationContext(), fruitsNames[i], Toast.LENGTH_LONG).show();//show the selected image in toast according to position
            }
        });

    }

}
Step 5:
Now create New Class. Go to app -> java -> right click on package-> New -> Java Class and create CustomAdapter.java and add following code. Here we extends SimpleAdapter in CustomAdapter class and override the methods of BaseAdapter since it is the parent adapter for all other adapters.
package example.abhiandriod.customsimpleadapterexample;

import android.content.Context;
import android.view.LayoutInflater;
import android.view.View;
import android.view.ViewGroup;
import android.widget.ImageView;
import android.widget.SimpleAdapter;
import android.widget.Toast;

import java.util.ArrayList;
import java.util.HashMap;

public class CustomAdapter extends SimpleAdapter {
LayoutInflater inflater;
Context context;
ArrayList<HashMap<String, String>> arrayList;

public CustomAdapter(Context context, ArrayList<HashMap<String, String>> data, int resource, String[] from, int[] to) {
super(context, data, resource, from, to);
this.context = context;
this.arrayList = data;
inflater.from(context);
}

@Override
public View getView(final int position, View convertView, ViewGroup parent) {
View view = super.getView(position, convertView, parent);
ImageView imageView = (ImageView) view.findViewById(R.id.imageView);
imageView.setOnClickListener(new View.OnClickListener() {
@Override
public void onClick(View view) {
Toast.makeText(context, arrayList.get(position).get("name"), Toast.LENGTH_SHORT).show();
}
});
return view;
}

}
Output:
Now start AVD in Emulator and run the App. You will see the custom list of fruit names with their images in a list view. Click on any fruit to see its name displayed on screen as Toast message.
thank you your code works like charm
you saved my day 🙂
I have custom adapter based on Simpleadapter, but when I call the notifyDataSetChanged nothing happens, how can I call the notifyDataSetChanged (function found in Baseadapter but not on Simpleadapter)?
Very very Tank You Dear My Brother
it s compiled in the my systems and working.
Thank u It Works
thankkkkkkkkkkkkkkkkkkkkkkkkkkkkkk you dude !!!!!!!!! u are great thanku
thanks this work for me 🙂