ProgressBar Tutorial With Example In Android Studio
In Android, ProgressBar is used to display the status of work being done like analyzing status of work or downloading a file etc. In Android, by default a progress bar will be displayed as a spinning wheel but If we want it to be displayed as a horizontal bar then we need to use style attribute as horizontal. It mainly use the “android.widget.ProgressBar” class.
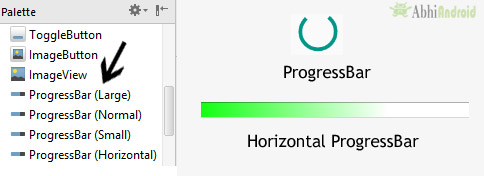
To add a progress bar to a layout (xml) file, you can use the <ProgressBar> element. By default, a progress bar is a spinning wheel (an indeterminate indicator). To change to a horizontal progress bar, apply the progress bar’s horizontal style.
ProgressBar code:
<ProgressBar
android:id="@+id/simpleProgressBar"
android:layout_width="wrap_content"
android:layout_height="wrap_content" />
Horizontal ProgressBar code:
<ProgressBar
android:id="@+id/simpleProgressBar"
android:layout_width="fill_parent"
android:layout_height="wrap_content"
style="@style/Widget.AppCompat.ProgressBar.Horizontal"/>
Table Of Contents
Important Methods Used In ProgressBar:
1. getMax() – returns the maximum value of progress bar
We can get the maximum value of the progress bar in java class. This method returns a integer value. Below is the code to get the maximum value from a Progress bar.
ProgressBar simpleProgressBar=(ProgressBar) findViewById(R.id.simpleProgressBar); // initiate the progress bar
int maxValue=simpleProgressBar.getMax(); // get maximum value of the progress bar
2. getProgress() – returns current progress value
We can get the current progress value from a progress bar in java class. This method also returns a integer value. Below is the code to get current progress value from a Progress bar.
ProgressBar simpleProgressBar=(ProgressBar)findViewById(R.id.simpleProgressBar); // initiate the progress bar
int progressValue=simpleProgressBar.getProgress(); // get progress value from the progress bar
Attributes of ProgressBar In Android:
Now let’s discuss important attributes that helps us to configure a Progress bar in xml file (layout).
1. id: id is an attribute used to uniquely identify a Progress bar.
<ProgressBar
android:id="@+id/simpleProgressBar"
android:layout_width="fill_parent"
android:layout_height="wrap_content"
style="@style/Widget.AppCompat.ProgressBar.Horizontal"/>
2. max: max is an attribute used in android to define maximum value of the progress can take. It must be an integer value like 100, 200 etc.
Below we set 100 maximum value for a progress bar.
<ProgressBar
    android:id="@+id/simpleProgressBar"
    android:layout_width="fill_parent"
    android:layout_height="wrap_content"
    style="@style/Widget.AppCompat.ProgressBar.Horizontal"
    android:max="100" /><!--set 100 maximum value for the progress bar-->
Set Max Value of ProgressBar In Java Class :
ProgressBar simpleProgressBar=(ProgressBar) findViewById(R.id.simpleProgressBar); // initiate the progress bar
simpleProgressBar.setMax(100); // 100 maximum value for the progress bar

Below we set the 100 max value and then set 50 default progress.
<ProgressBar
    android:id="@+id/simpleProgressBar"
    android:layout_width="fill_parent"
    android:layout_height="wrap_content"
    android:max="100"
    style="@style/Widget.AppCompat.ProgressBar.Horizontal"
    android:progress="50"/><!--// 50 default progress value-->
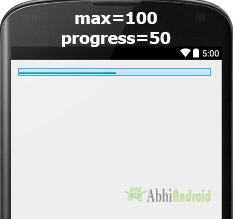
ProgressBar simpleProgressBar=(ProgressBar)findViewById(R.id.simpleProgressBar); // initiate the progress bar
simpleProgressBar.setMax(100); // 100 maximum value for the progress value
simpleProgressBar.setProgress(50); // 50 default progress value for the progress bar
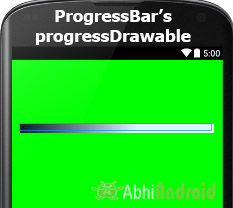
4. progressDrawable: progress drawable is an attribute used in Android to set the custom drawable for the progress mode.
Below we set a custom gradient drawable for the progress mode of a progress bar. Before you try below code make sure to download a progress icon from the web and add in your drawable folder.
Step 1: Add this code in activity_main.xml or main.xml inside layout.
<ProgressBar
android:id="@+id/simpleProgressBar"
android:layout_width="fill_parent"
android:layout_height="wrap_content"
android:max="100"
android:progress="60"
android:layout_marginTop="100dp"
style="@style/Widget.AppCompat.ProgressBar.Horizontal"
android:progressDrawable="@drawable/custom_progress"/><!--custom progress drawable for progress mode-->
Step 2: Create a new drawable resource xml in drawable folder and name it custom_progress. Here add the below code which creates gradient effect in progressbar.
<?xml version="1.0" encoding="utf-8"?>
<layer-list xmlns:android="http://schemas.android.com/apk/res/android" >

    <item>
        <shape>
            <gradient
                android:endColor="#fff"
                android:startColor="#1f1"
                android:useLevel="true" />

        </shape>
    </item>


</layer-list>
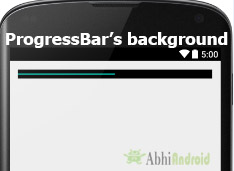
Below we set the black color for the background of a Progress bar.
<ProgressBar
    android:id="@+id/simpleProgressBar"
    android:layout_width="fill_parent"
    android:layout_height="wrap_content"
    android:max="100"
    android:progress="50"
    style="@style/Widget.AppCompat.ProgressBar.Horizontal"
    android:background="#000"/><!-- black background color for progress bar-->
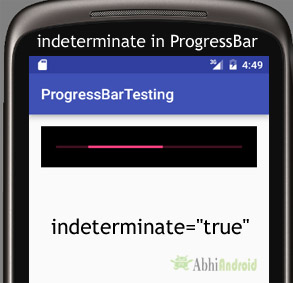
In below code we set the indeterminate to true.
<ProgressBar
    android:id="@+id/simpleProgressBar"
    android:layout_width="fill_parent"
    android:layout_height="wrap_content"
    android:max="100"
    android:progress="50"
    android:background="#000"
    android:padding="20dp" style="@style/Widget.AppCompat.ProgressBar.Horizontal"
    android:indeterminate="true"/><!--true value for indeterminate-->
ProgressBar simpleProgressBar=(ProgressBar)findViewById(R.id.simpleProgressBar); // initiate the progress bar
simpleProgressBar.setBackgroundColor(Color.BLACK); // black background color for the progress bar
7. padding: padding attribute is used to set the padding from left, right, top or bottom of ProgressBar.
- paddingRight: set the padding from the right side of the Progress bar.
- paddingLeft: set the padding from the left side of the Progress bar.
- paddingTop: set the padding from the top side of the Progress bar.
- paddingBottom: set the padding from the bottom side of the Progress bar.
- Padding: set the padding from the all side’s of the Progress bar.
Below we set the 20dp padding from all the side’s of the Progress bar.
<ProgressBar
    android:id="@+id/simpleProgressBar"
    android:layout_width="fill_parent"
    android:layout_height="wrap_content"
    android:max="100"
    android:progress="50"
    android:background="#000"
    style="@style/Widget.AppCompat.ProgressBar.Horizontal"
    android:padding="20dp"/><!--// 20dp padding from all the sides of the progress bar-->

ProgressBar Example In Android Studio:
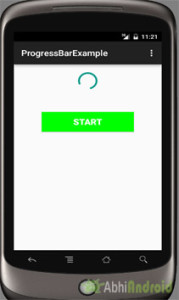
In the first example of ProgressBar we displayed a default spinning wheel progress bar and a start button whenever a user click on the button the progress bar is displayed. Below is the final output, download code and step by step explanation:

Select File -> New -> New Project… then Fill the forms and click "Finish" button.
Step 2: Open res -> layout -> activity_main.xml (or) main.xml and add following code:
In this step we open an xml file and add the code for displaying a progress bar and set its visibility to invisible and one start button.
<RelativeLayout xmlns:android="http://schemas.android.com/apk/res/android"
    xmlns:tools="http://schemas.android.com/tools"
    android:layout_width="match_parent"
    android:layout_height="match_parent"
    android:paddingBottom="@dimen/activity_vertical_margin"
    android:paddingLeft="@dimen/activity_horizontal_margin"
    android:paddingRight="@dimen/activity_horizontal_margin"
    android:paddingTop="@dimen/activity_vertical_margin"
    tools:context=".MainActivity">

    <ProgressBar
        android:id="@+id/simpleProgressBar"
        android:layout_width="wrap_content"
        android:layout_height="wrap_content"
        android:visibility="invisible"
        android:layout_centerHorizontal="true"/>

    <Button
        android:id="@+id/startButton"
        android:layout_width="200dp"
        android:layout_height="wrap_content"
        android:text="Start"
        android:textSize="20sp"
        android:textStyle="bold"
        android:layout_centerHorizontal="true"
        android:layout_marginTop="100dp"
        android:padding="10dp"
        android:background="#0f0"
        android:textColor="#fff"/>

</RelativeLayout>
Step 3: Now Open src -> package -> MainActivity.java
In this step we open MainActivity where we add the code to initiate the progress bar & button and then perform click event on button which display the progress bar.
package example.gb.progressbarexample;

import android.graphics.Color;
import android.support.v7.app.AppCompatActivity;
import android.os.Bundle;
import android.view.Menu;
import android.view.MenuItem;
import android.view.View;
import android.widget.ProgressBar;
import android.widget.Button;

public class MainActivity extends AppCompatActivity {

    @Override
    protected void onCreate(Bundle savedInstanceState) {
        super.onCreate(savedInstanceState);
        setContentView(R.layout.activity_main);
        // initiate progress bar and start button
        final ProgressBar simpleProgressBar = (ProgressBar) findViewById(R.id.simpleProgressBar);
        Button startButton = (Button) findViewById(R.id.startButton);
        // perform click event on button
        startButton.setOnClickListener(new View.OnClickListener() {
            @Override
            public void onClick(View v) {
                // visible the progress bar
                simpleProgressBar.setVisibility(View.VISIBLE);
            }
        });
    }


}
Output:
Now start the AVD in Emulator and run the App. Click on the start button and Progress Bar will be displayed on screen.
Horizontal ProgressBar Example In Android Studio:
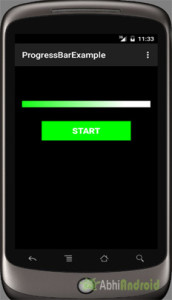
In the second example we display a horizontal progress bar with drawable background and a start button. Here whenever a user clicks on button a thread is used to start the progress. Below is the final output, download code and step by step explanation:
Select File -> New -> New Project… then Fill the forms and click "Finish" button.
Step 2: Open res -> layout -> activity_main.xml (or) main.xml and add following code:
In this step we open an xml file and add the code for displaying a horizontal progress bar by using style property, drawable progress xml and one start button.
<RelativeLayout xmlns:android="http://schemas.android.com/apk/res/android"
    xmlns:tools="http://schemas.android.com/tools"
    android:layout_width="match_parent"
    android:layout_height="match_parent"
    android:background="#000"
    android:paddingBottom="@dimen/activity_vertical_margin"
    android:paddingLeft="@dimen/activity_horizontal_margin"
    android:paddingRight="@dimen/activity_horizontal_margin"
    android:paddingTop="@dimen/activity_vertical_margin"
    tools:context=".MainActivity">

    <ProgressBar
        android:id="@+id/simpleProgressBar"
        style="@style/Widget.AppCompat.ProgressBar.Horizontal"
        android:layout_width="fill_parent"
        android:layout_height="wrap_content"
        android:layout_centerHorizontal="true"
        android:layout_marginTop="70dp"
        android:max="100"
        android:progress="0"
        android:progressDrawable="@drawable/custom_progress" />

    <Button
        android:id="@+id/startButton"
        android:layout_width="200dp"
        android:layout_height="wrap_content"
        android:layout_centerHorizontal="true"
        android:layout_marginTop="120dp"
        android:background="#0f0"
        android:padding="10dp"
        android:text="Start"
        android:textColor="#fff"
        android:textSize="20sp"
        android:textStyle="bold" />

</RelativeLayout>
Step 3: Create an xml file in drawable -> custom_progress.xml
In this step we create a custom drawable xml for the progress bar. In this xml we create a layer list in which we create an item and then set the gradient colors for our custom progress bar.
<?xml version="1.0" encoding="utf-8"?>
<layer-list xmlns:android="http://schemas.android.com/apk/res/android" >

    <item>
        <shape>
            <gradient
                android:endColor="#fff"
                android:startColor="#1f1"
                android:useLevel="true" />

        </shape>
    </item>


</layer-list>
Step 4: Open app -> package -> MainActivity.java
In this step we open MainActivity and add the code to initiate the progress bar, button and then perform click event on button. After that we start the progressing in a progress bar using a thread.
package example.gb.progressbarexample;

import android.app.Dialog;
import android.content.DialogInterface;
import android.content.Intent;
import android.graphics.Color;
import android.provider.Settings;
import android.support.v7.app.AlertDialog;
import android.support.v7.app.AppCompatActivity;
import android.os.Bundle;
import android.view.Menu;
import android.view.MenuItem;
import android.view.View;
import android.widget.ProgressBar;
import android.widget.Button;
import android.widget.Toast;

public class MainActivity extends AppCompatActivity {

    int progress = 0;
    ProgressBar simpleProgressBar;

    @Override
    protected void onCreate(Bundle savedInstanceState) {
        super.onCreate(savedInstanceState);
        setContentView(R.layout.activity_main);
        // initiate progress bar and start button
        simpleProgressBar = (ProgressBar) findViewById(R.id.simpleProgressBar);
        Button startButton = (Button) findViewById(R.id.startButton);
        // perform click event on button
        startButton.setOnClickListener(new View.OnClickListener() {
            @Override
            public void onClick(View v) {
                // call a function
                setProgressValue(progress);

            }
        });
    }

    private void setProgressValue(final int progress) {

        // set the progress
        simpleProgressBar.setProgress(progress);
        // thread is used to change the progress value
        Thread thread = new Thread(new Runnable() {
            @Override
            public void run() {
                try {
                    Thread.sleep(1000);
                } catch (InterruptedException e) {
                    e.printStackTrace();
                }
                setProgressValue(progress + 10);
            }
        });
        thread.start();
    }


    @Override
    public boolean onCreateOptionsMenu(Menu menu) {
        // Inflate the menu; this adds items to the action bar if it is present.
        getMenuInflater().inflate(R.menu.menu_main, menu);
        return true;
    }

    @Override
    public boolean onOptionsItemSelected(MenuItem item) {
        // Handle action bar item clicks here. The action bar will
        // automatically handle clicks on the Home/Up button, so long
        // as you specify a parent activity in AndroidManifest.xml.
        int id = item.getItemId();

        //noinspection SimplifiableIfStatement
        if (id == R.id.action_settings) {
            return true;
        }

        return super.onOptionsItemSelected(item);
    }
}
Output:
Now run the App in AVD, click on start button and you will see horizontal progressbar.
Related Topic – ProgressDialog In Android
Android Progress Dialog is a UI which shows the progress of a task like you want user to wait until the previous lined up task is completed and for that purpose you can use progress dialog. Read our Progressdialog tutorial with example.

10 thoughts on “ProgressBar Tutorial With Example In Android Studio”
Leave a Reply to Arslan Cancel reply
Premium Project Source Code:
- Food Ordering Android App Project Source Code
- Ecommerce Store Android App Project Source Code
- Convert Website Into Android App Project Source Code
- Quiz Game Android App Project Source Code
- Radio Streaming Android App Source Code
- City Guide Android App Project Source Code
- QR Barcode Android App Project Source Code
how to stop the progress bar when when toast shown
Really too late to find this useful site, I
am happy to learn from here,
Thank a lot.
really great tutorial buddy .. it helped me a lot………
hai, i just want to ask , where action_settings come from? i just confused ..
Amazing Post 🙂
Keep it up !
set time for loading circle bar….
how much time it will work
Thanks a lot
i need this source code
Source code is already added in the website. Click on download, fill password ‘abhiandroid’ and download it. Unzip the downloaded file and import in Android Studio. Finally run the program to test it.
good.