In android, An adapter is a bridge between UI component and data source that helps us to fill data in UI component. SimpleAdpater is used for customization of list or grid items.
In Android, SimpleAdapter is an easy adapter to map static data to views defined in an XML file (layout). In android you can specify the data backing to a list as an ArrayList of Maps(hashmap or other). Each entry in a ArrayList is corresponding to one row of a list. The Map contains the data for each row. You also specify an XML file(custom list items file) that defines the views used to display the row, and a mapping from keys in the Map to specific views. This whole thing will make sense when you do one example in Android Studio as discussed at the end of this article.
Whenever we have to create a custom list we need to implement custom adapter. As we discuss earlier ArrayAdapter is used when we have a list of single item’s backed by an Array. So if we need more customization in a ListView or a GridView we need to implement simple adapter.
Below is android SimpleAdapter code:
SimpleAdapter(Context context, List<? extends Map<String, ?>> data, int resource, String[] from, int[] to)
In above code snippet we show the implementation of a SimpleAdapter. Below is the description of all the parameters used for the implementation of a SimpleAdapter to show a list of elements in a list view or in a grid view.
Parameters used in SimpleAdapter:
1. context:
The first parameter is used to pass the context means the reference of current class. Here this is a keyword used to show the current class reference. We can also use getApplicationContext(), getActivity() in the place of this keyword. getApplicationContext() is used in a Activity and getActivity() is used in a Fragment.
Below is the example code in which we set the current class reference in a adapter.
SimpleAdapter(this, List<? extends Map<String, ?>> data, int resource, String[] from, int[] to)
2. data:
The second parameter is data which is a List of Maps. Each entry in a List corresponds to one row in the list. The Maps contains the data of each row and should include all the entries specified in “from” string array.
Below is the example, In which we set’s the map type arrayList.
SimpleAdapter(this, hashmapData, int resource, String[] from, int[] to)
3. resource:
The third parameter is resource id which is use to set the layout (xml file) for list items in which you have a text view, image view or any other view.
Below is the example code in which we set the layout (xml file) for creating custom list.
Suppose below is the code of Activity custom_list_items.xml where we define ImageView and TextView as list items which will be set in Layout:
<?xml version="1.0" encoding="utf-8"?>
<RelativeLayout xmlns:android="http://schemas.android.com/apk/res/android"
    android:layout_width="match_parent"
    android:layout_height="wrap_content">

    <ImageView
        android:id="@+id/imageView"
        android:layout_width="50dp"
        android:layout_height="50dp"
        android:padding="5dp"
        android:layout_alignParentRight="true"
        android:layout_marginRight="10dp"
        android:src="@drawable/ic_launcher" />

    <TextView
        android:id="@+id/textView"
        android:layout_width="wrap_content"
        android:layout_height="wrap_content"
        android:padding="@dimen/activity_horizontal_margin"
        android:text="Demo"
        android:textColor="#000" />
</RelativeLayout>
Now we will pass this layout as 3rd parameter in SimpleAdapter.
SimpleAdapter (this, hashmapData, R.layout.custom_list_items, String[] from, int[] to)
4. from:
The fourth parameter is from is an string array or called a list of column names that will be added to a Map associated with each item of a grid or list view.
Below is the example code in which we set an array for list items
String fromArray[]={"userName","userImage"};
SimpleAdapter (this, hashmapData, R.layout.custom_list_items, fromArray, int[] to)
5. to:
The fifth and last parameter is to which is an integer array used to store the Id’s of the views. The views that should display column in the “from” parameter. These should all be TextViews. The first N views in this list are given the values of the first N columns in the “from” parameter.
Below is the example code, In which we set the integer array for views id’s.
int to[]={R.id.textView,R.id.imageView};

SimpleAdapter (this, hashmapData, R.layout.custom_list_items, fromArray,to)
Example of Simple Adapter in Android Studio:
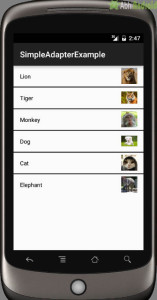
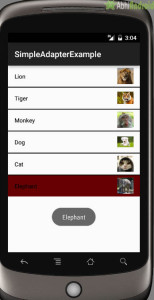
In below example of simple adapter we display the custom list of animal names with their images in a list view. Here animal image is displayed in the right side of the screen and the name is displayed to the left side of the screen. When you click on any list item the animal name from that item will be displayed as a Toast to screen. Below is the final output and code:
Create a new project in Android Studio and name it SimpleAdapterExample.
Select File -> New -> New Project and Fill the forms and click "Finish" button.
Step 2:
Now go to res -> layout -> xml (or) activity_main.xml and add following code. Here we are designing ListView in Relative Layout.
<RelativeLayout xmlns:android="http://schemas.android.com/apk/res/android"
    xmlns:tools="http://schemas.android.com/tools"
    android:layout_width="match_parent"
    android:layout_height="match_parent"
    tools:context=".MainActivity">

    <ListView
        android:id="@+id/simpleListView"
        android:layout_width="match_parent"
        android:layout_height="wrap_content"
        android:divider="#000"
        android:dividerHeight="2dp"
        android:listSelector="#600"/>

</RelativeLayout>
Step 3:
Now Create a new Activity. Go to res-> right click on layout-> new -> Activity -> Blank Activity and create list_view_items.xml activity. Here add following code. Here we are defining ImageView and TextView items that will be displayed inside each row of ListView.
<?xml version="1.0" encoding="utf-8"?>
<RelativeLayout xmlns:android="http://schemas.android.com/apk/res/android"
    android:layout_width="match_parent"
    android:layout_height="wrap_content">

    <ImageView
        android:id="@+id/imageView"
        android:layout_width="50dp"
        android:layout_height="50dp"
        android:padding="5dp"
        android:layout_alignParentRight="true"
        android:layout_marginRight="10dp"
        android:src="@drawable/ic_launcher" />

    <TextView
        android:id="@+id/textView"
        android:layout_width="wrap_content"
        android:layout_height="wrap_content"
        android:padding="@dimen/activity_horizontal_margin"
        android:text="Demo"
        android:textColor="#000" />
</RelativeLayout>
Step 4:
Now open app -> java -> package, click on MainActivity.java and add the below code. Here we will use SimpleAdapter to display static data in XML layout. More explanation is included in the code itself.
package example.abhiandriod.simpleadapterexample;

import android.support.v7.app.AppCompatActivity;
import android.os.Bundle;
import android.view.Menu;
import android.view.MenuItem;
import android.view.View;
import android.widget.AdapterView;
import android.widget.ListView;
import android.widget.SimpleAdapter;
import android.widget.Toast;

import java.util.ArrayList;
import java.util.HashMap;

public class MainActivity extends AppCompatActivity {

    //initialize view's
    ListView simpleListView;
    String[] animalName={"Lion","Tiger","Monkey","Dog","Cat","Elephant"};//animal names array
    int[] animalImages={R.drawable.lion,R.drawable.tiger,R.drawable.monkey,R.drawable.dog,R.drawable.cat,R.drawable.elephant};//animal images array
    @Override
    protected void onCreate(Bundle savedInstanceState) {
        super.onCreate(savedInstanceState);
        setContentView(R.layout.activity_main);
        simpleListView=(ListView)findViewById(R.id.simpleListView);

        ArrayList<HashMap<String,String>> arrayList=new ArrayList<>();
        for (int i=0;i<animalName.length;i++)
        {
            HashMap<String,String> hashMap=new HashMap<>();//create a hashmap to store the data in key value pair
            hashMap.put("name",animalName[i]);
            hashMap.put("image",animalImages[i]+"");
            arrayList.add(hashMap);//add the hashmap into arrayList
        }
        String[] from={"name","image"};//string array
        int[] to={R.id.textView,R.id.imageView};//int array of views id's
        SimpleAdapter simpleAdapter=new SimpleAdapter(this,arrayList,R.layout.list_view_items,from,to);//Create object and set the parameters for simpleAdapter
        simpleListView.setAdapter(simpleAdapter);//sets the adapter for listView

        //perform listView item click event
        simpleListView.setOnItemClickListener(new AdapterView.OnItemClickListener() {
            @Override
            public void onItemClick(AdapterView<?> adapterView, View view, int i, long l) {
                Toast.makeText(getApplicationContext(),animalName[i],Toast.LENGTH_LONG).show();//show the selected image in toast according to position
            }
        });
    }


}
Output:
Now run the App in AVD or Emulator and you will see the ListView displaying animal names and images. Now click on the any Animal and you will see Toast message showing Animal name.
I have a doubt about how to highlight the selected item before click ok, or use radio button checked on selected item? Can you please reply on this regard?
how to display image with text from Sqlite databse in listview with searchview post the source code plzzzzzzzzzzz
how can you refer to an element from list_view_items.xml in the main activity?
thank’s sir but how we can remove selected item
Valeu muito facil de entender.
Obrigado
gracias…..:)
Thank you so much.
I have fixed it.
Thank you for this wonderful tutorial but I am having issues with mine display result from database. below is my activity code and the result from the database.
Below is what the result from the database looks like.
[{“j_id”:”1″,”j_title”:”Online Content Management”},{“j_id”:”2″,”j_title”:”Graduate developer”}]
but it is diplaying on: 2 Graduate developer (i.e. only the last record)
Very good and easy to understand
Thanks
sooper thanks