TabHost Tutorial With Example In Android Studio
In Android, TabHost is a Container for tabbed window view. This object holds two children one is set of tab labels that the user clicks to select a specific tab and other is a FrameLayout object that displays the content of that page.
Whenever we need to enter or display a lot of information in one activity. A simple and effective method is to use tabs in your interface form which is done using TabHost in Android.
Important Note: A Tabhost holds two children’s from which one is use to set the labels that the users clicks to select tab other is a FrameLayout that is used to display the content of that page. It means when you select any label (or you can say change the tab) the FrameLayout is used to display the content for that particular tab.
Important Note: For Using TabHost in our MainActivity we need to extend TabActivity instead of Activity.
Table Of Contents
Basic TabHost XML code:
In Below code snippet we shows the TabHost with TabWidget and a FrameLayout.
<?xml version="1.0" encoding="UTF-8"?>
<TabHost xmlns:android="http://schemas.android.com/apk/res/android"
android:id="@android:id/tabhost"
android:layout_width="fill_parent"
android:layout_height="fill_parent">

<LinearLayout
android:layout_width="fill_parent"
android:layout_height="fill_parent"
android:orientation="vertical">

<FrameLayout
android:id="@android:id/tabcontent"
android:layout_width="fill_parent"
android:layout_height="0dip"
android:layout_weight="1" />

<TabWidget
android:id="@android:id/tabs"
android:layout_width="fill_parent"
android:layout_height="wrap_content"
android:layout_marginBottom="-4dp"
android:layout_weight="0" />

</LinearLayout>

</TabHost>

TabHost.TabSpec:
In Android, A tab has a tab indicator, content, and a tag that is used to keep track of it. This builder helps us to choose among these options. For the tab indicator our choices are set a label or set a label and an icon both together. For the tab content our choices are the id of View, a TabHost.TabContentFactory that creates the view content and an Intent that launches an Activity.
Important Methods Of TabSpec:
Let’s discuss some common methods of a TabSpec which are used to specify the indicator and content for a Tab.
1. setIndicator(CharSequence label): This method is used to set the text to show on tab. In this we specify CharSequence type value to display a label for Tab.
Below we set the “Tab 1” as an indicator ( label ) for a tab.
TabHost tabHost = (TabHost)findViewById(android.R.id.tabhost); // initiate TabHost
TabHost.TabSpec tabSpec = tabHost.newTabSpec("tab1"); // Create a new TabSpec using tab host
tabSpec.setIndicator("Tab 1"); // set the “Tab 1” as an indicator for a tab
Important Note: Mostly all methods described here needs to be used to make TabHost work. So do refer to the example at the end of this article to learn how to use all these method to create TabHost in Android.
2. setIndicator(CharSequence label,Drawable icon): This method is used to Specify a label and icon as the tab indicator. In this method you specify char sequence type value to display a label for tab and drawable to display an icon on tab.
Below we set the “Tab 1” as an indicator ( label ) and ic_launcher icon for a tab.
TabHost tabHost = (TabHost)findViewById(android.R.id.tabhost); // initiate TabHost
TabHost.TabSpec tabSpec = tabHost.newTabSpec("tab1"); // Create a new TabSpec using tab host
tabSpec.setIndicator("Tab 1",getResources().getDrawable(R.drawable.ic_launcher)); // set the label and icon an indicator for a tab
3. setContent(Intent intent): This method is used to specify an intent to use to launch an activity as the tab content. Whenever a user click on this tab an activity is open and display the content.
Below we set an intent that is used to launch an activity as the tab content.
TabHost tabHost = (TabHost)findViewById(android.R.id.tabhost); // initiate TabHost
TabHost.TabSpec tabSpec = tabHost.newTabSpec("tab1"); // Create a new TabSpec using tab host
tabSpec.setIndicator(view); // set the “Tab 1” as an indicator
Intent intent = new Intent(this, MyActivity.class);
tabSpec.setContent(intent); // specify an intent to use to launch an activity as the tab content
Important Methods Of TabHost:
Let’s discuss some important methods of a TabHost which are used to configure Tabs in our application.
1. addTab(TabSpec tabSpec): This method is used to add a tab onto a tab widget. Whenever we specify a new tab using TabSpec class we need to add that tab in our TabHost.
Below is an example code with explanation in which we specify a tab using TabSpec class and then add that tab in our tab host using addTab method.
TabHost tabHost = (TabHost) findViewById(android.R.id.tabhost); // initiate TabHost
TabHost.TabSpec tabSpec = tabHost.newTabSpec("tab1"); // Create a new TabSpec using tab host
tabSpec.setIndicator(view); // set the “Tab 1” as an indicator
Intent intent = new Intent(this, MyActivity.class);
tabSpec.setContent(intent); // specify an intent to use to launch an activity as the tab content
tabHost.addTab(tabSpec); // add a tab in Tab widget
2. clearAllTabs(): This method is used to remove all the tabs from the tab widget associated with TabHost.
Below is an example code in which Firstly we add two tabs and then remove all the tabs from a tab widget.
TabHost tabHost = (TabHost) findViewById(android.R.id.tabhost); // initiate TabHost
TabHost.TabSpec tabSpec = tabHost.newTabSpec("tab1"); // Create a new TabSpec using tab host
tabSpec.setIndicator("Tab 1"); // set the “Tab 1” as an indicator
Intent intent = new Intent(this, MyActivity.class);
tabSpec.setContent(intent);
TabHost.TabSpec tabSpec1 = tabHost.newTabSpec("tab2"); // Create a new TabSpec using tab host
tabSpec1.setIndicator("Tab 2"); // set the “Tab 2” as an indicator
Intent intent1 = new Intent(this, MyActivity.class);
tabSpec1.setContent(intent1); // specify an intent to use to launch an activity as the tab content
tabHost.addTab(tabSpec); // add first tab in Tab widget
tabHost.addTab(tabSpec1); // add second tab in Tab widget
tabHost.clearAllTabs(); // clear all the tabs from tab widget
3. setCurrentTab(int index): This method is used to set the current selected tab from the tab widget. By default a tab host set first tab as current tab but we can change it by using this function.
Below is an example code in which firstly we add two tabs and then set the second tab as current tab.
TabHost tabHost = (TabHost) findViewById(android.R.id.tabhost); // initiate TabHost
TabHost.TabSpec tabSpec = tabHost.newTabSpec("tab1"); // Create a new TabSpec using tab host
tabSpec.setIndicator("Tab 1"); // set the “Tab 1” as an indicator
Intent intent = new Intent(this, MyActivity.class);
tabSpec.setContent(intent);
TabHost.TabSpec tabSpec1 = tabHost.newTabSpec("tab2"); // Create a new TabSpec using tab host
tabSpec1.setIndicator("Tab 2"); // set the “Tab 2” as an indicator
Intent intent1 = new Intent(this, MyActivity.class);
tabSpec1.setContent(intent1); // specify an intent to use to launch an activity as the tab content
tabHost.addTab(tabSpec); // add first tab in Tab widget
tabHost.addTab(tabSpec1); // add second tab in Tab widget
tabHost.setCurrentTab(1); // set second tab as current selected tab
4. setOnTabChangedListener(OnTabChangeListenerl): This method is used to register a callback to be invoked when the selected state of any of the items in this list changes.
Below we show how to use setOnTabChangedListener in TabHost.
// perform set on tab changed listener on tab host
tabHost.setOnTabChangedListener(new TabHost.OnTabChangeListener() {
@Override
public void onTabChanged(String tabId) {
// Add code Here
}
});
TabHost Example In Android Studio:
Below is the example of TabHost in which we display a TabHost by using Tab Widget and FrameLayout. In this example we display three tabs named home, contact and about by using TabHost.TabSpec where we display static data. We also implement setOnTabChangeListener, so whenever a tab is changed the name of the tab is displayed by using a Toast.
Below you can download complete Android Studio project code, see final output and read step by step explanation:

Step 1: Create a new project and name it TabHostExample
Step 2: Open res -> layout ->activity_main.xml (or) main.xml and add following code :
In this step we add the code for displaying a TabHost by using TabWidget and Framelayout.
<?xml version="1.0" encoding="UTF-8"?>
<TabHost xmlns:android="http://schemas.android.com/apk/res/android"
android:id="@android:id/tabhost"
android:layout_width="fill_parent"
android:layout_height="fill_parent">


<LinearLayout
android:layout_width="fill_parent"
android:layout_height="fill_parent"
android:orientation="vertical">

<FrameLayout
android:id="@android:id/tabcontent"
android:layout_width="fill_parent"
android:layout_height="0dip"
android:layout_weight="1" />

<TabWidget
android:id="@android:id/tabs"
android:layout_width="fill_parent"
android:layout_height="wrap_content"
android:layout_marginBottom="-4dp"
android:layout_weight="0" />

</LinearLayout>

</TabHost>
Step 3: Open src -> package -> MainActivity.java
In this step we add the code to initiate the TabHost and then add three tabs home, contact and about by using TabHost.TabSpec where we display static data. We also implement setOnTabChangeListener so whenever a tab is changed the name of the tab is displayed by using a Toast.
For Using TabHost in our MainActivity we need to extend TabActivity instead of Activity.
package example.abhiandroid.tabhostexample;

import android.app.TabActivity;
import android.content.Intent;
import android.os.Bundle;
import android.view.Menu;
import android.view.MenuItem;
import android.widget.TabHost;
import android.widget.Toast;

public class MainActivity extends TabActivity {
    /**
     * Called when the activity is first created.
     */
    @Override
    public void onCreate(Bundle savedInstanceState) {
        super.onCreate(savedInstanceState);
        setContentView(R.layout.activity_main);

        TabHost tabHost = (TabHost) findViewById(android.R.id.tabhost); // initiate TabHost
        TabHost.TabSpec spec; // Reusable TabSpec for each tab
        Intent intent; // Reusable Intent for each tab

        spec = tabHost.newTabSpec("home"); // Create a new TabSpec using tab host
        spec.setIndicator("HOME"); // set the “HOME” as an indicator
        // Create an Intent to launch an Activity for the tab (to be reused)
        intent = new Intent(this, HomeActivity.class);
        spec.setContent(intent);
        tabHost.addTab(spec);

        // Do the same for the other tabs

        spec = tabHost.newTabSpec("Contact"); // Create a new TabSpec using tab host
        spec.setIndicator("CONTACT"); // set the “CONTACT” as an indicator
        // Create an Intent to launch an Activity for the tab (to be reused)
        intent = new Intent(this, ContactActivity.class);
        spec.setContent(intent);
        tabHost.addTab(spec);

        spec = tabHost.newTabSpec("About"); // Create a new TabSpec using tab host
        spec.setIndicator("ABOUT"); // set the “ABOUT” as an indicator
        // Create an Intent to launch an Activity for the tab (to be reused)
        intent = new Intent(this, AboutActivity.class);
        spec.setContent(intent);
        tabHost.addTab(spec);
        //set tab which one you want to open first time 0 or 1 or 2
        tabHost.setCurrentTab(1);
        tabHost.setOnTabChangedListener(new TabHost.OnTabChangeListener() {
            @Override
            public void onTabChanged(String tabId) {
                // display the name of the tab whenever a tab is changed
                Toast.makeText(getApplicationContext(), tabId, Toast.LENGTH_SHORT).show();
            }
        });


    }


}
Step 4: Now we need 3 activities and 3 xml layouts for three tabs. So create three activities by right click on your package folder and create classes and name them as HomeActivity, ContactActivity and AboutActivity and add the following code respectively.
Right Click on package folder -> New -> Class and create:
HomeActivity.class
package example.abhiandroid.tabhostexample;

import android.support.v7.app.AppCompatActivity;
import android.os.Bundle;

public class HomeActivity extends AppCompatActivity {

    @Override
    protected void onCreate(Bundle savedInstanceState) {
        super.onCreate(savedInstanceState);
        setContentView(R.layout.activity_home);
    }
}
ContactActivity.class
package example.abhiandroid.tabhostexample;

import android.support.v7.app.AppCompatActivity;
import android.os.Bundle;

public class ContactActivity extends AppCompatActivity {

    @Override
    protected void onCreate(Bundle savedInstanceState) {
        super.onCreate(savedInstanceState);
        setContentView(R.layout.activity_contact);
    }
}
AboutActivity.class
package example.abhiandroid.tabhostexample;

import android.support.v7.app.AppCompatActivity;
import android.os.Bundle;

public class AboutActivity extends AppCompatActivity {

    @Override
    protected void onCreate(Bundle savedInstanceState) {
        super.onCreate(savedInstanceState);
        setContentView(R.layout.activity_about);
    }
}
Step 5: Now create 3 xml layouts by right clicking on res/layout -> New -> Layout Resource File and name them as activity_home, activity_contact and activity_about and add the following code in respective files.
Here we will design the basic simple UI for all the three tabs.
activity_home.xml code:
<RelativeLayout xmlns:android="http://schemas.android.com/apk/res/android"
xmlns:tools="http://schemas.android.com/tools"
android:layout_width="match_parent"
android:layout_height="match_parent"
android:paddingBottom="@dimen/activity_vertical_margin"
android:paddingLeft="@dimen/activity_horizontal_margin"
android:paddingRight="@dimen/activity_horizontal_margin"
android:paddingTop="@dimen/activity_vertical_margin"
tools:context="example.abhiandroid.tabhostexample.HomeActivity">

<TextView
android:layout_width="wrap_content"
android:layout_height="wrap_content"
android:layout_centerInParent="true"
android:textSize="25sp"
android:textColor="#f00"
android:textStyle="bold"
android:text="Home Activity" />

</RelativeLayout>
activity_contact.xml:
<RelativeLayout xmlns:android="http://schemas.android.com/apk/res/android"
xmlns:tools="http://schemas.android.com/tools"
android:layout_width="match_parent"
android:layout_height="match_parent"
android:paddingBottom="@dimen/activity_vertical_margin"
android:paddingLeft="@dimen/activity_horizontal_margin"
android:paddingRight="@dimen/activity_horizontal_margin"
android:paddingTop="@dimen/activity_vertical_margin"
tools:context="example.abhiandroid.tabhostexample.ContactActivity">

<TextView
android:layout_width="wrap_content"
android:layout_height="wrap_content"
android:layout_centerInParent="true"
android:text="Contact Activity"
android:textColor="#00f"
android:textSize="25sp"
android:textStyle="bold" />

</RelativeLayout>
activity_about.xml:
<RelativeLayout xmlns:android="http://schemas.android.com/apk/res/android"
xmlns:tools="http://schemas.android.com/tools"
android:layout_width="match_parent"
android:layout_height="match_parent"
android:paddingBottom="@dimen/activity_vertical_margin"
android:paddingLeft="@dimen/activity_horizontal_margin"
android:paddingRight="@dimen/activity_horizontal_margin"
android:paddingTop="@dimen/activity_vertical_margin"
tools:context="example.abhiandroid.tabhostexample.AboutActivity">

<TextView
android:layout_width="wrap_content"
android:layout_height="wrap_content"
android:layout_centerInParent="true"
android:textSize="25sp"
android:textColor="#0f0"
android:textStyle="bold"
android:text="About Activity" />
</RelativeLayout>
Step 6: Open AndroidManifest.xml
In this step we open Manifest file and add the code for defining Home, Contact and About activity.
<?xml version="1.0" encoding="utf-8"?>
<manifest xmlns:android="http://schemas.android.com/apk/res/android"
package="example.abhiandroid.tabhostexample">

<application
android:allowBackup="true"
android:icon="@mipmap/ic_launcher"
android:label="@string/app_name"
android:theme="@style/AppTheme">
<activity
android:name=".MainActivity"
android:label="@string/app_name">
<intent-filter>
<action android:name="android.intent.action.MAIN" />

<category android:name="android.intent.category.LAUNCHER" />
</intent-filter>
</activity>
<activity
android:name=".HomeActivity"
android:label="@string/title_activity_my"></activity>
<activity
android:name=".AboutActivity"
android:label="@string/title_activity_about"></activity>
<activity
android:name=".ContactActivity"
android:label="@string/title_activity_contact"></activity>
</application>

</manifest>
Step 7: Open Strings.xml
Now go to app-> values -> strings.xml and add the below codes. Here we are defining the String that we used in the earlier step.
<resources>
    <string name="app_name">TabHostExample</string>
    <string name="hello_world">Hello world!</string>
    <string name="action_settings">Settings</string>
    <string name="title_activity_my">MyActivity</string>
    <string name="title_activity_about">AboutActivity</string>
    <string name="title_activity_contact">ContactActivity</string>
</resources>
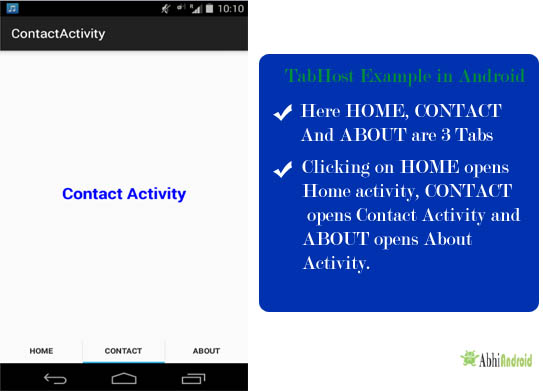
Output:
Now run the App and you will see 3 tabs in the bottom which we created in TabHost. Now click on any Tab and activity corresponding to it will be open.
15 thoughts on “TabHost Tutorial With Example In Android Studio”
Leave a Reply to Ashutosh Cancel reply
Premium Project Source Code:
- Food Ordering Android App Project Source Code
- Ecommerce Store Android App Project Source Code
- Convert Website Into Android App Project Source Code
- Quiz Game Android App Project Source Code
- Radio Streaming Android App Source Code
- City Guide Android App Project Source Code
- QR Barcode Android App Project Source Code
Hi, Am new to android I tried your tabhost program but am getting an error that “Your TabHost must have a TabWidget whose id attribute is ‘android.R.id.tabs”. I dont know whats the problem.
Use @android:Id/tabs instead of @+Id/tabs
I want to open new activity on button click in home activity but I need tabHost will be there in new activity also .
Suppose new activiyy is A.java I want to open it on button click from Home activity but I want tabs are there in A.java activity.
I was trying to replace the tab-content(fragment) from another fragment. But couldn’t find a way to do this. Please suggest me what should i do?
Thanks. It is very helpful.
How to add icon instead of text means how we can replace home, contact, about by specific icons?
tabHost.setIndicator(“Tab Title”, getResources().getDrawable(R.drawable.icon_photos_tab));
tabHost.setIndicator(“Tab Title”, getResources().getDrawable(R.drawable.icon_photos_tab));
WHEN APPLY THIS IN MY CODE ,tabHost shows error
instead of these code im using
spec.setIndicator(“HOME”, getResources().getDrawable(R.drawable.homepic));
im used this ,this will shoes ony TITLE
Hello
I try to make an TabHost, in MainActivity when i changed Activity to TabActivity, I find out this method is deprecated. what’s the alternative for that?
Best alternative is TabLayout http://abhiandroid.com/materialdesign/tablayout-example-android-studio.html
i downloaded the project files and tried to run it in my device … but it crashes
i’ve got a NullPointerException in Logcat =|
I just rechecked it is working fine here. As the code is created in older version of Android Studio so make sure to update it. If you still faces the problem please elaborate more about your device, android studio version etc. We will retest it.
i am anil atri and i am new android…….field..kindly suggest me????
suppose our home activity contains data into list, i want to click on list item then it add or replace fragment….???? and visible new fragment as like maintance.class(fragment). and hide the all content of home activity…….???????
same as about or contact activities…..???
in this case what i do…??? i take different fragment for home,and different for about,and different for contact…????
or common fragment for all…kindly suggest me i confused……???
if take common fragment for all then how we use it and where we set xml in project……..?????
thanks…..
Then you will want to use a ViewPager instead of a TabHost. TabHost is for Activities. ViewPager is newer and better and for Fragments.
thanks for reply