Below is the example of Dynamic RelativeLayout aka programmatically. In this example we created dynamic view’s (ImageView and Button) programmatically in Java class. For creating views programmatically firstly we define the Relative Layout in our xml file and then add the code in java class to create ImageView and a Button one after another. Finally we perform onClick event listener on Button so whenever a user click on Button a message “ Button Clicked” is displayed on screen by using a Toast.
The Relative Layout is very flexible layout used in android for custom layout designing. It gives us the flexibility to position our component/view based on the relative or sibling component’s position. Relative layout is the most used layout after the Linear Layout in Android.
Below you can download code, see final output and step by step explanation:
 Step 1:
Create a new project and name it DynamicRelativeLayout.
Step 2: Open res -> layout ->activity_main.xml (or) main.xml and add following code:
In this step we open xml file and then add RelativeLayout as main layout in which we add views programmatically means in java class.
<RelativeLayout xmlns:android="http://schemas.android.com/apk/res/android"
xmlns:tools="http://schemas.android.com/tools"
android:layout_width="match_parent"
android:layout_height="match_parent"
android:paddingBottom="@dimen/activity_vertical_margin"
android:paddingLeft="@dimen/activity_horizontal_margin"
android:paddingRight="@dimen/activity_horizontal_margin"
android:paddingTop="@dimen/activity_vertical_margin"
tools:context=".MainActivity"
android:id="@+id/simpleRelativeLayout">

</RelativeLayout>
Step 3:
Open src -> package -> MainActivity.java
In this step Firstly we get the reference of RelativeLayout. After that we add the code to create ImageView and a Button one after another. We also set the different properties of ImageView and Button. Finally we perform onClick event listener on Button so whenever a user click on Button a message “ Button Clicked” is displayed on screen by using a Toast.
package example.abhiandroid.dynamicrelativelayout;

import android.graphics.Color;
import android.support.v7.app.AppCompatActivity;
import android.os.Bundle;
import android.view.Menu;
import android.view.MenuItem;
import android.view.View;
import android.widget.Button;
import android.widget.ImageView;
import android.widget.RelativeLayout;
import android.widget.Toast;

public class MainActivity extends AppCompatActivity {
    RelativeLayout simpleRelativeLayout;

    @Override
    protected void onCreate(Bundle savedInstanceState) {
        super.onCreate(savedInstanceState);
        setContentView(R.layout.activity_main);
        // get the reference of RelativeLayout
        simpleRelativeLayout = (RelativeLayout) findViewById(R.id.simpleRelativeLayout);
        // set the layout params for ImageView
        RelativeLayout.LayoutParams imageViewParam = new RelativeLayout.LayoutParams(
                RelativeLayout.LayoutParams.WRAP_CONTENT,
                RelativeLayout.LayoutParams.WRAP_CONTENT);
        // create a new ImageView
        ImageView simpleImageView = new ImageView(this);
        simpleImageView.setId(1);  // set ImageView's id
        simpleImageView.setLayoutParams(imageViewParam); // set defined layout params to ImageView
        simpleImageView.setImageResource(R.drawable.abhi_android);    // set resource in ImageView
        simpleImageView.setBackgroundColor(Color.BLACK); // set black color in the background of ImageView
        imageViewParam.addRule(RelativeLayout.CENTER_HORIZONTAL); // align ImageView in the center
        simpleRelativeLayout.addView(simpleImageView); // add ImageView in RelativeLayout

        // set the layout params for Button
        RelativeLayout.LayoutParams buttonParam = new RelativeLayout.LayoutParams(
                RelativeLayout.LayoutParams.MATCH_PARENT,
                RelativeLayout.LayoutParams.WRAP_CONTENT);
        Button myButton = new Button(this);  // create a new Button
        myButton.setText("Dynamic Button"); // set Text in the Button
        myButton.setLayoutParams(buttonParam); // set defined layout params to Button
        myButton.setTextColor(Color.WHITE); // set white color for the text of Button
        myButton.setBackgroundColor(Color.parseColor("#95C03C")); // set Button's background color
        buttonParam.addRule(RelativeLayout.BELOW, 1); // set Button to the below of ImageView
        simpleRelativeLayout.addView(myButton); // add Button in RelativeLayout
        // perform setOnClickListener event
        myButton.setOnClickListener(new View.OnClickListener() {
            @Override
            public void onClick(View v) {
                // display a toast on Button click
                Toast.makeText(getApplicationContext(), "Button Clicked", Toast.LENGTH_LONG).show();
            }
        });
    }

    @Override
    public boolean onCreateOptionsMenu(Menu menu) {
        // Inflate the menu; this adds items to the action bar if it is present.
        getMenuInflater().inflate(R.menu.menu_main, menu);
        return true;
    }

    @Override
    public boolean onOptionsItemSelected(MenuItem item) {
        // Handle action bar item clicks here. The action bar will
        // automatically handle clicks on the Home/Up button, so long
        // as you specify a parent activity in AndroidManifest.xml.
        int id = item.getItemId();

        //noinspection SimplifiableIfStatement
        if (id == R.id.action_settings) {
            return true;
        }

        return super.onOptionsItemSelected(item);
    }
}
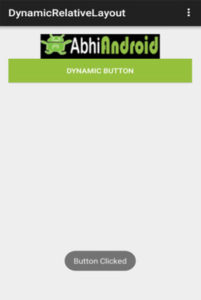
Output:
Now run the App and you will see one image and a Button which is created dynamically i.e. programmatically in JAVA.